
Homemade Whipped Cream
As an Amazon Associate, I earn from qualifying purchases. Read the full disclosure here.
Making your own fresh whipped cream at home is much easier than you think it is, and tastes worlds better than anything you can buy. Use this easy tutorial to get perfect whipped cream at home every time!
YOU ARE GOING TO LOVE THIS Easy Whipped Cream Recipe
Fresh, homemade whipped cream is one of those things that sounds super intimidating and like something you would never think to try your hand at making at home.
I’m here to tell you, it’s my job and duty as your resident recipe provider and baking coach to tell you… It’s not hard. And you can totally do this.
The first time I made whipped cream at home, I failed miserably. I beat it way too long, because I had no idea what I was doing or looking for.
I was essentially well on my way to butter, which is what you’ll get if you beat your cream long enough.
Lucky for you, I have now made dozens and dozens of batches of this whipped cream recipe AND taken lots of pictures along the way so you know just what to look for when you make your own whipped cream after your next trip to the grocery store.
Or maybe not? You might have what you need on hand already, and in that case… Let’s get to whipping!
Fresh Whipped Cream ingredients
The ingredient list for the best whipped cream recipe is short. Very short.
Just three ingredients short.
• heavy cream or heavy whipping cream
• sugar
• vanilla extract
First, you’ll need some whipping cream which can go by the name heavy cream or heavy whipping cream.
Let me break this down because, uhh… Dairy can be confusing, apparently.
I’ll make this simple: fat content varies just a tad among the contents of these weirdly labeled cartons.
Whipping cream is typically around 30% milk fat while heavy cream and heavy whipping cream is sitting pretty at around 36%.
Any of these options are fine, just don’t try this with milk or even half-and-half. They just do not contain enough fat to be stable at a whipped state. I usually just buy whatever is available and don’t prefer one over the other.
Whatever you can find will work great for my recipe for homemade whipped cream.
A bit of sugar (granulated or powdered– check the recipe for tips on this) and some vanilla extract hang out with your heavy cream to make one of the simplest “recipes” ever.
Depending on what I’m using my whipped cream for, I use anywhere from ½ to 1 full teaspoon of vanilla extract.
If I’m making whipped cream for cake (like to fill it), I will use a little less vanilla than if I’m making whipped cream for pie or cheesecake.
Add as much or as little as you wish. You can always taste test (highly encouraged).
How to make Homemade Whipped Cream
Next, you’ll attach the whisk to your stand mixer.
You can also use a handheld mixer, but keep in mind, my instructions reflect the use of a stand mixer, which is typically much stronger than a handheld one.
That said, times will vary when you use a handheld mixer, but the process will look the same. I go back and forth between my KitchenAid stand mixer and handheld mixer depending on what equipment I do or don’t already have out.
When in doubt, it’s not about how long to beat whipping cream, but rather what stages to beat whipping cream through to achieve the desired result.
Put your cream, sugar, and vanilla into the bowl of your stand mixer (or large bowl, if you’re using a handheld mixer).
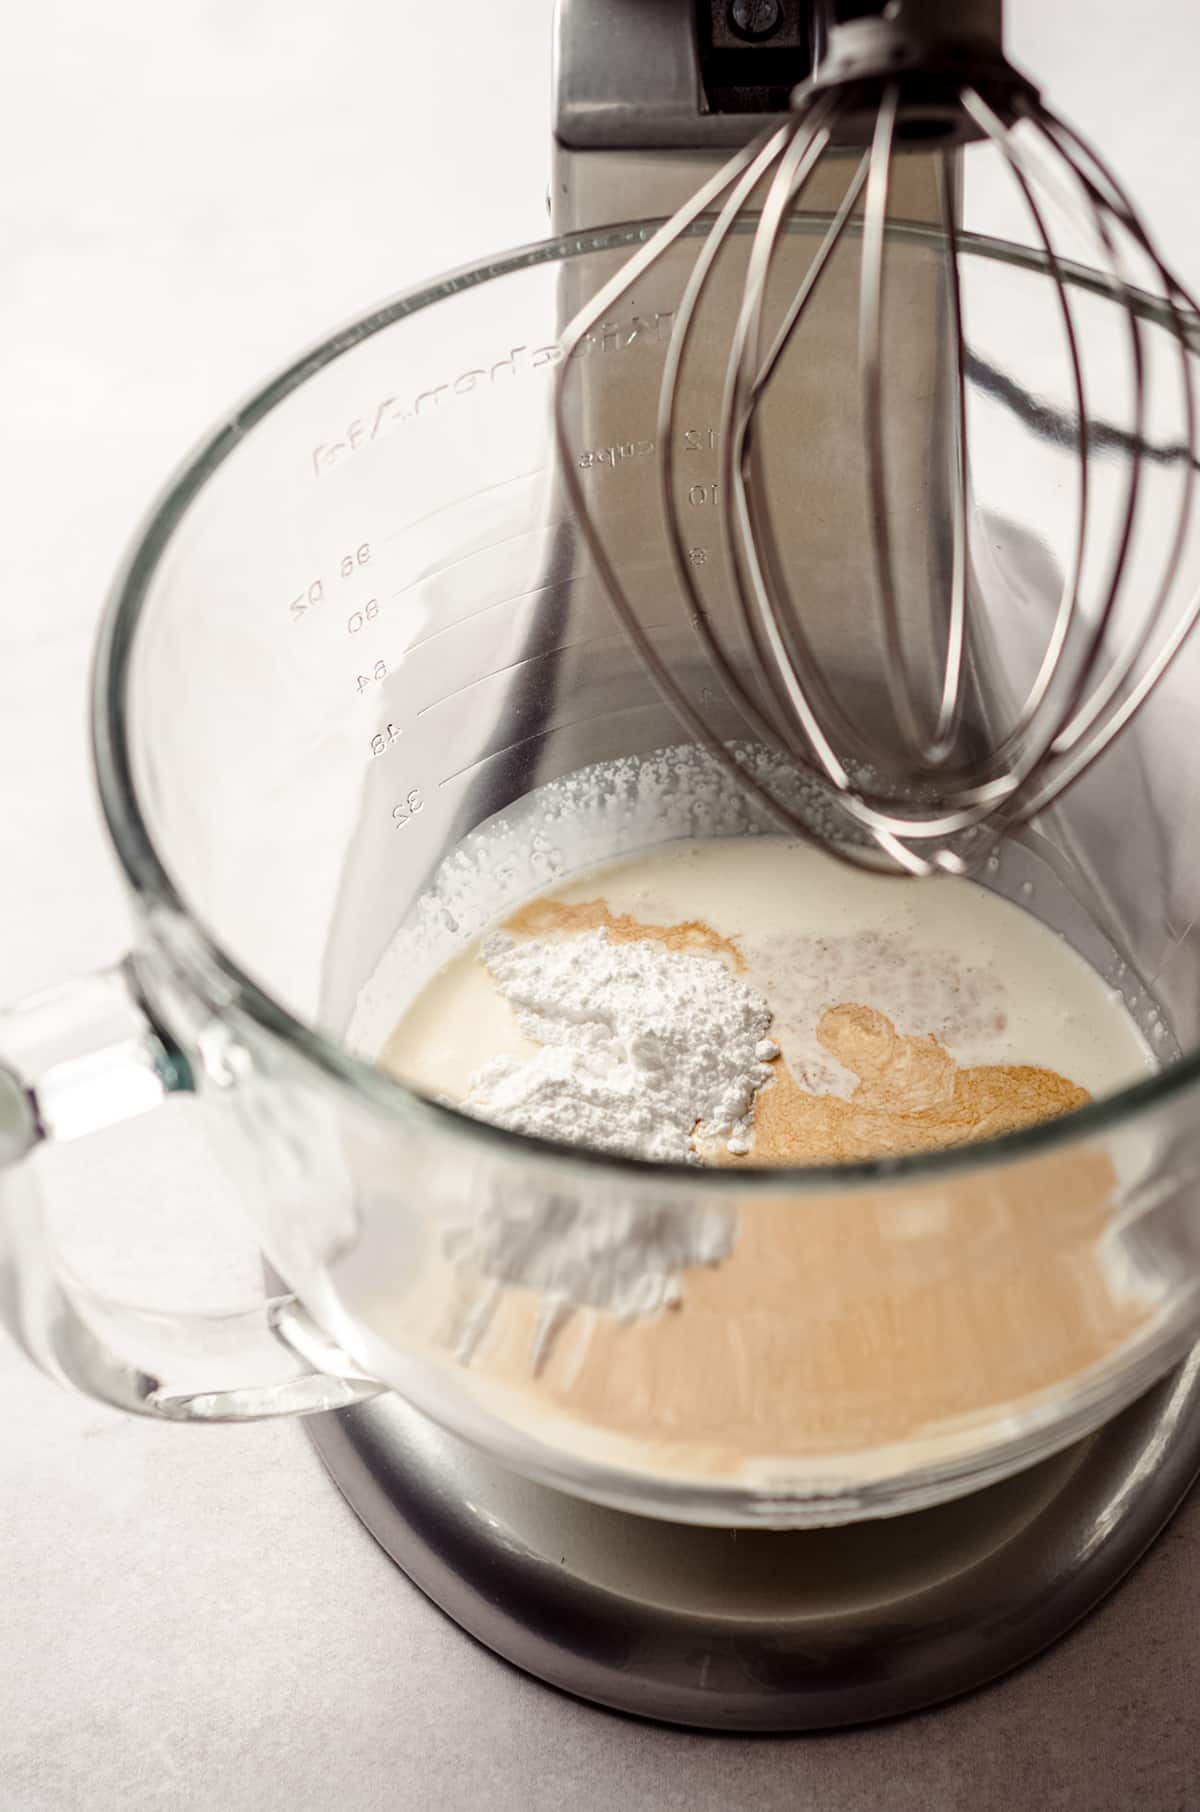
Turn the mixer to medium speed (KitchenAid stand mixer speed 4 or 5, handheld mixer speed 2 or 3). The mixture will start to get frothy and bubbly.
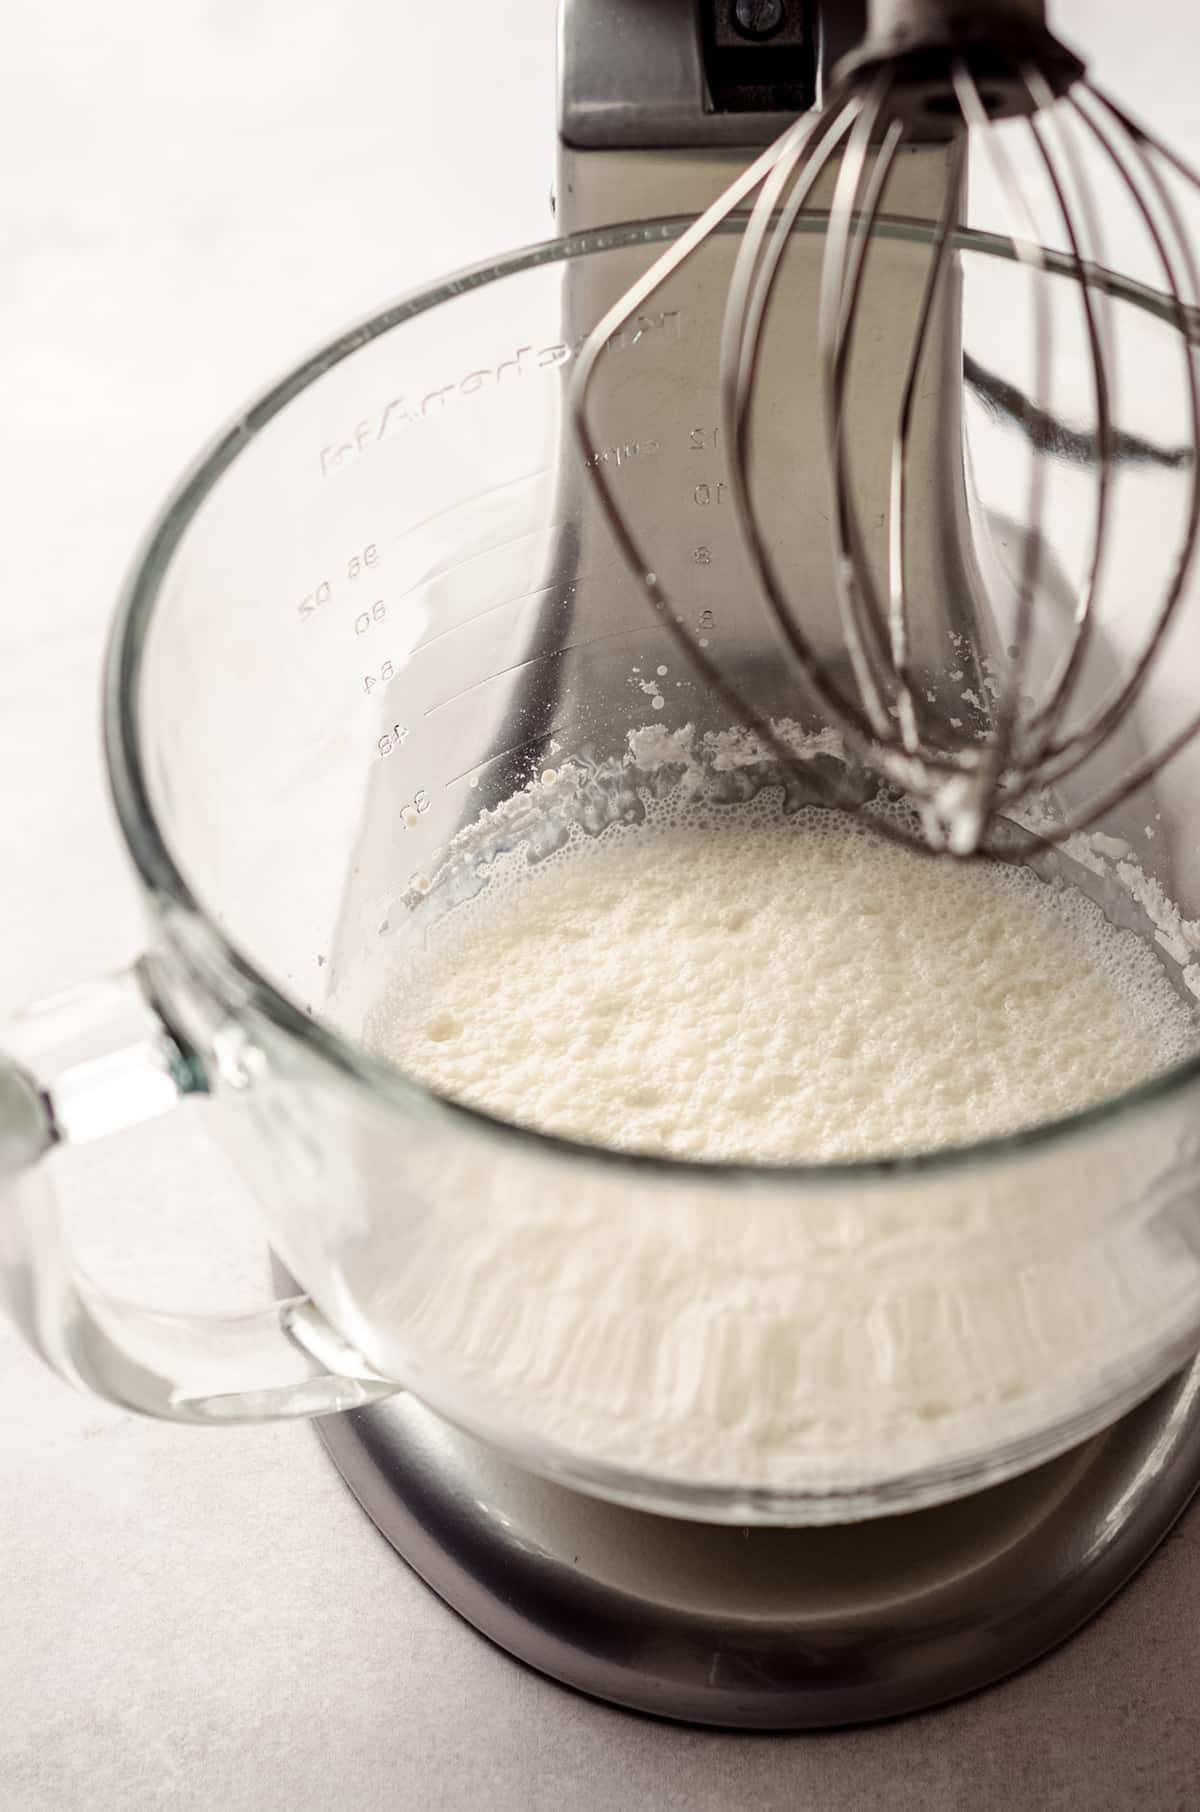
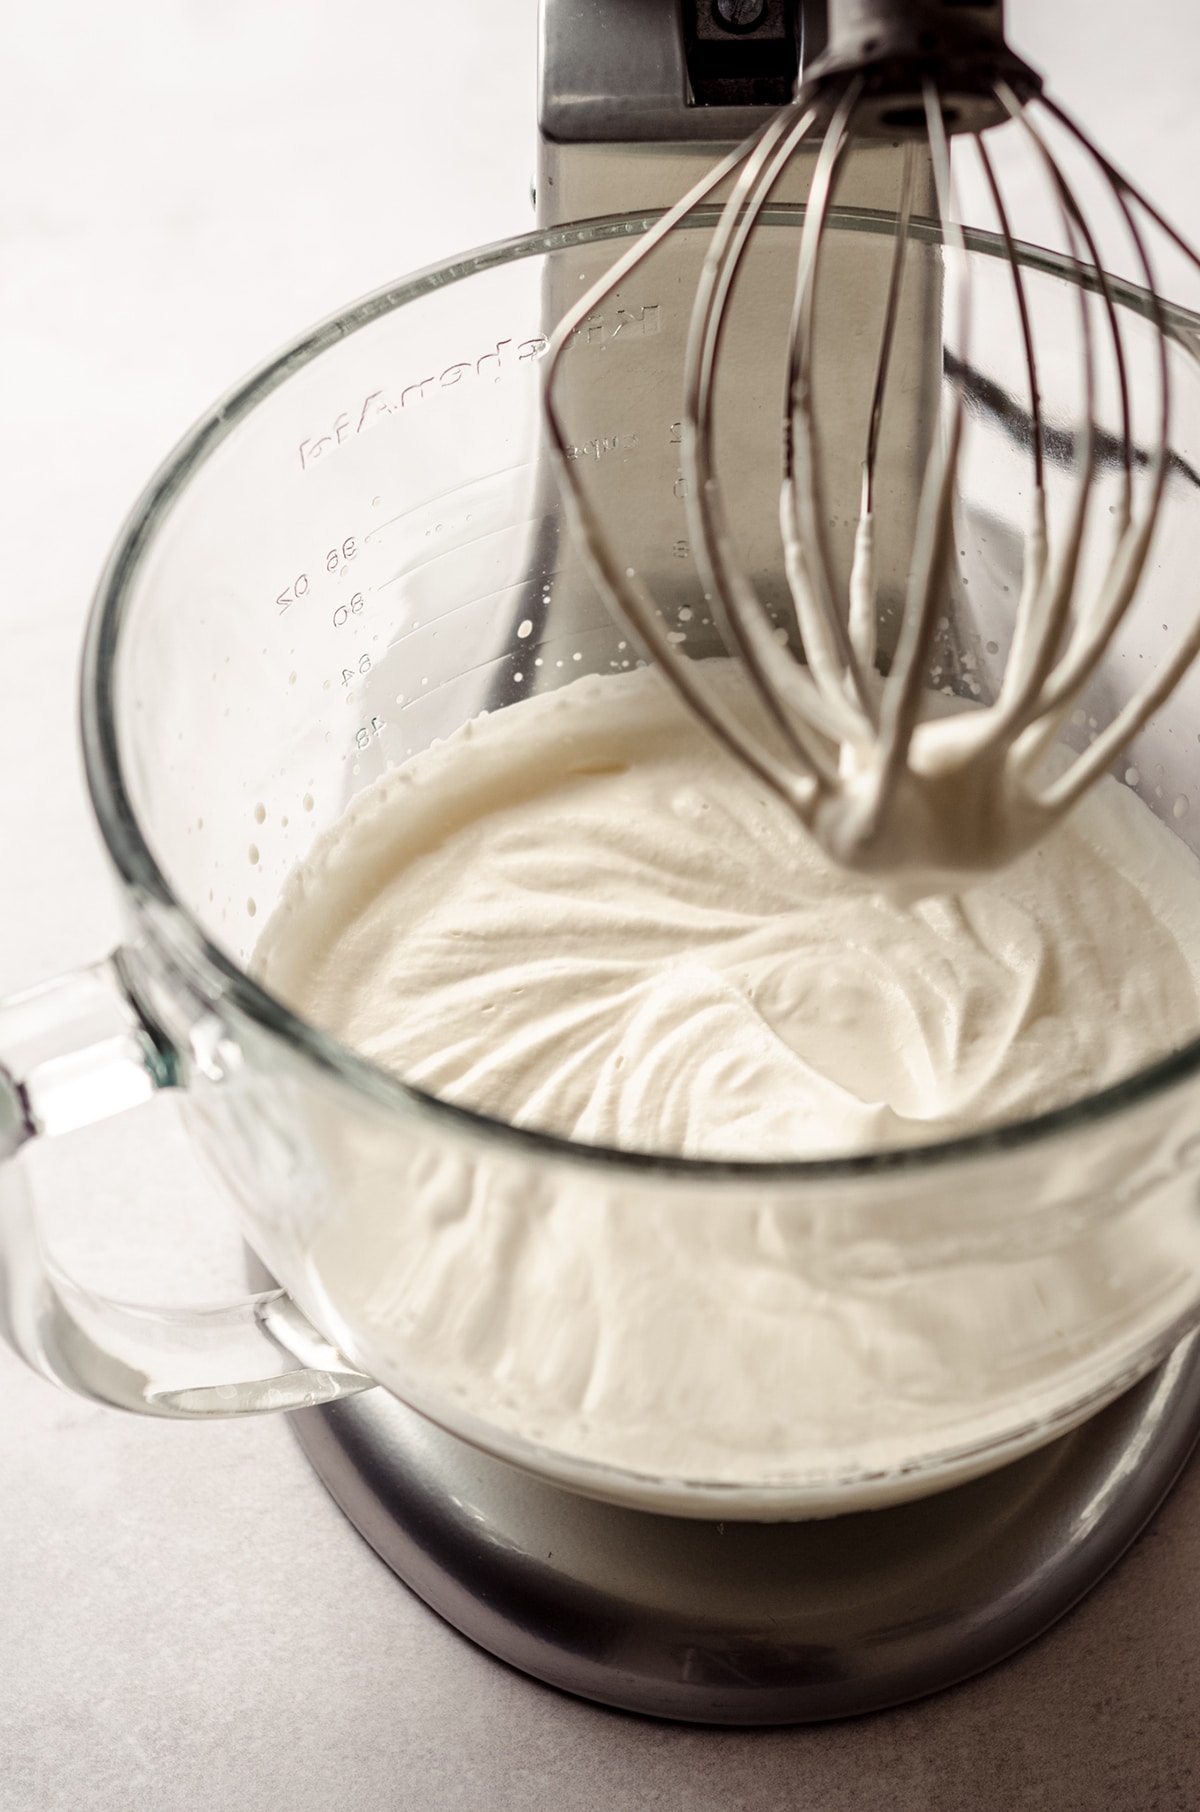
After about 2 to 3 minutes, the mixture will start to thicken.
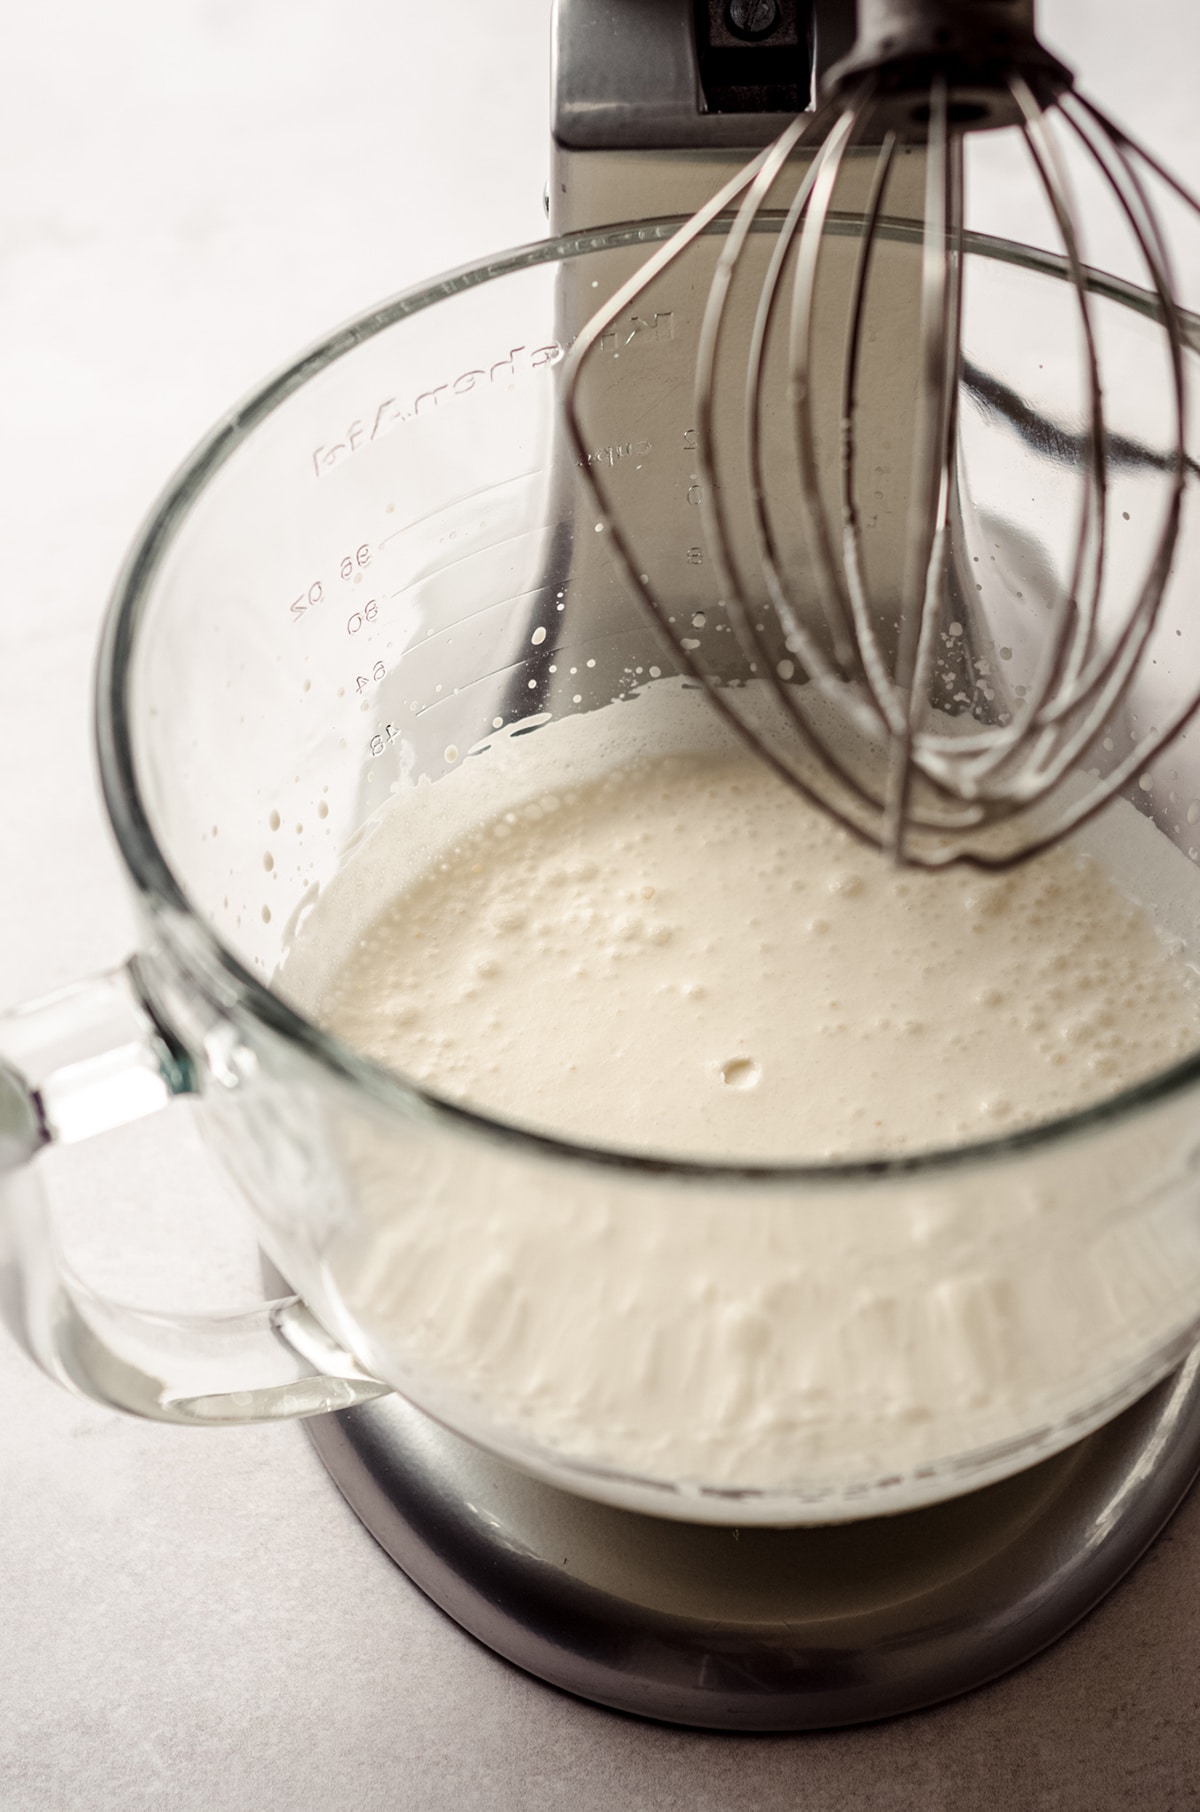
Once it appears thick (the trail of the whisk will start to become visible), increase the speed to medium-high (KitchenAid speed 7 or 8, handheld mixer speed 4 or 5) and beat for an additional 30 seconds to 1 minute.

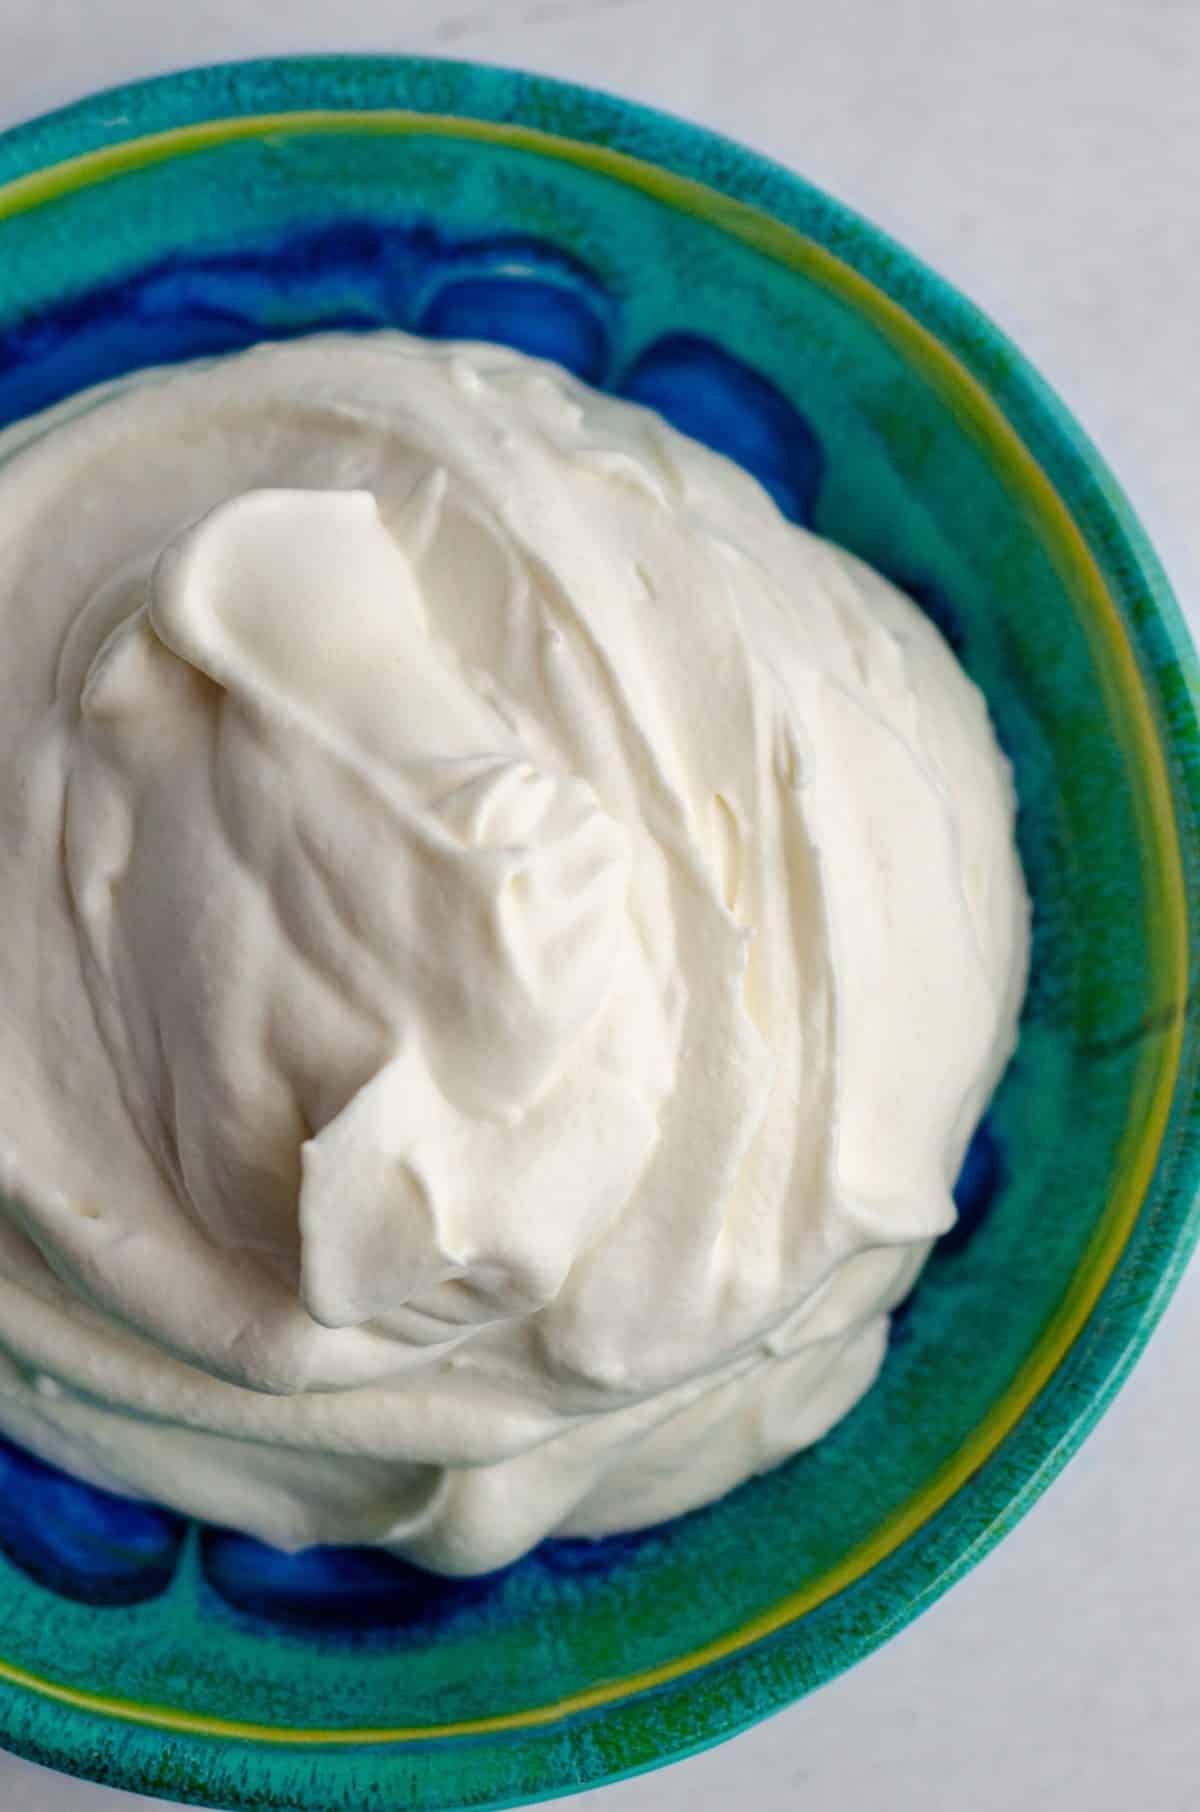
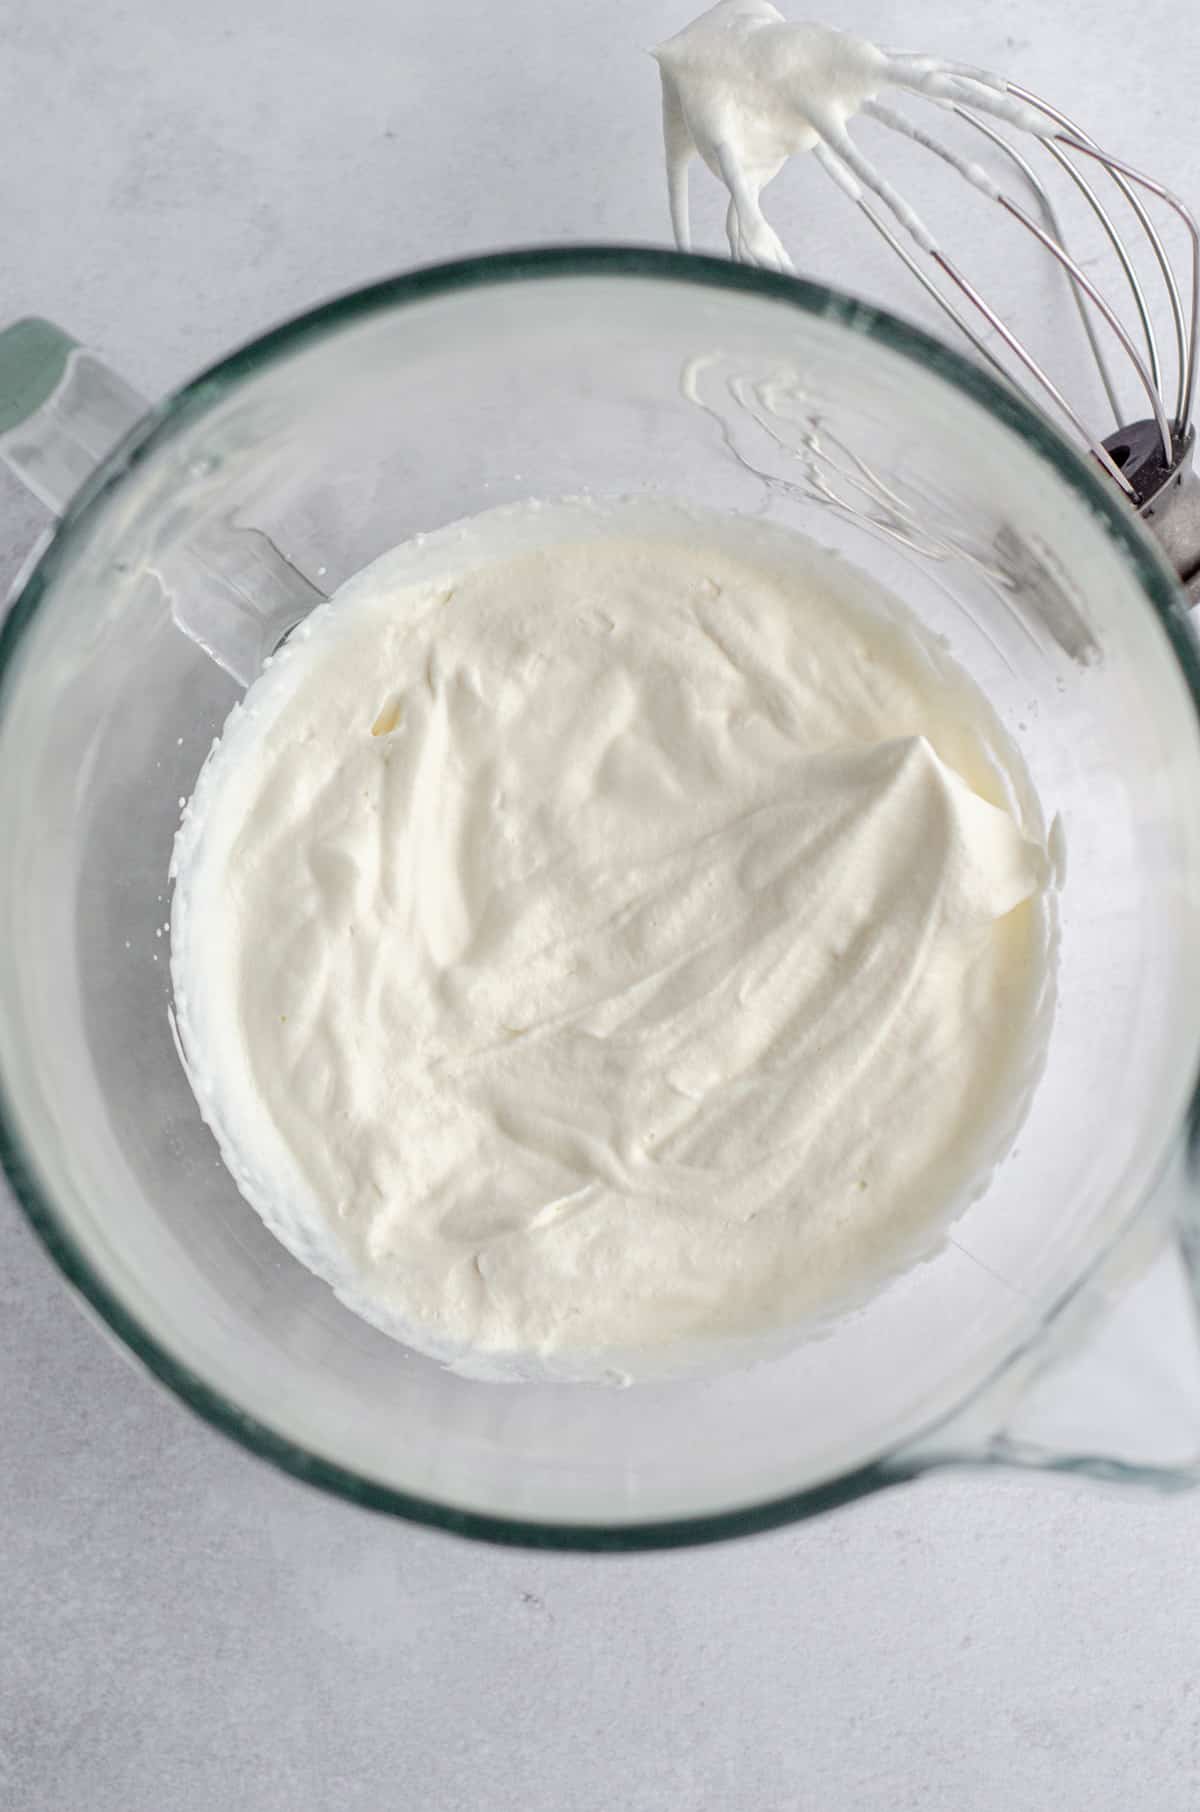
At this point, your whipped cream should start to look “billowy” and the trails from your whisk will be quite distinct.
HOW DO I KNOW WHEN MY HOMEMADE WHIPPED CREAM IS DONE?
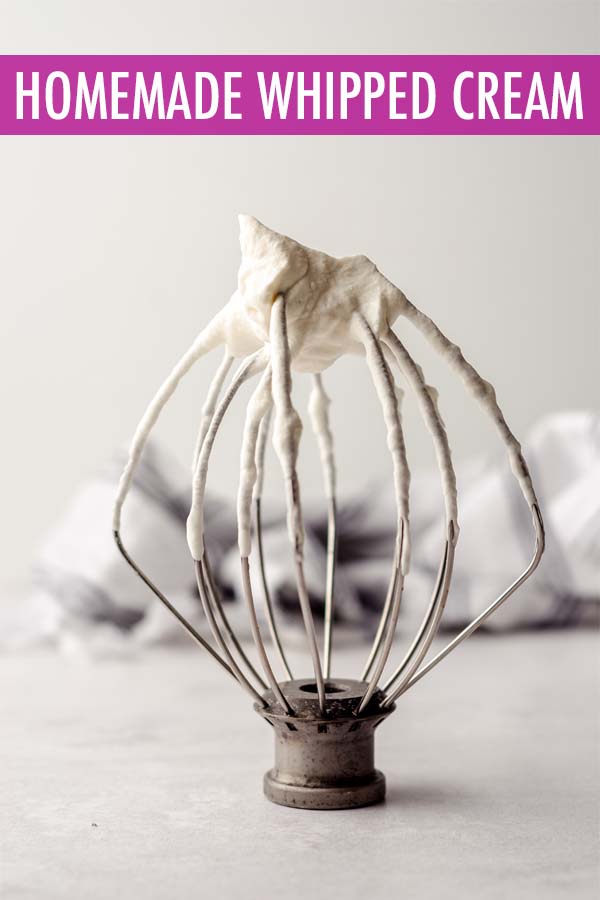
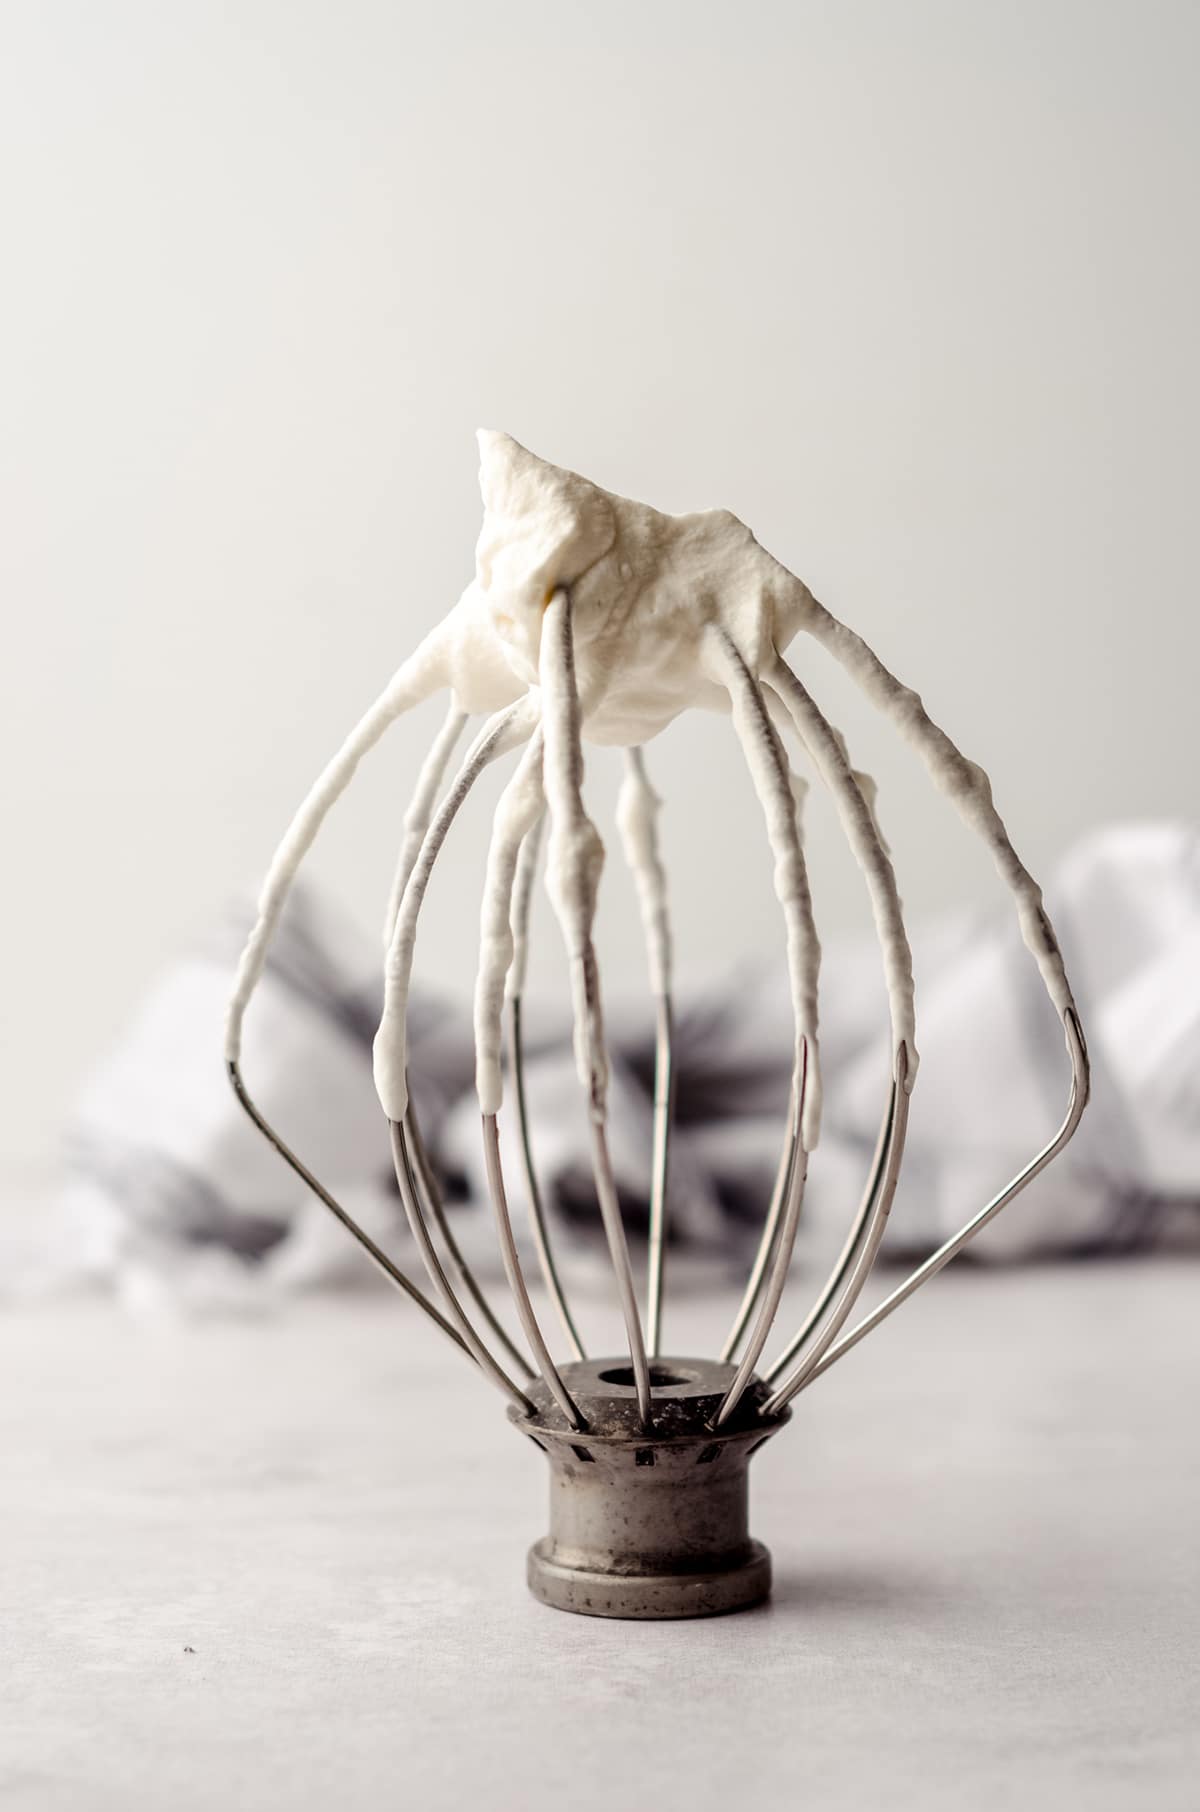
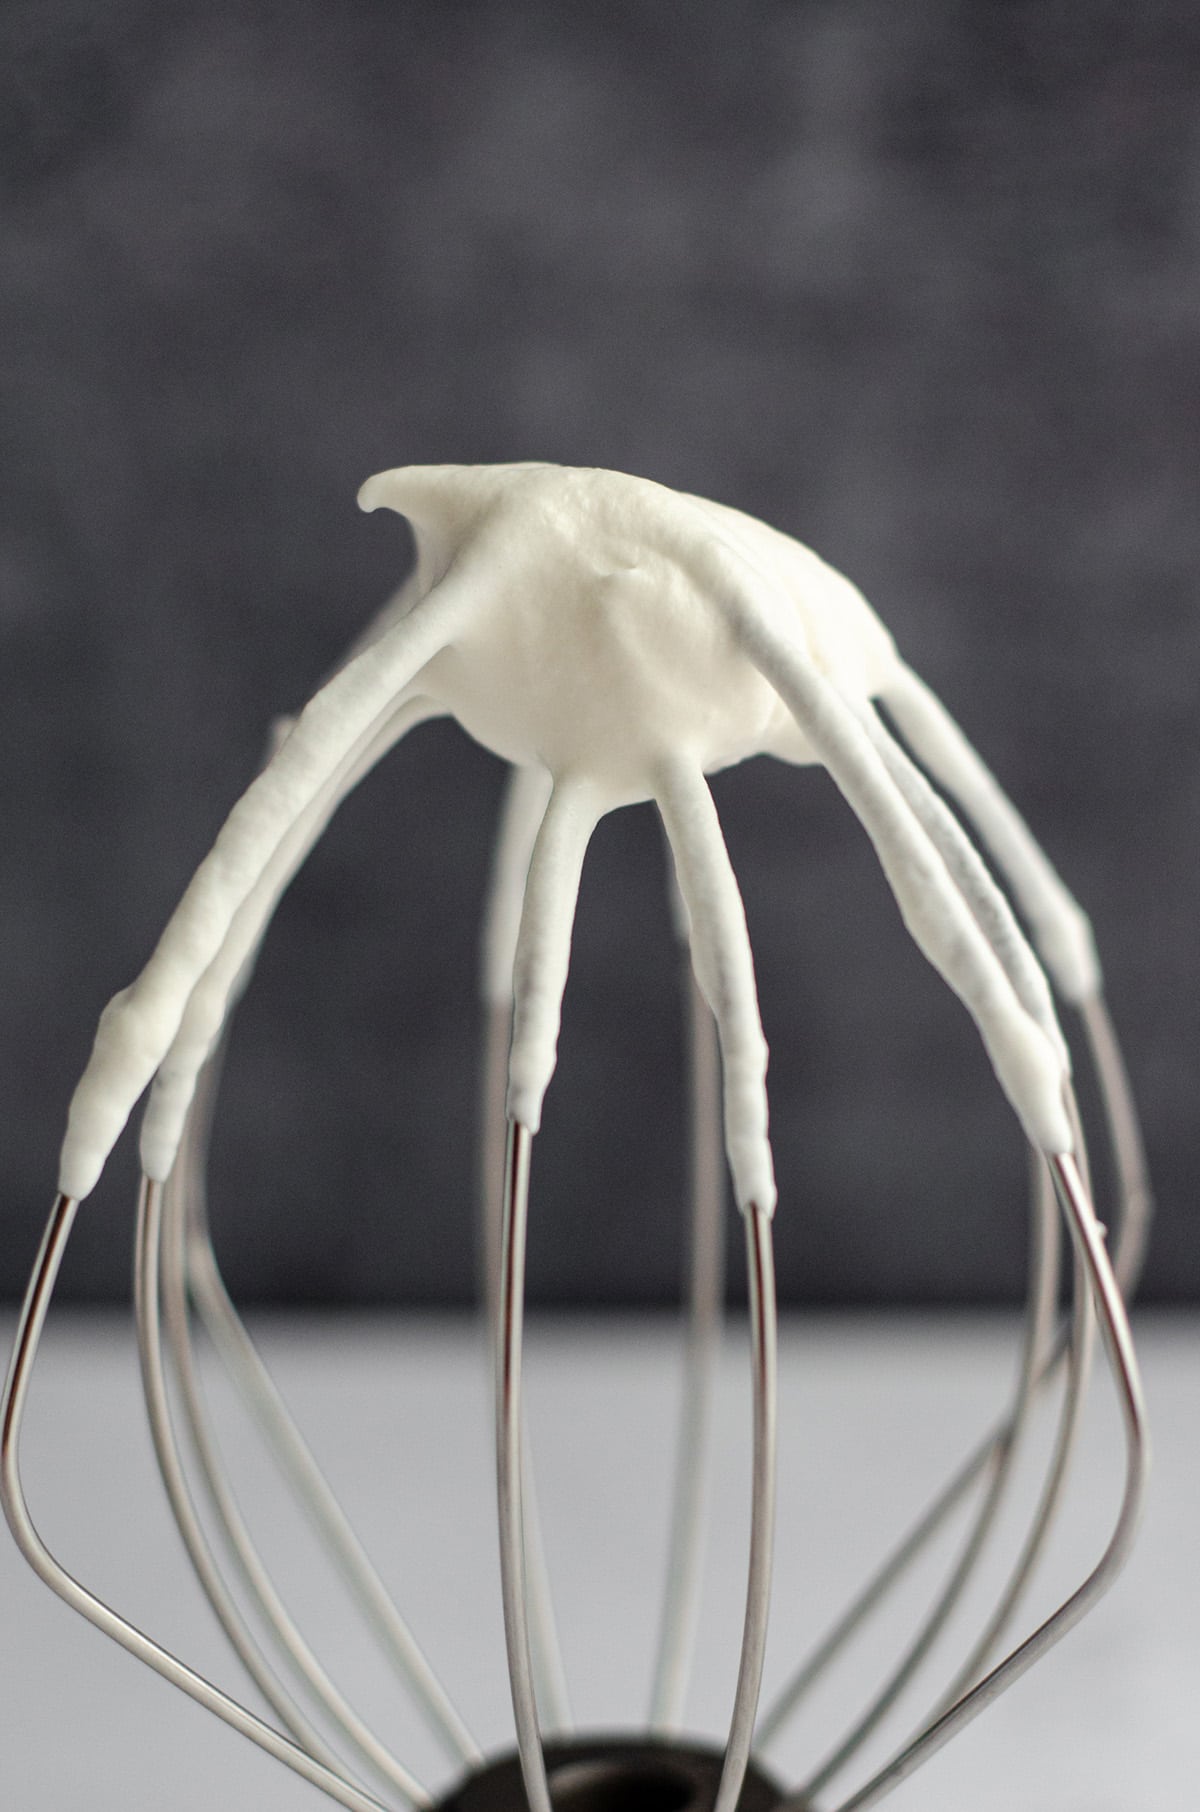
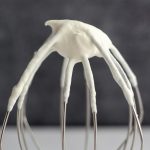
Pull the whisk out of the bowl and check the peaks of your whipped cream.
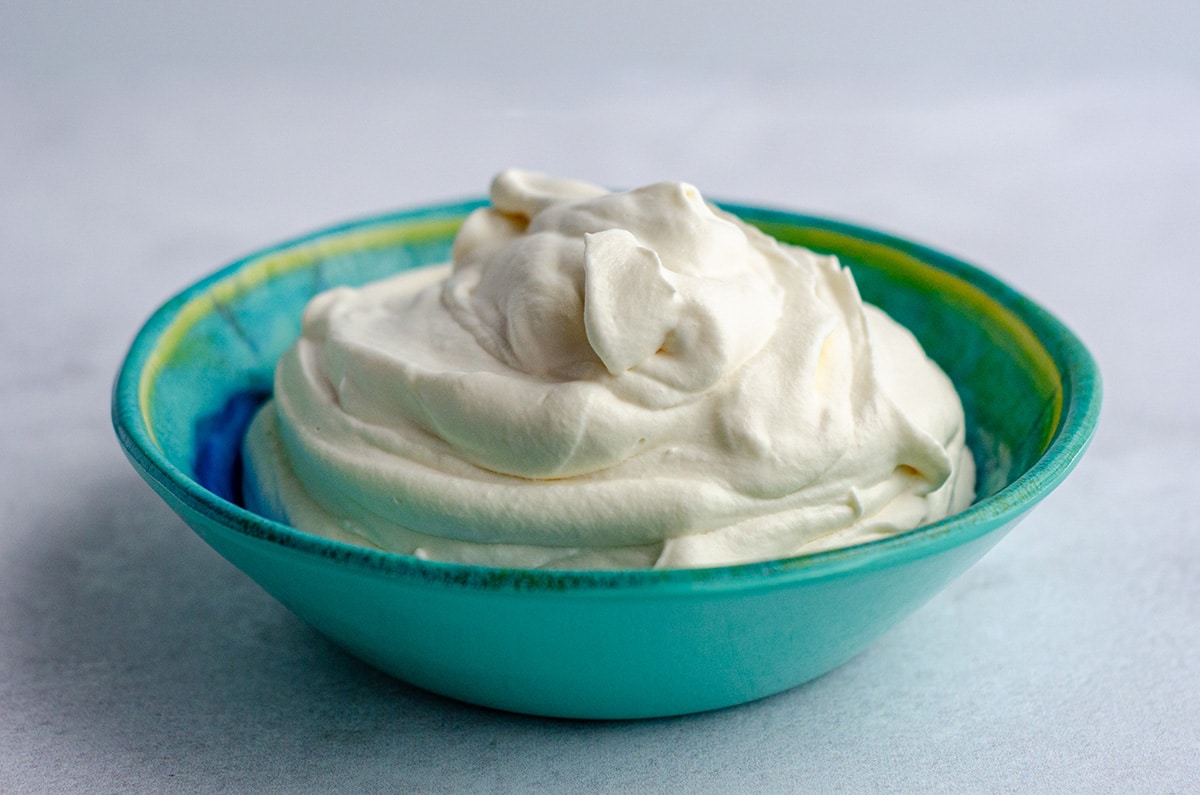
For your final product, you want the whipped cream in the bowl to have formed what are called “stiff peaks.” This is just a fancy term for “the whipped cream stays standing up when you pull something out of it.”
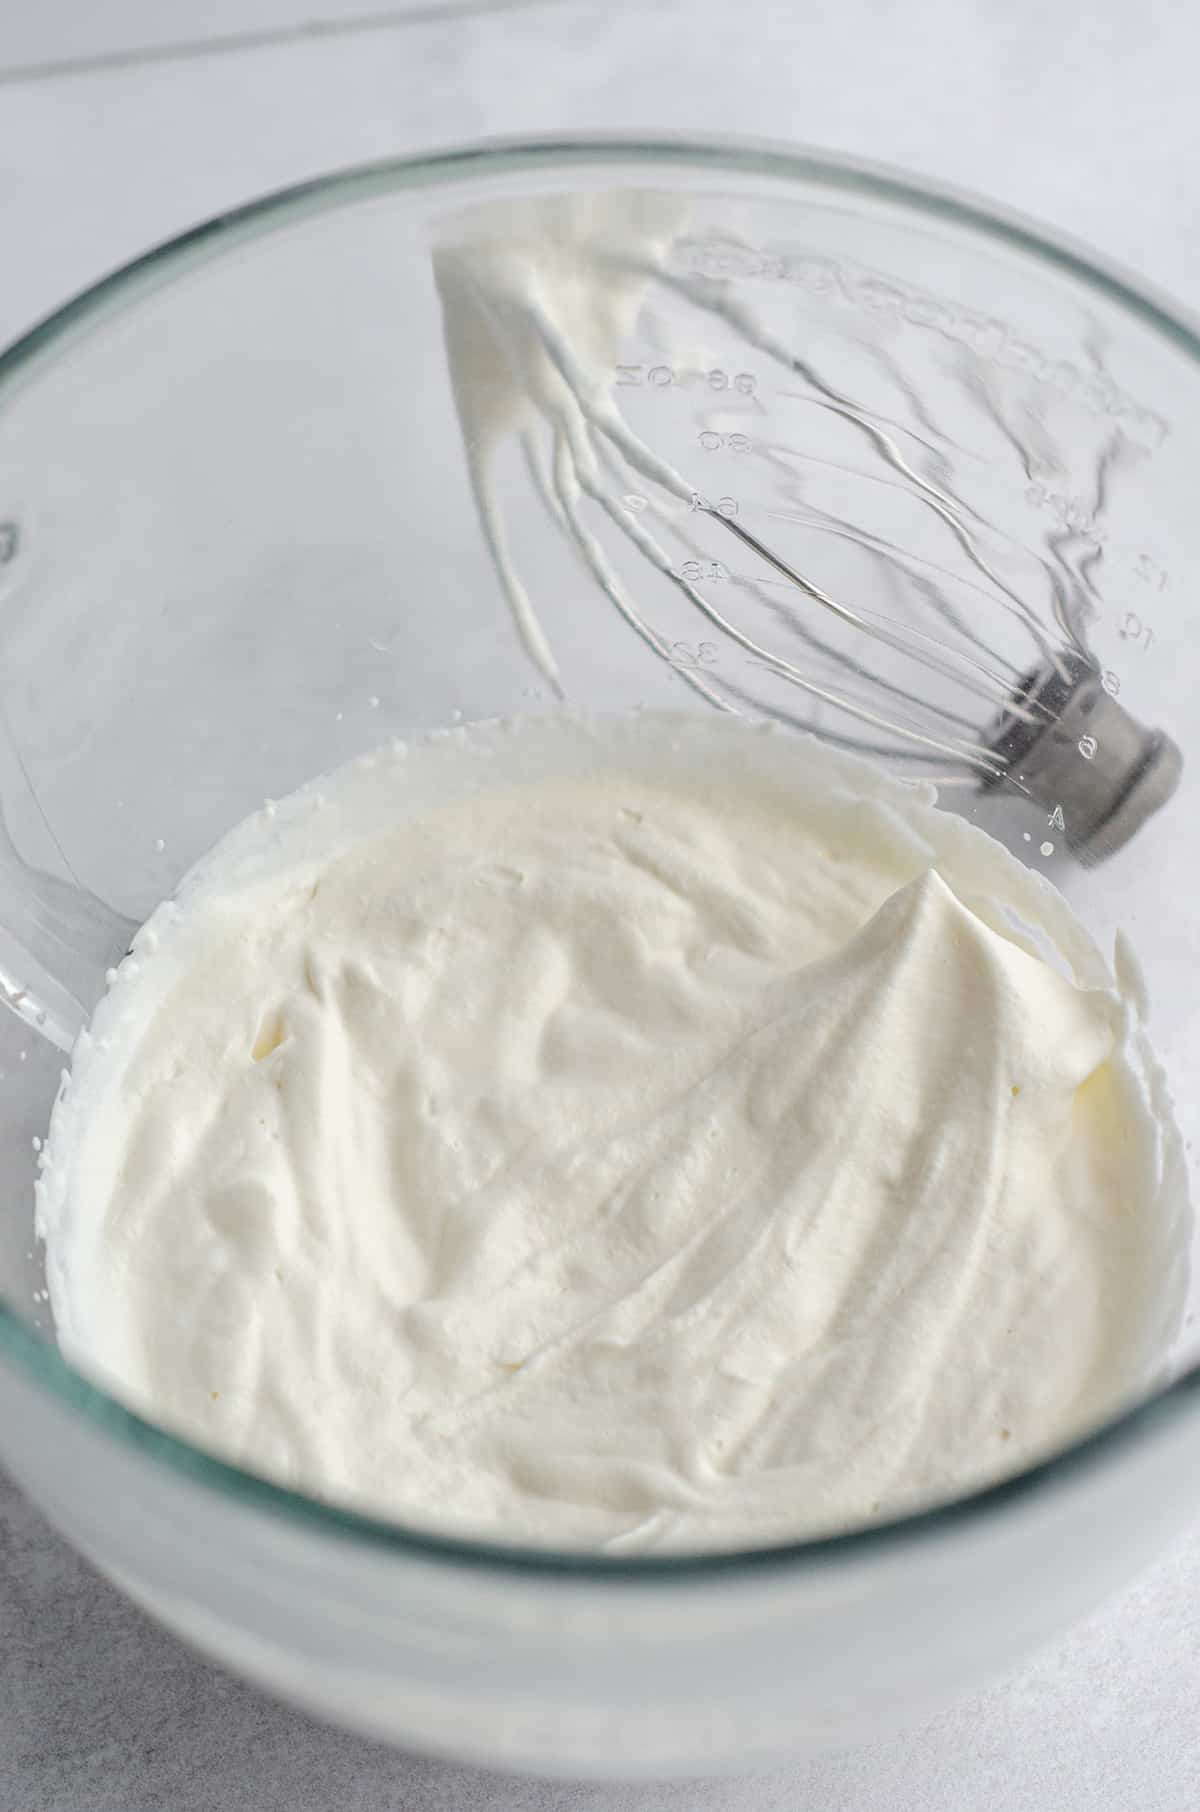
You can double check that your whipped cream is done by removing the whisk and flipping it upside down. If the peak stays tall without drooping off, it’s done.
If it’s still a bit droopy, put the whisk attachment back on the mixer and beat another 10-15 seconds on medium-high (KitchenAid speed 7 or 8, handheld speed 4 or 5) until stiff peaks form, checking after each 10-15 second increment.
You’d be surprised how much just 10 seconds at a slightly slower speed can do to home whipped cream that is close to being finished.
For reference, a good peak will stay standing just like the photo below for quite some time.
And just like that… You’ve made your own whipped cream at home!
HOW TO ADJUST FRESH WHIPPED CREAM STIFFNESS
Depending on what you want to use your whipped cream for, you can adjust the stiffness.
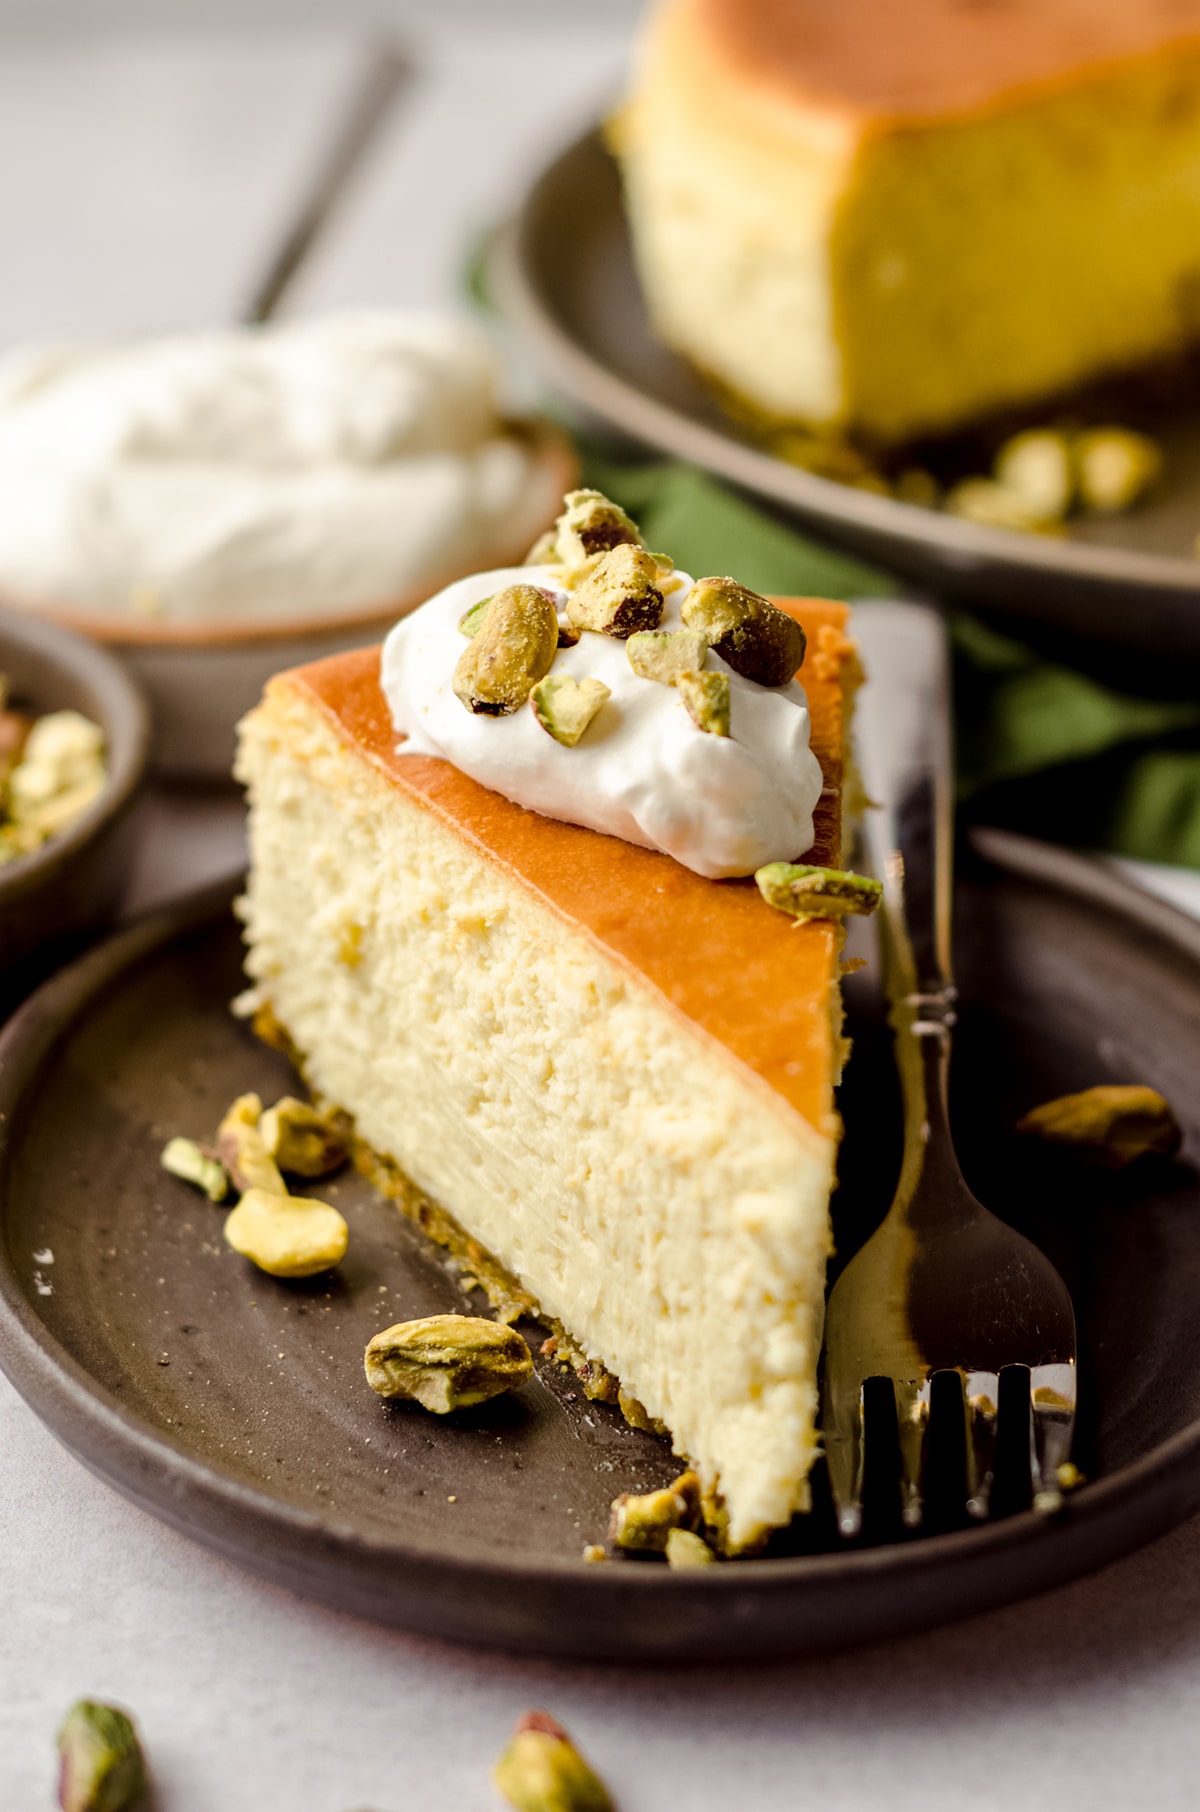
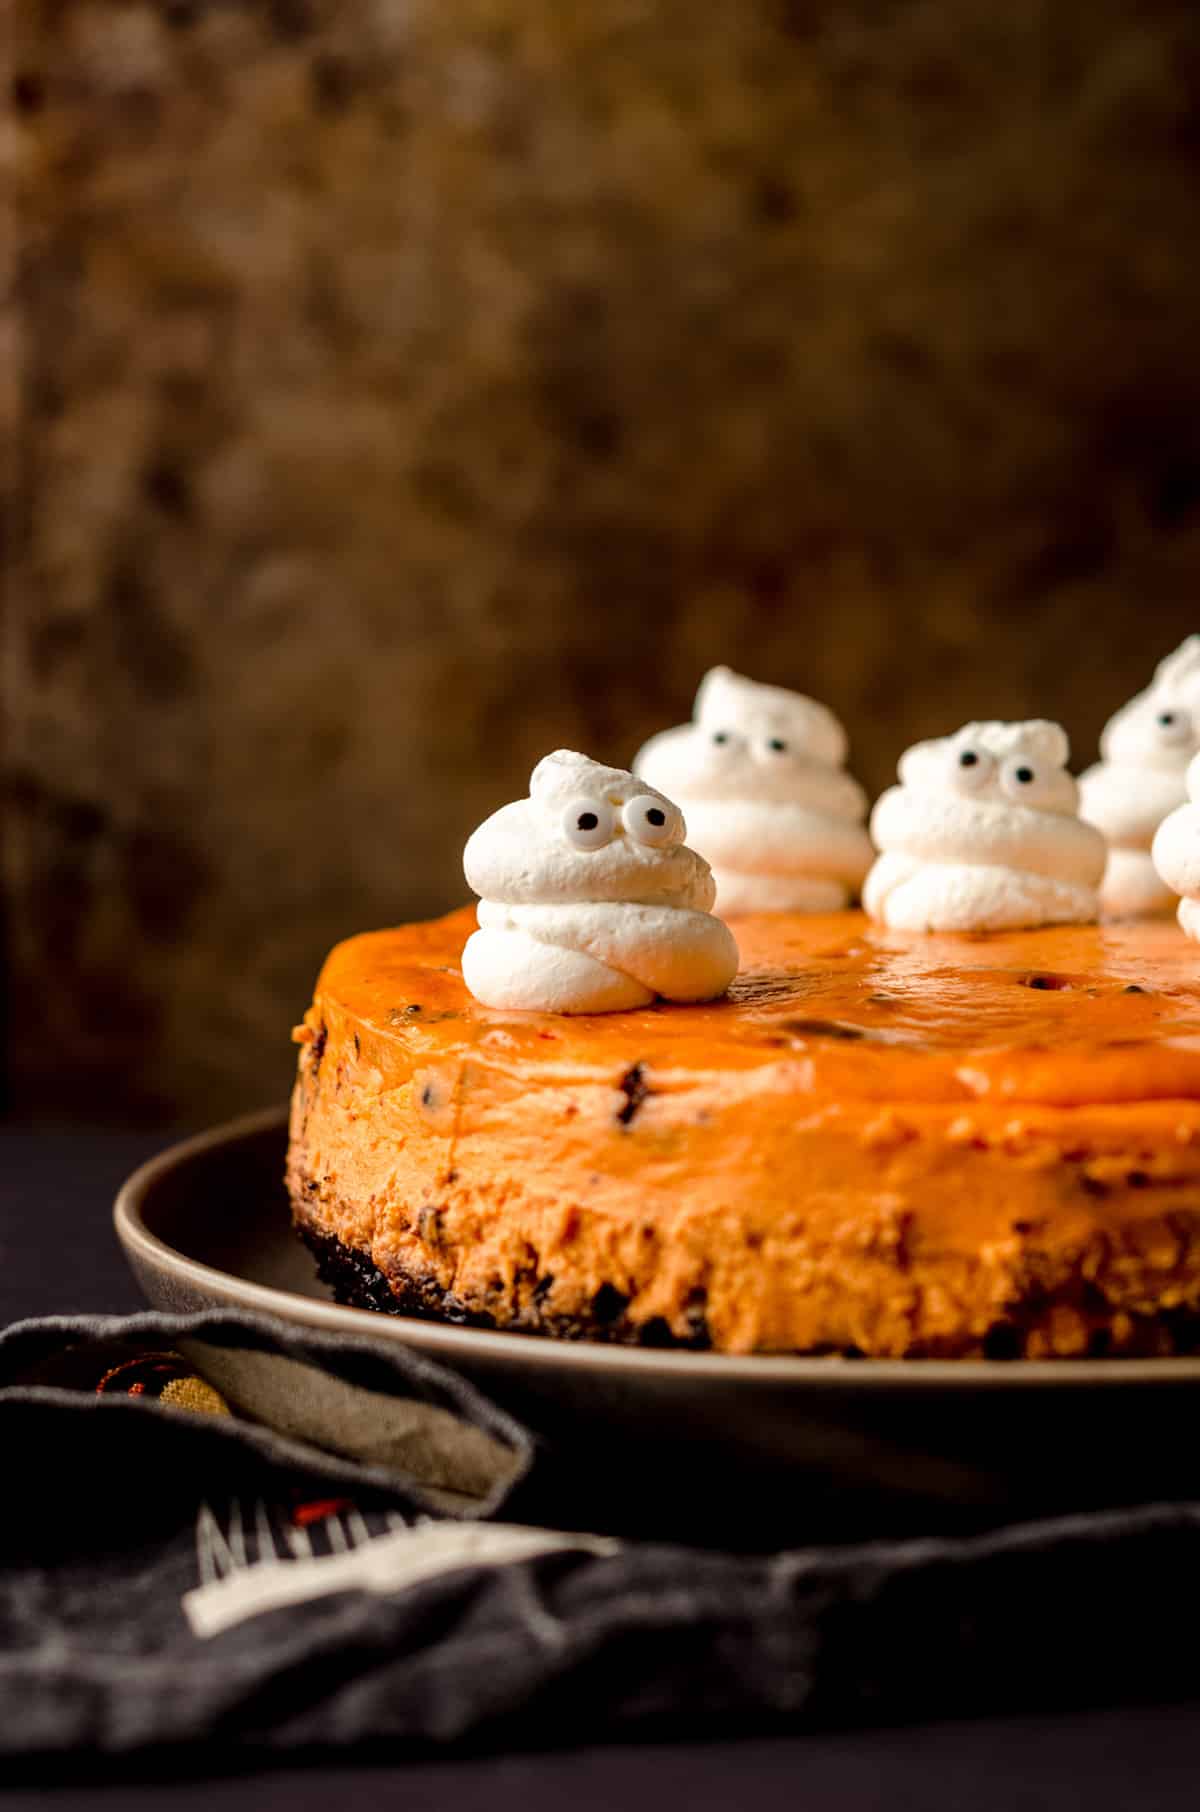
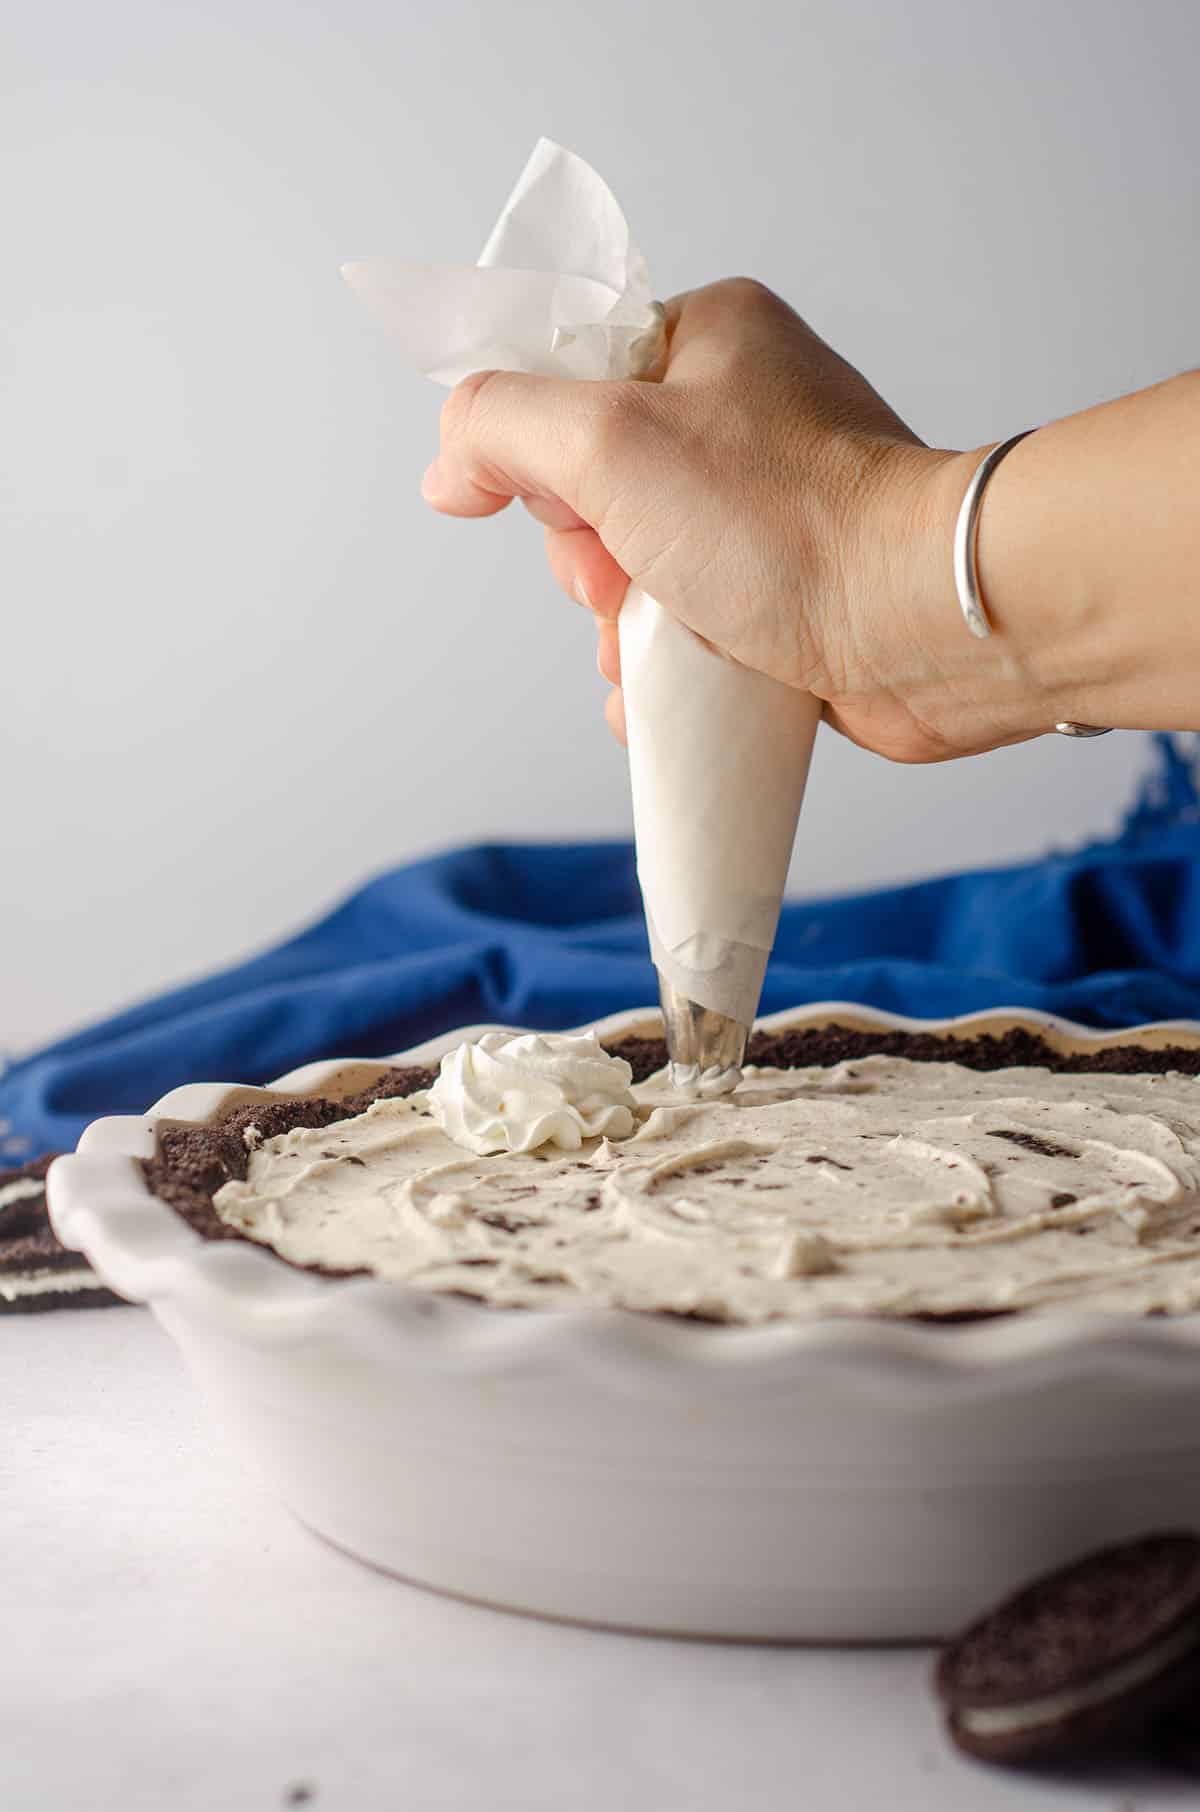
If you’re just spreading or dolloping it on top of pie, you may not need it to be as stable as whipped cream that you’re going to pipe (like ghosts on a Halloween cheesecake or swirls on a no bake Oreo pie).
You’ll get more familiar with the texture you prefer the more you make it.
Use that 10-15 seconds at medium-high speed rule to adjust. And remember– you can always make it stiffer, but you can’t make it lighter.
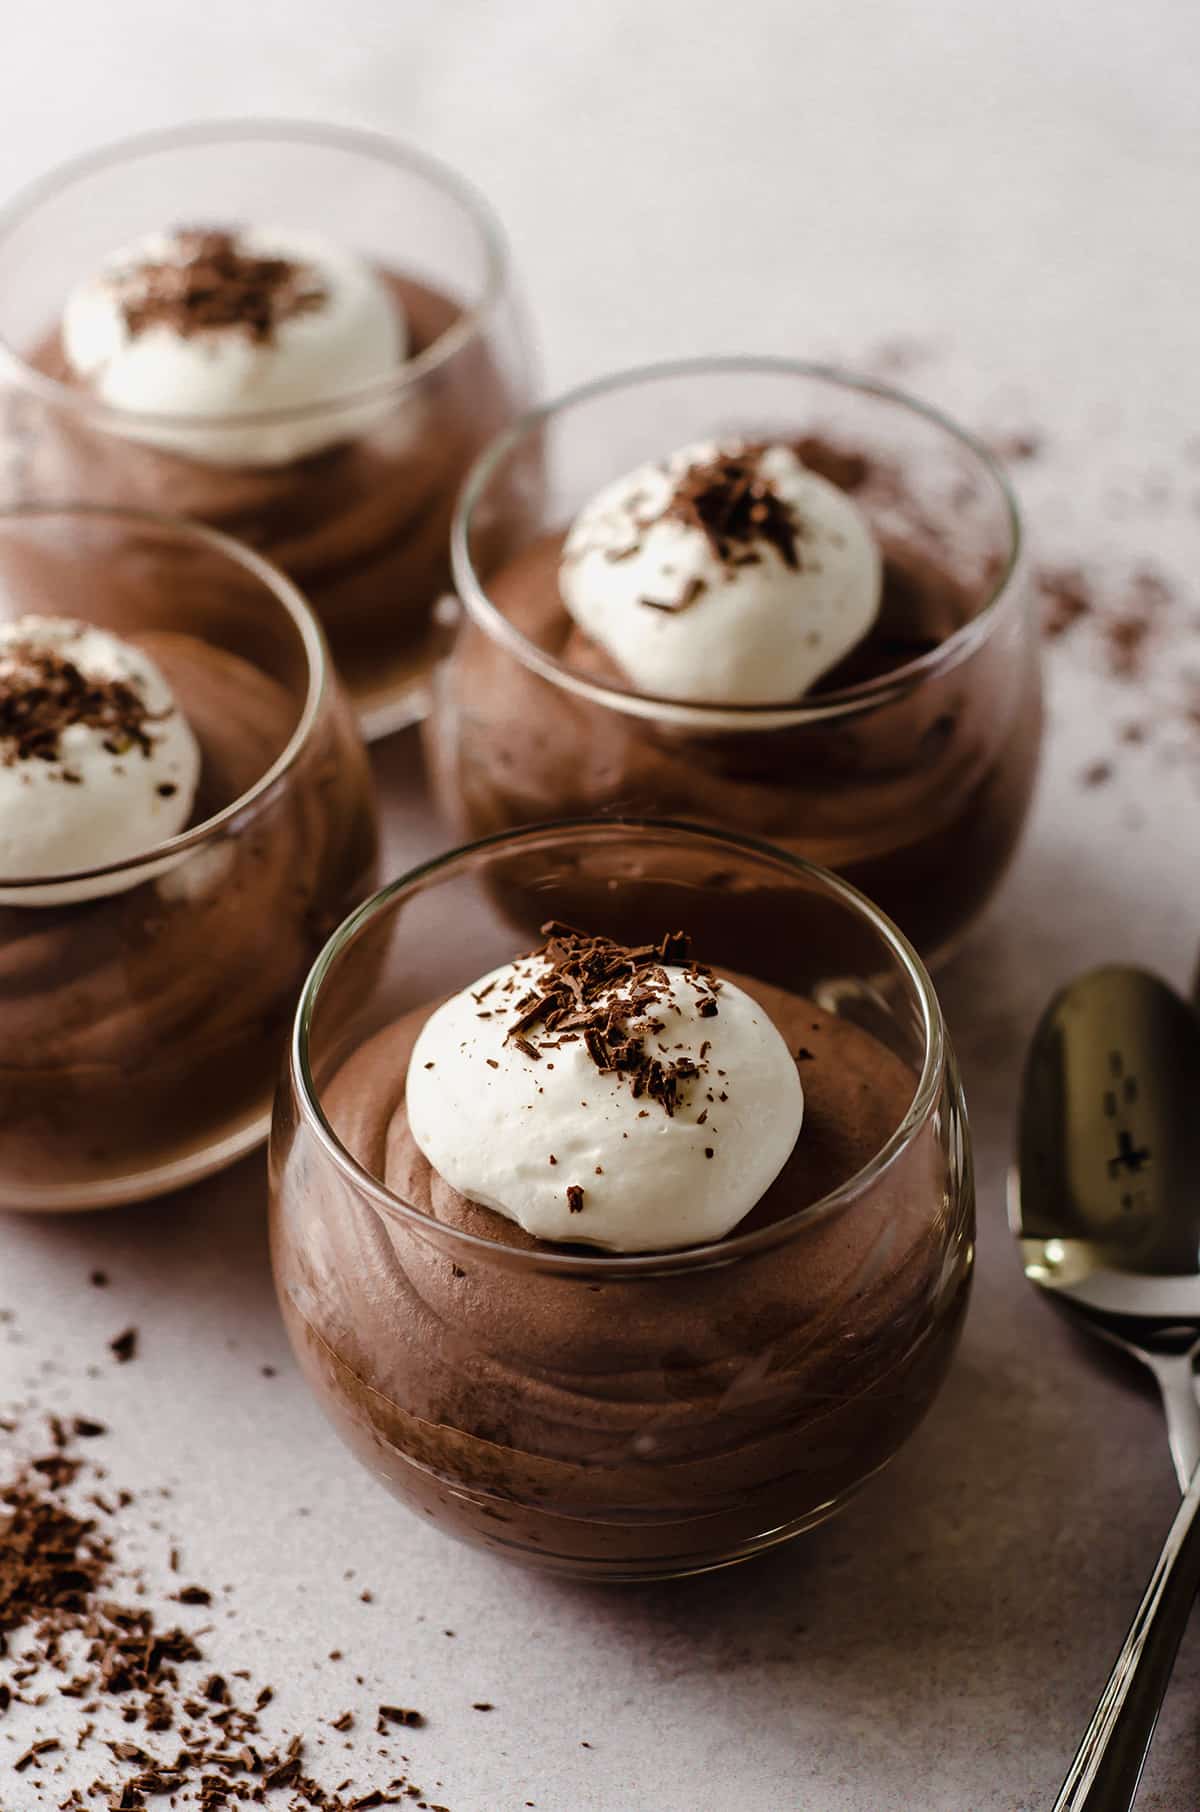
Use your fresh whipped cream for cakes, pies, fruit, or whatever it is you enjoy eating topped with a nice dollop of whipped cream.
I promise you, making your own whipped cream at home is much easier than you think it is.
It might take a bit of practice, but once you have it down, it’s one of those things that impresses your friends and your dessert guests because it tastes out-of-this-world better than anything from a can, or worse… CoolWhip. Blech!
How to serve this Homemade Whipped Cream Recipe
And now, a list of my recipes that either include homemade whipped cream as an ingredient or topping or that are just begging for a dollop as garnish!
• chocolate chip cookie dough ice cream pie
• no bake peanut butter pie
• ice cream sheet cake
• gingersnap cheesecake bites
• no bake Cadbury egg pie
• no bake chocolate chip cookie dough pie
• no bake candy cane crunch pie
• classic pumpkin pie
• no bake mint chocolate chip pie
• anything that goes in my favorite homemade pie crust
• as a filling for any of my cakes
How to store this Homemade Whip Cream Recipe
You can keep your homemade whipped cream covered tightly in the refrigerator for about 3 days before it starts to separate. If you find yourself with enough leftover whipped cream to save, you can freeze it!
While freezing and thawing leftover whipped cream will diminish some of the “fluff” factor, it’s doable and great for tossing onto slices of pie or into hot chocolate. See notes in the recipe for how to freeze whipped cream.
HOW LONG DOES HOMEMADE WHIPPED CREAM LAST?
Technically, it is safe to consume homemade whipped cream as long as it still smells like fresh cream. Chances are, by the time it starts to spoil, it will have separated and it wouldn’t be appetizing anyway.
Homemade whipped cream will keep its shape in the refrigerator for about 3 days and cannot be re-whipped.
Whipped Cream Recipe with Heavy CreaM FAQs
So there you have it! Let’s get to whipping, superstar! I believe in your peaks.
More Favorites from Fresh April Flours
Homemade Whipped Cream Recipe
Ingredients
- 1 cup (240mL) heavy cream or heavy whipping cream
- 1 Tablespoon (8g or 13g) sugar1
- ½ to 1 teaspoon vanilla extract
Instructions
- Pour the heavy whipping cream, sugar, and vanilla extract into the bowl of a stand mixer fitted with the whisk attachment.1 cup (240mL) heavy cream, 1 Tablespoon (8g or 13g) sugar1, ½ to 1 teaspoon vanilla extract
- Turn the mixer to medium speed (KitchenAid stand mixer speed 4 or 5, handheld mixer speed 2 or 3). The mixture will start to get frothy and bubbly. After about 2 to 3 minutes, the mixture will start to thicken.
- Once mixture is visibly thick (you will be able to see the trail of the whisk), increase the speed to medium-high (KitchenAid speed 7 or 8, handheld mixer speed 4 or 5) and beat for an additional 30 seconds to 1 minute. At this point, your whipped cream should start to look "billowy" and the trails from your whisk will be quite distinct.
- Pull the whisk out of the bowl and check that the whipped cream in the bowl has formed what are called "stiff peaks." This is just a fancy term for "the whipped cream stays standing up when you pull something out of it."
- Double check that your whipped cream is done by removing the whisk and flipping it upside down. If the peak stays tall without drooping off, it's done. If it's still a bit droopy, put the whisk attachment back on the mixer and beat another 10-15 seconds on medium-high (KitchenAid speed 7 or 8, handheld mixer speed 4 or 5) until stiff peaks form, checking after each 10-15 second increment.
- Use immediately on your favorite dessert. Store whipped cream covered tightly in the refrigerator up to 2 days. See notes2 for freezing instructions.
Notes
- Sugar: you can use granulated or powdered sugar here. I have used both and find a slightly smoother whipped cream with powdered. If you want to double or triple this recipe, powdered sugar is the way to go to keep everything light and airy. For 1 Tablespoon of sugar, powdered sugar will be 8g and granulated sugar will be 13g.
- Freezing: freezing and thawing leftover whipped cream will diminish some of the “fluff” factor, but it’s doable and great for tossing onto slices of pie or into hot chocolate. See this tutorial for the best way to freeze it!
Nutrition Disclosure
All nutritional values are approximate and provided to the reader as a courtesy. Changing ingredients and/or quantities will alter the estimated nutritional calculations.
I have the same stand mixer as you. What # speed did you use? It goes up to 10, so is “medium speed” 4 or 6?
I usually use speed 3 or 4 for medium.
Thank you for posting this. I just got a new Kitchenaid and have never made whipped cream with a stand mixer. Love it! It is sooo good. Thank you, again
I’m so glad you liked it, Jo! Enjoy!
This might be the longest blog post to recipe ratio I have ever seen.
It’s unfortunate that you felt the need to leave this comment! If you’re interested in reading content that is even LONGER than this, and what real people and Google consider content of value, you might be interested in my lemon macarons, cake pops 101, or cut-out sugar cookies.
Thanks so much for visiting 🙂
She has a “Jump to Recipe” button. With your obvious limited patience, you should try using that.
The whipped cream turned out great! Thanks Lynn.
Thank you, Debi 🙂
Awesome instructions!!! Without this recipe I definitely would have over-whipped. Instead my whipped cream turned out great. Thank you!
I’m so glad you found it helpful, Debbie!
Lynn, I really appreciated the detail in your post–perfect for newbies, like me! I literally made this flawlessly the first try because of your pictures and descriptions. My mother and grandmother didn’t cook or bake much, so I have learned from others online, like you, who are so generous with their time and energy to share their wisdom, like a mentor! Thank you so much for this post! Can’t wait to check out your others!
Thanks so much, Emily! I appreciate your feedback and am so glad you were able to have success. Hope to see you around the blog again soon 🙂
I foud this quiet shocking that your generation find this information shocking. I’m glad you have informed them of what a better whip then canned or (belch) coolwhip oil is. You are right but I would add one comment you need not add any sugar it’s not needed and just furthers addiction, there is enough natural sweetener in milk products.you dont add suger to your glass of milk do you?
Thank you for this post. For years I have used the white mixer attachment kitchen aid and after seeing your blog. I used the wisk was ready to dump it and it is beautiful cream !!!!! Thank you so much. Carol D
You’re so welcome, Carol!
PERFECT recipe. Thanks so much, Lynn!
Thank you so much, Noelle!
I use this recipe all the time for literally everything. It’s so easy!!
I love that, Joanie– thank you so much!
Super simple. Made it to go along with the easy chocolate mousse. This will be my goto recipe for whipped cream from now on.
Thanks so much, Eileen! 🙂
This explanation of making whipped cream was so long I gave up reading it, closed the site and went and made whipped cream. It was good. It’s whipped cream. Not that difficult to figure out. It’s cream that’s whipped.
Congratulations, Marie! You spent more time leaving this comment than you would have just exiting and never saying anything. Thanks for stopping by!