
Funfetti Cheesecake
As an Amazon Associate, I earn from qualifying purchases. Read the full disclosure here.
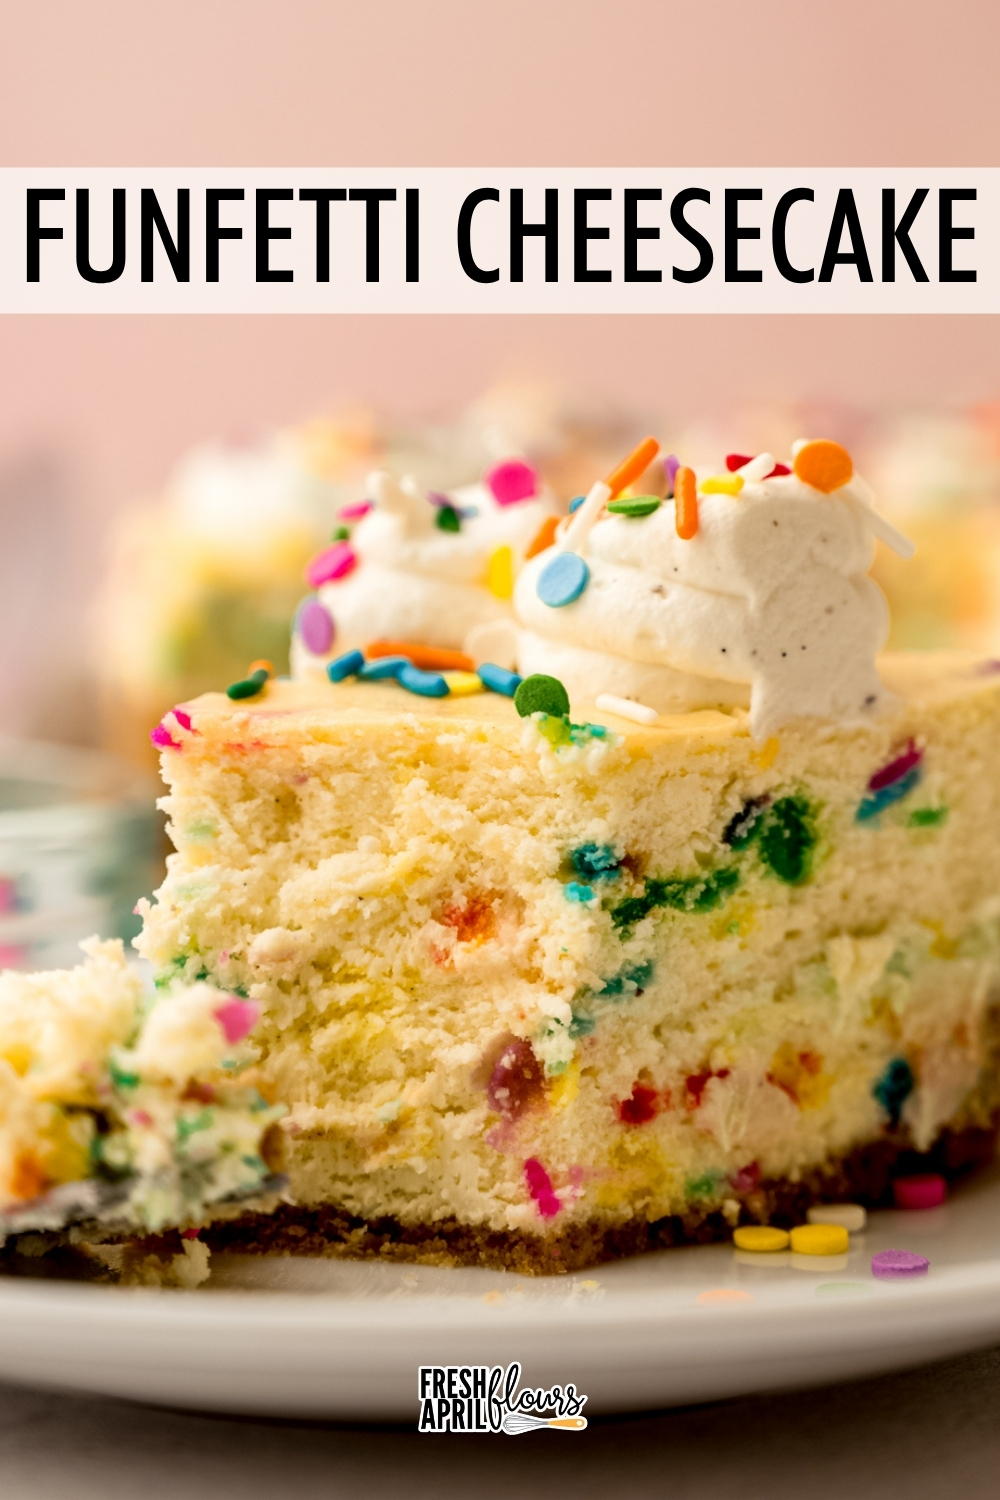
This deliciously creamy funfetti cheesecake has plenty of sprinkles inside and out! Perfect for birthdays, parties, or any celebration. This post has plenty of tips, tricks, and photos to insure you have a perfect and beautiful rainbow-filled cheesecake every time, and I’ve included instructions for making the easiest water bath (no foil necessary!).
MY FAVORITE CHEESECAKE IS BETTER THAN EVER
This funfetti cheesecake holds a very special place in my heart– it was the very first cheesecake I ever made, back in 2021, and it is, admittedly, my favorite cheesecake in my entire cheesecake collection.
At the time, I was SO nervous, admittedly quite intimidated, and honestly just winging it with my best guesses about what made a great cheesecake based on what I’d read on the internet and seen in videos from my favorite food legends (Ina and Alton forever).
And you know what? It turned out great! But great is not the same as perfected.
Fast forward to 2024, when I dedicated an entire year to monthly cheesecake recipes. I made (banana pudding) cheesecake after (coffee) cheesecake— testing, tweaking, tasting, and refining– until I landed on a base recipe I was truly proud of.
And with that perfected foundation came the obvious next step: it was time to revisit this funfetti classic and give it the upgrade it deserved.
HERE’S WHAT CHANGED, AND WHY IT MATTERS:
Out: heavy cream and extra egg yolks.
In: more sour cream.
The original recipe leaned on heavy cream and two extra egg yolks for richness. After a lot of testing, I found that swapping those out for more full fat sour cream produces a silkier, more velvety interior. It’s still rich and indulgent, but the texture is smoother and more luxurious. Bonus: no more separating eggs or staring at leftover whites wondering what to do with them.
Out: almond extract.
In: cake batter extract.
Over the years, I got a lot of questions from readers with nut allergies asking if they could swap the almond extract for something else. The answer is yes, and the more specific answer is cake batter extract. It brings that unmistakable funfetti birthday cake flavor without any nut concerns. I’ve linked my favorite brand in the recipe card below in case you can’t find it at your local grocery store, but there’s no reason you can’t use almond extract if that’s your preference or all you have.
My taste testers who remembered the 2021 version unanimously agreed: this updated and improved one is better. And that is exactly why we keep evolving as bakers and as teachers of baking. I’m so excited for you to try this new and improved version!
USE ROOM TEMPERATURE INGREDIENTS
In almost all of my cake and cookie recipes, I ask you to prepare your ingredients at room temperature, but with cheesecake, it’s even more imperative that you follow this instruction to insure your cheesecake batter is as smooth as can be.
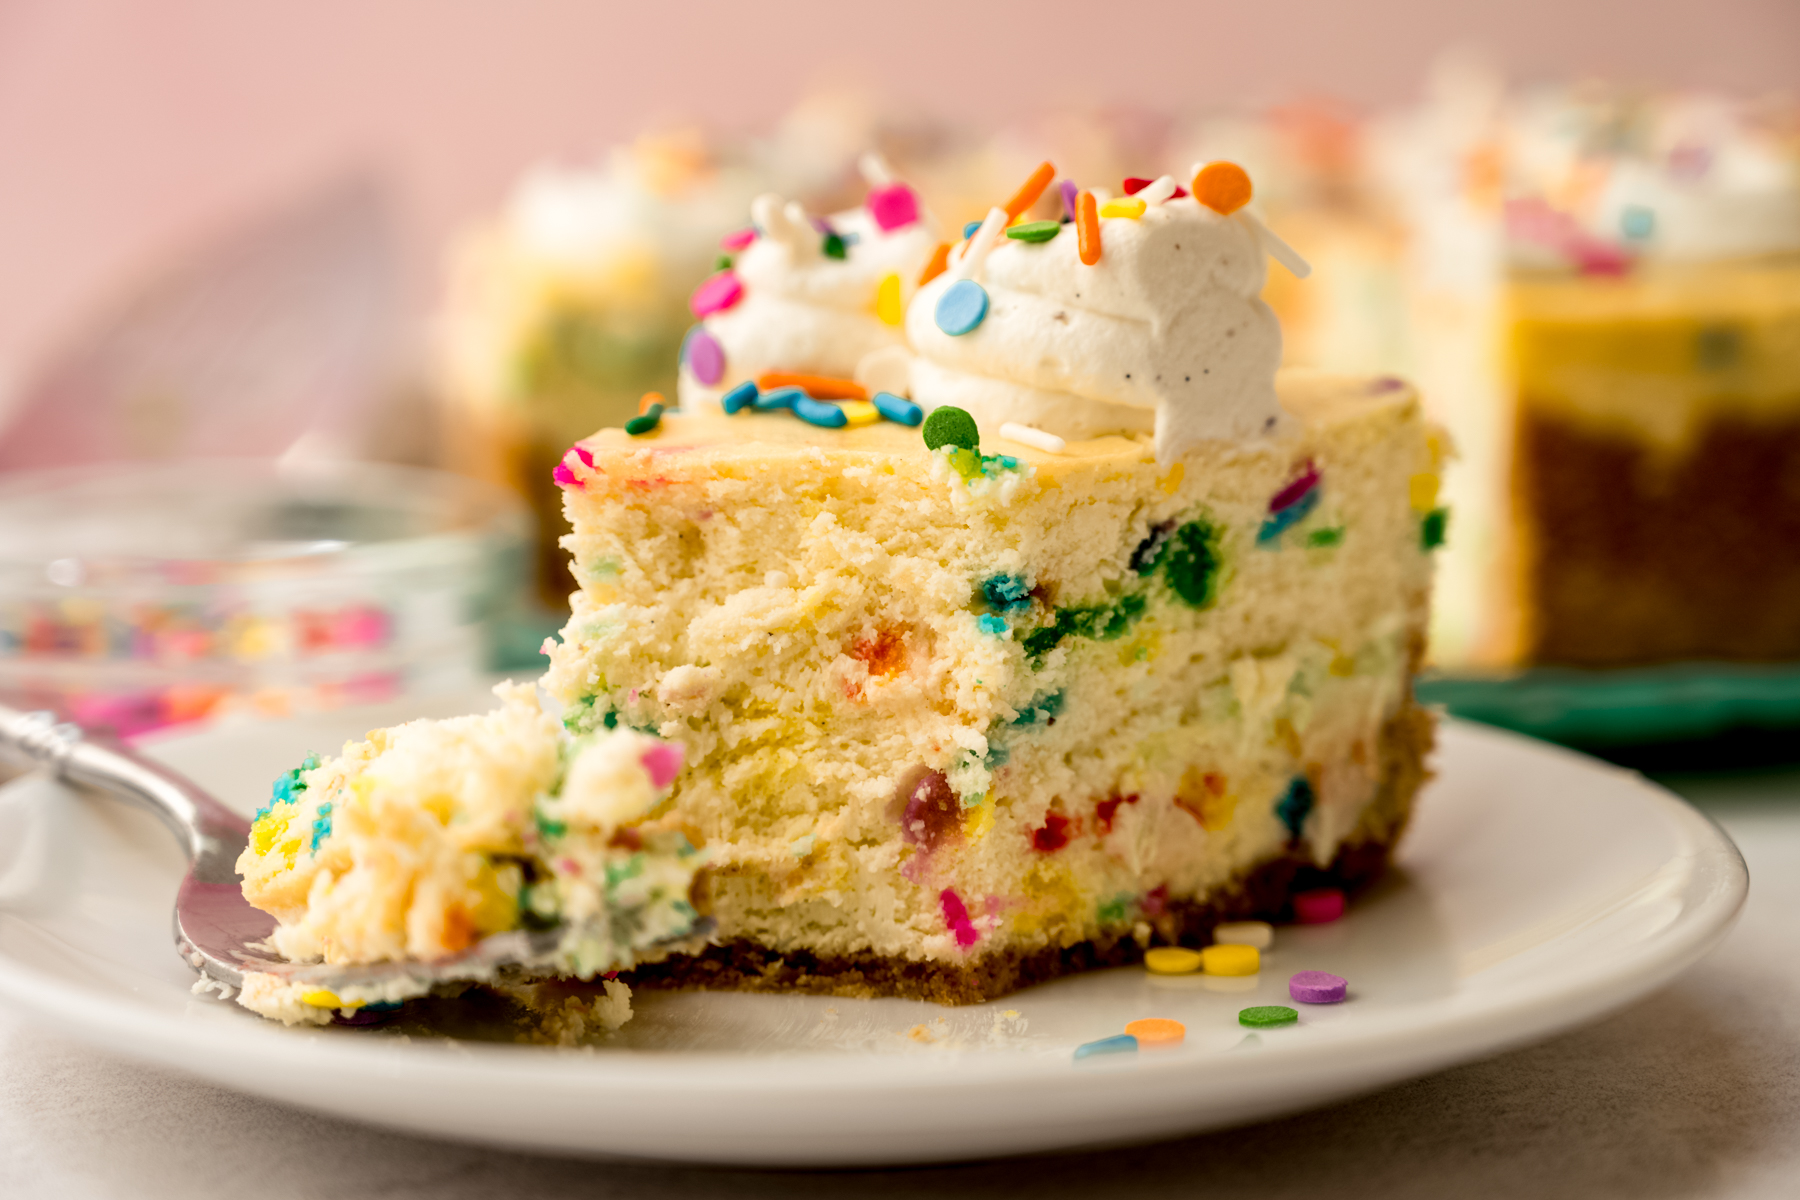
For this funfetti cheesecake, I sliced all 4 of my blocks of cream cheese into 16 squares, put them in a large bowl, and let it sit at room temperature for 2 hours.
If you’re pressed for time, you can let the cubed cream cheese sit in a warm oven or microwave, just be sure not to melt the cream cheese, because that’s too soft.
Other ingredients will be at room temperature in more like 45 to 60 minutes. But definitely don’t skip this step, or you’ll wind up with a lumpy cheesecake.
So let’s talk about how all of those ingredients get to their final presentation.
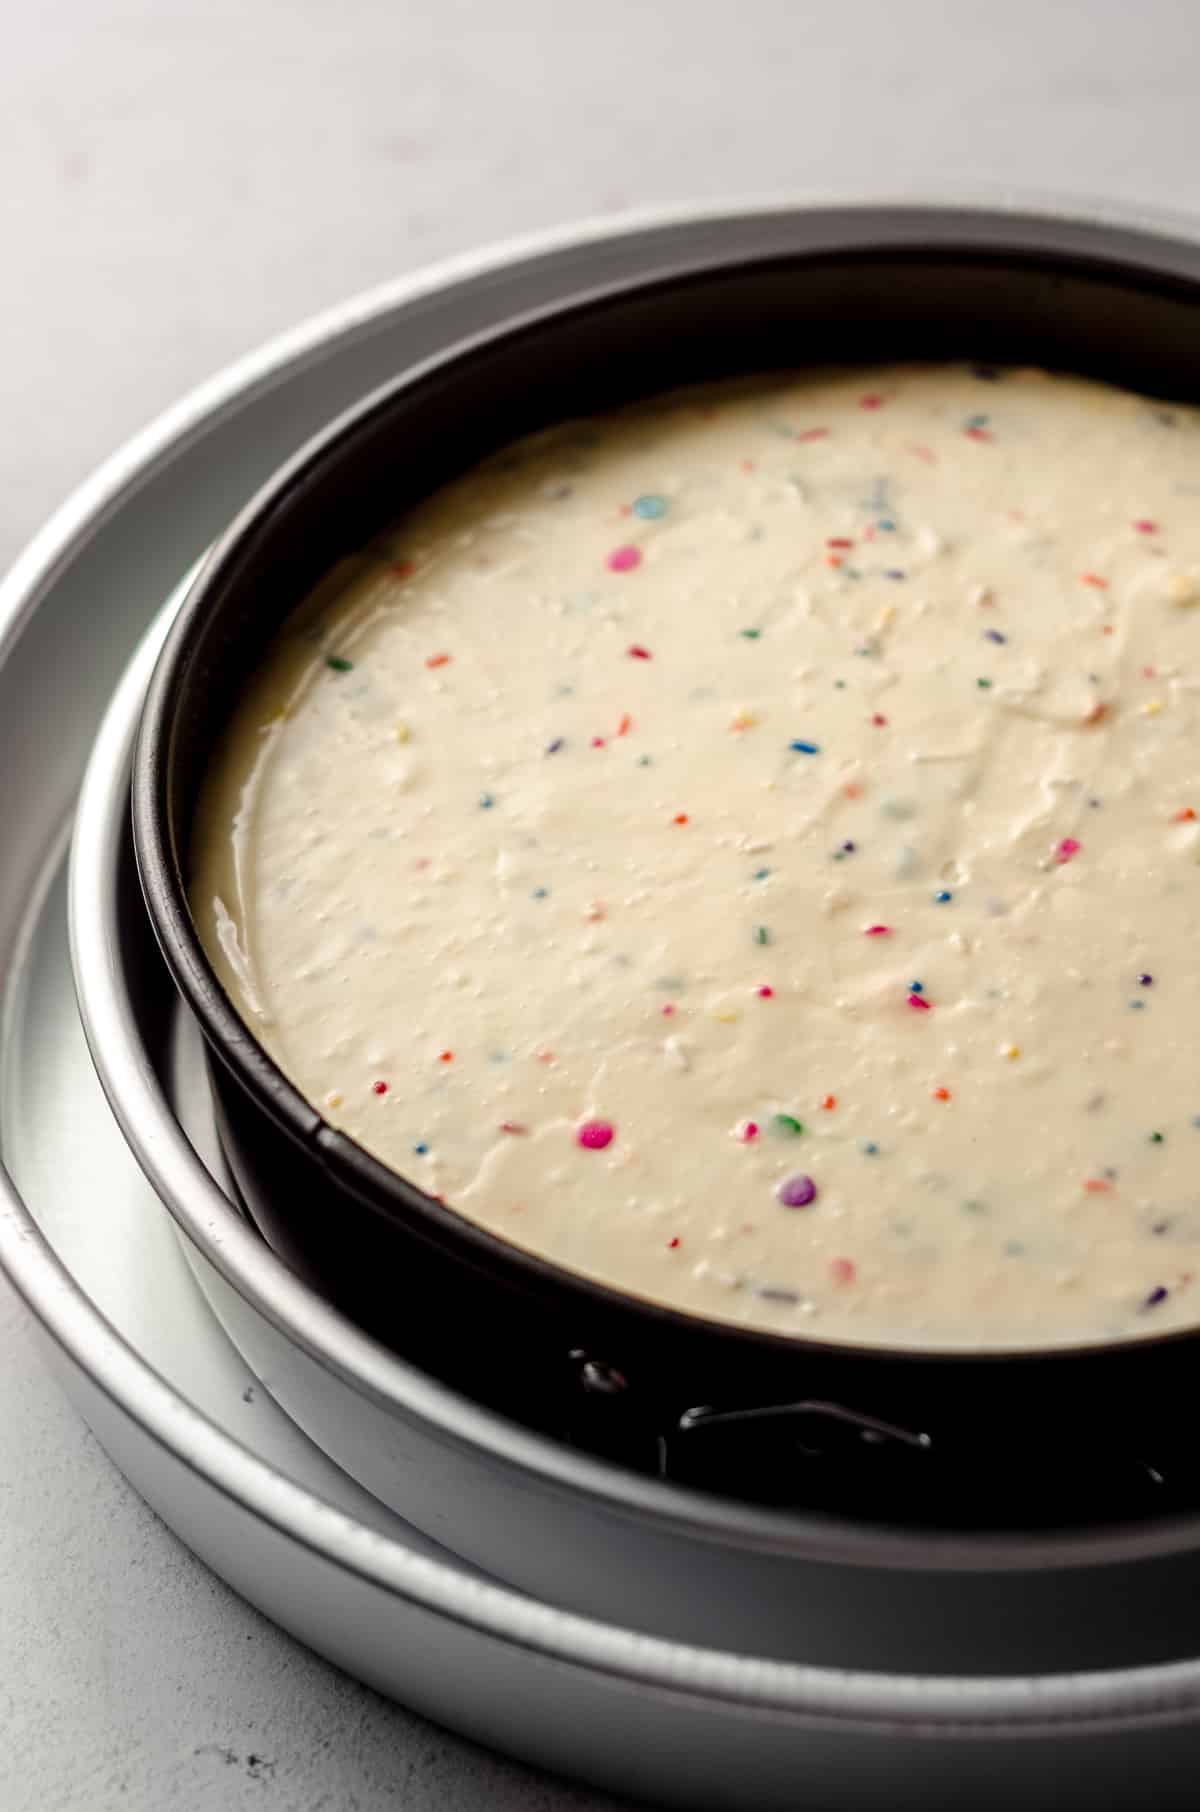
USE JIMMIES OR CONFETTI QUINS
Do not use nonpareils for this funfetti cheesecake. The colors will run and make a mess of the color of your batter.
Instead, use regular sprinkles (also known as jimmies or rods) and/or confetti quins, as these tend to bleed a whole lot less than nonpareils. I typically like to mix jimmies and quins to make sort of my own mixture. It combines colors and shapes and is just so fun!
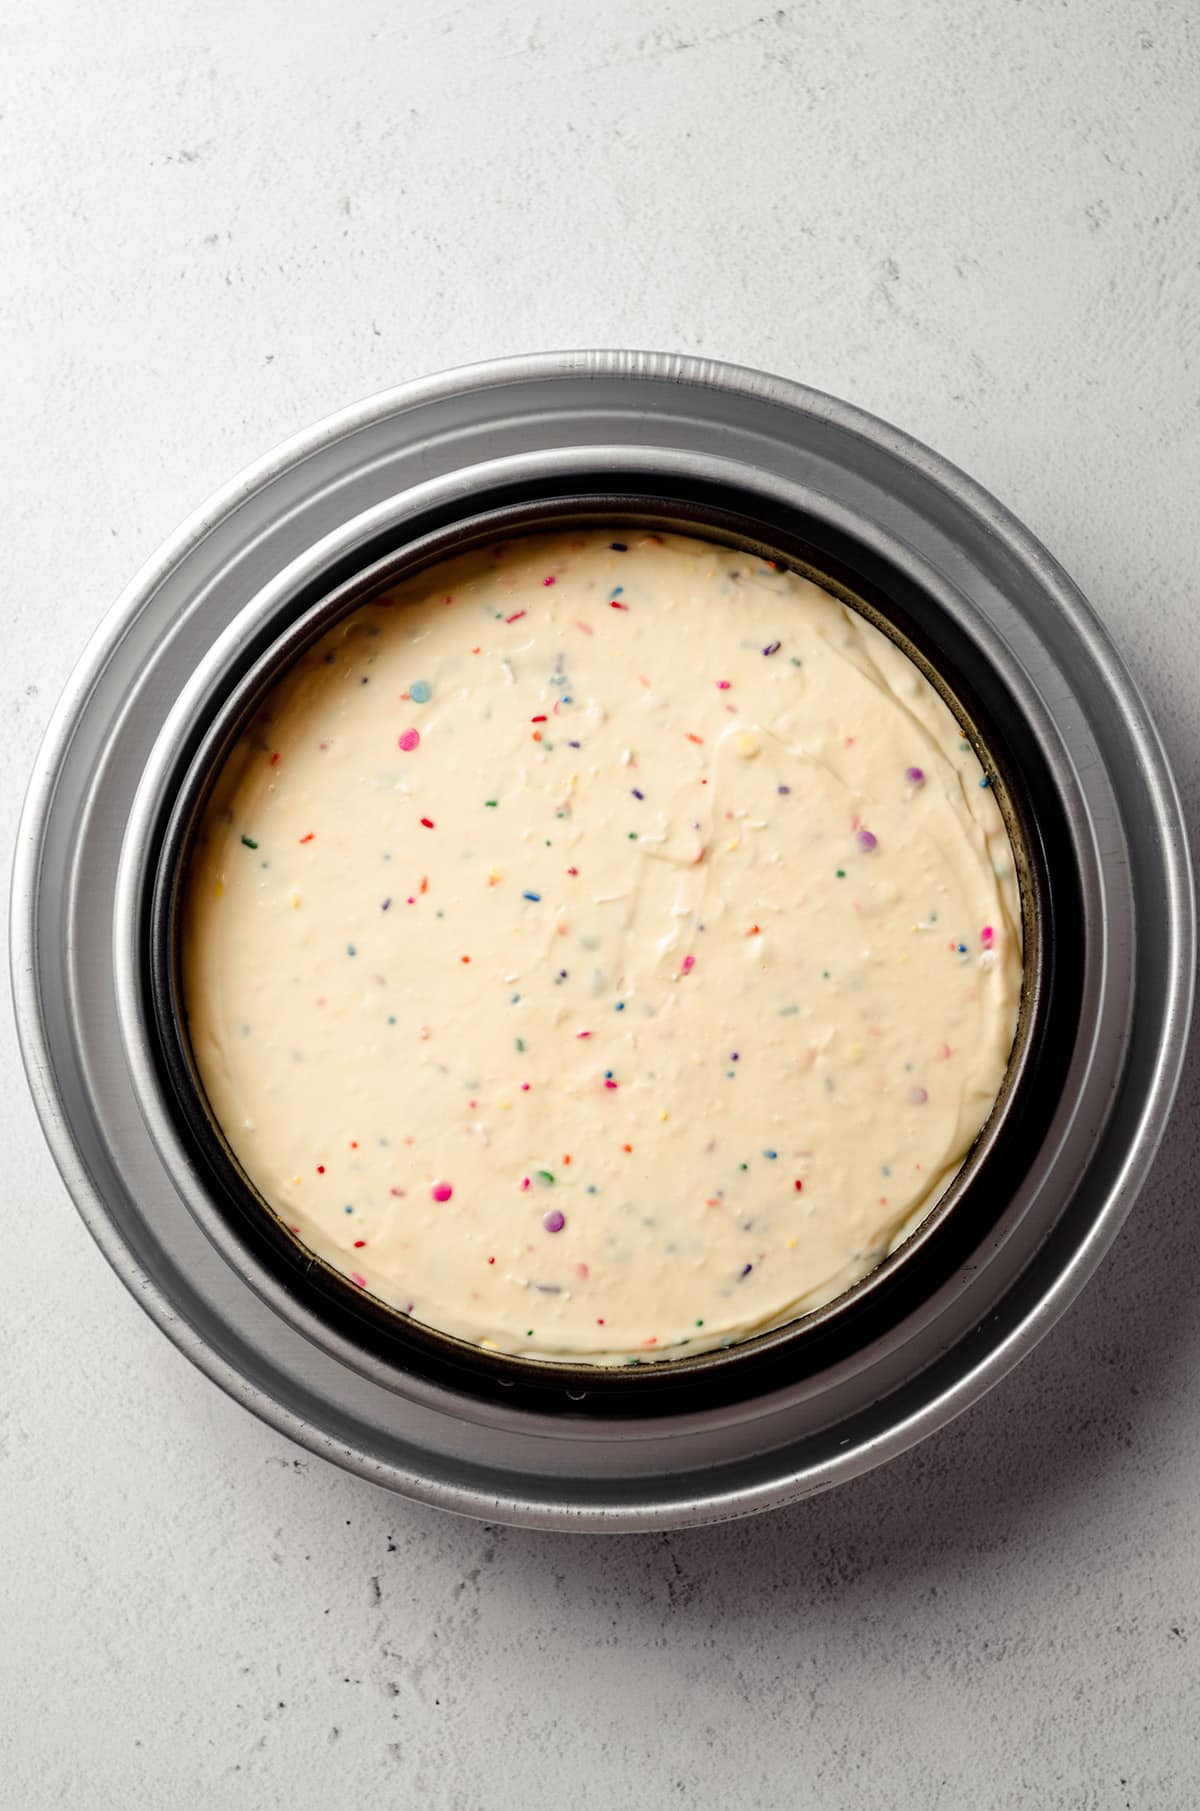
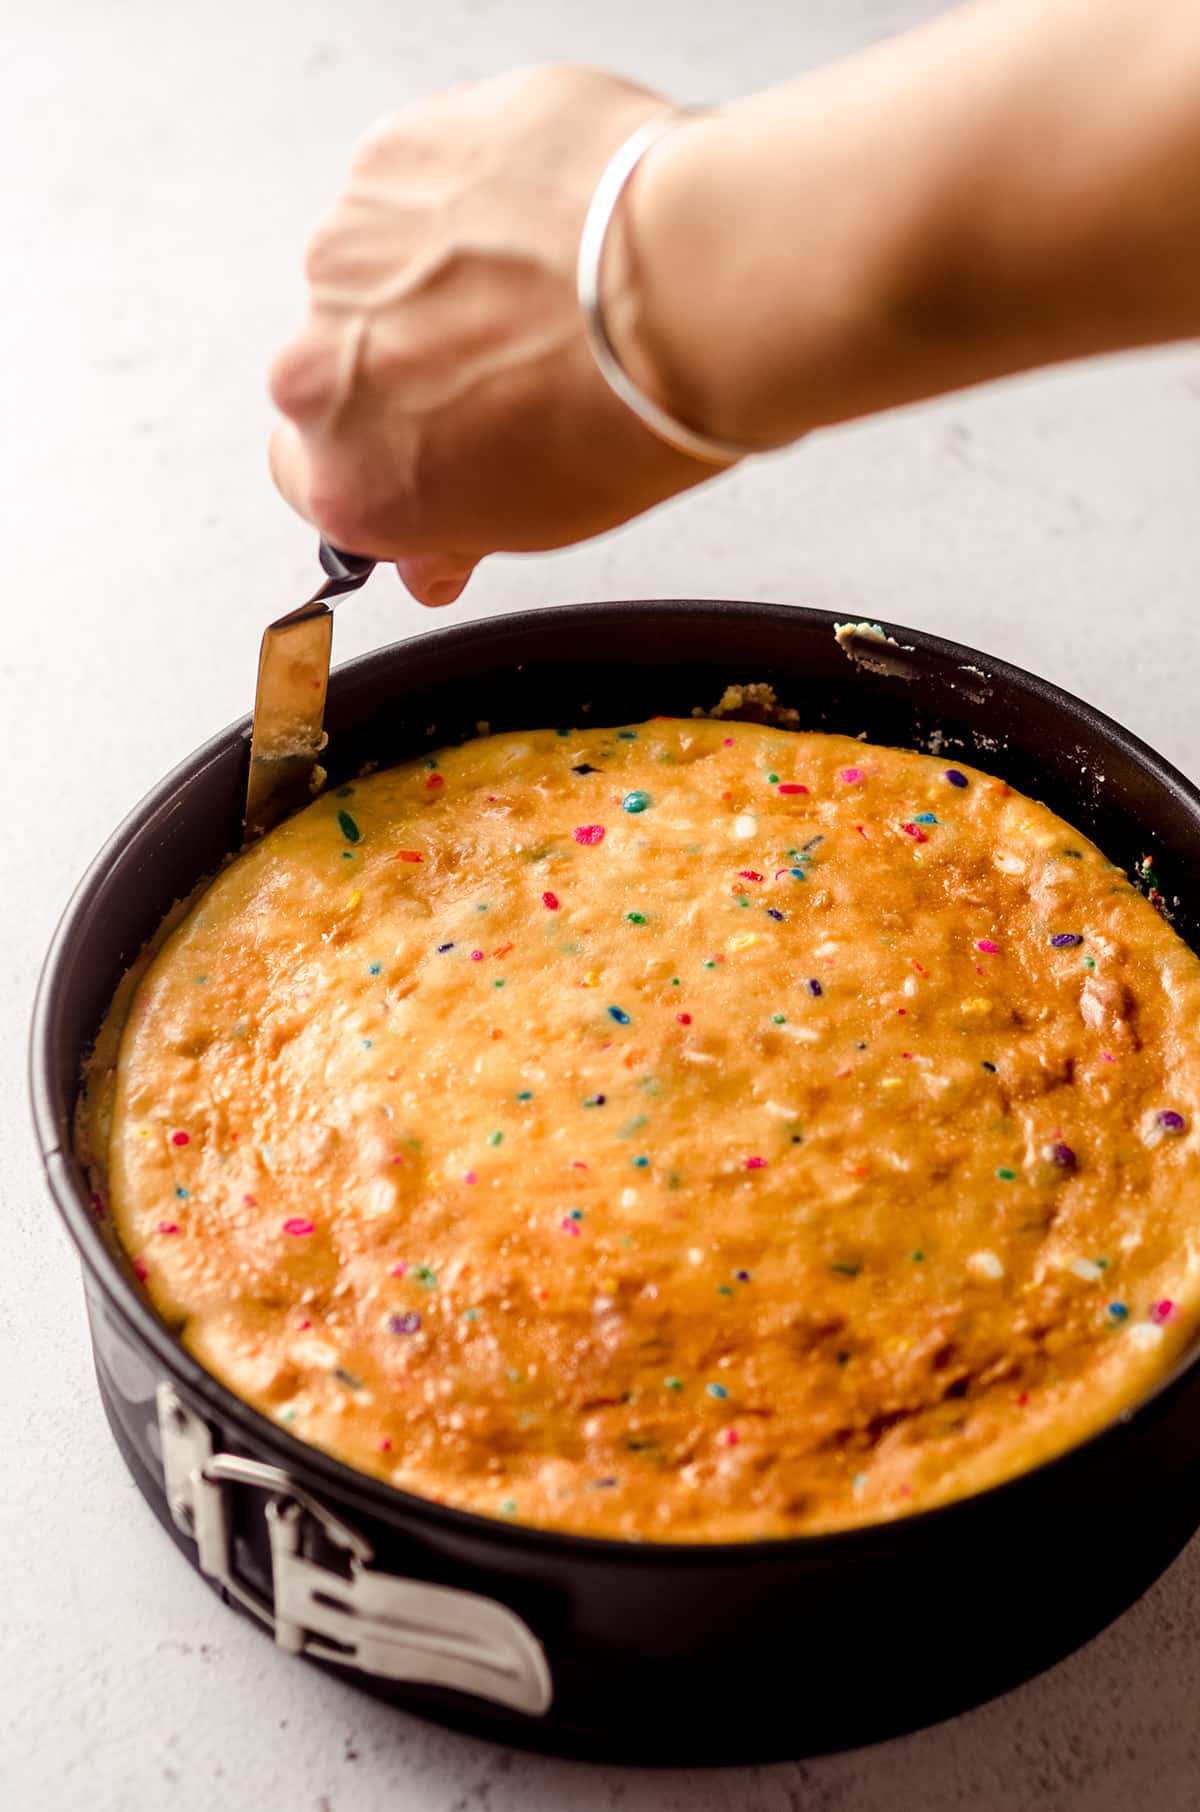
There will be a little bit of bleeding as the sprinkles sit in the batter, so make sure your whole cheesecake batter is ready before you add the sprinkles. You should only need to stir it a few times to disperse the sprinkles evenly.
Pour the batter into the springform pan, and then quickly but gently smooth out the top.
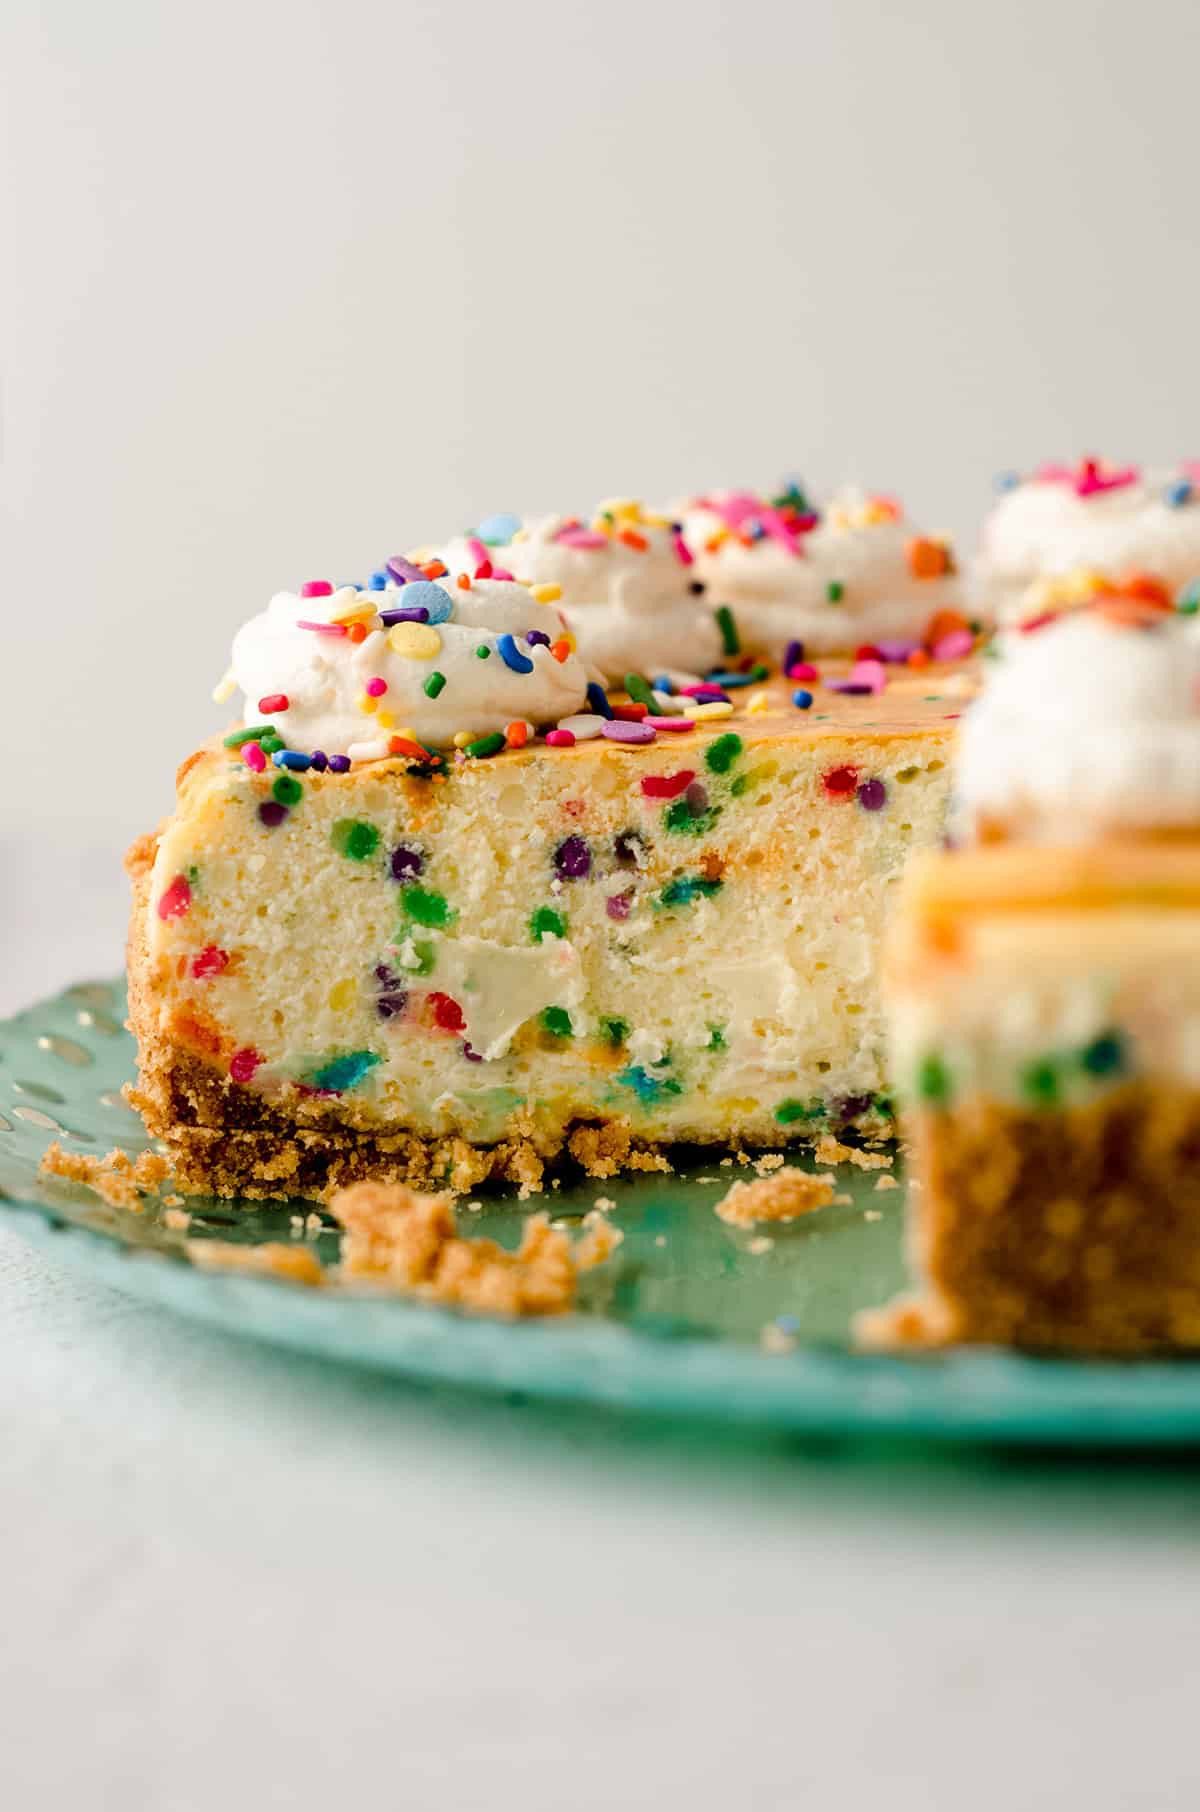
USE A SPRINGFORM PAN
You’ll be using a 9″ springform pan (or my favorite Fat Daddio cheesecake pan– see below) to bake your cheesecake, which is what I like to use when I make any of my cookie cakes. What a springform pan does is allows you to bake something and then remove the outer ring, leaving the cake/cookie cake/cheesecake/whatever it is on a platform.
The springform pan makes for easier removal of delicate cakes and tortes and other cakes with loose toppings. Though you can bake a cheesecake without a springform pan, know that you’ll be digging into your cake pan to remove slices and they will absolutely lose their shape (but of course, still taste perfect!).
MAKE AN EASY GRAHAM CRACKER CRUST
This is nothing fancy. Just crushed graham crackers, a little sugar, and some melted butter.
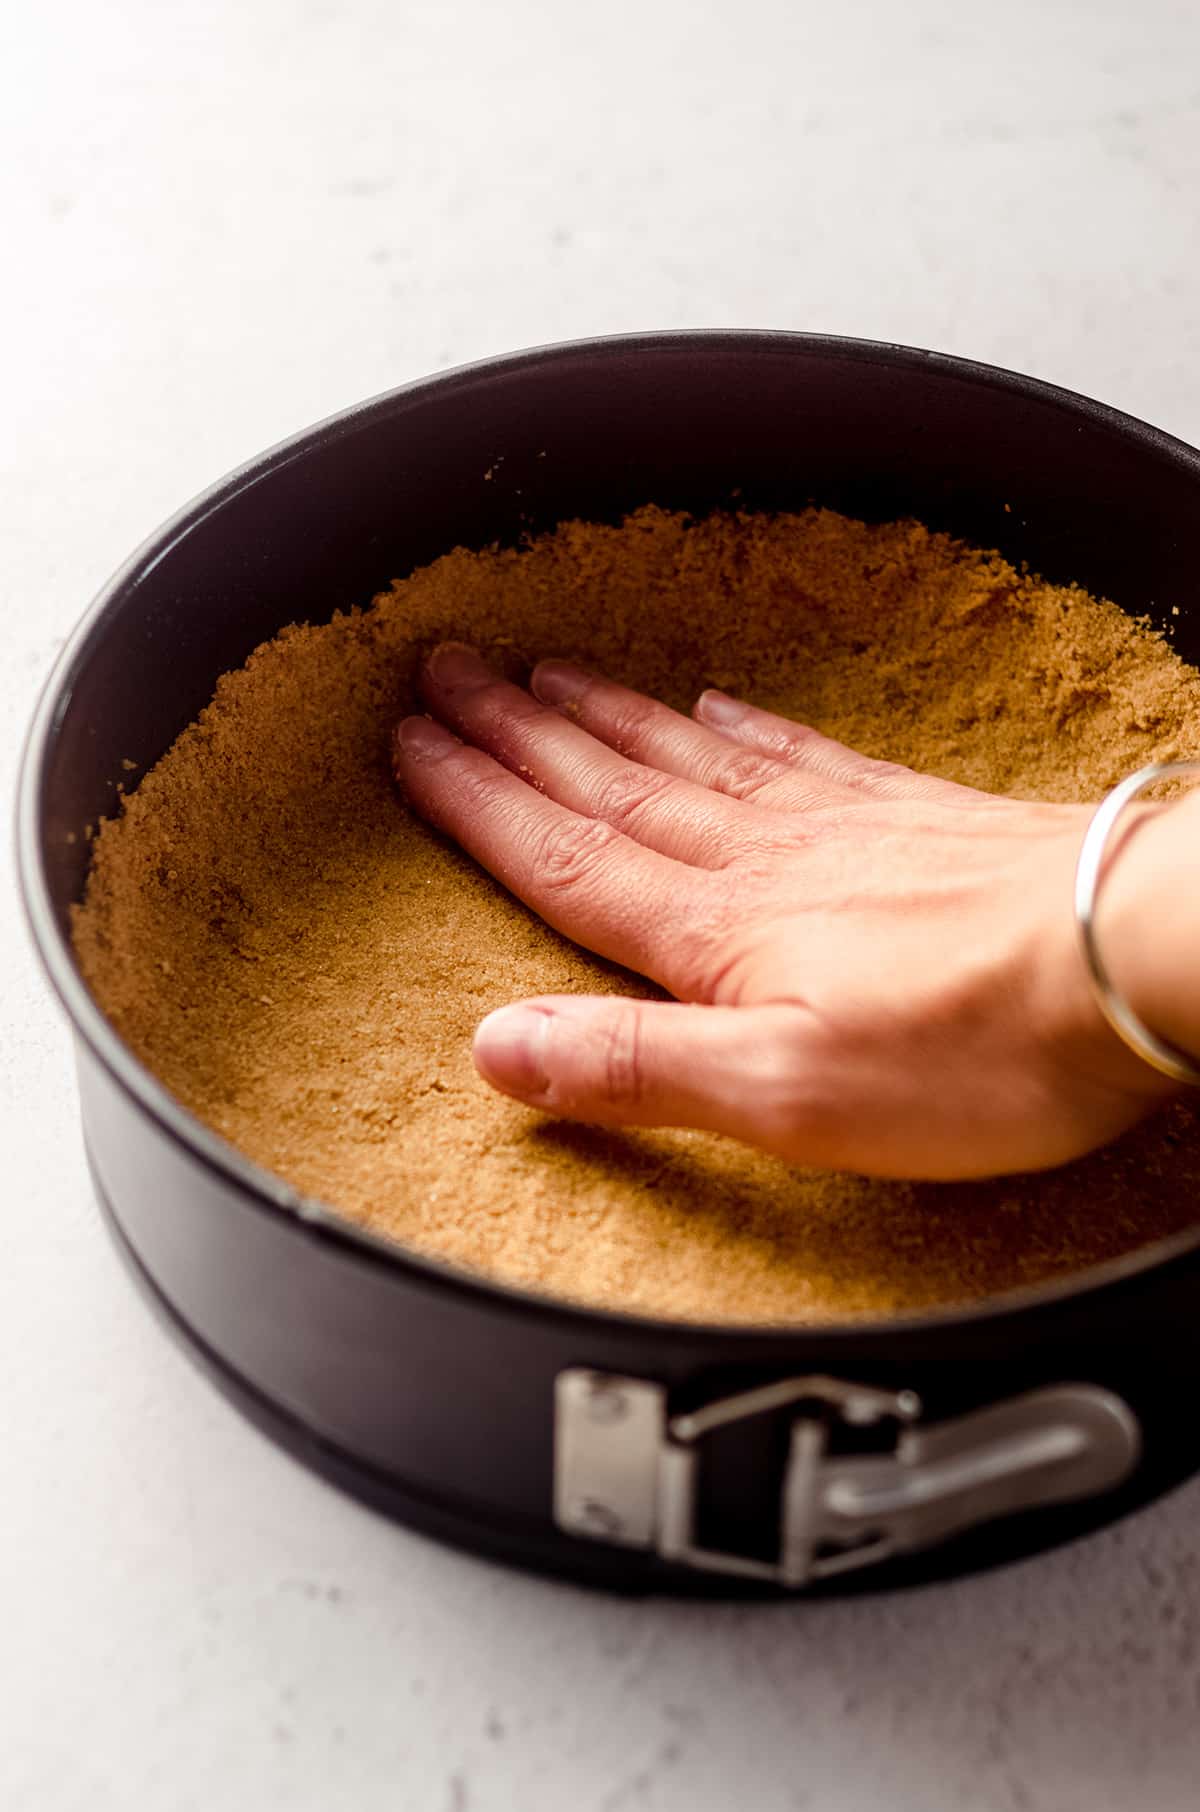
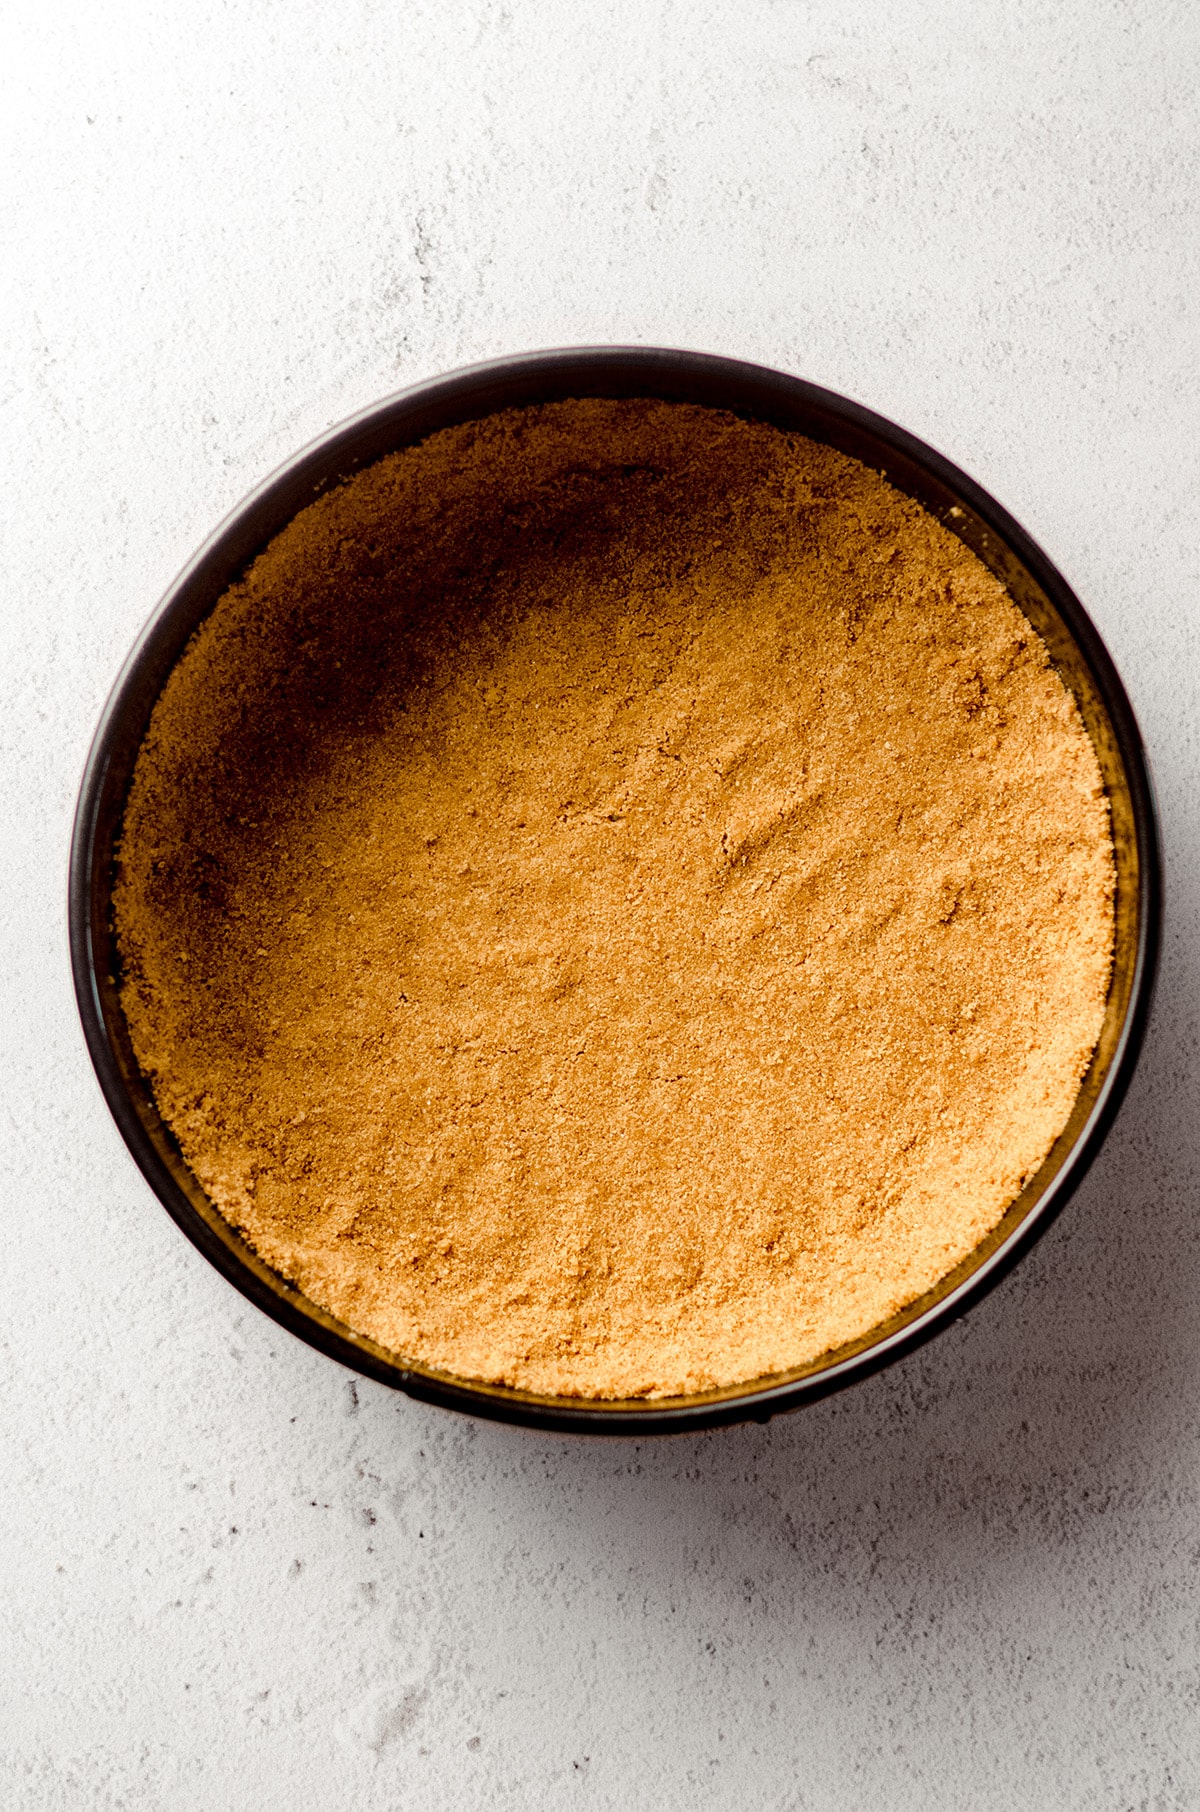
Press this mixture into the springform pan and a little bit up the sides. This does not have to be perfect. Just make sure the whole bottom of the springform pan is covered in graham cracker crust before moving up the sides. The bottom is the most important part!
MAKE AN EASY WATER BATH WITHOUT FOIL
The water bath is the step that intimidates people the most, and I get it– it sounds like a lot. But I promise it’s simpler than you think, and I strongly encourage you not to skip it.
Cheesecake has no leavening agents, so it relies on steam from the water bath to rise slowly and evenly. That humid environment is what gives you a smooth, crack-free top and a cheesecake that stays tall after it cools rather than sinking in the center.
Here’s my no-foil method: place your 9″ springform pan inside a slightly larger pan (a 10″ cake pan works great), and then set both of those inside an even larger pan or roasting pan. Fill the outer pan with hot water halfway up the sides of the middle pan, then carefully transfer everything to the oven. Here is a bundle that includes all the pans I use (10″ and 12″).
This nested pan setup keeps water from seeping into the cheesecake without the hassle of wrapping the springform pan in layers of foil. I have an entire post dedicated to how to make a no-foil water bath if you want all the details.
Still sound confusing? It’s not. Here’s a visual.
HOW LONG TO BAKE FUNFETTI CHEESECAKE
This cheesecake bakes low and slow. Plan for about 1 hour and 45 minutes, though I start checking mine around the 1 hour 20 minute mark. Do not open the oven door while it’s baking. Use your oven light to check on it. Every time you crack the door, you let hot air escape and risk uneven baking.
HOW TO TELL WHEN YOUR CHEESECAKE IS DONE
You’ll want to look for two things to check for doneness of your cheesecake.
First: visual– gently wiggle the outer/roasting pan. A finished cheesecake will jiggle just a little bit (you’re looking for a couple inch radius in just the center of the cheesecake to jiggle, not the entire top).
Second: internal temperature– you’ll want an internal temperature of 145ºF (63ºC), which you can test with a digital instant read thermometer. Just know that if you’re inserting it in the center, there will be a hole. You can, of course, cover this with something if you prefer.
COOL THE CHEESECAKE SLOWLY TO PREVENT CRACKS
Patience is everything at this stage. Moving a cheesecake too quickly from a hot oven to cooler temperatures is what causes it to crack and sink.
When the cheesecake is done, turn off the oven, prop the door open slightly with a wooden spoon or spatula, and let the cheesecake cool inside the oven for 1 hour.
After that, remove the springform pan from the water bath setup and let it continue cooling on a wire rack on the counter for about 2 hours. Once it’s at room temperature, cover and refrigerate it for a minimum of 6 hours. Overnight is even better.
HOW TO REMOVE THE CHEESECAKE FROM THE SPRINGFORM PAN
Run a small spatula or butter knife around the edge of the rim of the springform pan to release the cheesecake from the pan. The outer ring should easily pop off and leave you with a beautiful cheesecake on the bottom platform of the springform pan.
You can leave the cheesecake on the platform or remove it.
To remove the cheesecake from the platform: run that same spatula or knife under the cheesecake to separate it from the platform, then use two large spatulas to carefully lift it up and onto a serving plate.
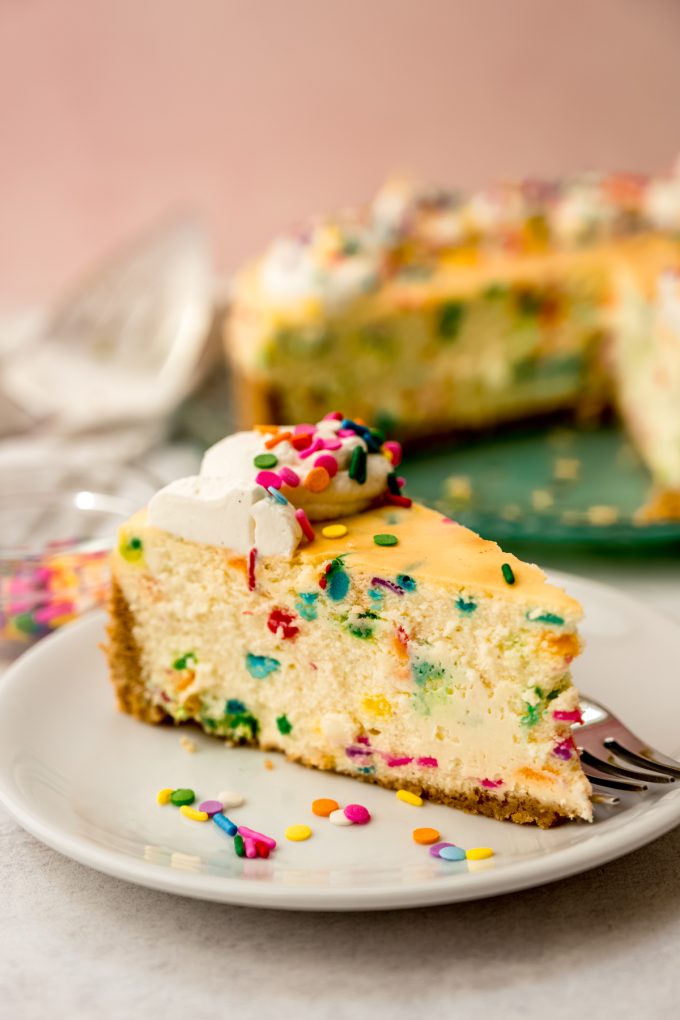
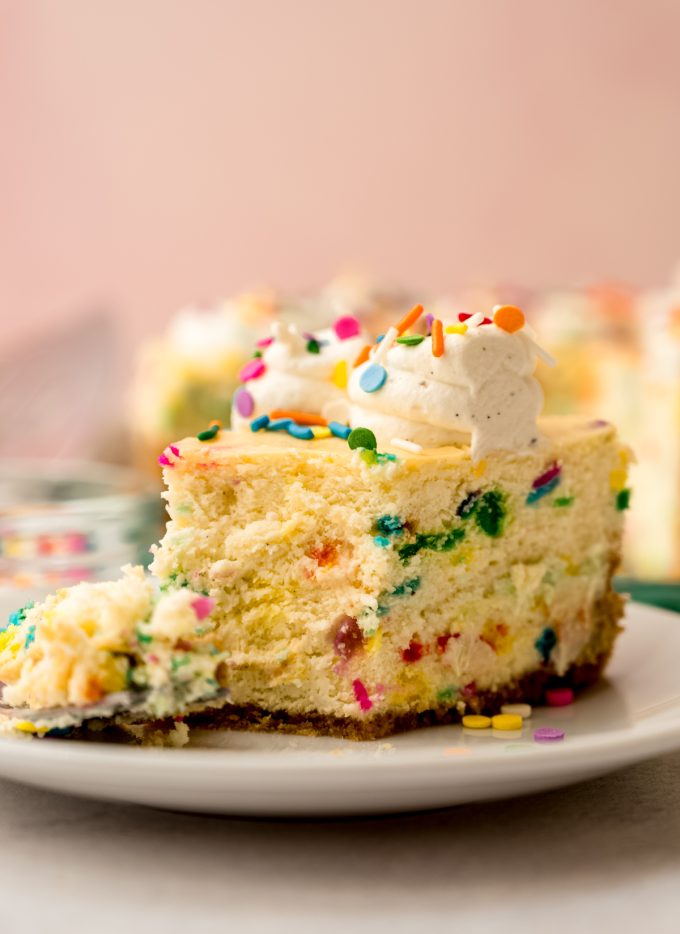
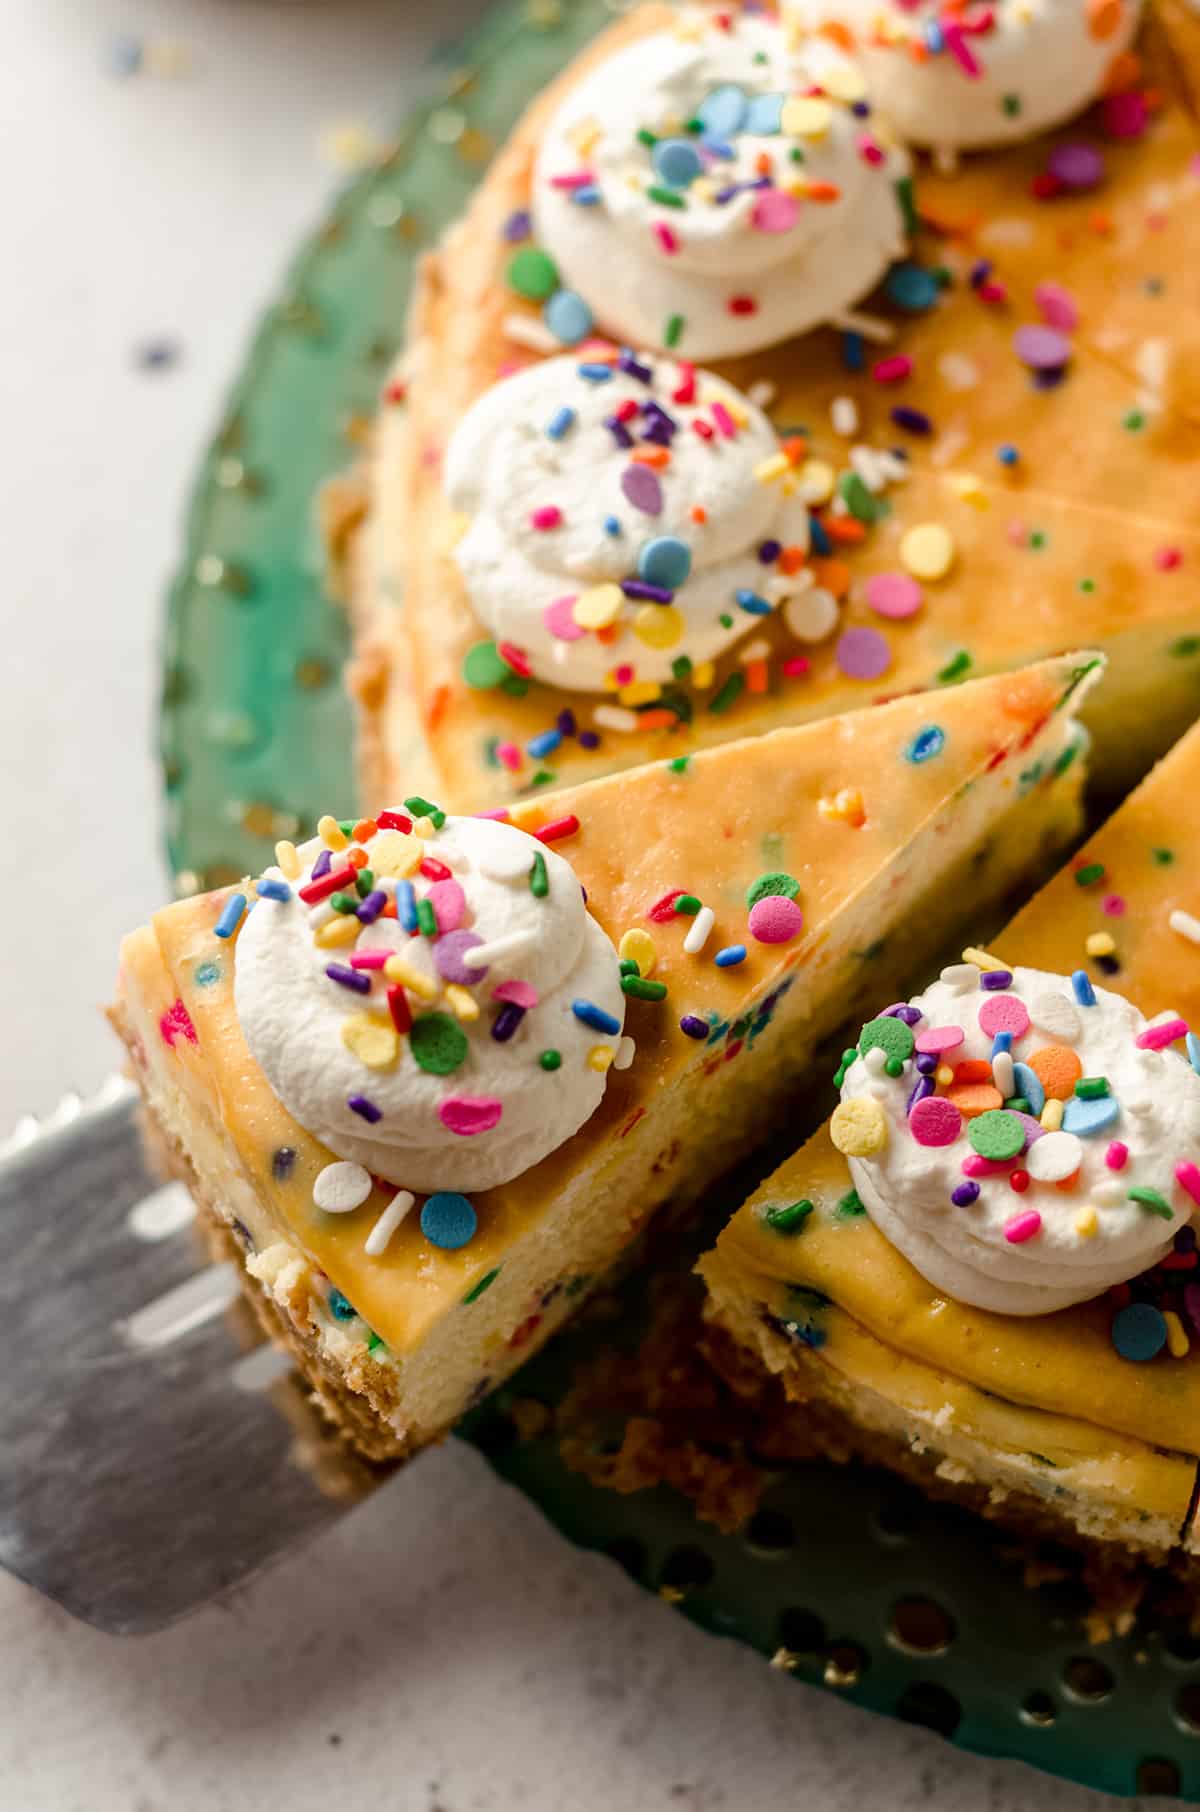
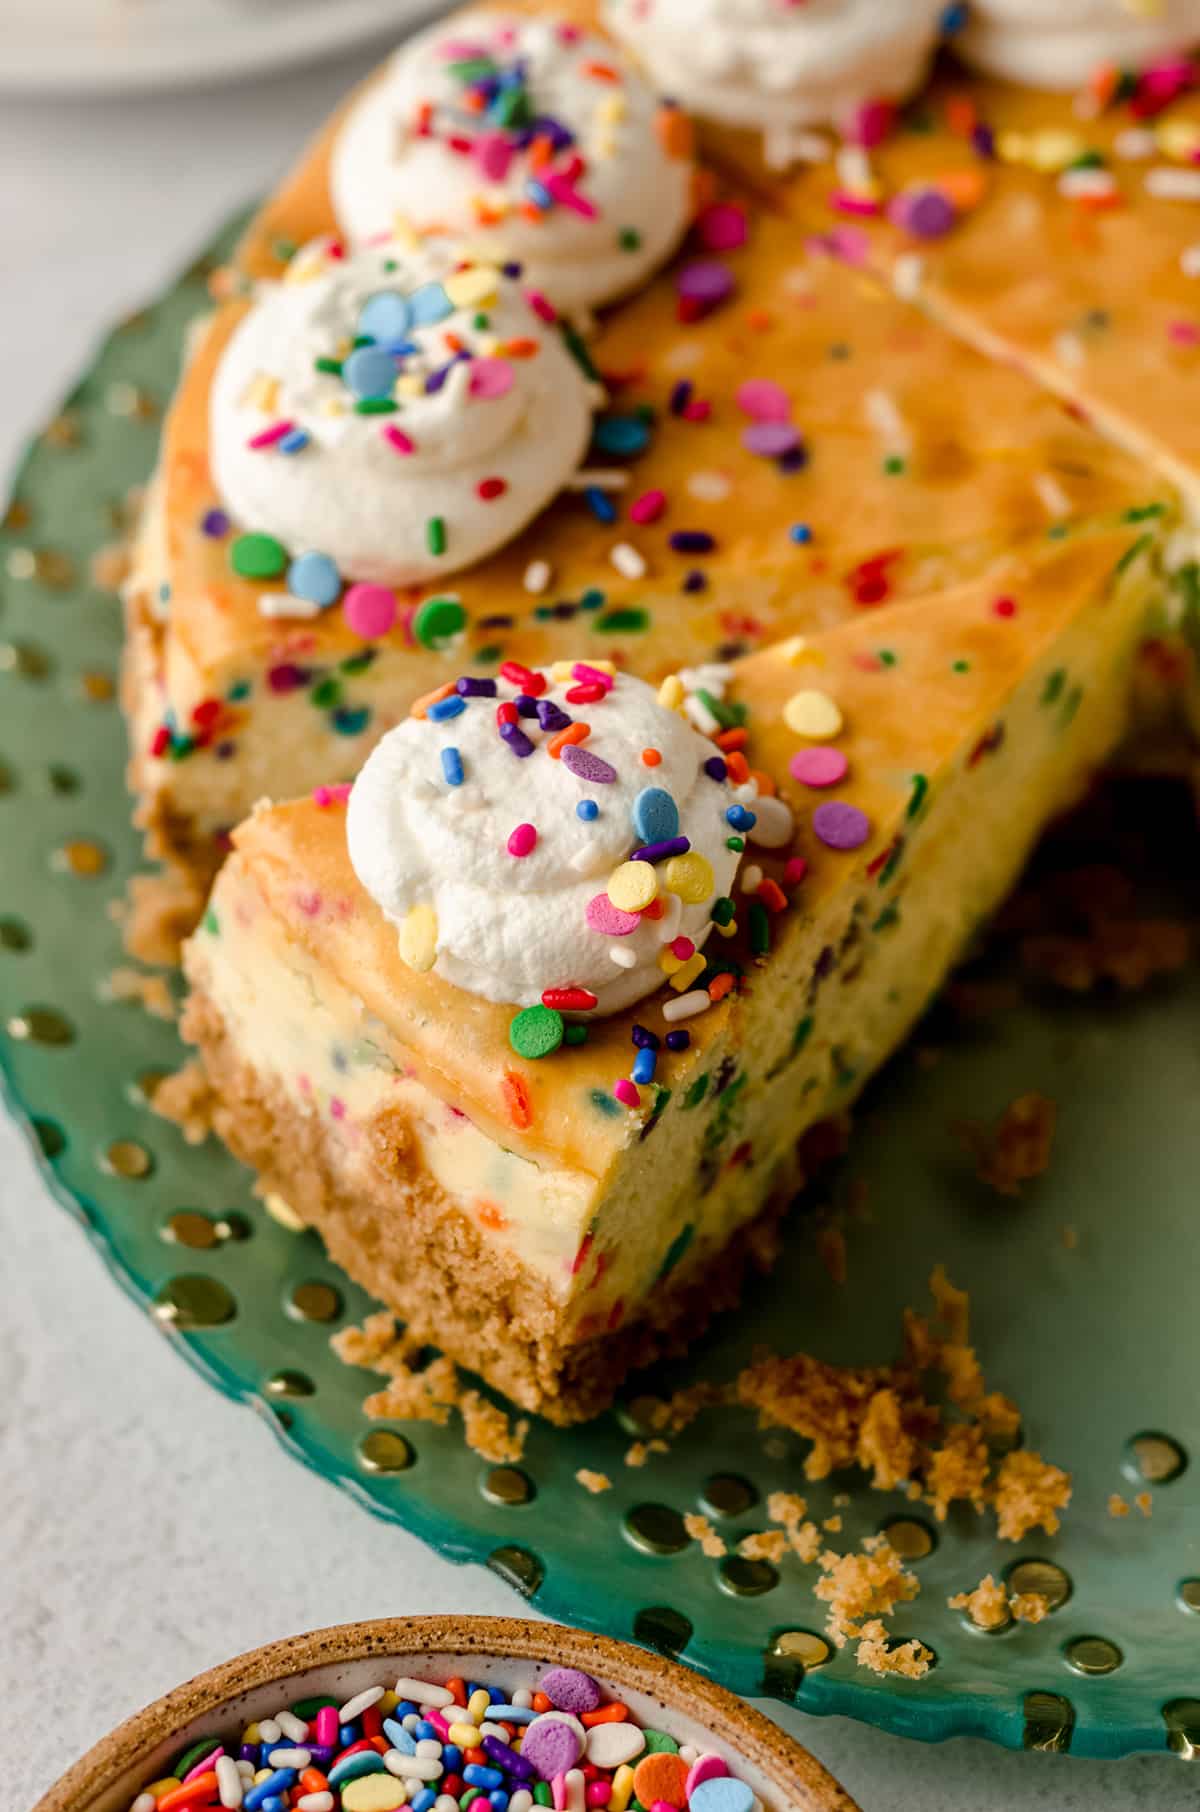
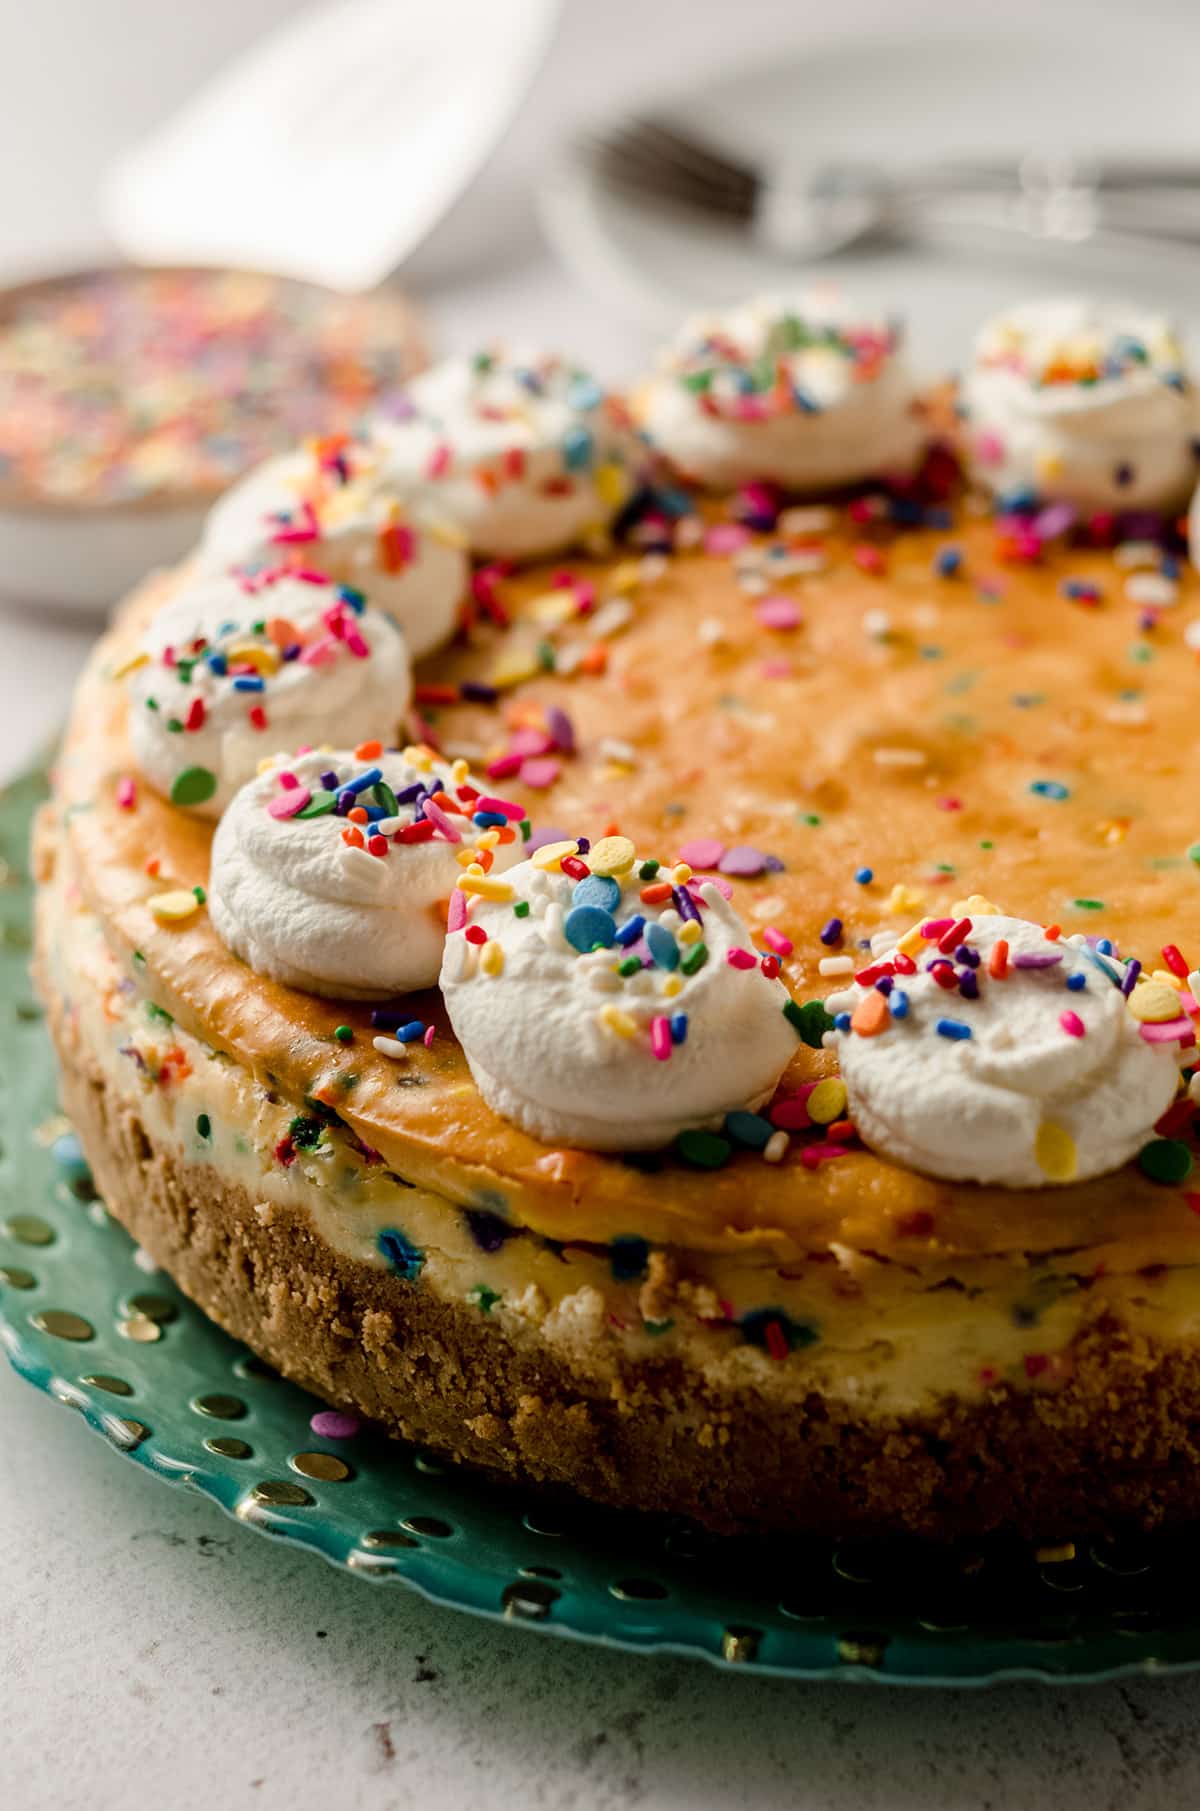
TOPPING YOUR FUNFETTI CHEESECAKE
I chose to top my funfetti cheesecake with my homemade whipped cream and more sprinkles, but you’re welcome to use whatever you want or leave it plain.
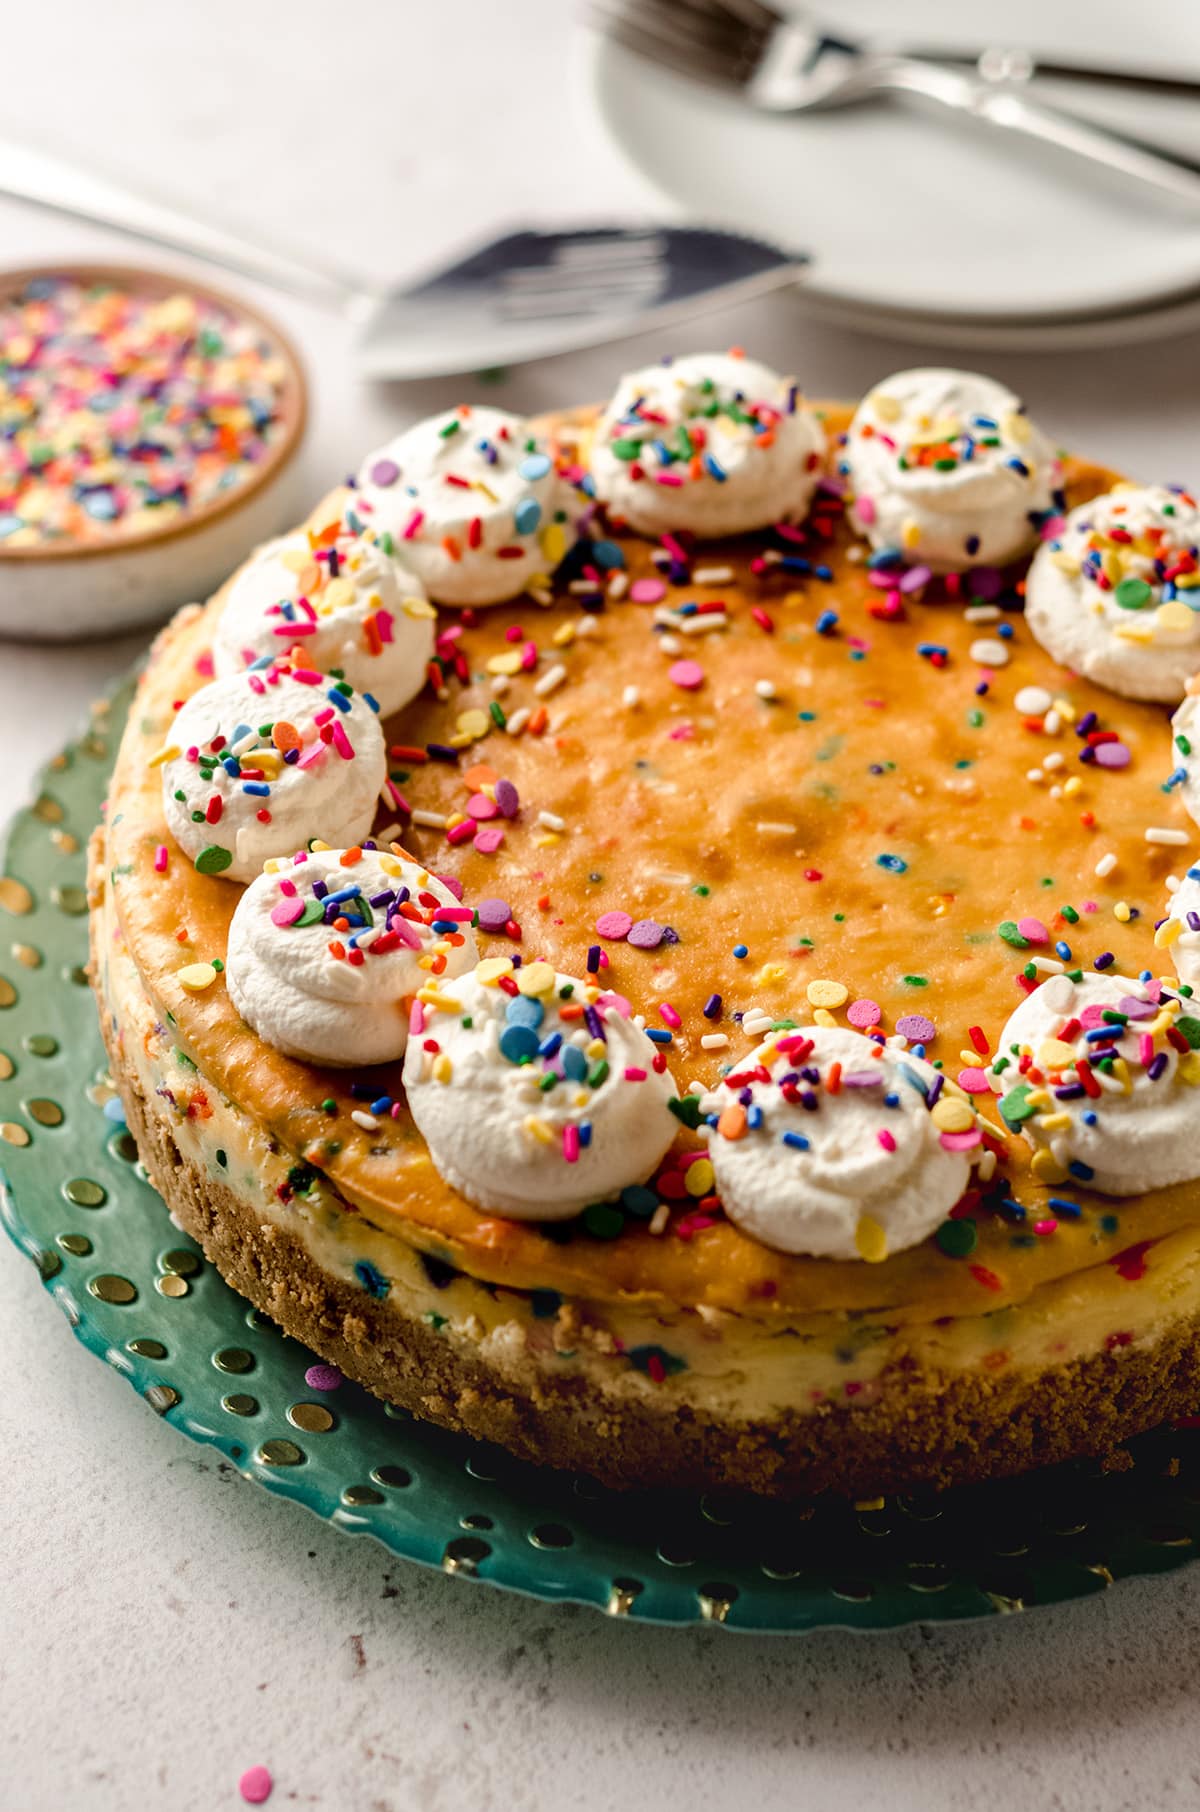
To slice cleanly: use a very sharp knife, and wipe the blade clean between every single cut. The cheesecake is soft and it will cling to the knife– a clean knife means clean, beautiful slices.

I hope this post (and this updated recipe!) gives you the confidence to tackle your first cheesecake or to come back and try this new and improved version even if you’ve made the original. Once you understand that it’s really all about patience and following the steps, I think you’ll surprise yourself. I can’t wait to see your funfetti slices!
Funfetti Cheesecake Recipe
Ingredients
GRAHAM CRACKER CRUST
- 1 and ½ cups (155g) graham cracker crumbs approximately 10 full rectangles
- 2 and ½ Tablespoons (31g) granulated sugar
- ¼ cup (57g) unsalted butter melted
FUNFETTI CHEESECAKE
- 32 ounces (900g) full fat block cream cheese completely softened to room temperature
- 1 cup (200g) granulated sugar
- 8 ounces (226g) full fat sour cream about 1 scant cup; at room temperature
- 1 Tablespoon vanilla extract
- 1 and ½ teaspoons cake batter extract1
- 4 large eggs at room temperature
- ⅔ cup (67g) sprinkles
TOPPING
- 1 cup homemade whipped cream
- more sprinkles if desired
Instructions
GRAHAM CRACKER CRUST
- Preheat the oven to 325ºF (162ºC). Spray a 9" springform pan or my very favorite Fat Daddio's cheesecake pan with nonstick spray. Set aside.
- In a food processor, crush the graham crackers until they become a fine crumb. Pour the crushed graham crackers into a large bowl, add the sugar and melted butter, and stir to combine.1 and ½ cups (155g) graham cracker crumbs, 2 and ½ Tablespoons (31g) granulated sugar, ¼ cup (57g) unsalted butter
- Press the graham cracker crumb mixture into the bottom of the prepared springform pan, then bake the graham cracker crust for 6-8 minutes, or until slightly golden brown. Remove from the oven and allow to cool while you prepare the filling.
FUNFETTI CHEESECAKE
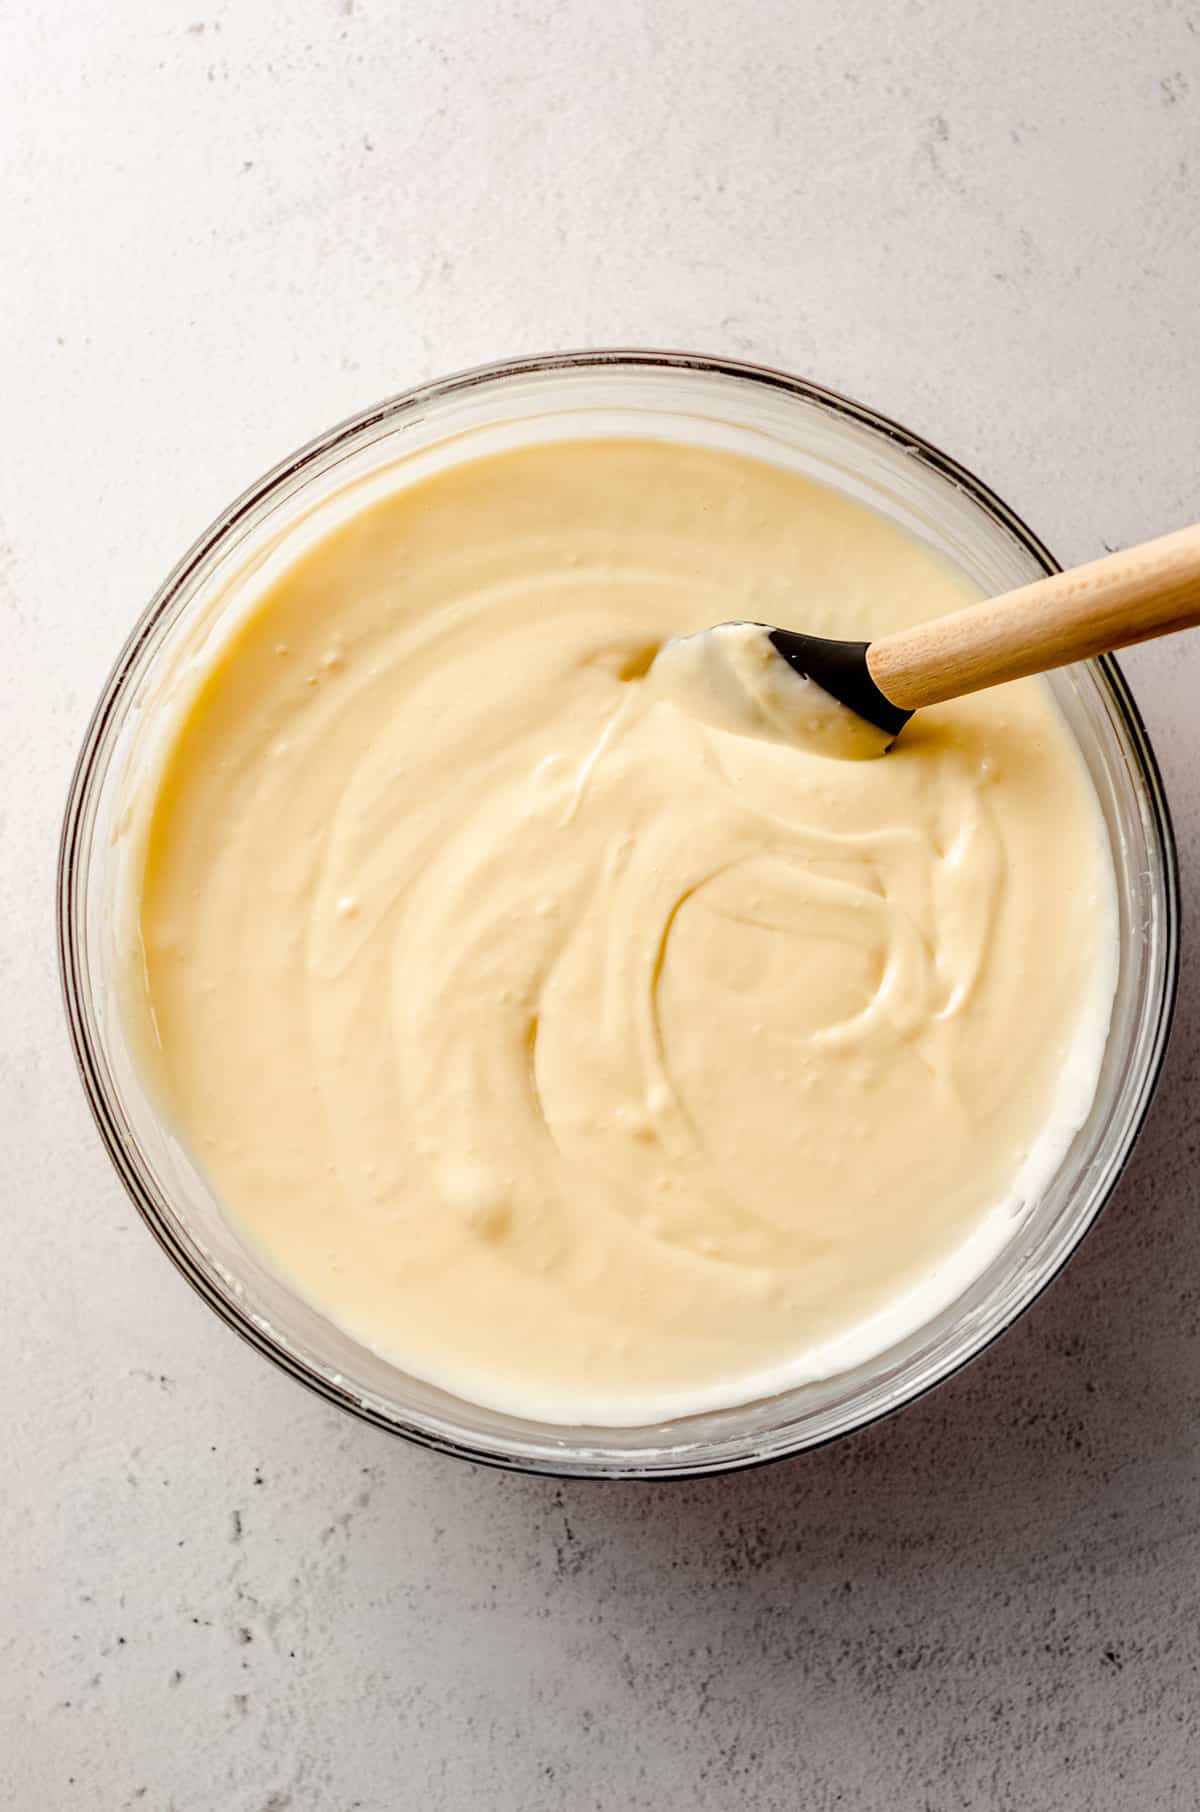
- In a large bowl with a handheld mixer or the bowl of a stand mixer fitted with the paddle attachment, beat the cream cheese on medium high speed until smooth, about 2 minutes. Add the granulated sugar then beat again until combined, about another 2 minutes.32 ounces (900g) full fat block cream cheese, 1 cup (200g) granulated sugar
- Reduce the mixer speed to low2, then add the sour cream, vanilla extract, and cake batter (or almond) extract and mix until completely combined. Add the eggs one at a time and continue mixing on low until eggs are just combined. Your batter should be smooth and creamy without lumps. Gently fold in the sprinkles until just combined (do not overmix).8 ounces (226g) full fat sour cream, 1 Tablespoon vanilla extract, 1 and ½ teaspoons cake batter extract1, 4 large eggs, ⅔ cup (67g) sprinkles
- Pour the batter into the prepared pan. Create a water bath3 by placing the 9" springform pan in a slightly larger round pan (I like to use a 10" cake pan) and then place that pan into an even larger round pan (I like to use a 12" cake pan) or roasting pan.
- Fill the outer pan with hot water halfway up the sides of the middle pan, then carefully transfer the whole thing to the oven.
- Bake the cheesecake for 75-95 minutes. The middle of the cheesecake (a center approximately 2" wide) should jiggle just a little bit. I use my digital instant-read thermometer to check the internal temperature has reached 145ºF (63ºC). Turn the oven off4 and allow the cheesecake to cool in the oven for 1 hour. After 1 hour, remove the springform pan from all of the other pans and allow to cool on a cooling rack for another 2 hours. When the cheesecake is completely cool, cover or wrap tightly and allow to chill in the refrigerator for at least 6 hours, ideally overnight.
TOPPING
- Remove the cheesecake from the fridge and use a spatula or butter knife to gently loosen the crust from the side of the pan, then release the outer ring of the springform pan.
- Top the cheesecake with fresh whipped cream (I use my homemade whipped cream recipe). Store leftovers in the refrigerator up to 5 days. Cheesecake freezes well, up to 3 months. Thaw in the refrigerator overnight.1 cup homemade whipped cream, more sprinkles
Video
Notes
- Cake batter extract: while historically I have used almond extract to flavor my funfetti recipes, I have more recently started using cake batter extract. I often have folks ask about a nut-free extract due to allergies, and this cake batter extract from LorAnn is completely nut-free (though the facility it is produced in is not). You can use either one, but I prefer the taste of this cheesecake with the cake batter extract.
- Mixer speed: it’s important not to go above low (or low-medium) speed after you’ve beaten the cream cheese. Incorporating too much air will create bubbles and potential cracks in your finished cheesecake.
- Water bath pans: here is a bundle that includes all the pans I use. Using this method eliminates the need to wrap anything in foil.
- Cool the cheesecake: I like to prop the oven door open with a wooden spoon or spatula.
Nutrition Disclosure
All nutritional values are approximate and provided to the reader as a courtesy. Changing ingredients and/or quantities will alter the estimated nutritional calculations.
This was so good!! We used Christmas sprinkles.
Really great recipe. This was also the first time I ever made homemade whipped cream!
I love that, Sami! Thanks so much for trying it out 🙂
Made for Thanksgiving as a fun twist on regular cheesecake— it was a hit!
Thanks so much, Wendy!
I made this and it was delicious; I think I’ll add a touch of butter extract next time too!
Thanks so much, Lauren!
I made this for Thanksgiving this year, the water bath tip gave me my first cheesecake without cracks. It was delicious!
Amazing, Liz! I love hearing that 🙂
Hi
This cheesecake looks good, but with just that 1 cup of sugar it’s not sweet enough for me.
Hi, Jackie– more sugar than that will mess with the science of the recipe. If you want to add more sweetness, you can always top with sweetened homemae whipped cream or even frosting, if desired. I have never had someone tell me my cheesecake isn’t sweet enough!
I do love this cheesecake idea for Easter. Bright and beautiful, however,the pan set that I see that you recommend using is only a set of regular pans. I don’t see how you could replace a regular cheesecake pan with removable rim with this set.
Hi, Carol– that set is just for the water bath part of the cheesecake. I still put the cheesecake itself in a springform or platform baking pan. Hope that clears things up!