
Ice Cream Sheet Cake
As an Amazon Associate, I earn from qualifying purchases. Read the full disclosure here.
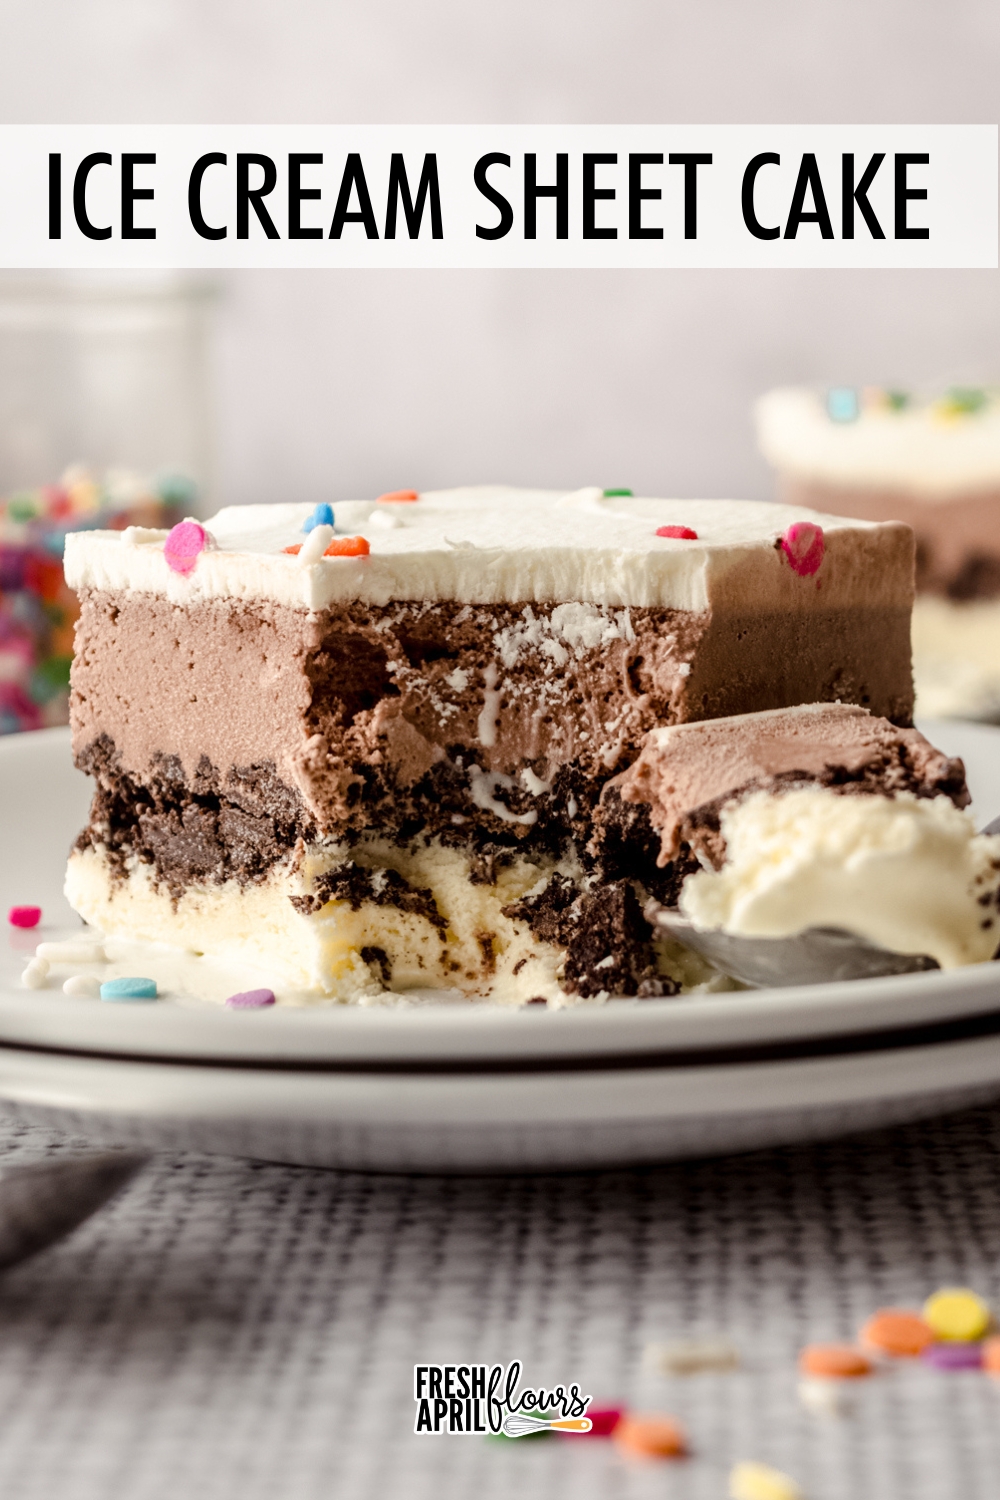
This easy recipe for homemade ice cream cake features two ice cream flavors of your choice, a crunchy cookie layer right in the middle, and homemade whipped cream and sprinkles on top. This no bake dessert makes a great make-ahead option since it needs to to freeze for at least 12 hours before serving. Make it extra fun by adding homemade hot fudge sauce!
WHY YOU’LL LOVE THIS ICE CREAM CAKE
While I do consider myself an expert in cake making as I started my scratch baking career in 2010 with a cake baking and decorating business, I also consider myself an ice cream expert. I mean, yeah, I have a few ice cream recipes on my site (looking at you, peach ice cream, blackberry ice cream, praline ice cream, and coffee ice cream, to name a few), but really, I’m more of an expert at eating ice cream.
There’s no denying an ice cream cake is, for some of us, nostalgic, but I think we can all agree that layers of our favorite ice cream with a filling of crunchy Oreo cookies between them and a topping of creamy whipped cream is a no bake dessert that is hard to resist.
Here’s why I love an ice cream cake, and why you will, too:
• more fun to eat than a bowl of ice cream
• easy no-bake recipe
• can be made ahead of time
• use your favorite ice cream flavors
• crunchy cookie layer in the middle
FOUR SIMPLE LAYERS
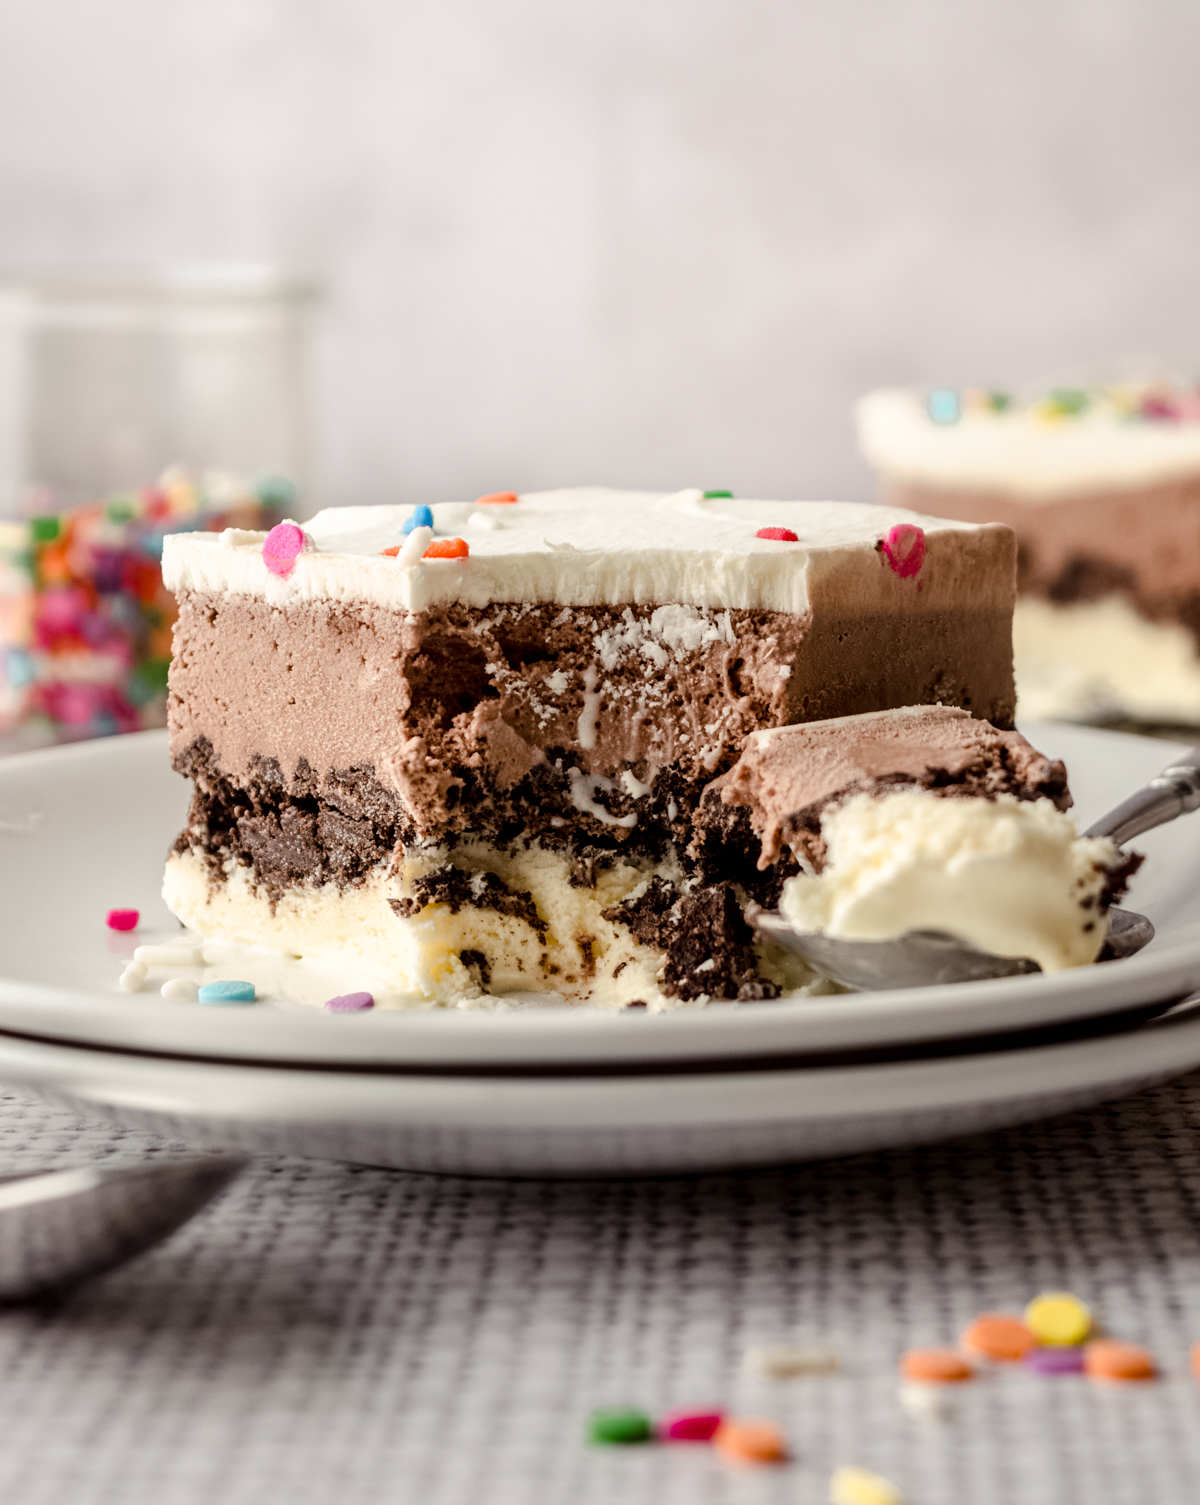
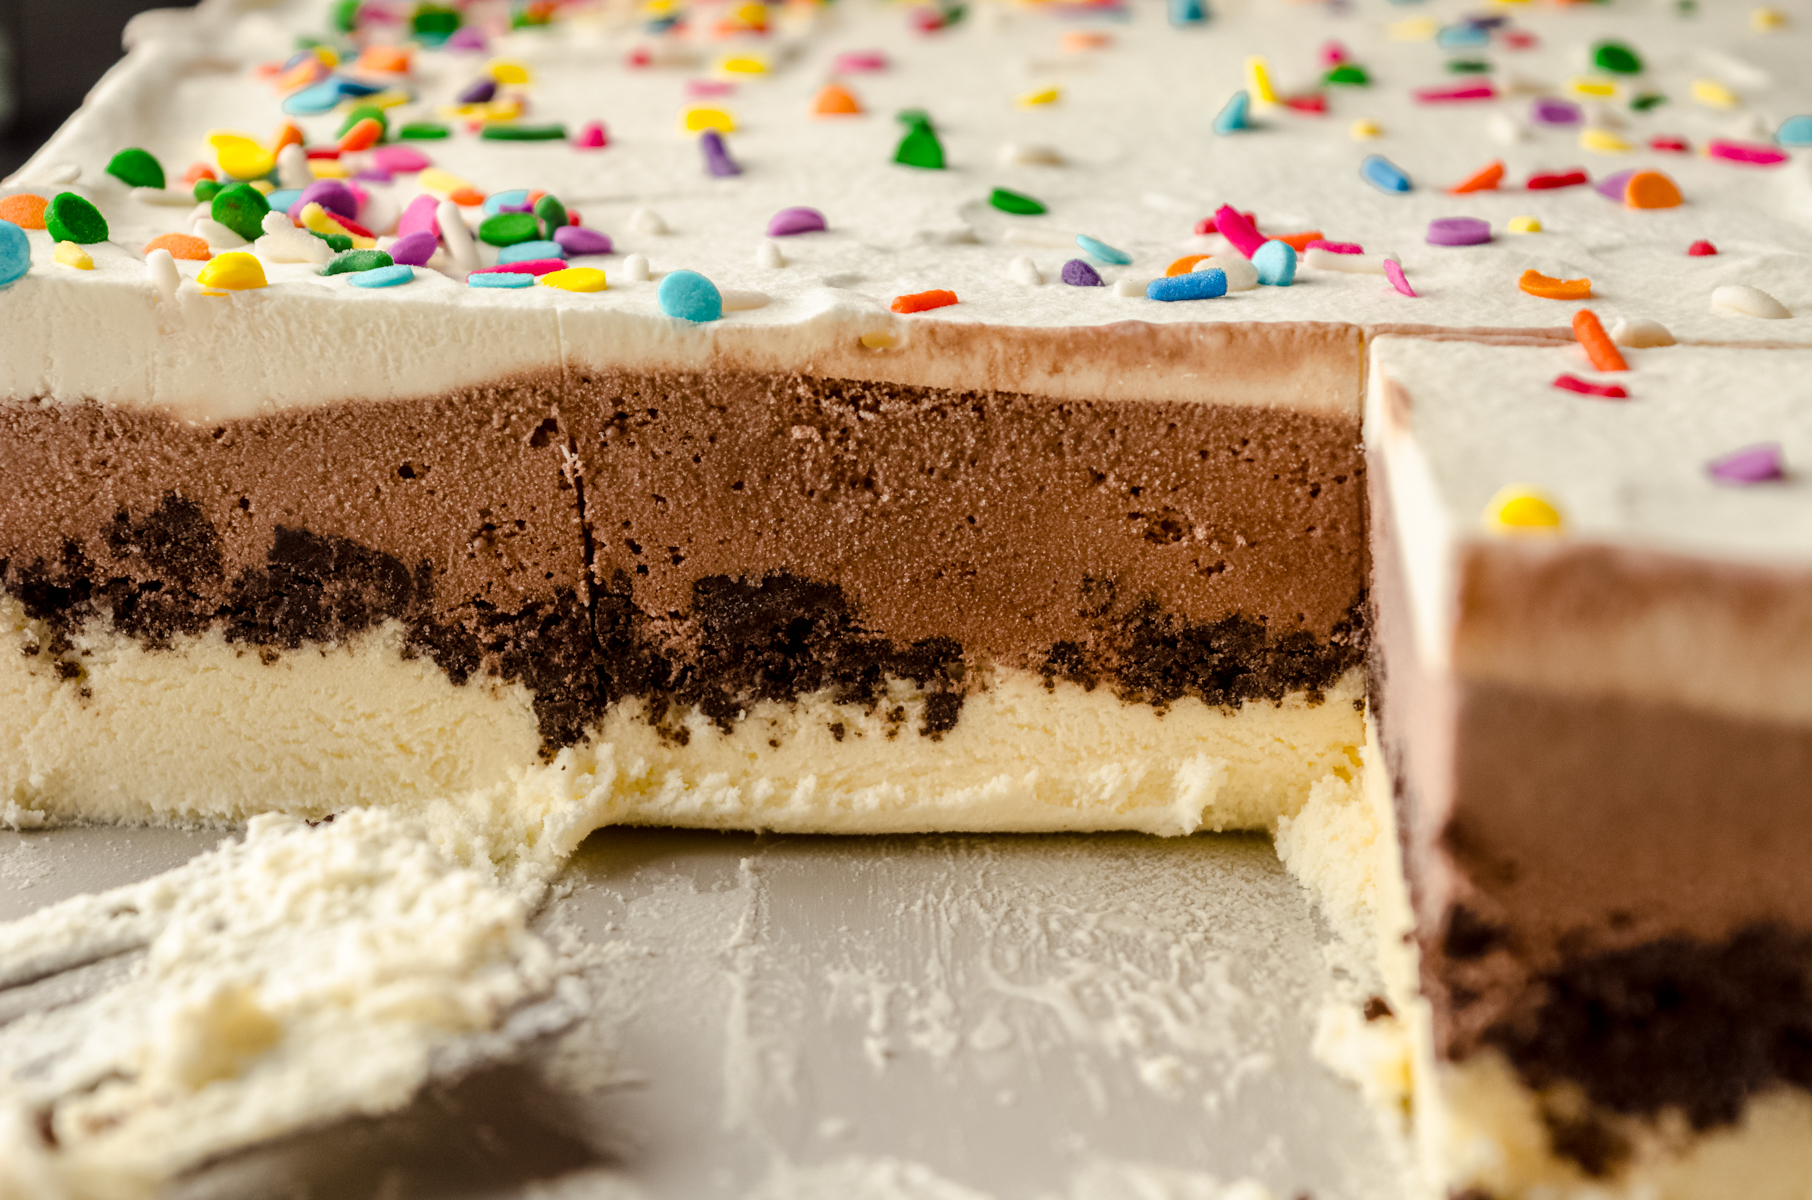
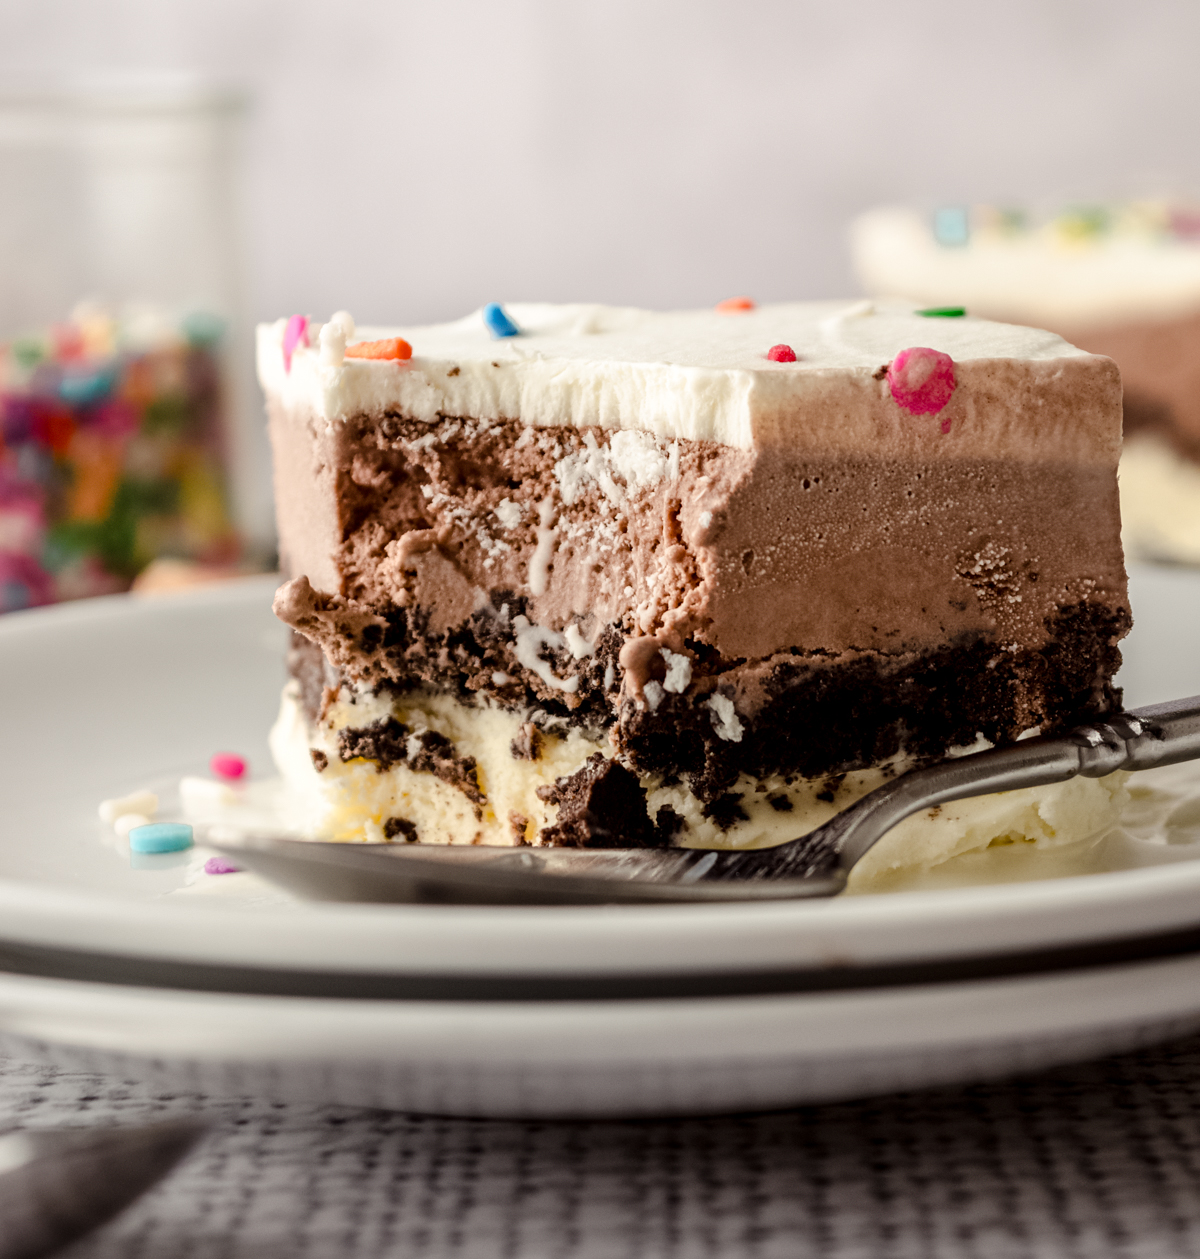
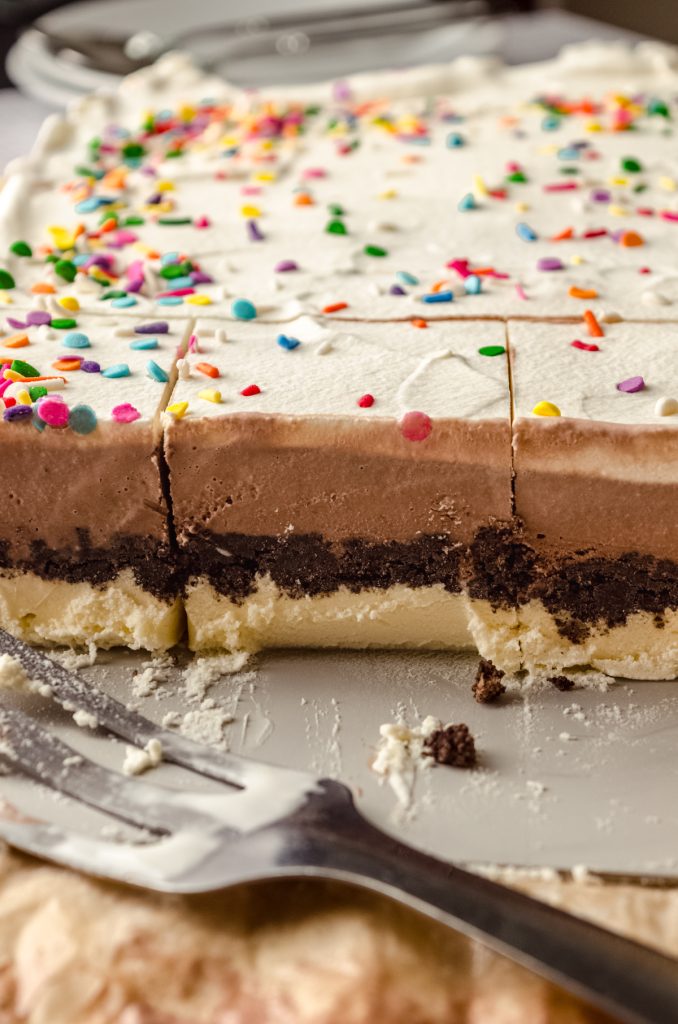
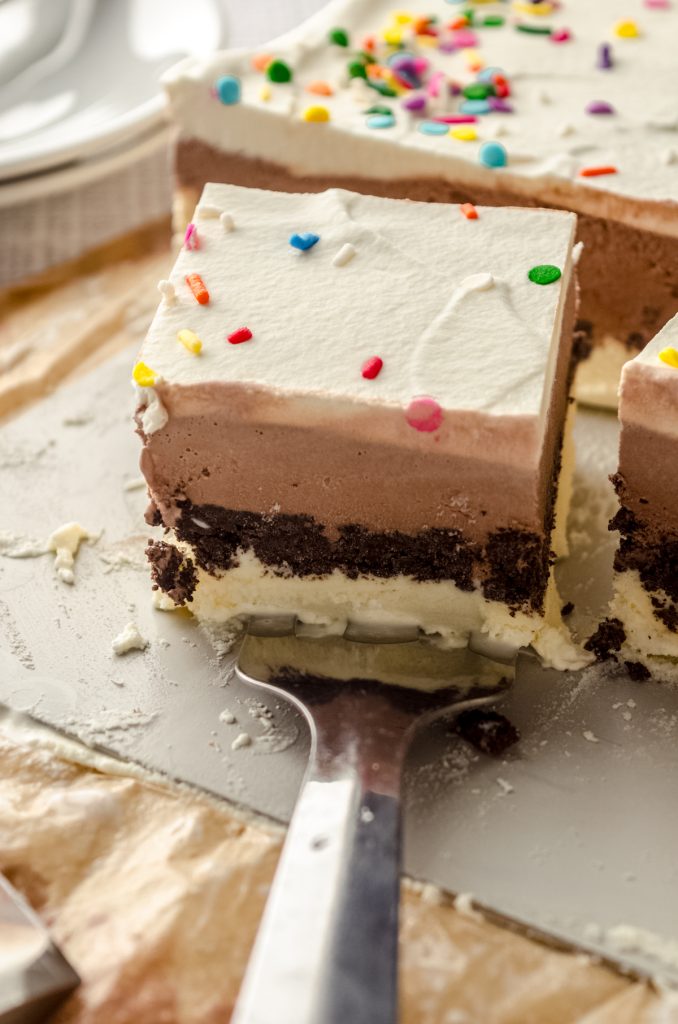
There are 4 delectable layers in this ice cream sheet cake recipe:
VANILLA ICE CREAM: use store-bought or make your own! I like a basic flavor for the base, but as mentioned, you can use any two flavors of ice cream you prefer.
CHOCOLATE ICE CREAM: again, you can use store-bought or make your own. And if you want to change up the flavors of this ice cream cake recipe, I just suggest picking a contrasting flavor to the first flavor you pick.
OREOS + MAGIC SHELL: that crunchy cookie layer is a signature of ice cream cakes. I always have homemade magic shell on hand, but store-bought is totally fine.
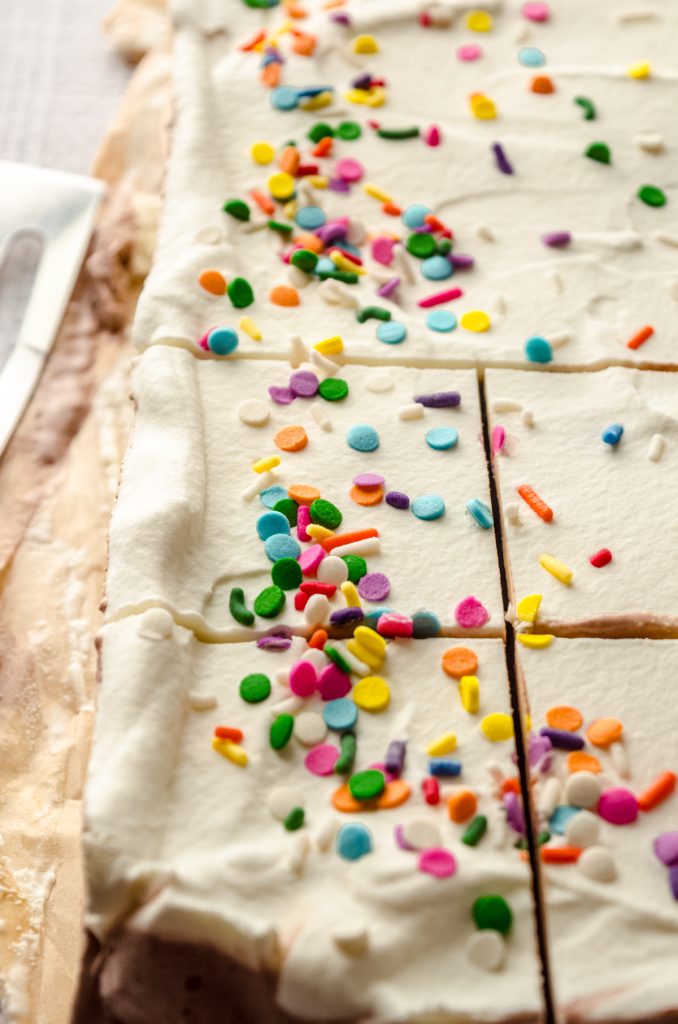
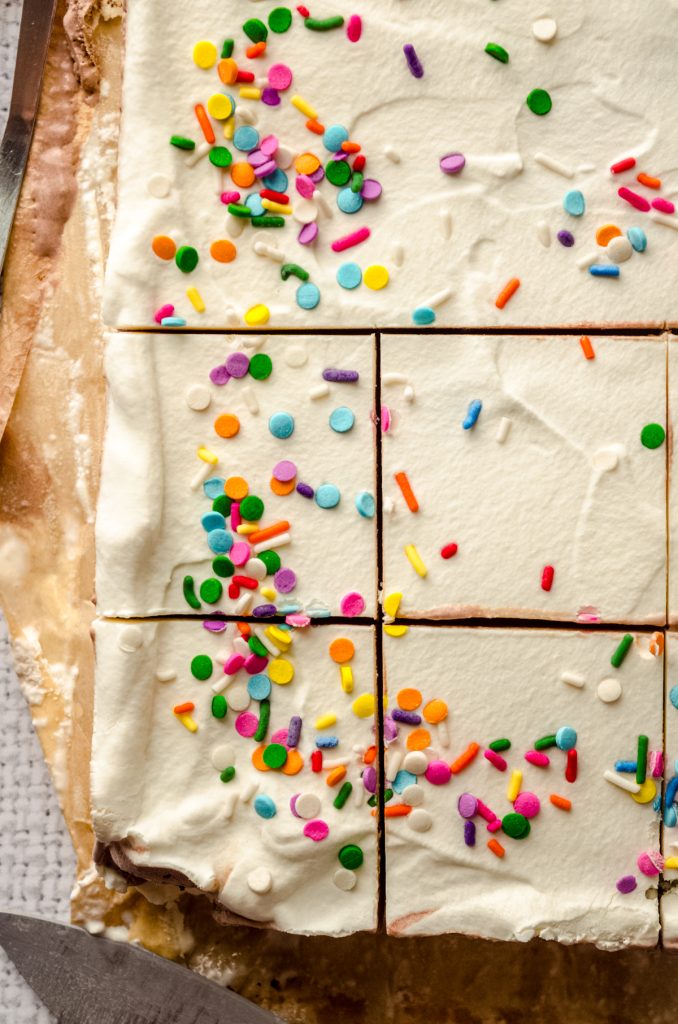
WHIPPED CREAM & SPRINKLES: we’re topping this big ice cream cake with homemade whipped cream, made with heavy cream, sugar, and vanilla extract. It comes together in a snap and you can whip it up (literally) while the top layer of the cake firms up. And of course, sprinkles. Make ’em match your occasion for more fun!
WHY ISN’T THERE A COOKIE CRUST ON THE BOTTOM?
While my traditional layered ice cream cake recipe starts with an Oreo cookie crust on the bottom, I like to stick to the traditional setup of treating the ice cream layers like cake layers when I make a sheet cake. It’s easier to cut and serve, and it makes for a smoother use of a fork or spoon when eating a slice.
DON’T SKIP THE HOMEMADE WHIPPED CREAM
While this recipe uses several store-bought ingredients, I don’t recommend using store-bought whipped cream or CoolWhip. Whipped cream is so easy to make yourself, and you only need 3 ingredients. If you really want to skip this step and use CoolWhip instead, you will need 2 cups thawed.
If you want to make a coffee or a pumpkin version of this ice cream sheet cake, consider using coffee whipped cream or pumpkin spice whipped cream to make it even more fun!

The flavor combination options here are endless! Try pairing chocolate + peanut butter cup, vanilla + strawberry, chocolate + mint chocolate chip, or vanilla + cookie dough.
HOW TO MAKE ICE CREAM SHEET CAKE
Making this ice cream cake recipe is so simple– don’t let the number of steps fool you. Make sure you’ve made room in your freezer to accommodate the 9″ x 13″ pan as you’ll be making a few trips back and forth and storing it in there to freeze up for the final step.
PREPARE THE ICE CREAM AND COOKIE LAYERS
STEP #1
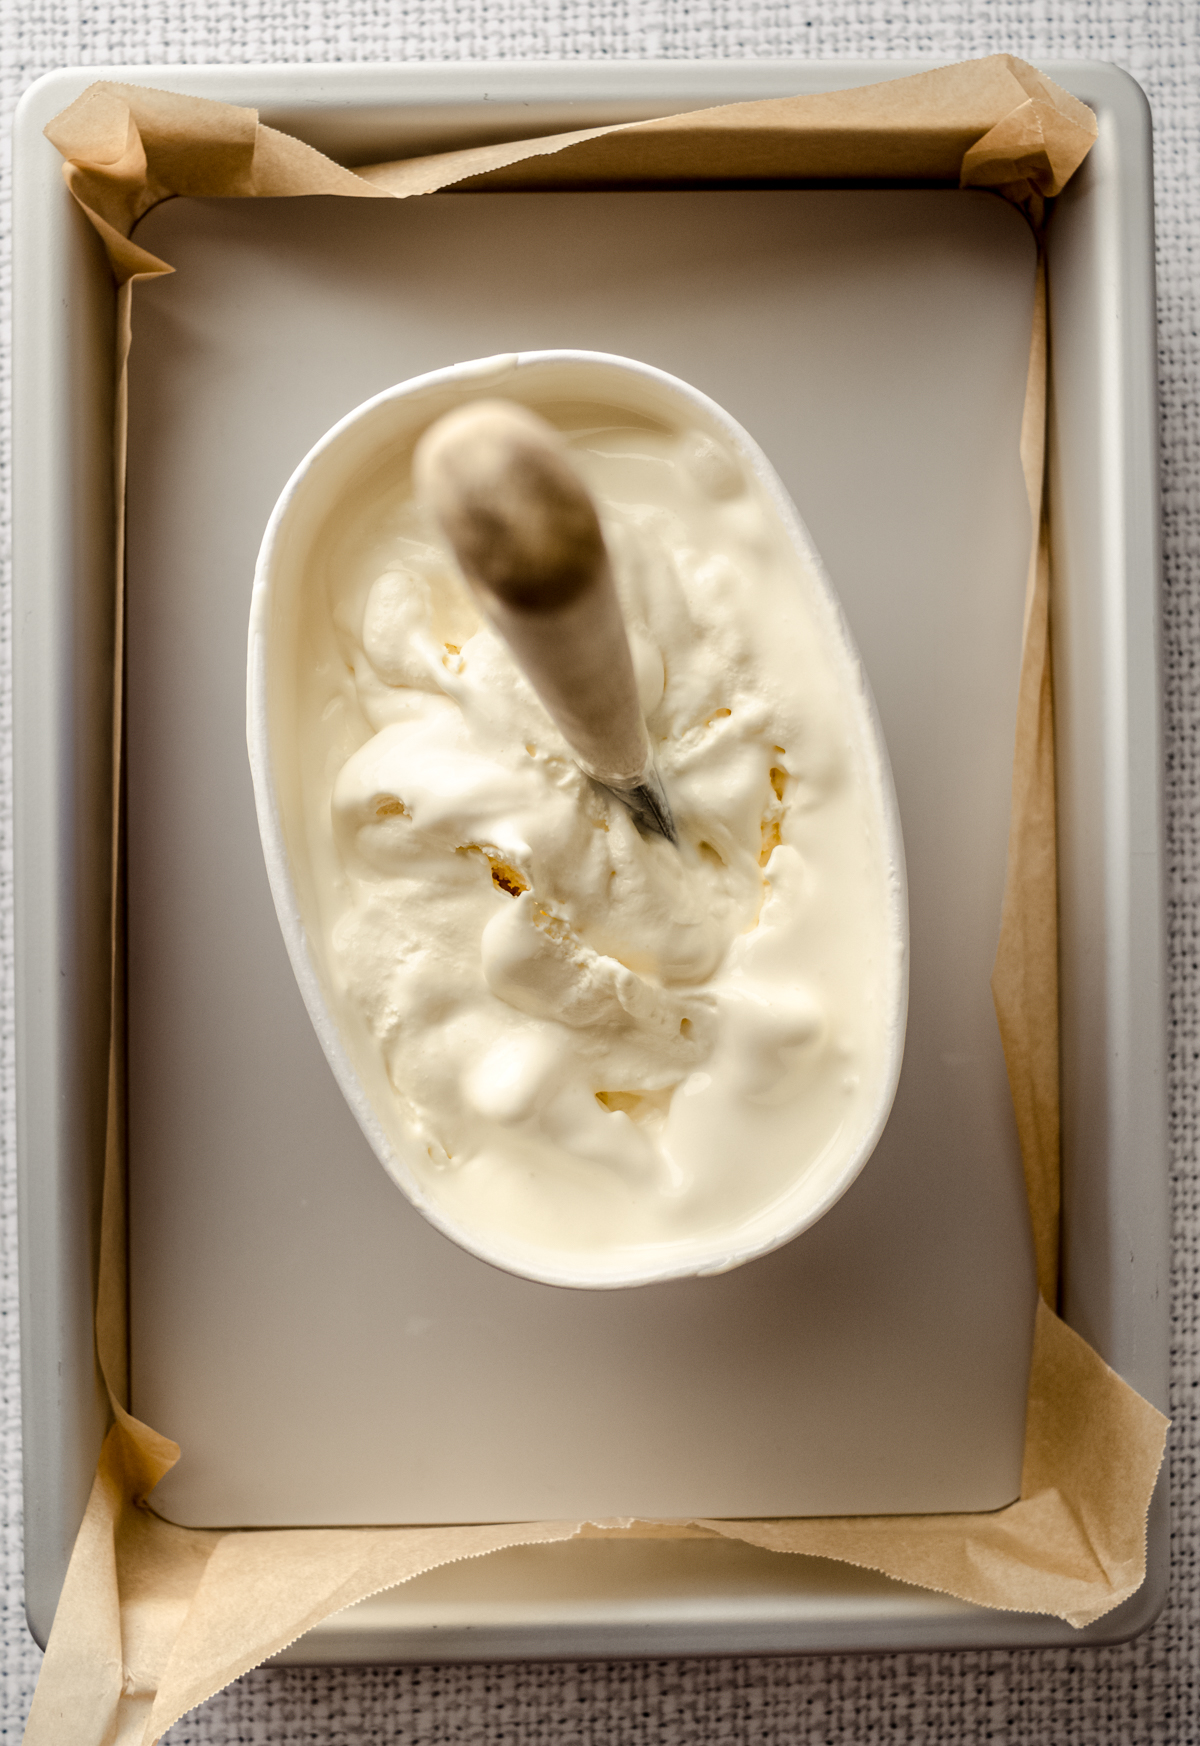
After making room in your freezer for the pan, set out the vanilla ice cream (or whichever flavor you’re starting with) at room temperature.
STEP #2
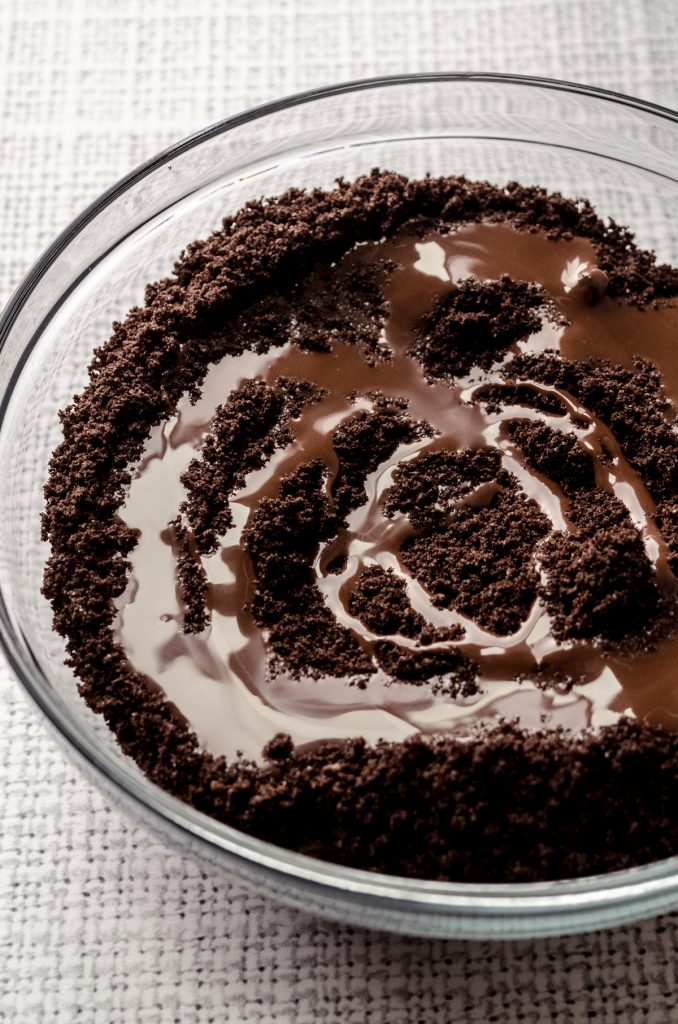
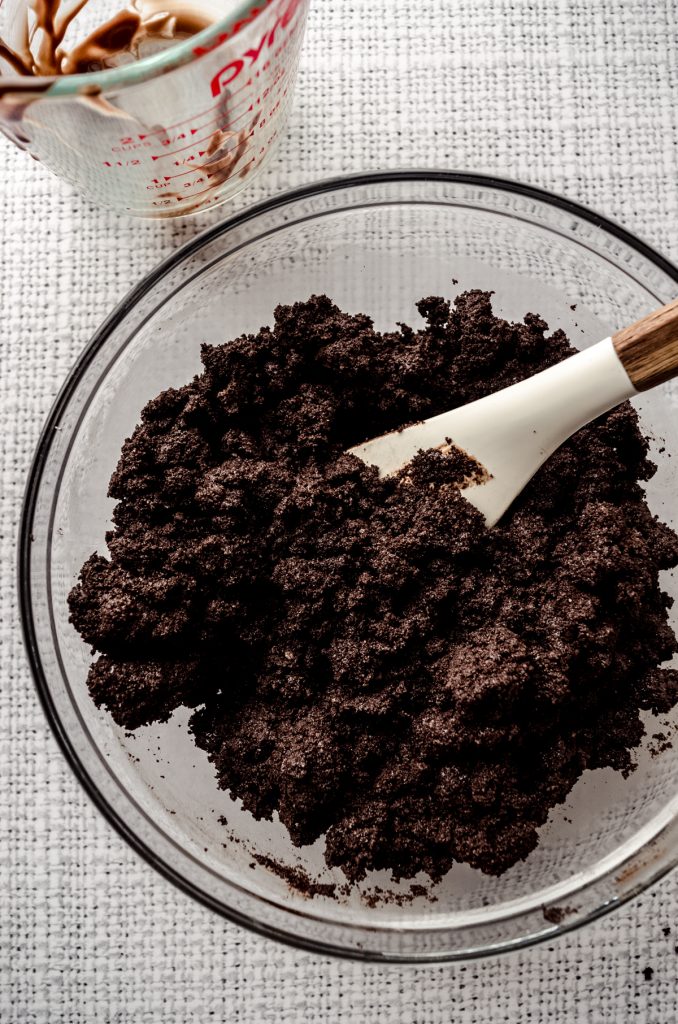
Place the Oreos in the bowl of a food processor and pulse until cookies form a fine crumb.
STEP #3
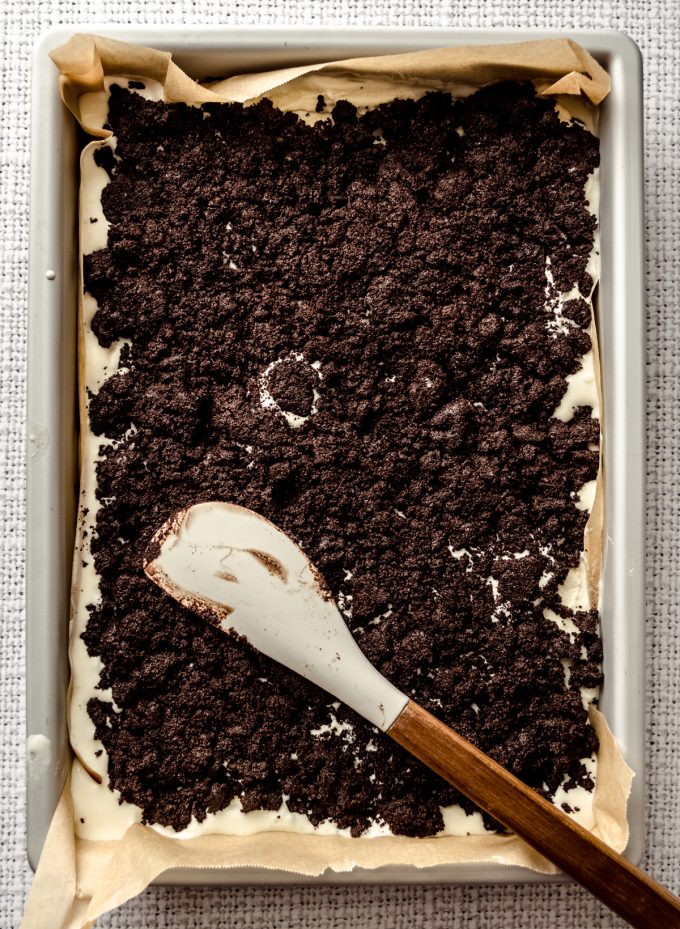
Pour the cookies into a medium size bowl, then drizzle the magic shell over the cookie crumbs. Stir until all of the cookies are evenly coated and moist, then set this mixture aside.
STEP #4
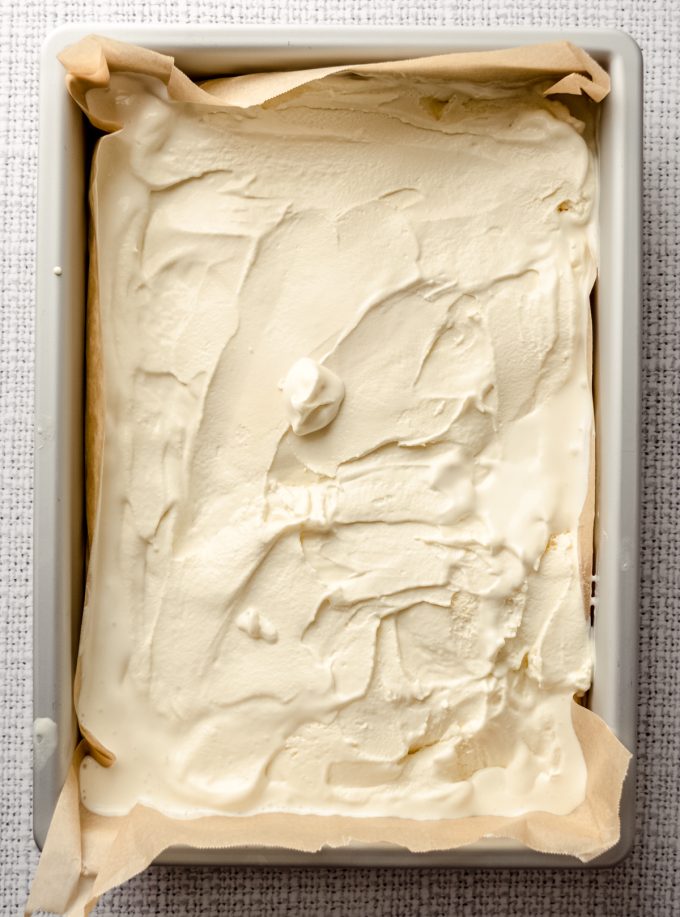
Once your vanilla ice cream has been sitting out for about 15 minutes, pour it into a large bowl and stir it with a large spatula to smooth it out. You can also stir it in the container, but it does get very messy.
STEP #5
Once the ice cream is smooth and easily stirred, pour all of it into your baking dish. Spread the ice cream evenly into the bottom of the baking dish, making sure to fill in any holes and push ice cream into the very corners of your dish.
STEP #6
Sprinkle the cookie crumbs evenly over the vanilla layer, making sure to break up large cookie clusters with your fingers. Once you have used up all of the cookie crumbs, place the baking dish in the freezer to firm up for about 20 minutes.
STEP #7
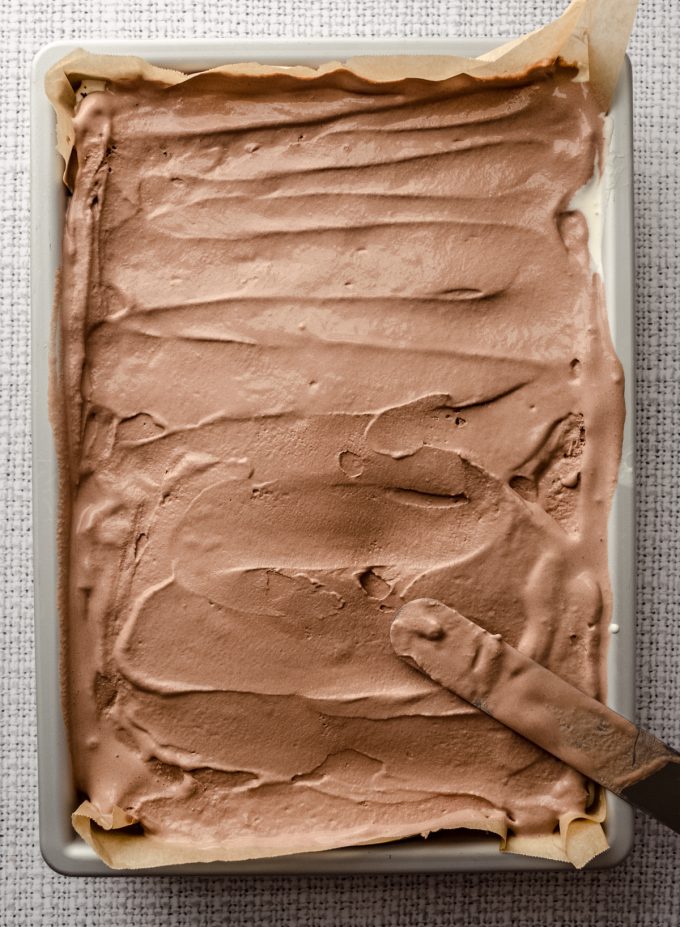
Set out your chocolate ice cream (or whatever your second flavor of ice cream is), then repeat steps 4 and 5 with the chocolate ice cream, spreading the ice cream evenly over the cookie layer. Allow to set up in the freezer for about 20 minutes. While you wait for the cake to freeze, make the homemade whipped cream topping.
MAKE THE WHIPPED CREAM TOPPING
STEP #8
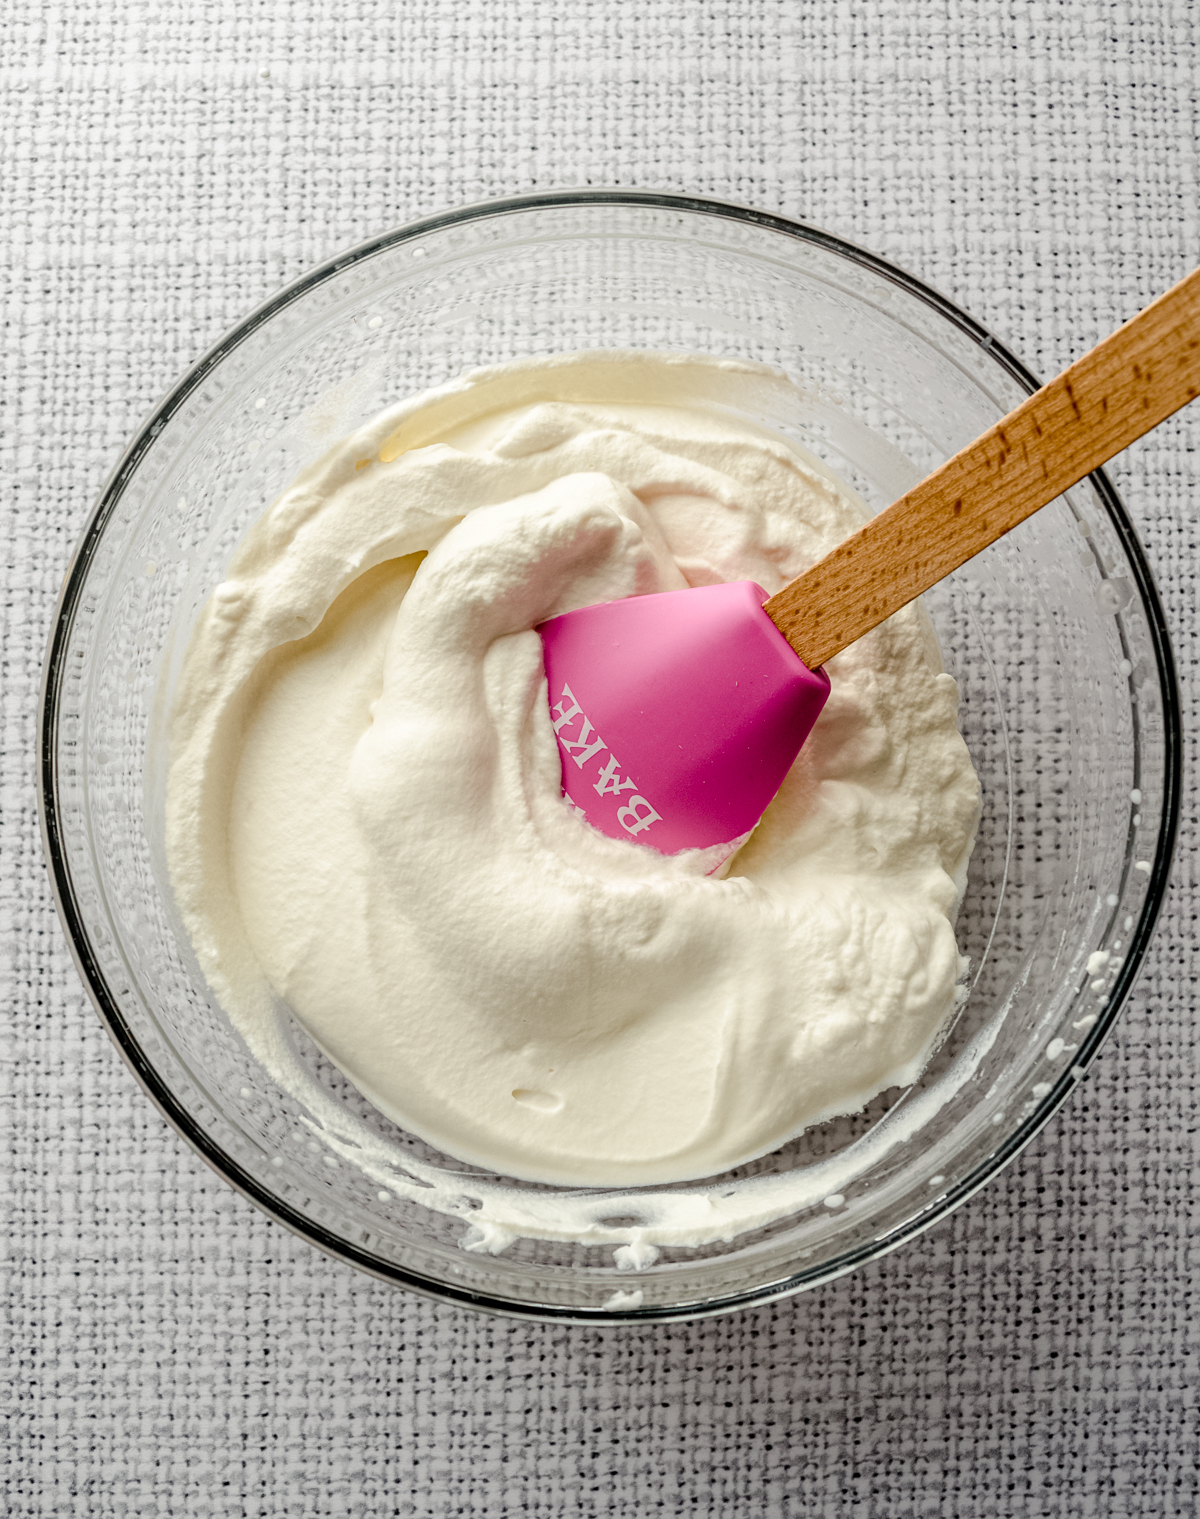
Pour the heavy whipping cream, sugar, and vanilla extract into the bowl of a stand mixer fitted with the whisk attachment.
STEP #9
Turn the mixer to medium speed. The mixture will start to get frothy and bubbly. After about 2 to 3 minutes, the mixture will start to thicken.
STEP #10
Once mixture is visibly thick (you will be able to see the trail of the whisk), increase the speed to medium-high and beat for an additional 30 seconds to 1 minute. At this point, your whipped cream should start to look “billowy” and the trails from your whisk will be quite distinct.
STEP #11
Pull the whisk out of the bowl and check that the whipped cream in the bowl has formed stiff peaks.
STEP #12
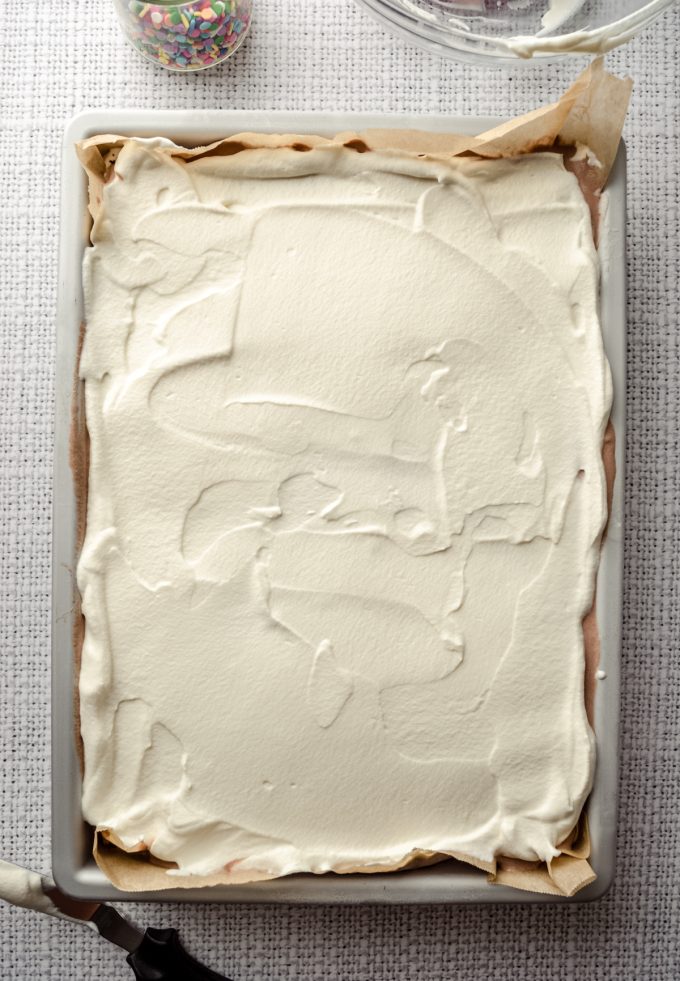
When your cake is firm, use a spatula to smooth the whipped cream topping over the chocolate ice cream layer, then decorate with sprinkles if desired. Allow to freeze completely in the freezer at least 12 hours, preferably 1 day.
HOW TO SERVE ICE CREAM SHEET CAKE
When you are ready to serve the cake, allow it to sit at room temperature for about 5 minutes and use a very sharp knife to cut. I have even run the knife under hot water, dried it off, and then cut the cake which makes for even smoother slices.

ICE CREAM SHEET CAKE SUCCESS TIPS
TIP #1
The key to getting the perfect consistency for spreading the ice cream into the baking dish is to smooth it out. You don’t want it melted, but you want it uncomfortably frozen. Like… It sat out too long and it’s getting soupy, but you could still enjoy it if you wanted to, you’d just have to eat it pretty fast. Stirring it in a bowl or in the container will distribute the super cold spots and the warmer melted spots to create a uniform texture that is easily spread.
TIP #2
Make sure you have set aside enough time for freezing the cake for about 20 minutes between each layer. This is a simple recipe, but you will need about 1 hour to complete it before you can set it and forget it.
TIP #3
If you want to use homemade magic shell, make sure it’s ready ahead of time.
TIP #4
The cake is finished and ready to serve once it’s been frozen for at least 12 hours, so you’ll need a bit of time to plan ahead if you want to serve this ice cream sheet cake at a specific time or event, but the great part is, you can make it well ahead of time– up to a month!
TIP #5
For the cleanest cuts, run a sharp knife under hot water before slicing into pieces for serving.

Ice Cream Sheet Cake Recipe
Ingredients
ICE CREAM CAKE
- 1 and ½ quarts (1410g) vanilla ice cream2
- 1 standard package Oreos1
- ½ cup (120mL) homemade magic shell store bought is fine
- 1 and ½ (1410g) chocolate ice cream2
WHIPPED CREAM TOPPING
- 1 cup (240mL) heavy cream or heavy whipping cream
- 1 Tablespoon (8g or 13g) sugar3
- 1 teaspoon vanilla extract
Instructions
ICE CREAM CAKE
- Make room in your freezer for a 9" x 13" baking dish (be sure to see notes4 for specifics). Set out the vanilla ice cream at room temperature.1 and ½ quarts (1410g) vanilla ice cream2
- Place the Oreos in the bowl of a food processor and pulse until cookies form a fine crumb.1 standard package Oreos1
- Pour the cookies into a medium size bowl, then drizzle the magic shell over the cookie crumbs. Stir until all of the cookies are evenly coated and moist, then set this mixture aside.
- Once your vanilla ice cream has been sitting out for about 15 minutes, pour it into a large bowl and stir it with a large spatula to smooth it out. You can also stir it in the container, but it does get very messy.
- Once the ice cream is smooth and easily stirred, pour all of it into your baking dish. Spread the ice cream evenly into the bottom of the baking dish, making sure to fill in any holes and push ice cream into the very corners of your dish.
- Sprinkle the cookie crumbs evenly over the vanilla layer, making sure to break up large cookie clusters with your fingers. Once you have used up all of the cookie crumbs, place the baking dish in the freezer to firm up for about 20 minutes.
- Set out your chocolate ice cream, then repeat steps 4 and 5 with the chocolate ice cream, spreading the ice cream evenly over the cookie layer. Allow to set up in the freezer for about 20 minutes. While you wait for the cake to freeze, make the homemade whipped cream topping.1 and ½ (1410g) chocolate ice cream2
WHIPPED CREAM TOPPING
- Pour the heavy whipping cream, sugar, and vanilla extract into the bowl of a stand mixer fitted with the whisk attachment.1 cup (240mL) heavy cream or heavy whipping cream, 1 Tablespoon (8g or 13g) sugar3, 1 teaspoon vanilla extract
- Turn the mixer to medium speed. The mixture will start to get frothy and bubbly. After about 2 to 3 minutes, the mixture will start to thicken.
- Once mixture is visibly thick (you will be able to see the trail of the whisk), increase the speed to medium-high and beat for an additional 30 seconds to 1 minute. At this point, your whipped cream should start to look "billowy" and the trails from your whisk will be quite distinct.
- Pull the whisk out of the bowl and check that the whipped cream in the bowl has formed stiff peaks.
- When your cake is firm, use a spatula to smooth the whipped cream topping over the chocolate ice cream layer. Decorate with sprinkles if desired. Allow to freeze completely in the freezer at least 12 hours, preferably 1 day. When you are ready to serve the cake, allow to sit at room temperature for about 5 minutes and use a very sharp knife to cut. Cover leftovers and store in the freezer up to 1 month.
Notes
- Oreos: this is one regular pack of regular stuffed Oreos. If you want to use something else like DoubleStuf or MegaStuf, use about 30 Oreos. You can also use any flavor of Oreos, which are DoubleStuf, so you’ll want to use about 30 of them, too.
- Ice cream flavors: you can use any flavors of ice cream you wish in this recipe.
- Sugar: you can use granulated or powdered sugar here. I have used both and find a slightly smoother whipped cream with powdered. For 1 Tablespoon of sugar, powdered sugar will be 8g and granulated sugar will be 13g.
- 9″ x 13″ dish: I prefer using a Fat Daddio’s platform pan for this sheet cake, but it’s crucial you line it with foil or parchment under the platform insert to prevent leaking. You’ll want to make sure the lining goes all the way up the sides of the pan with overhang. If you want to use a pan without a platform, it will just be harder to get the first row of slices out.
- Whipped cream topping: you can use CoolWhip if you want to, though I prefer the taste of homemade whipped cream. If using CoolWhip, you’ll need 2 cups thawed.
Nutrition Disclosure
All nutritional values are approximate and provided to the reader as a courtesy. Changing ingredients and/or quantities will alter the estimated nutritional calculations.
No doubt this is a MILLION times better than the DQ or other store-bought ice cream cake varieties. Fabulous and festive!
Absolutely!!
No shame whatsoever in enjoying a treat as delicious as this! I loved ice cream cakes as a kid – who am I fooling – I LOVE ice cream cakes NOW! Even though it’s gloomy and rainy outside today I could still go for a big ole slice of this with extra sprinkles. Just know that even in an Aussie winter this one is going to be on our dessert plates very soon!
(also – ONE ALREADY? Where did that time go!!!!)
I mean, if you don’t love ice cream cake, I’m not sure you have a soul– right?! 🙂 (AND OMG I KNOW. Whaaaaaat?!)
This looks so good. I have made a tiered Ice cream cake before, The one on the cover of Food Network magazine last year. It definitely takes time & patience. Just like you said its a springform pan and parchment paper. I couldn’t get the outside to look the way I wanted too,(like the magazine cover) but when you cut into it the layers were SOO pretty. I have made homemade crunchies before but I don’t think I ever used enough, Next time it will be a whole box of oreos. With homemade magic shell of course.
I’m definitely going to have to do the tiered ice cream cake soon!!
Sounds yummy and just what
my coworker would like for her birthday but as you mentioned it should travel short distance. I know this is totally crazy, but is there anyway to transport 50 min if in cooler on and surrounded by frozen icee blocks and put back in freezer for several hours before serving or would it become a melted mess ? Do you serve this from the pan? I don’t see mention of how to unmold it or transfer to serving plate. Thank you!
Hmm, that MIGHT work, but definitely risky! And yes, you do serve it directly from the pan.
I will trust your advice and save this recipe for something fun at our own house. Chances are it will just mean more for us to devour! Thanks so much for your fast reply. I just discovered your site today and am having fun reading through your recipes and commentaries. I definitely enjoy the science side of baking too. Well done!
Glad to have you, Janet! Thank you!
I actually made this for my sons birthday in August. Today is my daughters birthday and she requested the same cake brother had, on the way out the door to school. So now I don’t have 12 hours. Maybe next week just because.
Haha, but of course! Happy birthday to your daughter! I hope she gets her ice cream cake eventually 🙂
Made this but the whip cream was rock hard even when icecream got soft to eat, any idea why? It was a thicker layer and organic cream so no thickening agents.
Hi, Mónica– it definitely firms up but it shouldn’t be rock hard! It’s possible you just made your layer too thick?
What brands of icecreams do you suggest?
Any works here, Sierra! Enjoy!
How should I do this if I need to put it on a cake board for a party
Should I use Saran Wrap to line the pan the when ready to frost take it out?
I’d use parchment or wax paper!
I would give this recipe 10 stars if I could. It was a huge hit at my Super Bowl party. People couldn’t stop raving about it. I used vanilla ice cream and caramel toffee ice cream and topped the whipped cream with toffee bits. The magic topping mixed with the Oreo crumbs was amazing and added a wonderful crunch. Loved it!
Thank you so much, Sandy! I appreciate you taking the time to leave such a lovely review 🙂
Could one of the ice cream layers be replace by a cake layer?
Hey, Theresa– I’m sure it could, but I’ve never tried it! Let me know if you do 🙂
My vanilla ice cream layer was runny but the rest were normal. Is there anything I could do to make it like the chocolate ice cream which wasn’t runny?
Hey, Mike– I’m not sure what to tell you! Could have just been that the layer wasn’t fully set.
Hi, I purchased a 11×13 inch plus 4 inch deep pan from fat daddios. I am making an ice cream cake for my grandson. I’ve made ice cream cakes before, but they were not deep enough, however this probably is too deep. Lol. There are about 30 people coming. Would you be able to help with the measurements and right amounts for this size pan. Sounds like a great ice cream cake. I am thinking of having the bottom layer chocolate cake.
Thank you
Janice Gutierrez
Hi, Janice! The 4″ pan will be perfect! It should work perfectly! I’d suggest using this recipe for chocolate cake, bake it in that pan, then layer the ice cream cake components on top. Enjoy!
Thank you for replying so quickly, I appreciate it.
Do you have a gluten free version of this recipe? It sounds delicious!
Hi, Molly– you can use GF Oreos and this will be completely GF. Enjoy!
We used chocolate chip cookie dough as our ice cream & it was yummy. Just needed a few extra minutes to soften. We’ve used Lynn’s recipes for 6 out of 10 birthdays for our daughter. It’s become a tradition!
I love this so much– happy birthday, Rosalie! 🙂
I made the dessert in a 13×9 pan and lined the pan first with plastic wrap .
The dessert will hopefully be hard enough to lift out and put on a board, but how do I get the plastic wrap off the bottom?
Hi, Carol– all you’ll need to do is lift up one end of the dessert and pull off the plastic, then lift up the other side and repeat. It should pull off completely at the middle. Hope that helps!
It was delicious but the Oreo/magic shell layer was extremely hard and everyone had trouble cutting through it, so next time I will either omit the magic shell or use hot fudge instead. Otherwise excellent recipe!
Thanks for your review, Annie!