
BEST Red Velvet Bundt Cake Recipe
As an Amazon Associate, I earn from qualifying purchases. Read the full disclosure here.
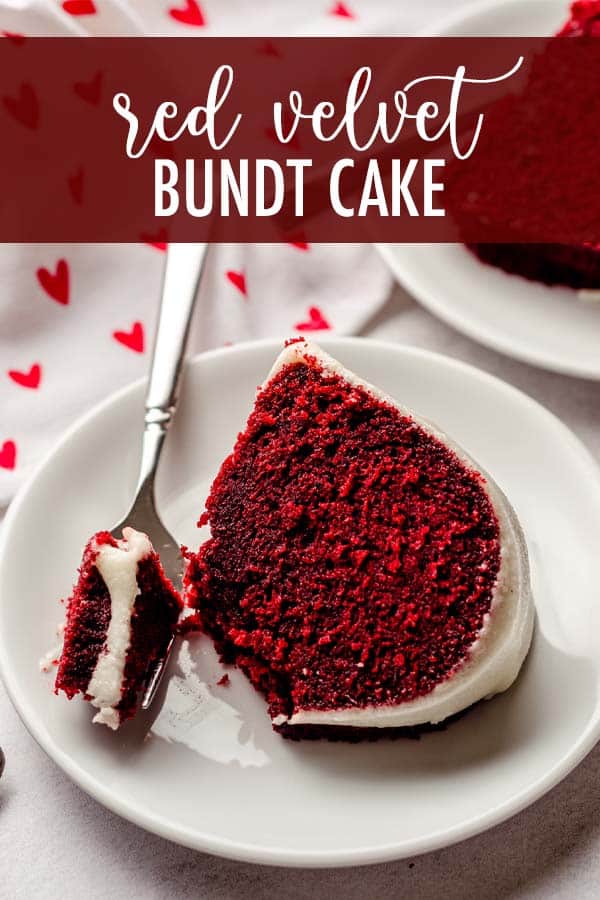
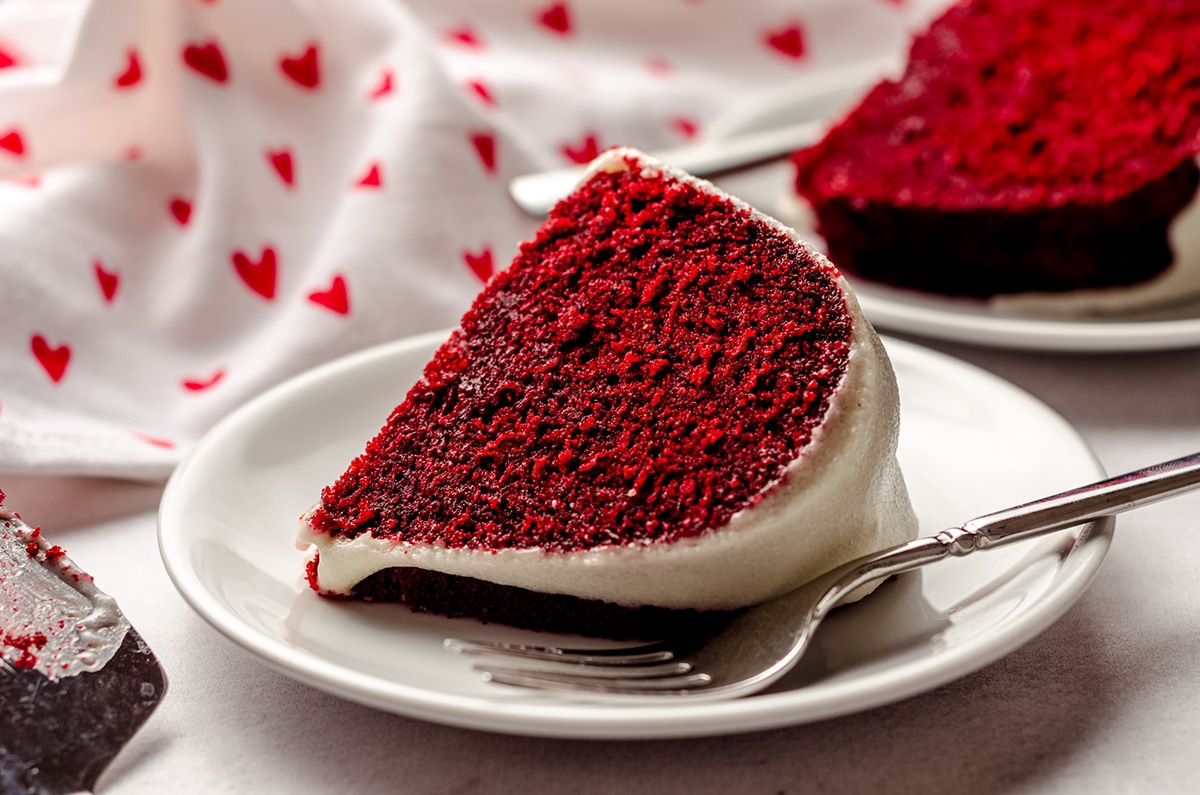
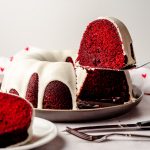
Learn how to make traditional red velvet cake from scratch and discover all my secrets to keeping the cake moist and fluffy! Bake in a bundt pan for easy presentation and top it with a simple cream cheese icing.
As Valentine’s Day quickly approaches, so does my desire for all things red, pink, and chocolate-y. And what a better excuse to get into the kitchen and whip up a beautiful red velvet bundt cake with a drippy, decadent cream cheese icing!
I don’t know if you’ve noticed this or not, but red velvet is my JAM. That’s right, I’m totally obsessed with this beautiful, tangy, airy, and delicious cake and I just wanna put it in (on? over?) everything!
In years past I’ve made red velvet Rice Krispies treats, red velvet biscotti, red velvet blossom cookies, red velvet lava cakes, and countless other red velvet inspired recipes.
There’s just something about the bright red hue and subtle chocolate flavor that lends itself so well to the season of love, and I can’t get enough!
While some of those red velvet-inspired recipes are made with red velvet cake mix, here at Fresh April Flours, we are making one beautiful cake completely from scratch. And I have the complete low down on how to get that velvety texture juuuuust perfect.
WHAT IS RED VELVET CAKE?
Red velvet cake is a unique cake with a complicated history. It’s gone through many changes over the years, but there are a few constants: it must have a tight, moist crumb and it absolutely must be red.
The first red velvet cake recipe is believed to have been created sometime around the Victorian era, and was the result of a chemical reaction between non Dutch processed cocoa powder and vinegar. Vinegar was often used to tenderize cakes, kind of like how we use buttermilk (also an acidic liquid) to create moist and tender cakes today!
The vinegar had a chemical reaction with the cocoa powder which created a beautiful red hue, and so red velvet cake was born.
But as time went on, new ingredients and processes were introduced to the market, so bakers had to find a way to keep the brilliant red hue, as well as the fine crumb and slight tanginess.
A NEW RED VELVET BUNDT CAKE
New Dutch processed cocoa powder did not react with the vinegar in the same way that the previous standard cocoa powder did, so bakers found a way around this new conundrum: adding dye.
In addition to adding red dye, as the cake made its way across the United States, it took on a new ingredient: buttermilk! This made for an even more tangy, moist, and airy texture. It just kept getting better!
Now, with the introduction of gel food dyes to the market, we can get an even more brilliant and delicious red velvet cake, without watering the batter down with the addition of too much food dye.
Red velvet cake recipes have earned their place at the top of the cake hierarchy, and are now one of the most popular cakes worldwide! They have even inspired variations of every color.
One of my favorite variations is my black velvet cake, but your creativity doesn’t have to stop there! You can experiment with all sorts of colors and combinations of colors, all while maintaining the original texture and taste of red velvet.
But if you want to keep it classic, you can try some of my (many) red velvet recipes! They include my red velvet cupcakes, red velvet brownies, red velvet donuts, red velvet pancakes, and even red velvet puppy chow.
It’s safe to say I’ve got you covered in the red velvet department, don’t you agree?
Bundt Cake Red Velvet Ingredients
When it comes to the ingredients for this elegant and easy red velvet bundt cake, you might be surprised to see a lot of basic pantry staples in the list. Although it certainly has a brilliant red color, and a uniquely tight and moist crumb, all of that is achieved through technique and a touch of gel food coloring.
No need to go out and buy any obscure ingredients, you probably already have everything you need right in your pantry and fridge to get this moist red velvet bundt cake happening in your kitchen.
Also, fun fact: this homemade red velvet bundt cake recipe is adapted straight from my red velvet cupcakes recipe. It’s just doubled with a little extra baking soda to help the cake climb the sides of the bundt pan.
FOR THE CAKE
For the homemade red velvet cake itself, you’ll need staple ingredients like:
• eggs
• flour
• cornstarch
• cocoa powder
• butter
• sugar
• oil
• buttermilk: If you don’t have it on hand, no sweat! Check out my easy homemade buttermilk recipe to make a simple substitute with just 2 ingredients.
You’ll also need some red gel coloring to get that signature red color, but you can use standard liquid coloring if you don’t have gel coloring available to you.
WHY NO CAKE FLOUR?
You might be wondering… With all this talk about the perfect texture of the cake, why aren’t we using cake flour, which lends itself to the softest, most perfect cake crumb while still maintaining a moist texture?
Well, in a pinch, you can always use a carefully crafted mixture of all-purpose flour + cornstarch to mimic the protein content and fluffiness of cake flour, so instead of actually using cake flour, I always use this “hack” to keep my recipes approachable for the home baker.
You’re welcome.
FOR THE ICING
The cream cheese icing used on this red velvet bundt cake is just a simplified, thinner version of my traditional cream cheese frosting and acts a lot like a cream cheese glaze, since we’re thinning it much more than a traditional frosting.
All you need for the simplified version is:
• cream cheese
• powdered sugar
• vanilla extract
• milk or cream
Just promise me one thing: you will make sure your cream cheese is softened to room temperature.
HOW TO MAKE RED VELVET BUNDT CAKE
Even though you might be intimidated if you’ve never baked a red velvet cake before, I assure you it is super simple! If you can make a vanilla or chocolate cake from scratch, you can totally make this red velvet bundt cake with ease.
I’ll share my best tips and tricks to make sure you have baking success. Follow along closely, and (I promise) you’ll do just fine.
STEP #1: START WITH BEATING EGG WHITES
To get the absolutely fluffiest cake possible, you’ll start with beating 4 egg whites until they form soft peaks. This should take about 2 minutes, and it is imperative to ensure that you get a super airy, light, and springy texture.
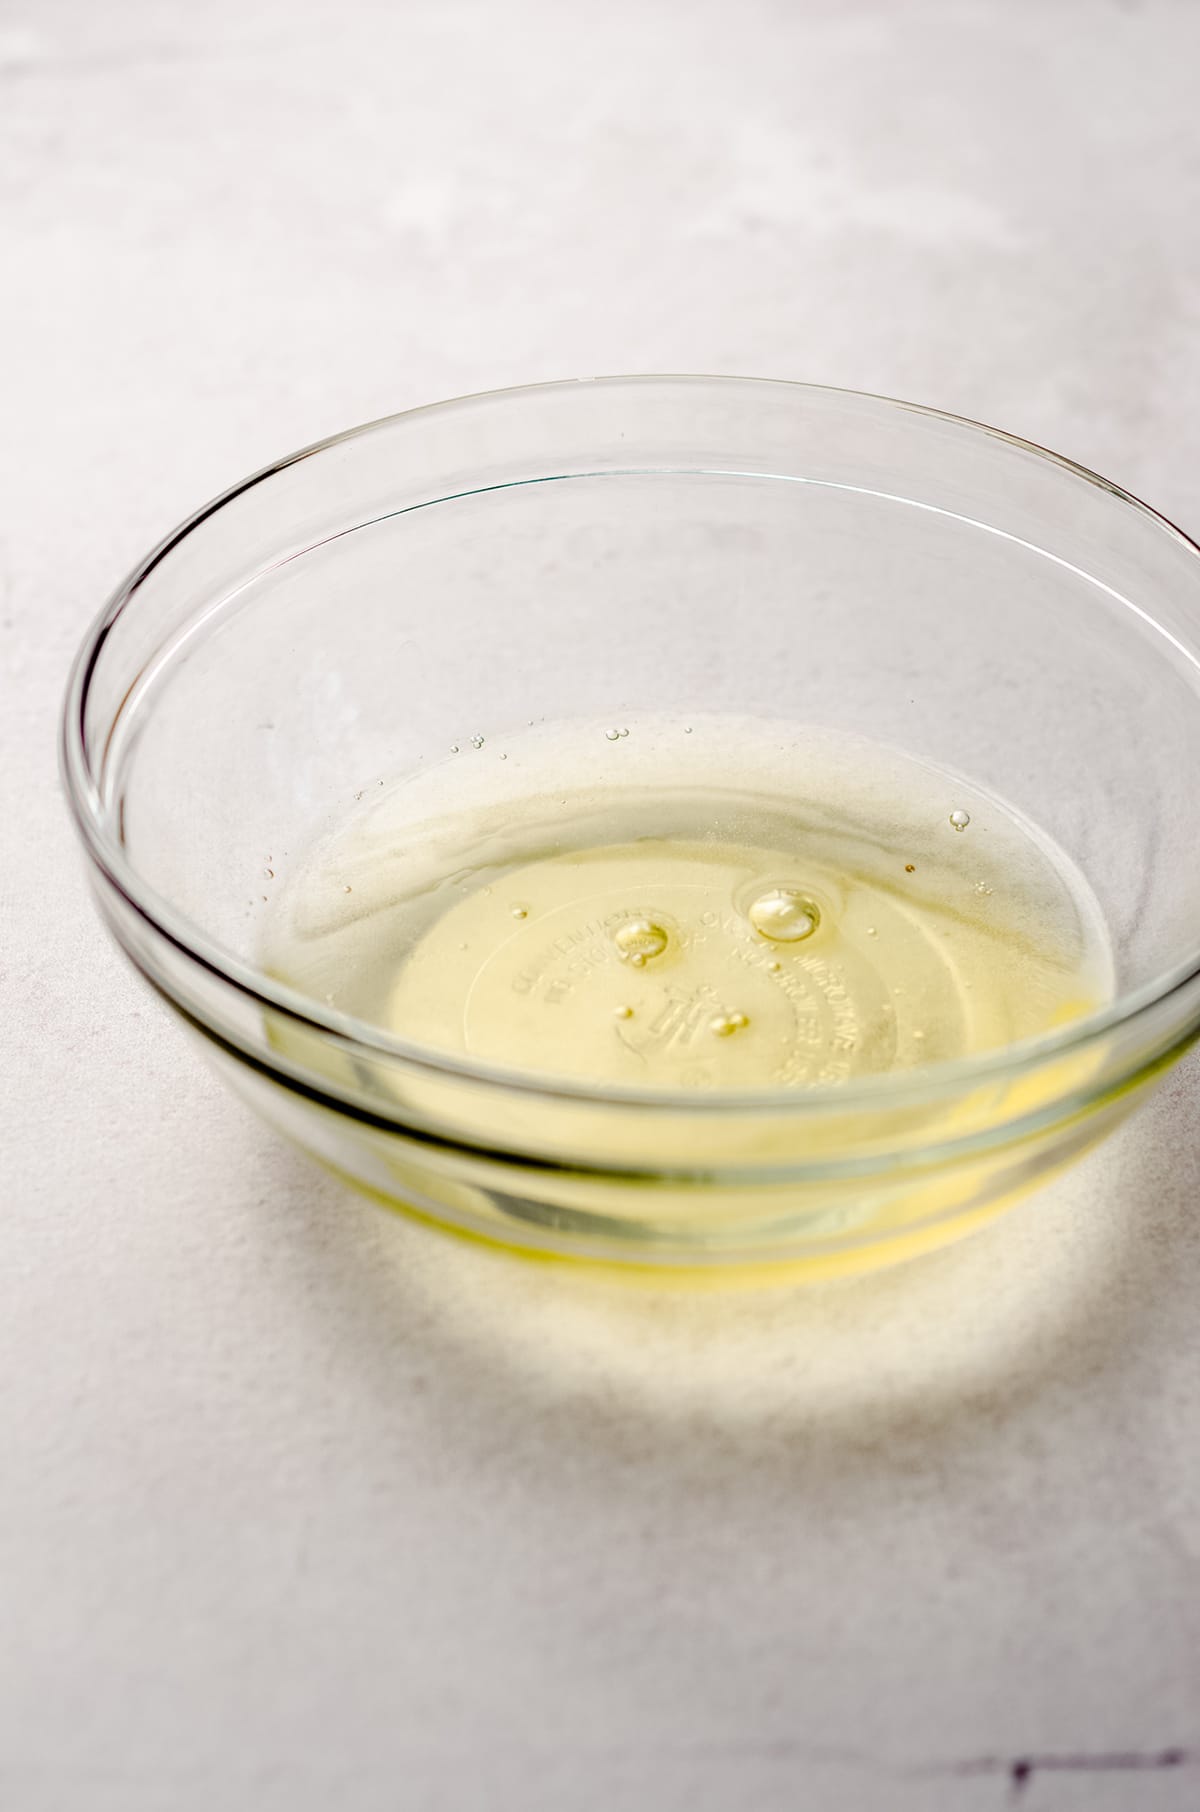
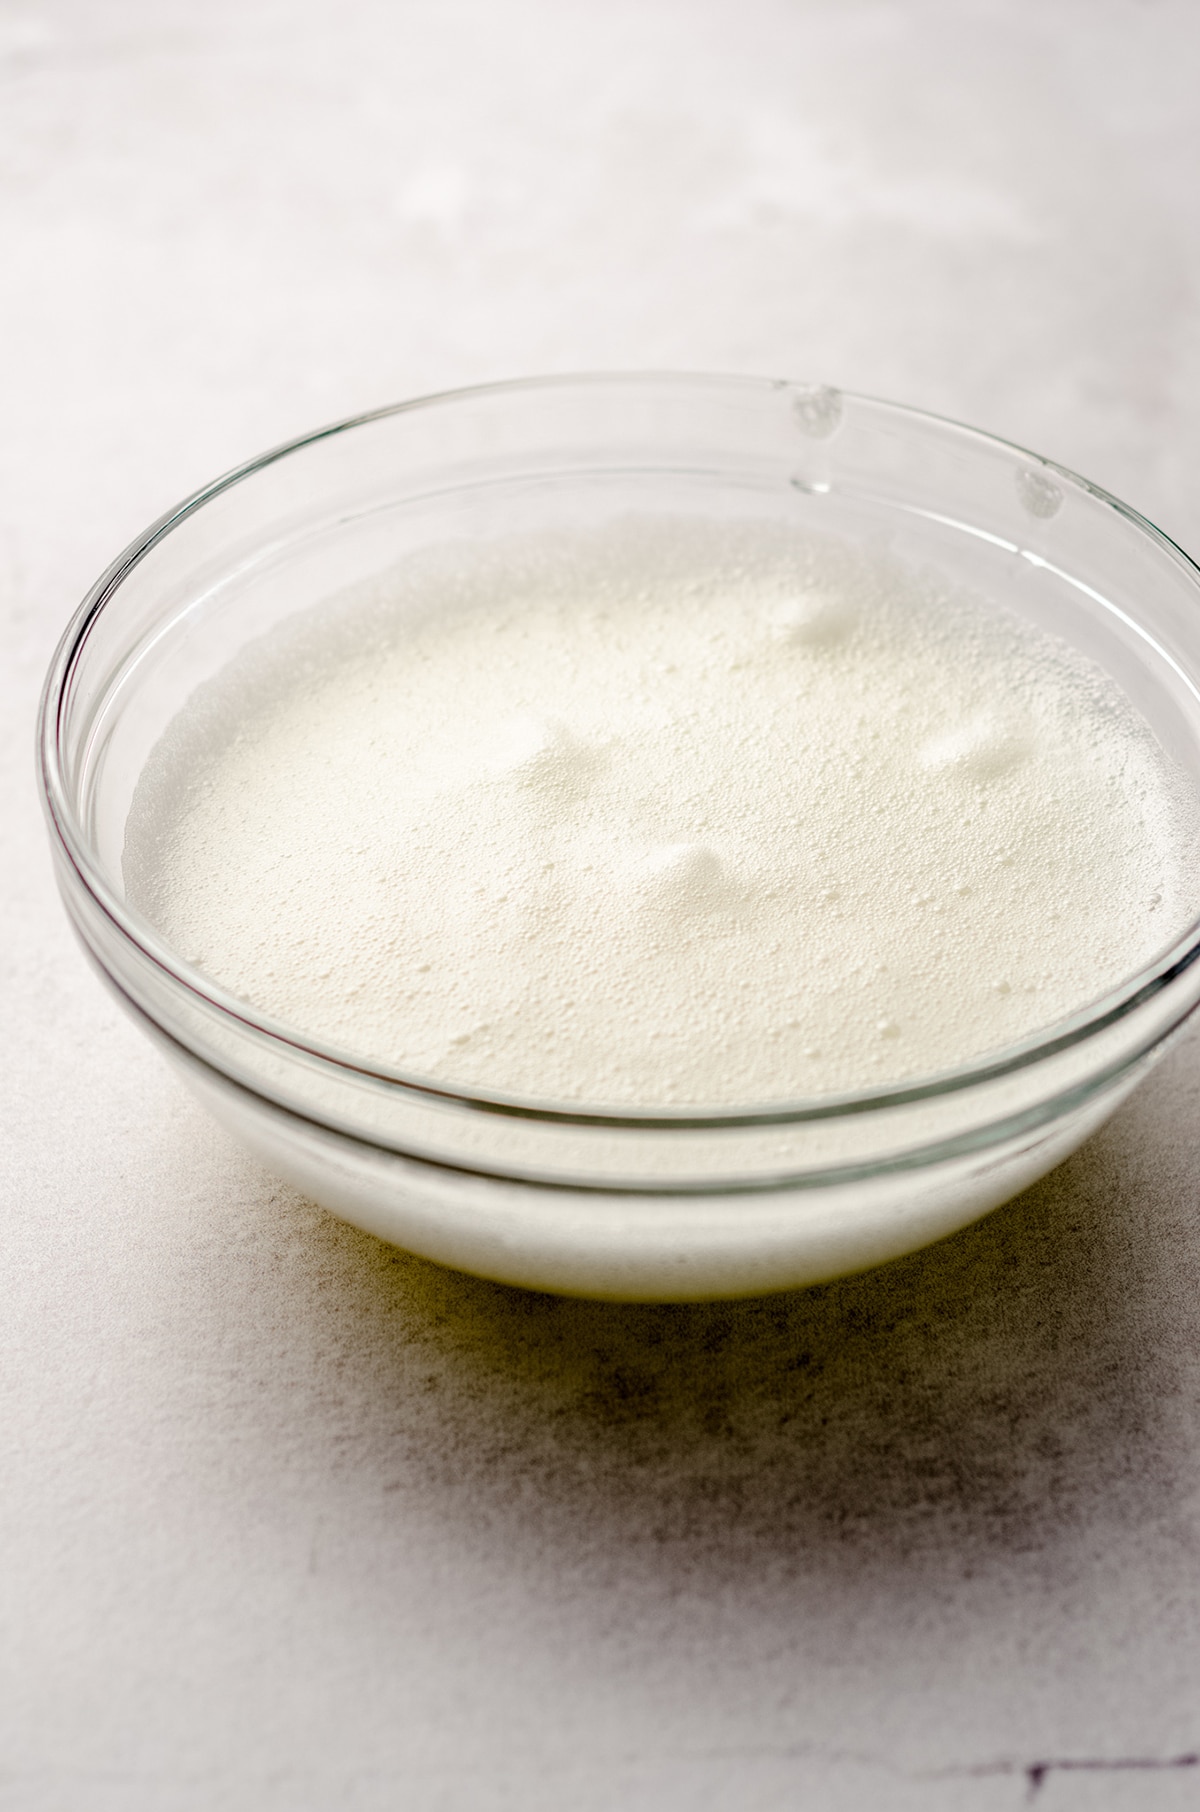
Once your egg whites are perfectly whipped and fluffy, set them aside and get started on the next element: the cake batter.
If you used your mixer to whip the egg whites, go ahead and transfer the egg whites to another bowl and simply wipe your mixing bowl clean.
STEP #2: MAKE THE BATTER
Start off by sifting together all of your dry ingredients (flour, corn starch, cocoa powder, and salt). Sifting these ingredients together rather than stirring is yet another way we achieve the best results for that irresistible tight crumb that is signature to red velvet cake.
Set the bowl of sifted ingredients aside and fit your mixer with the paddle attachment. Cream the butter and sugar until super light and fluffy. This normally takes me about 2-3 minutes, and is really worth taking the time to make sure the ingredients are thoroughly combined.
Then, you’ll add in the vegetable oil and mix just until incorporated. Stop the mixer, add in your egg yolks, vanilla extract, vinegar, and red food coloring. Mix again until everything comes together nice and smooth.
Then, grab those sifted dry ingredients you set aside earlier. Add it to the batter in 3 additions, alternating with half of the buttermilk.
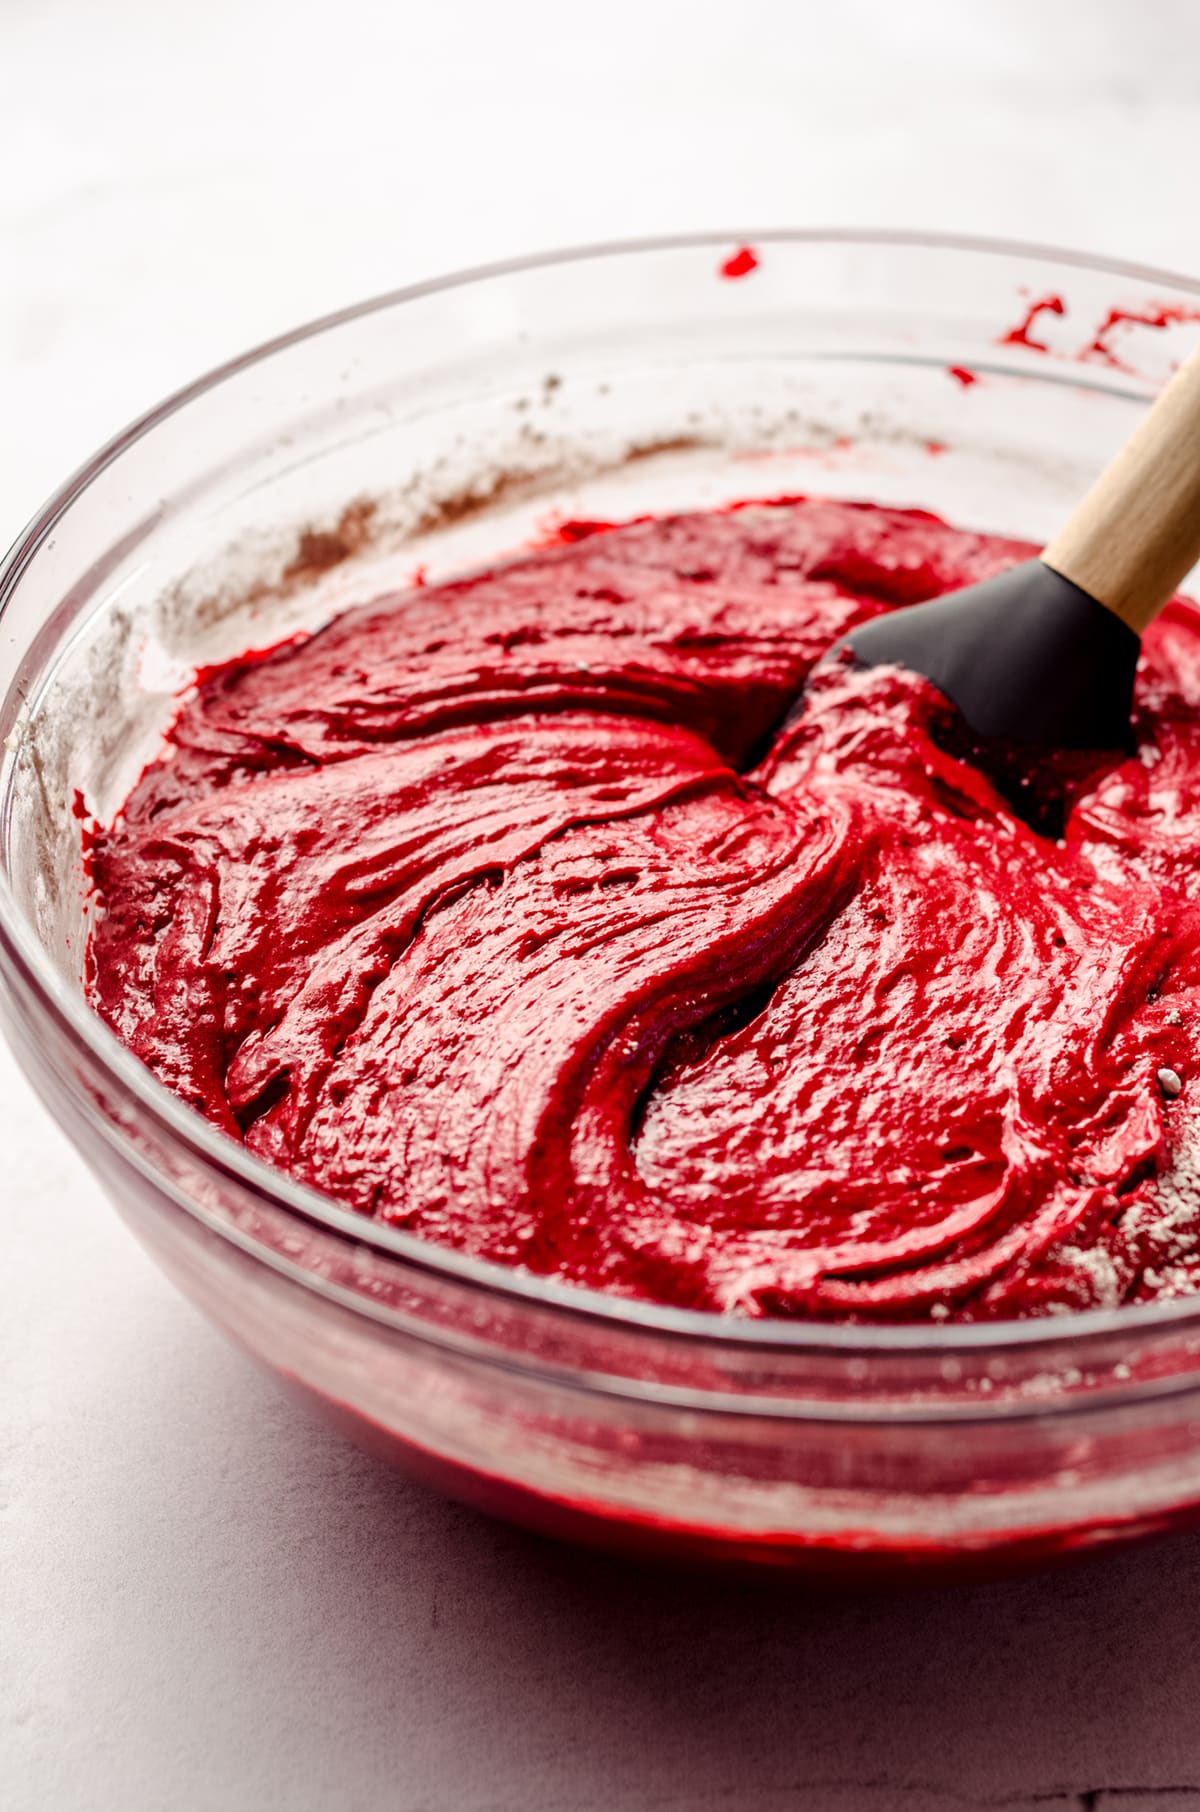
Stop once everything is just combined. Overmixing at this point begins the process of gluten development. This is good for bread, but not for cakes. We’ll get the rest of the batter together when we fold in the egg whites.
STEP #3: FOLD IN THE EGG WHITES
Now that your batter is together, it’s time to add those egg whites back into the mix.
In order to keep the cake light and airy, we need to fold the egg whites in gently. This can only be done by hand, so turn your mixer off and grab a silicone spatula instead.
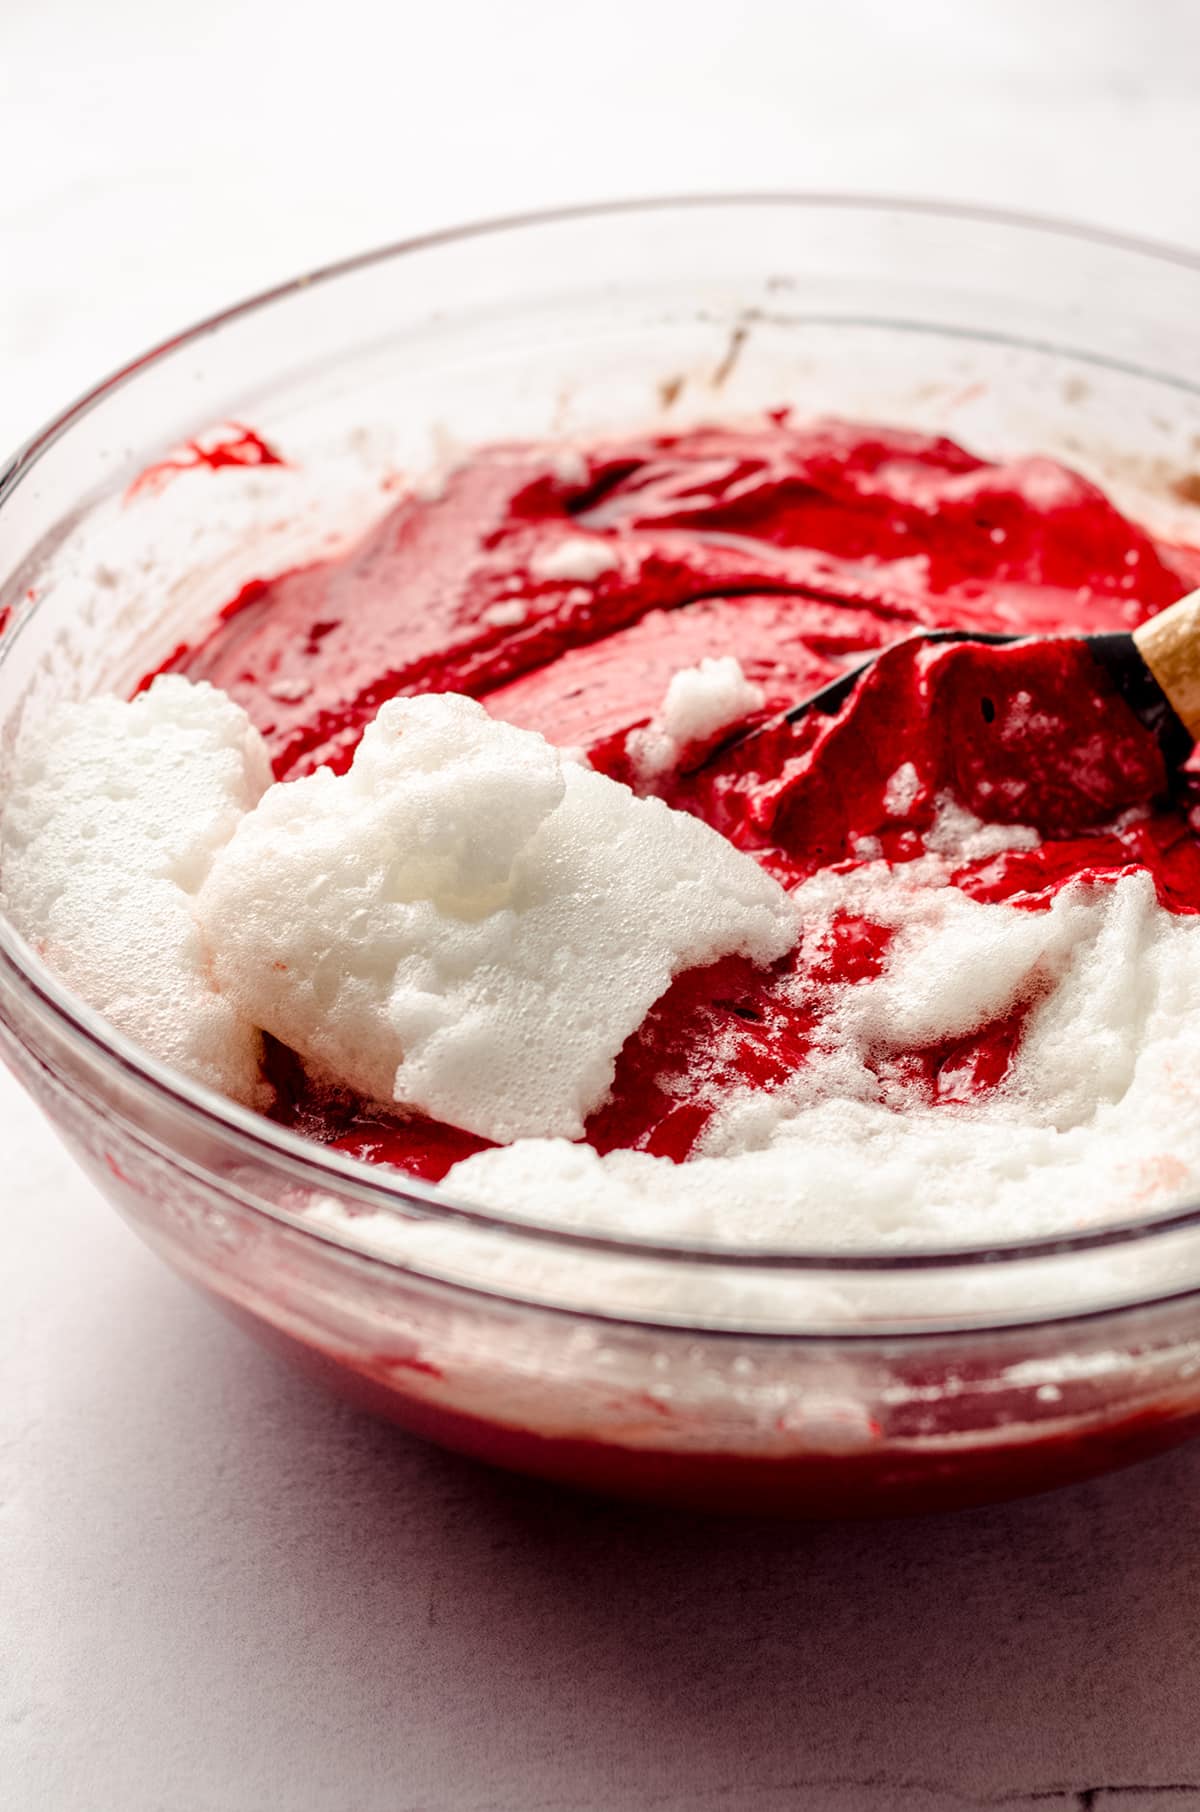
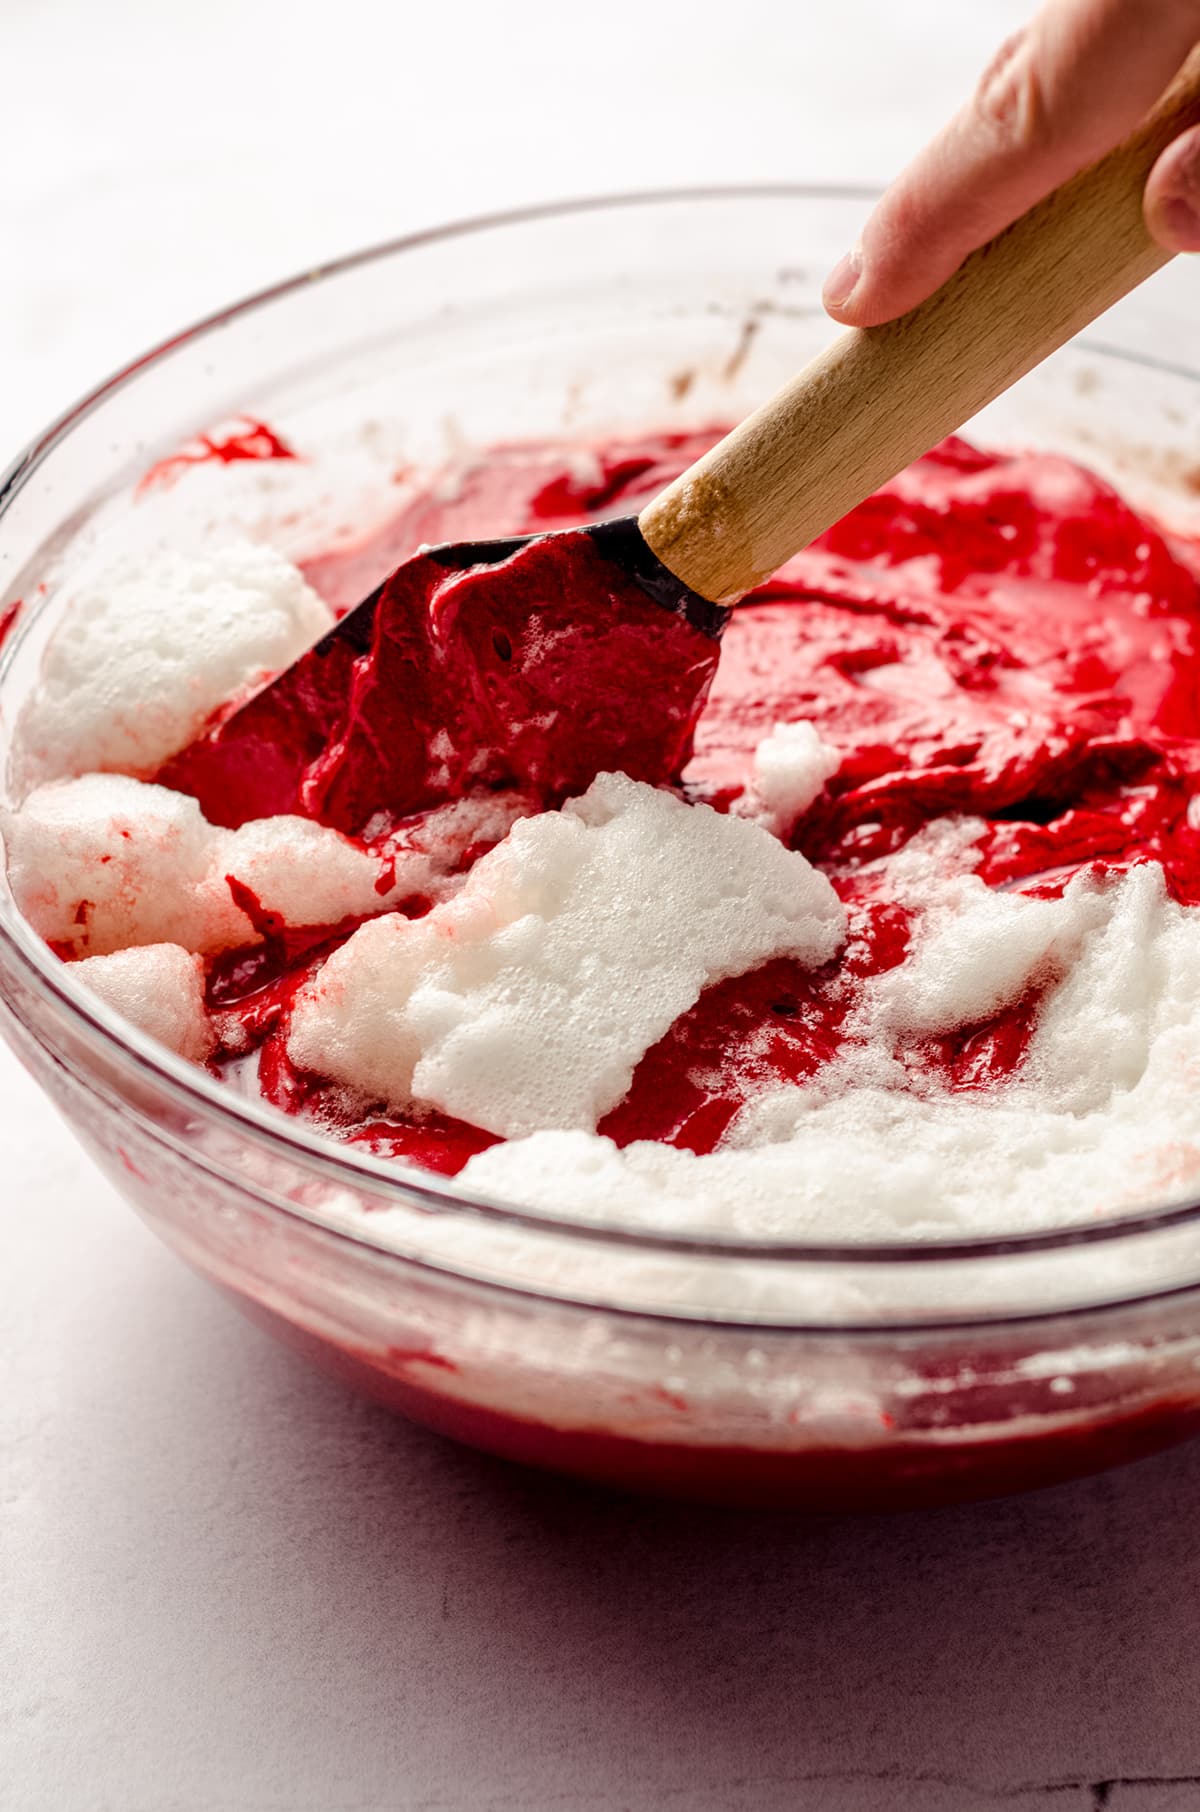
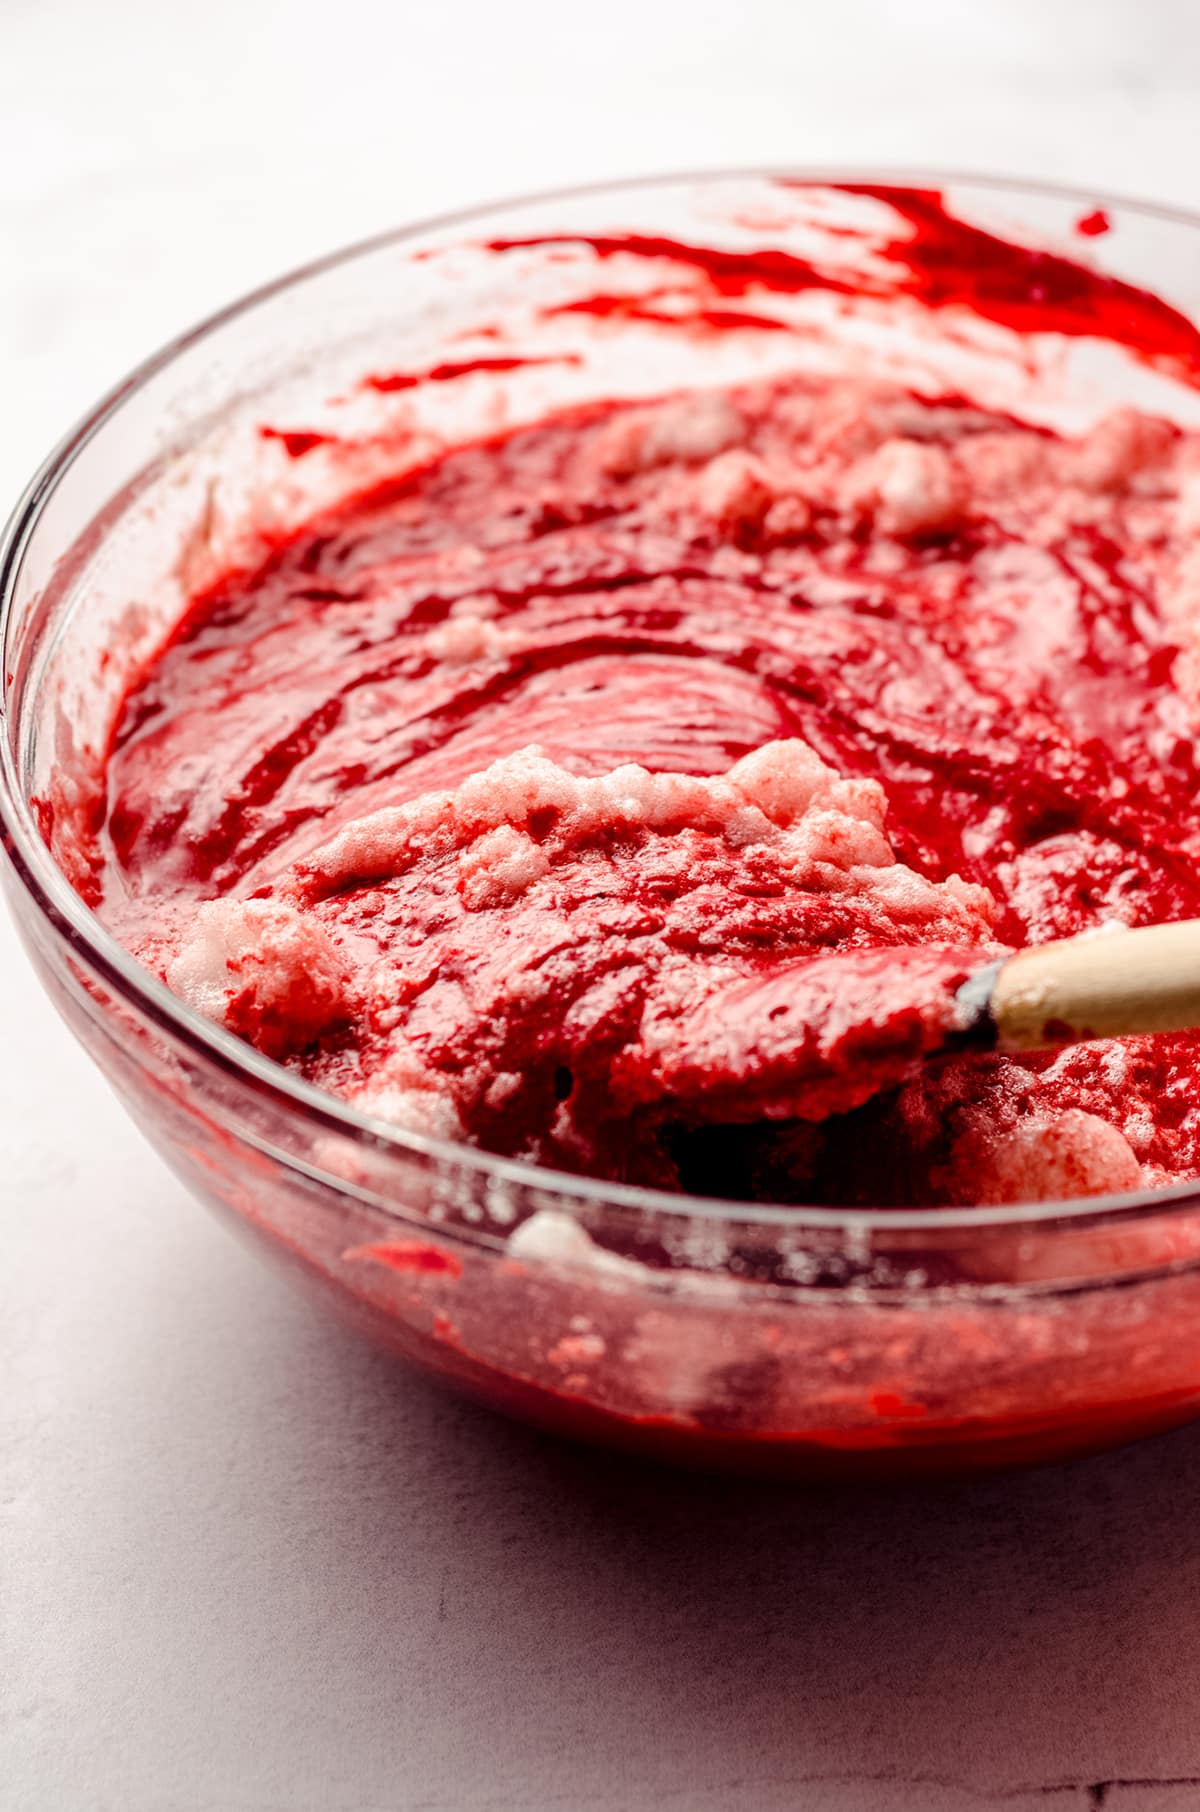
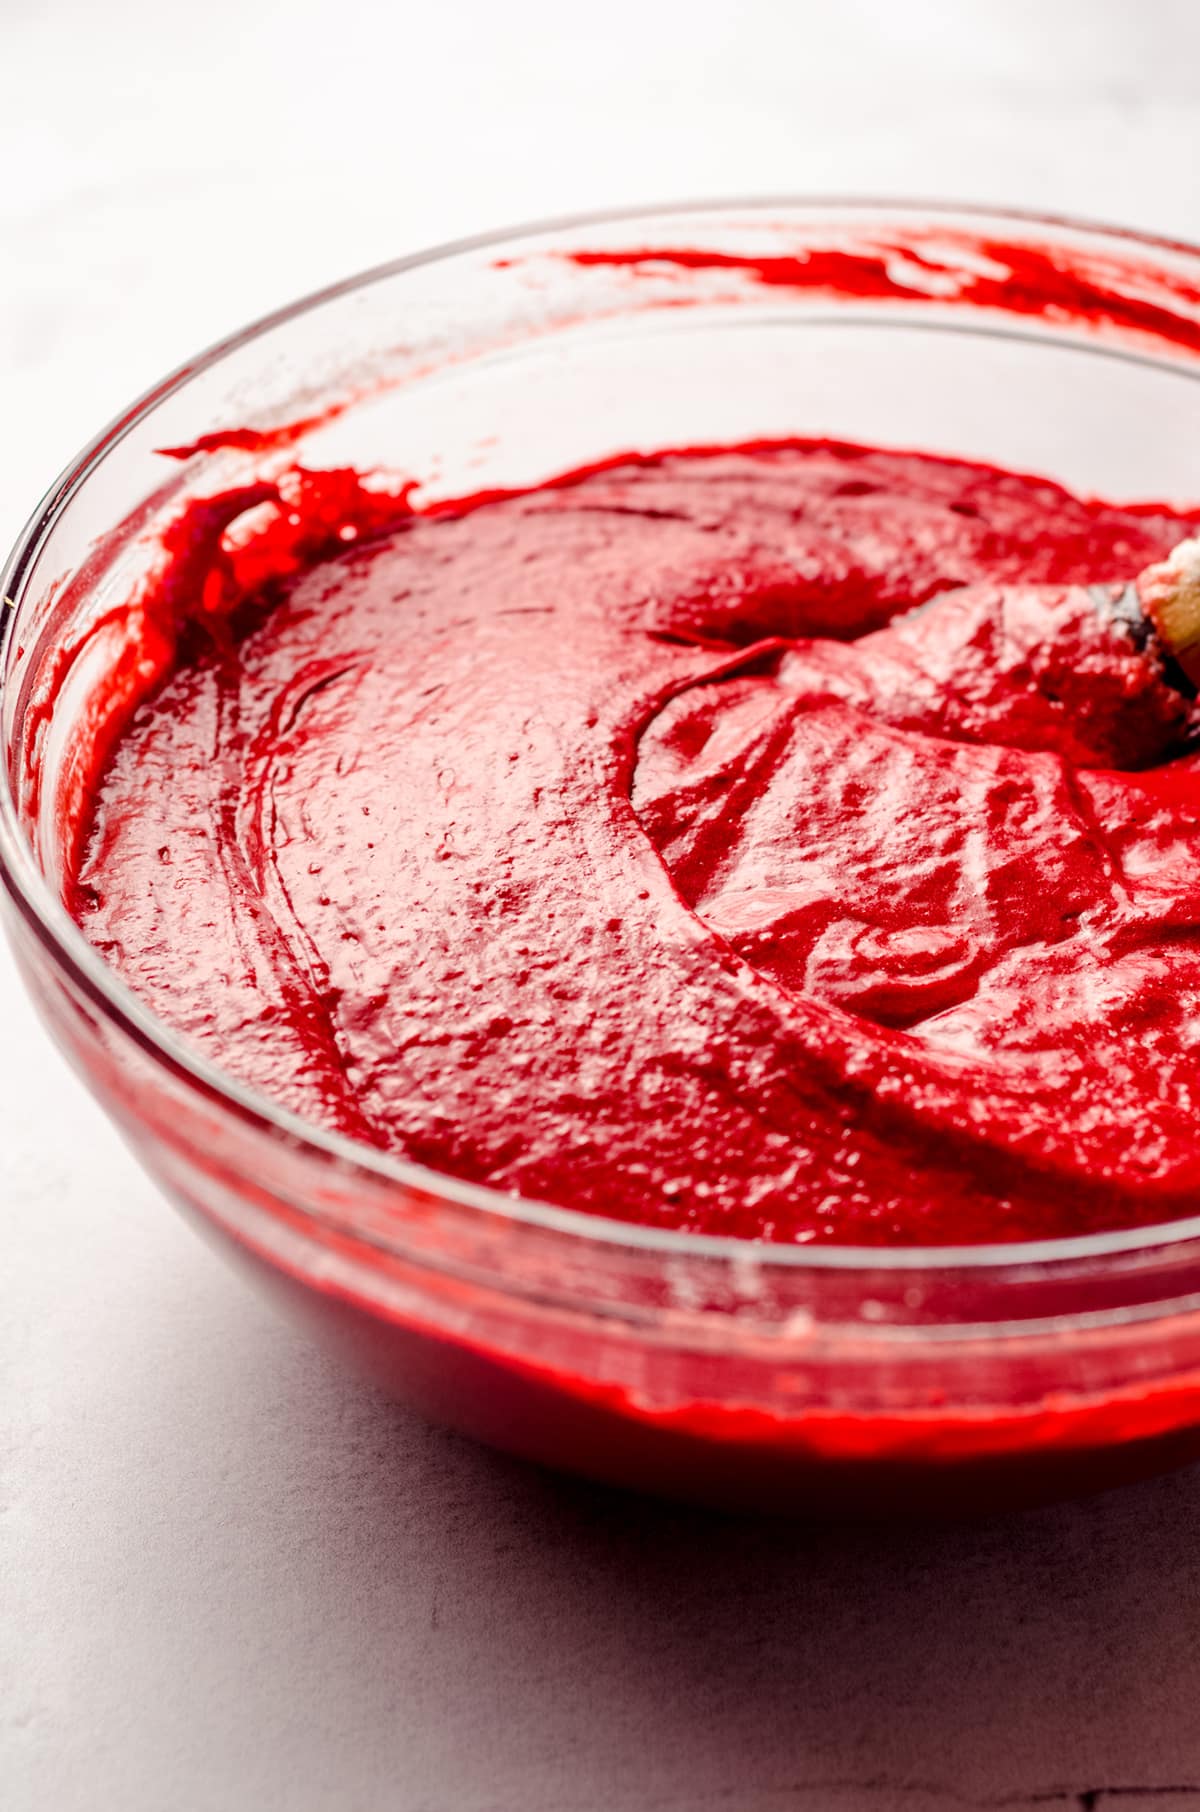
Add the egg whites into the batter, and fold the egg whites in with a light hand. The goal is to integrate the egg whites into the batter, without deflating them completely. Just work carefully and it will soon come together into one gloriously red and fluffy batter.
Look how much smoother that batter is now that we’ve added the egg whites. Luscious!
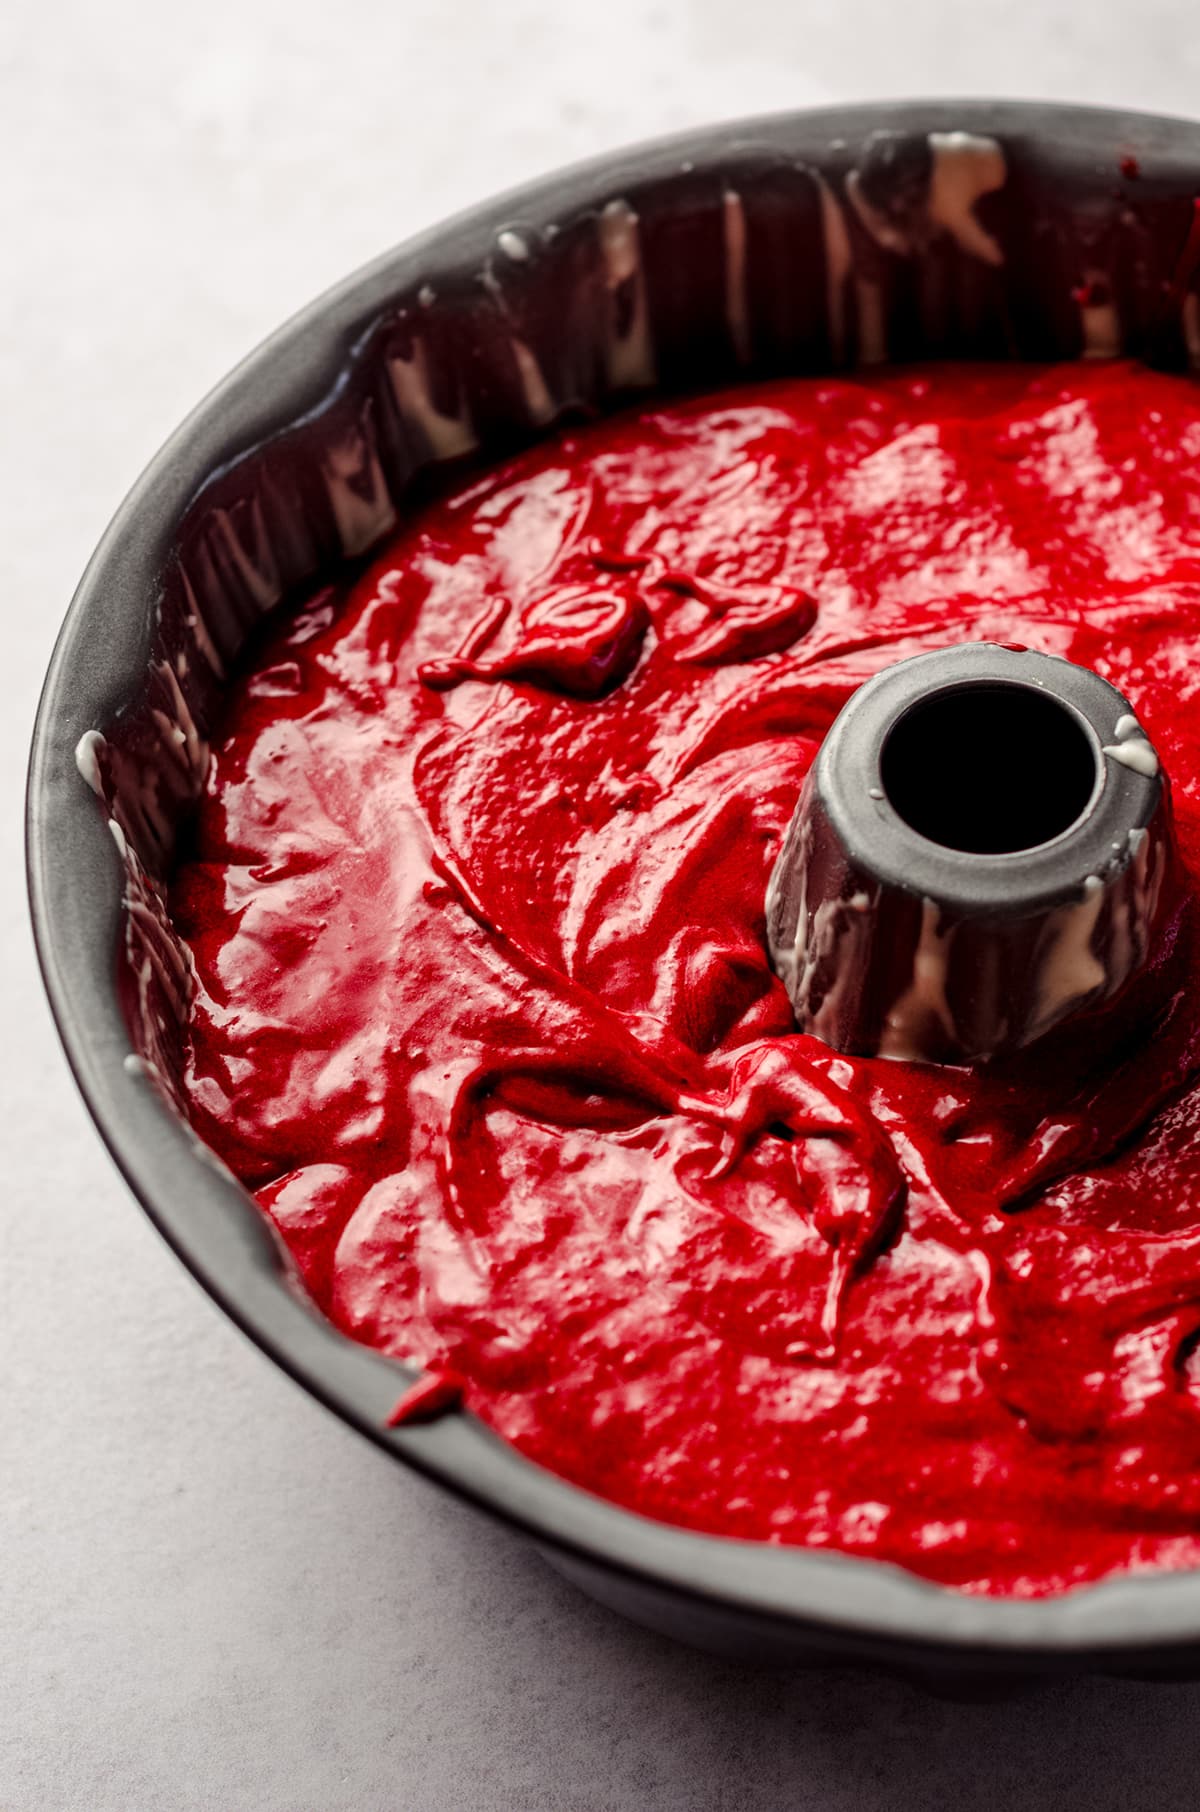
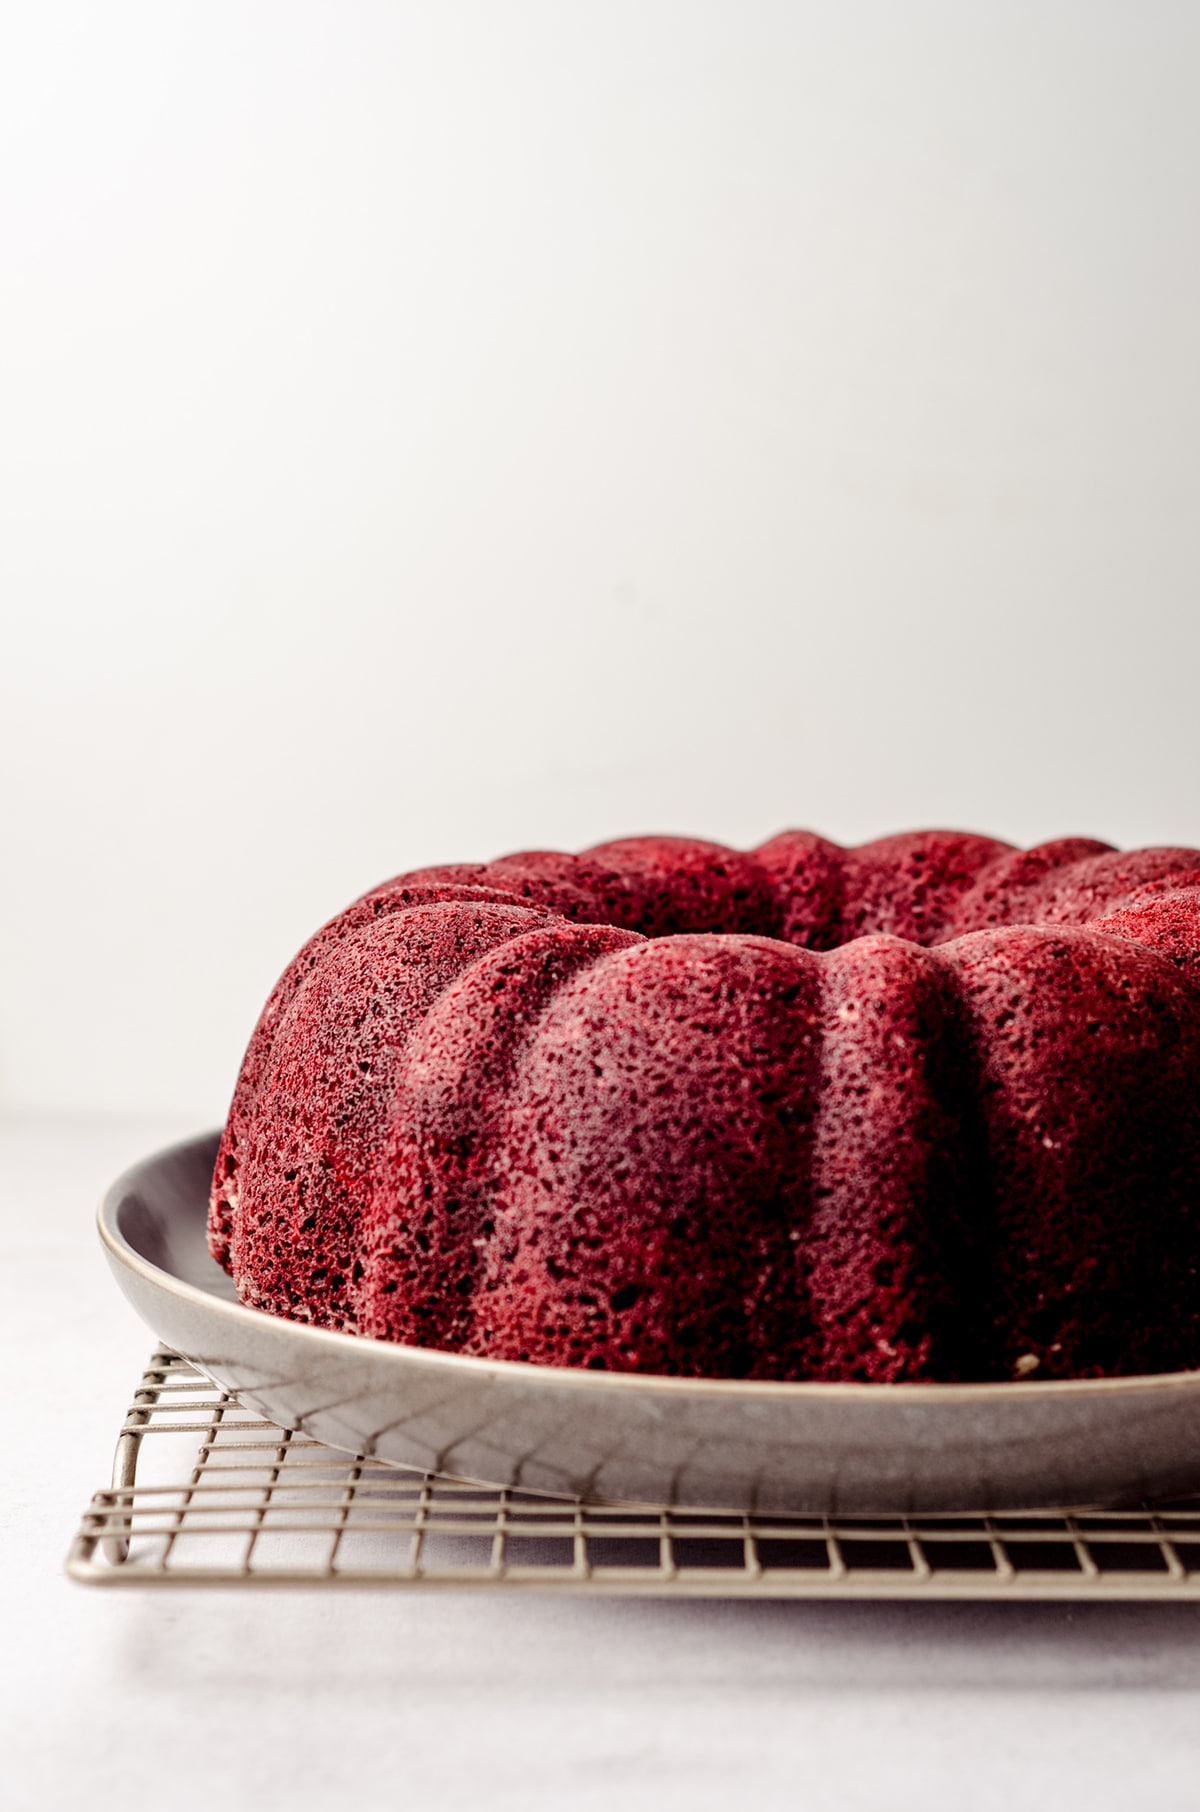
Spread the batter into your prepared bundt pan (more on that in a minute) and bake for 40-44 minutes, or until a toothpick comes out mostly clean when inserted into the middle of the cake.
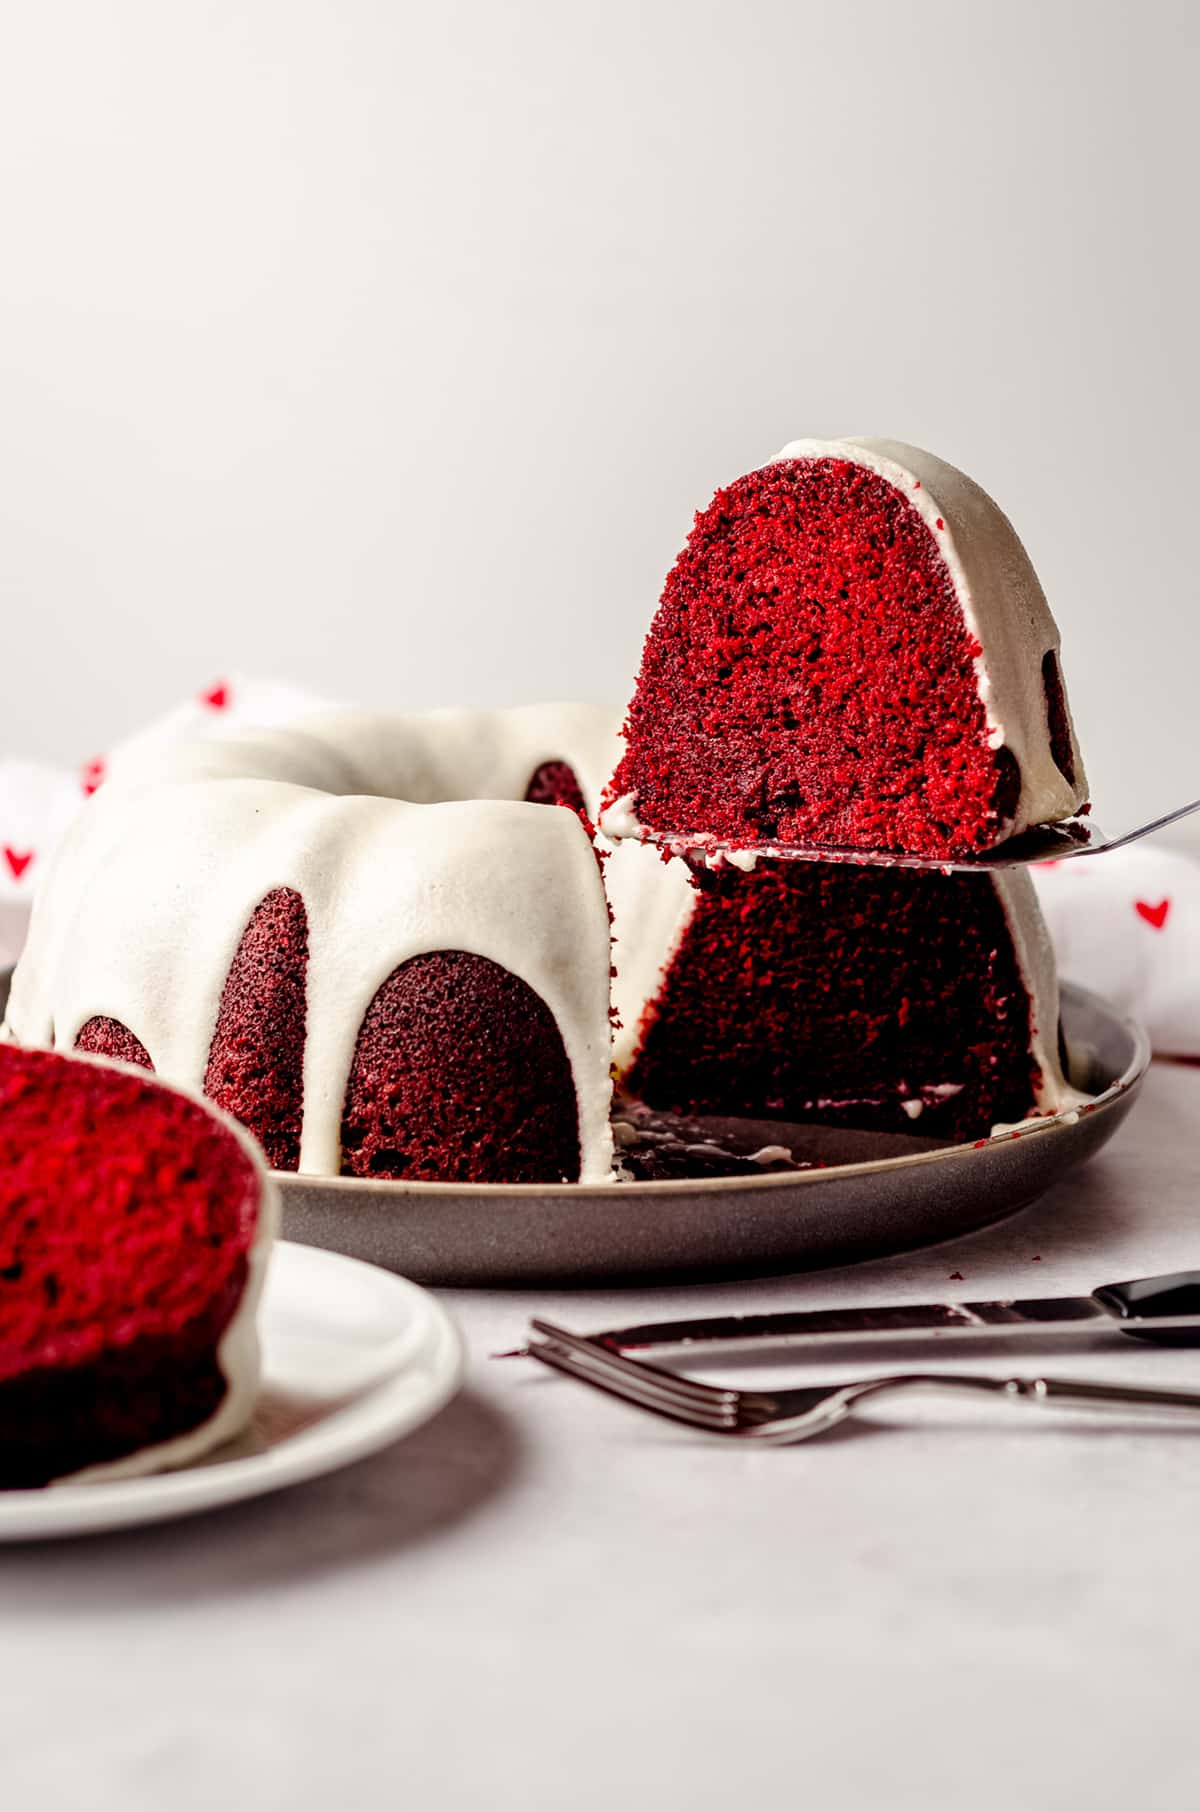
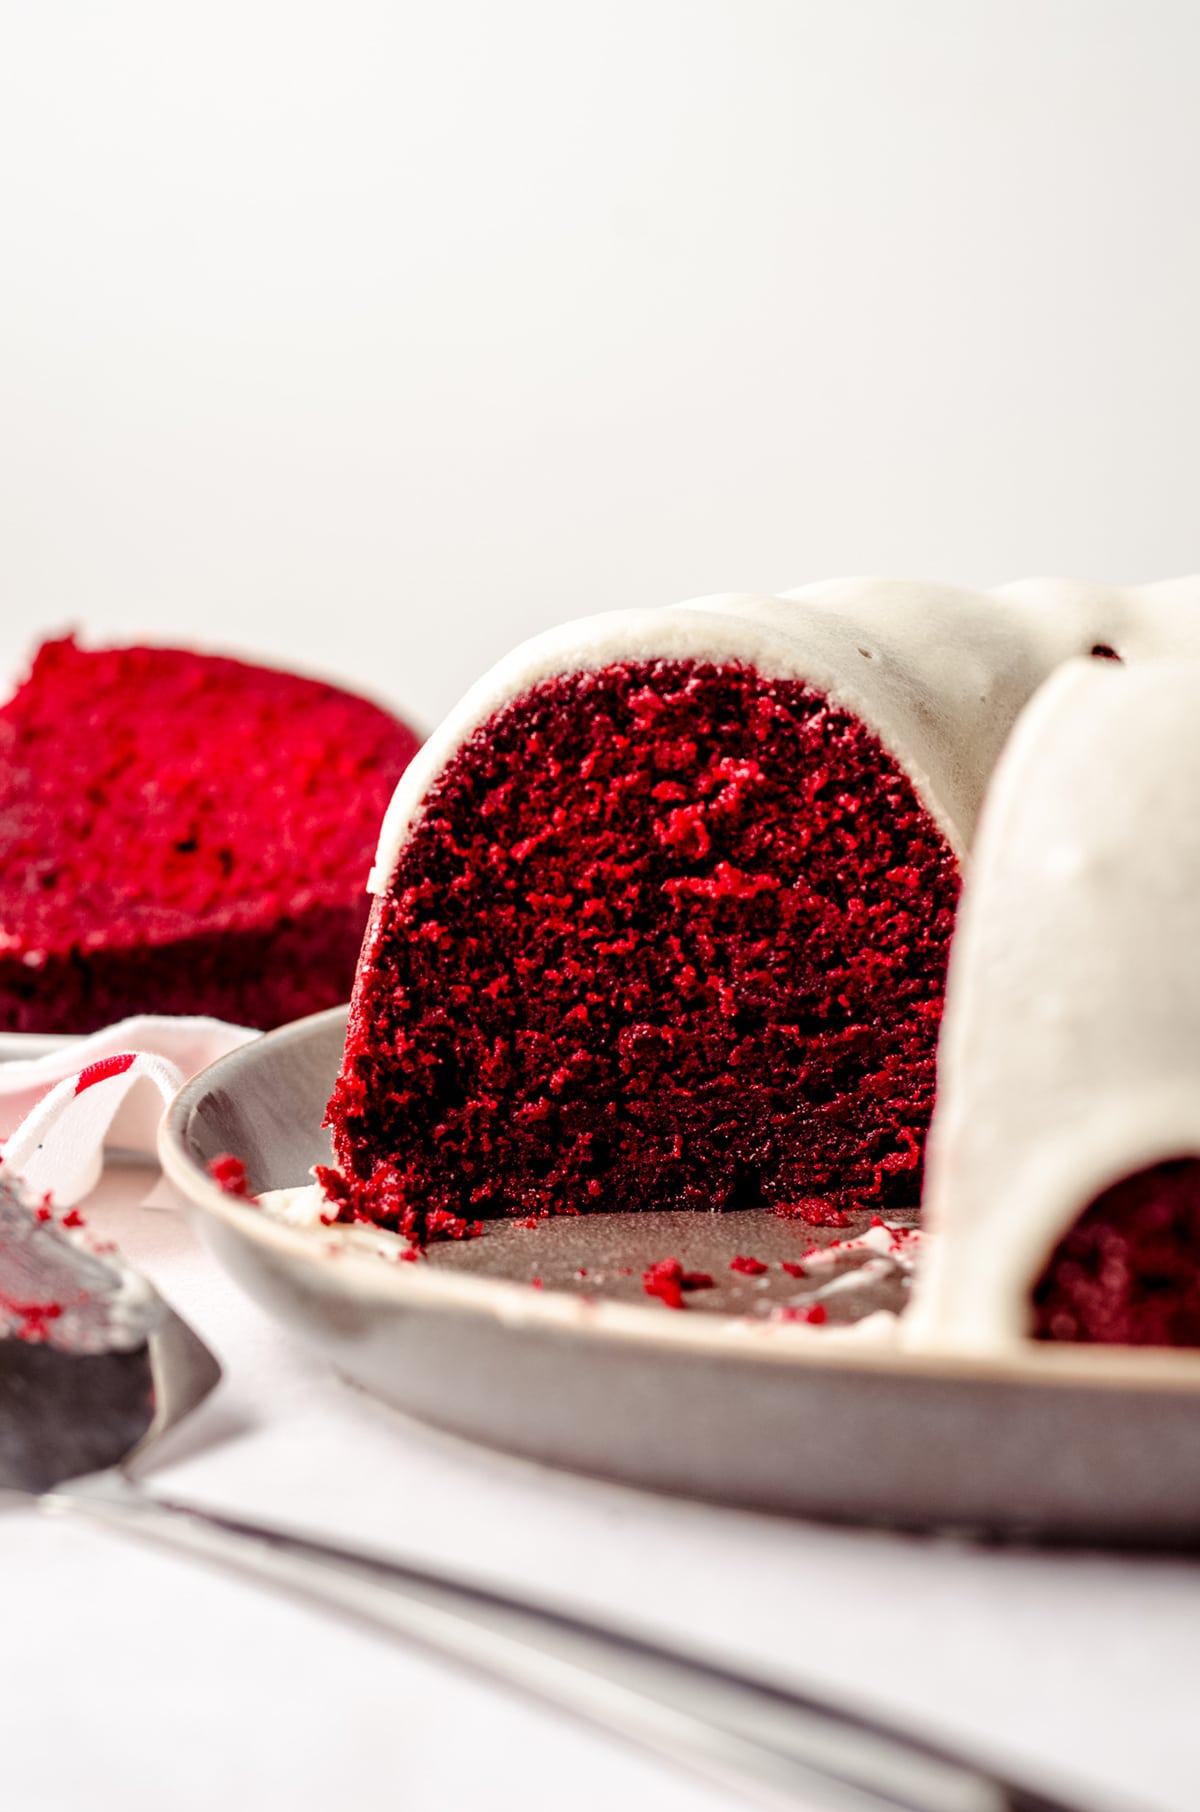
Red Velvet Bundt Cake Recipe Tips
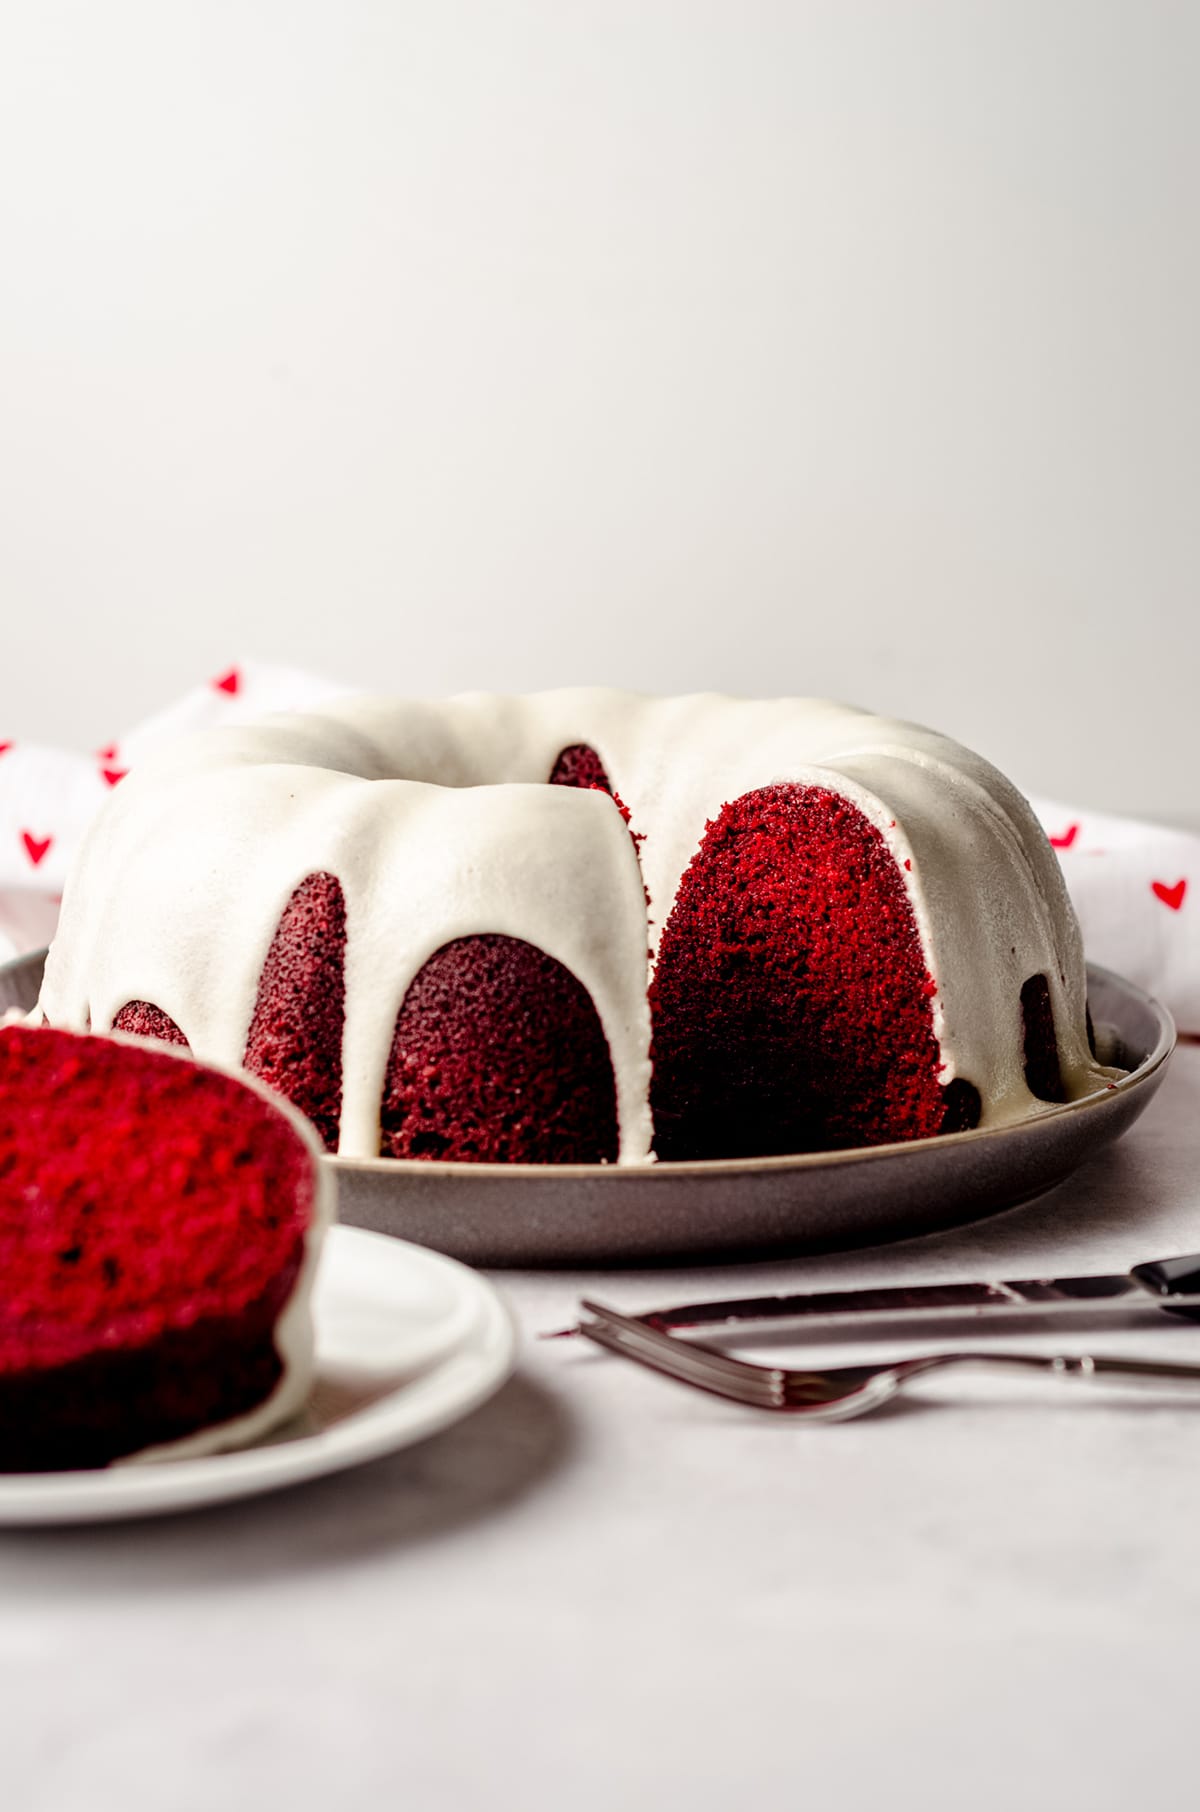
Since this is a red velvet bundt cake after all, you will add your batter to a bundt pan. Not only does this make for a gorgeous presentation, it actually helps the cake bake more evenly since more of the batter is in close contact with the edges of the pan. Pretty neat, huh?
The thing about bundt pans, though, is that they can be a bit tricky when it comes time to removing that beautifully baked cake.
Don’t despair, I’ve got you covered!
Back when I had a home baking business, I made a lot of cakes. That’s a serious understatement, but you catch my drift. In that time, I discovered a great product that made removing my cakes from their pans an absolute breeze.
It wasn’t long after that when I realized I could totally make that product at home! My homemade cake release is made with just 3 ingredients, and is the BEST way to make sure your cake comes out cleanly every single time.
If you’re using my homemade cake release, all you need to do is paint it on the inside of your bundt pan with a pastry brush. It forms a layer that separates the cake from the pan, making for a seamless transfer.
Alternatively, you can opt to liberally grease (and flour) your baking pan before pouring the batter in.
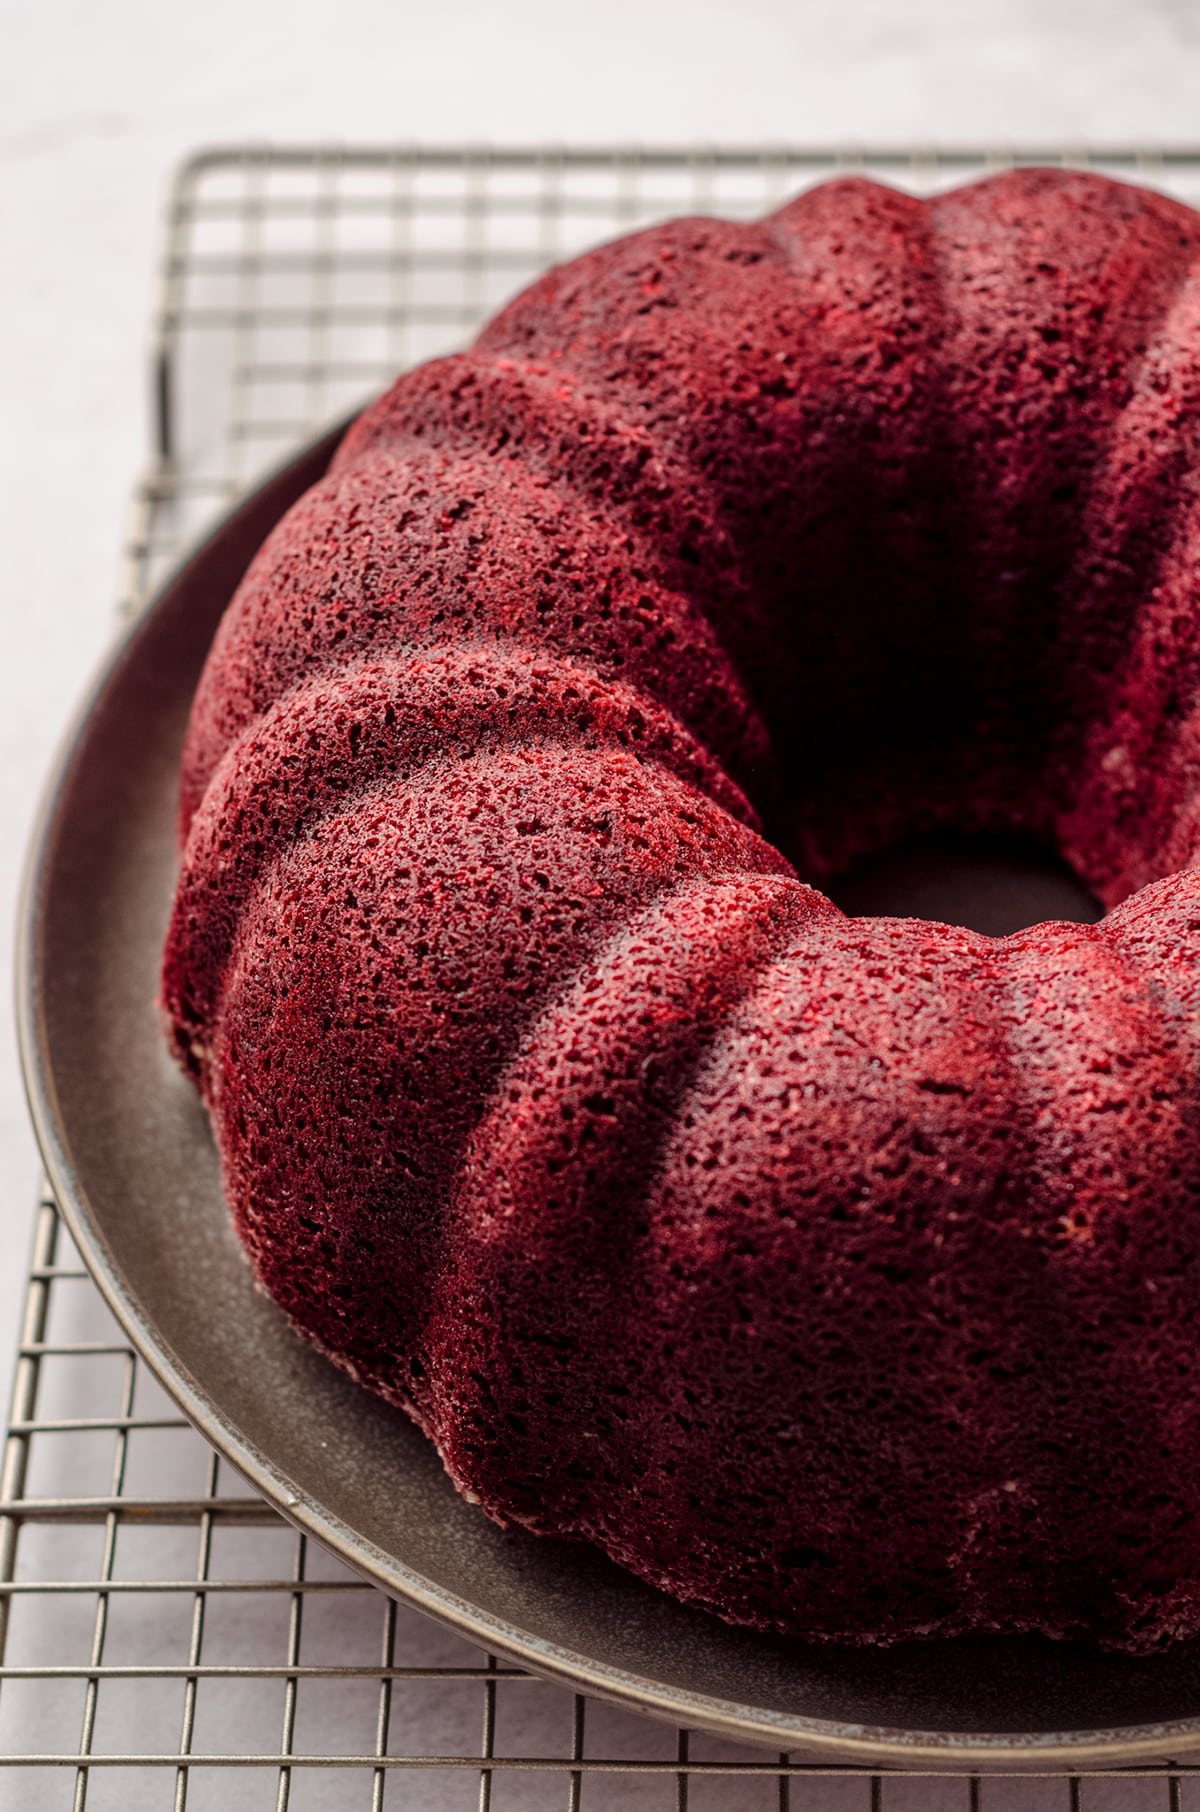
Once your cake is done baking, remove it from the oven and allow it to cool for 10 minutes on a wire cooling rack. Attempting to remove the cake while it is still piping hot is not a good plan.
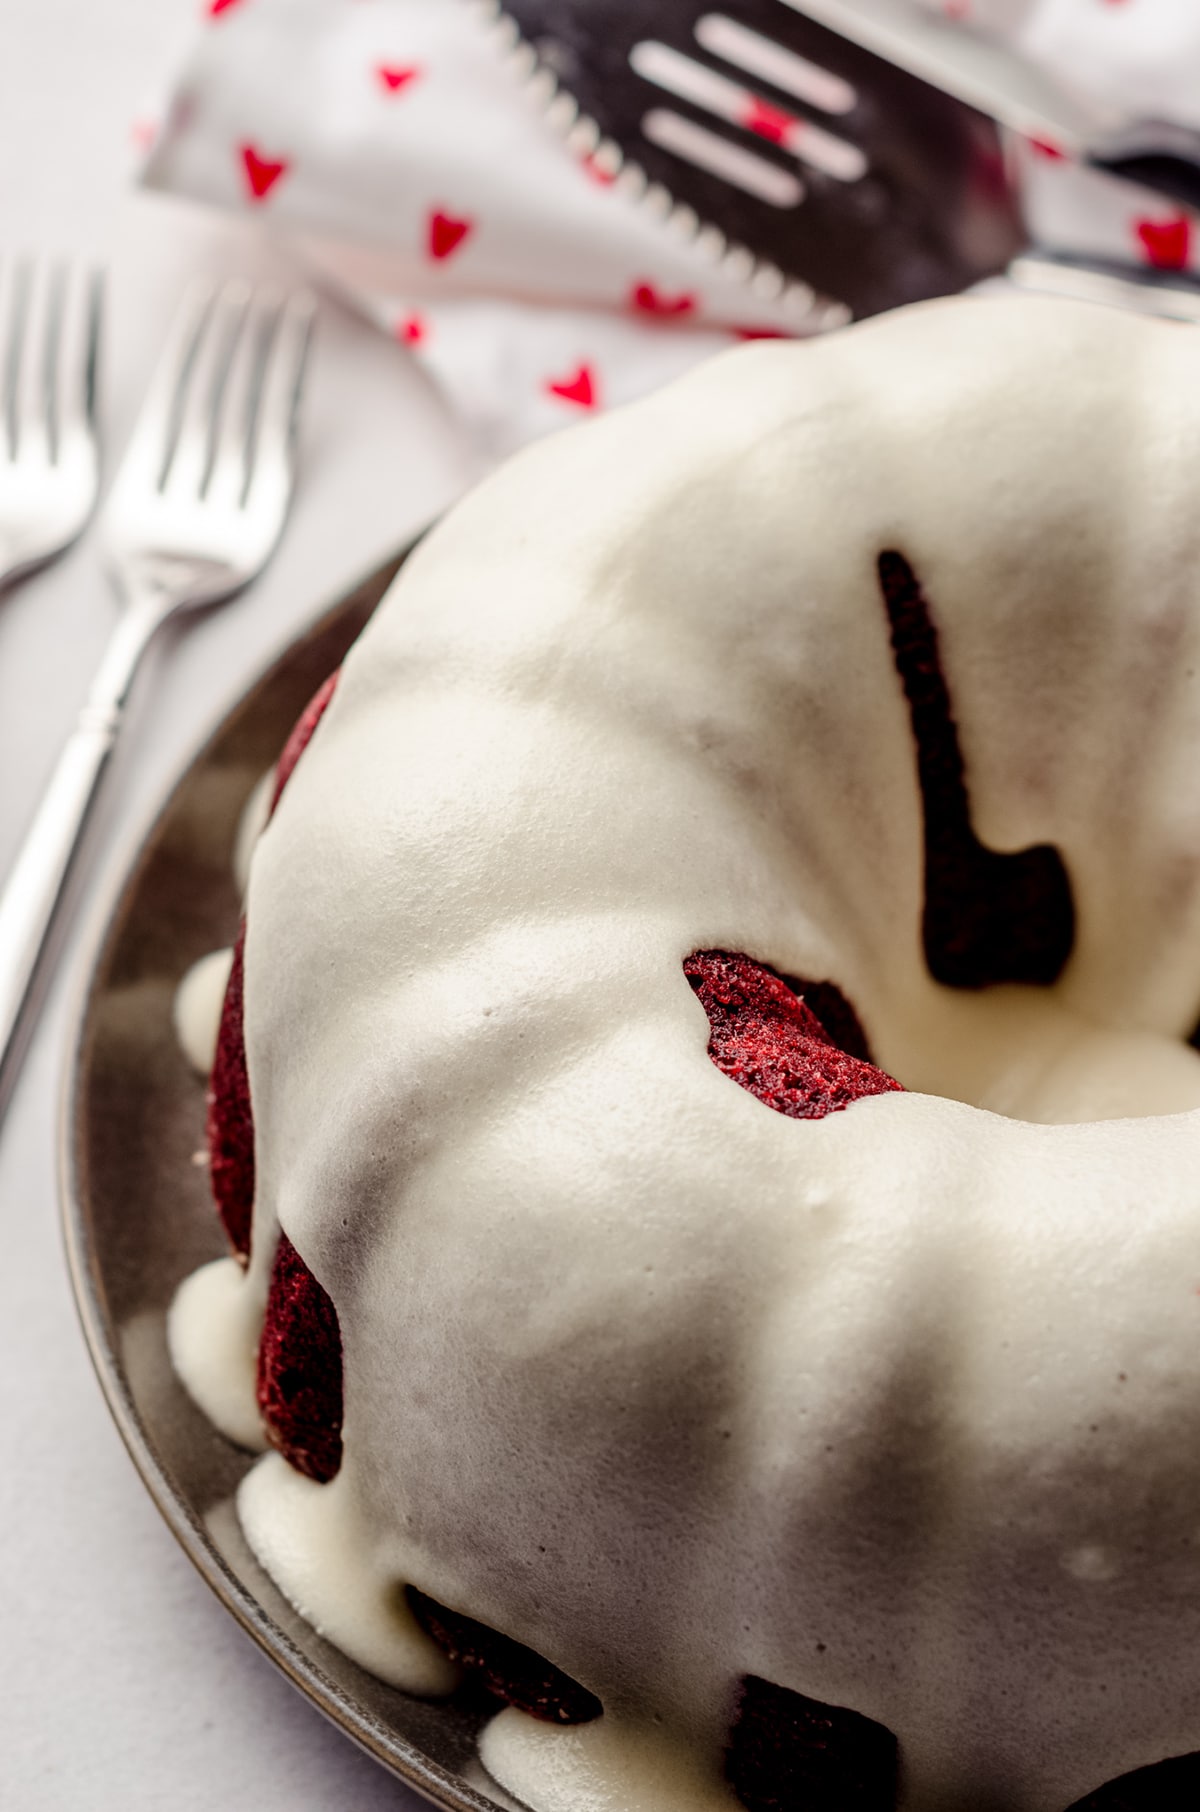
Once your cake has cooled for the 10 minutes, use oven mitts to carefully flip your bundt cake onto a serving platter or dish. Make sure to leave the cake pan in place, resting on top of the cake as it cools. Leave it there until the cake has completely cooled and is ready for decorating.
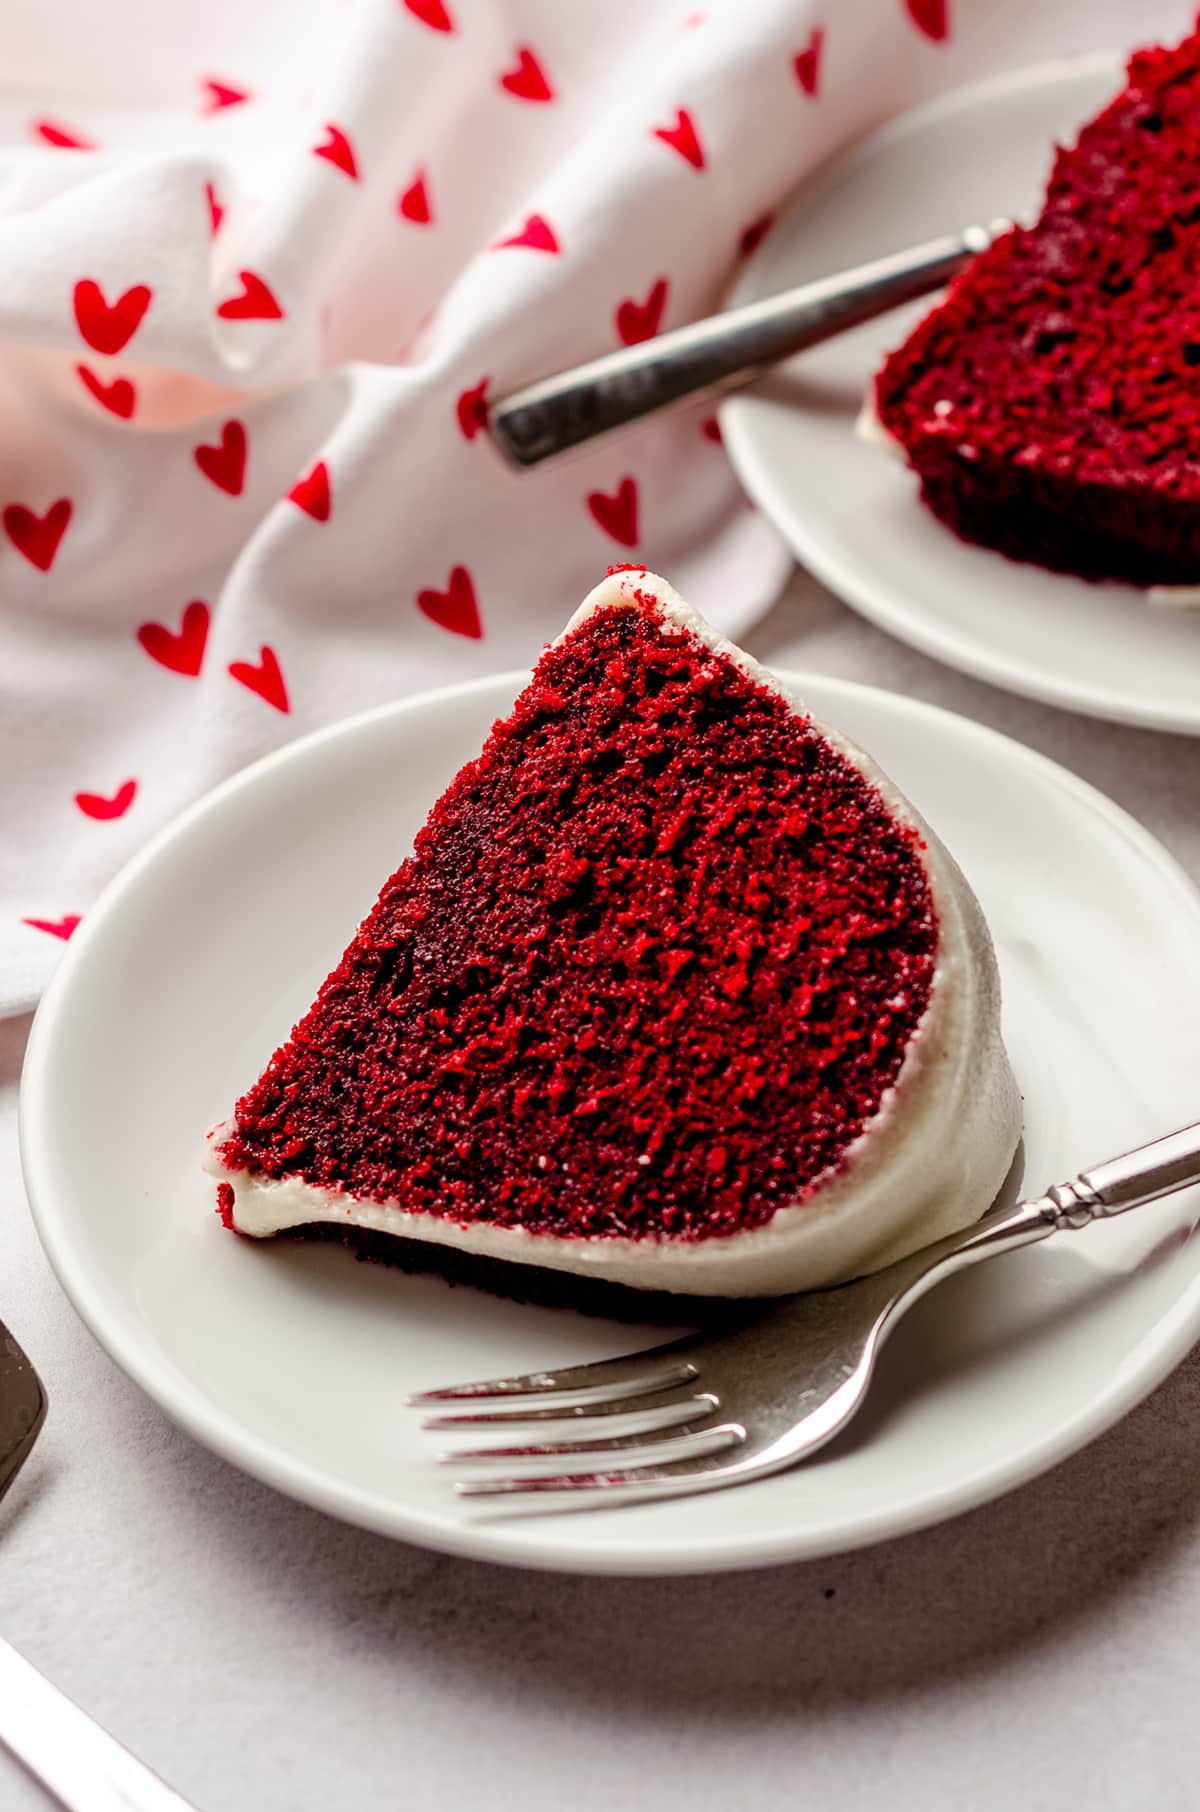
The Best Red Velvet Bundt Cake Recipe Serving Suggestions
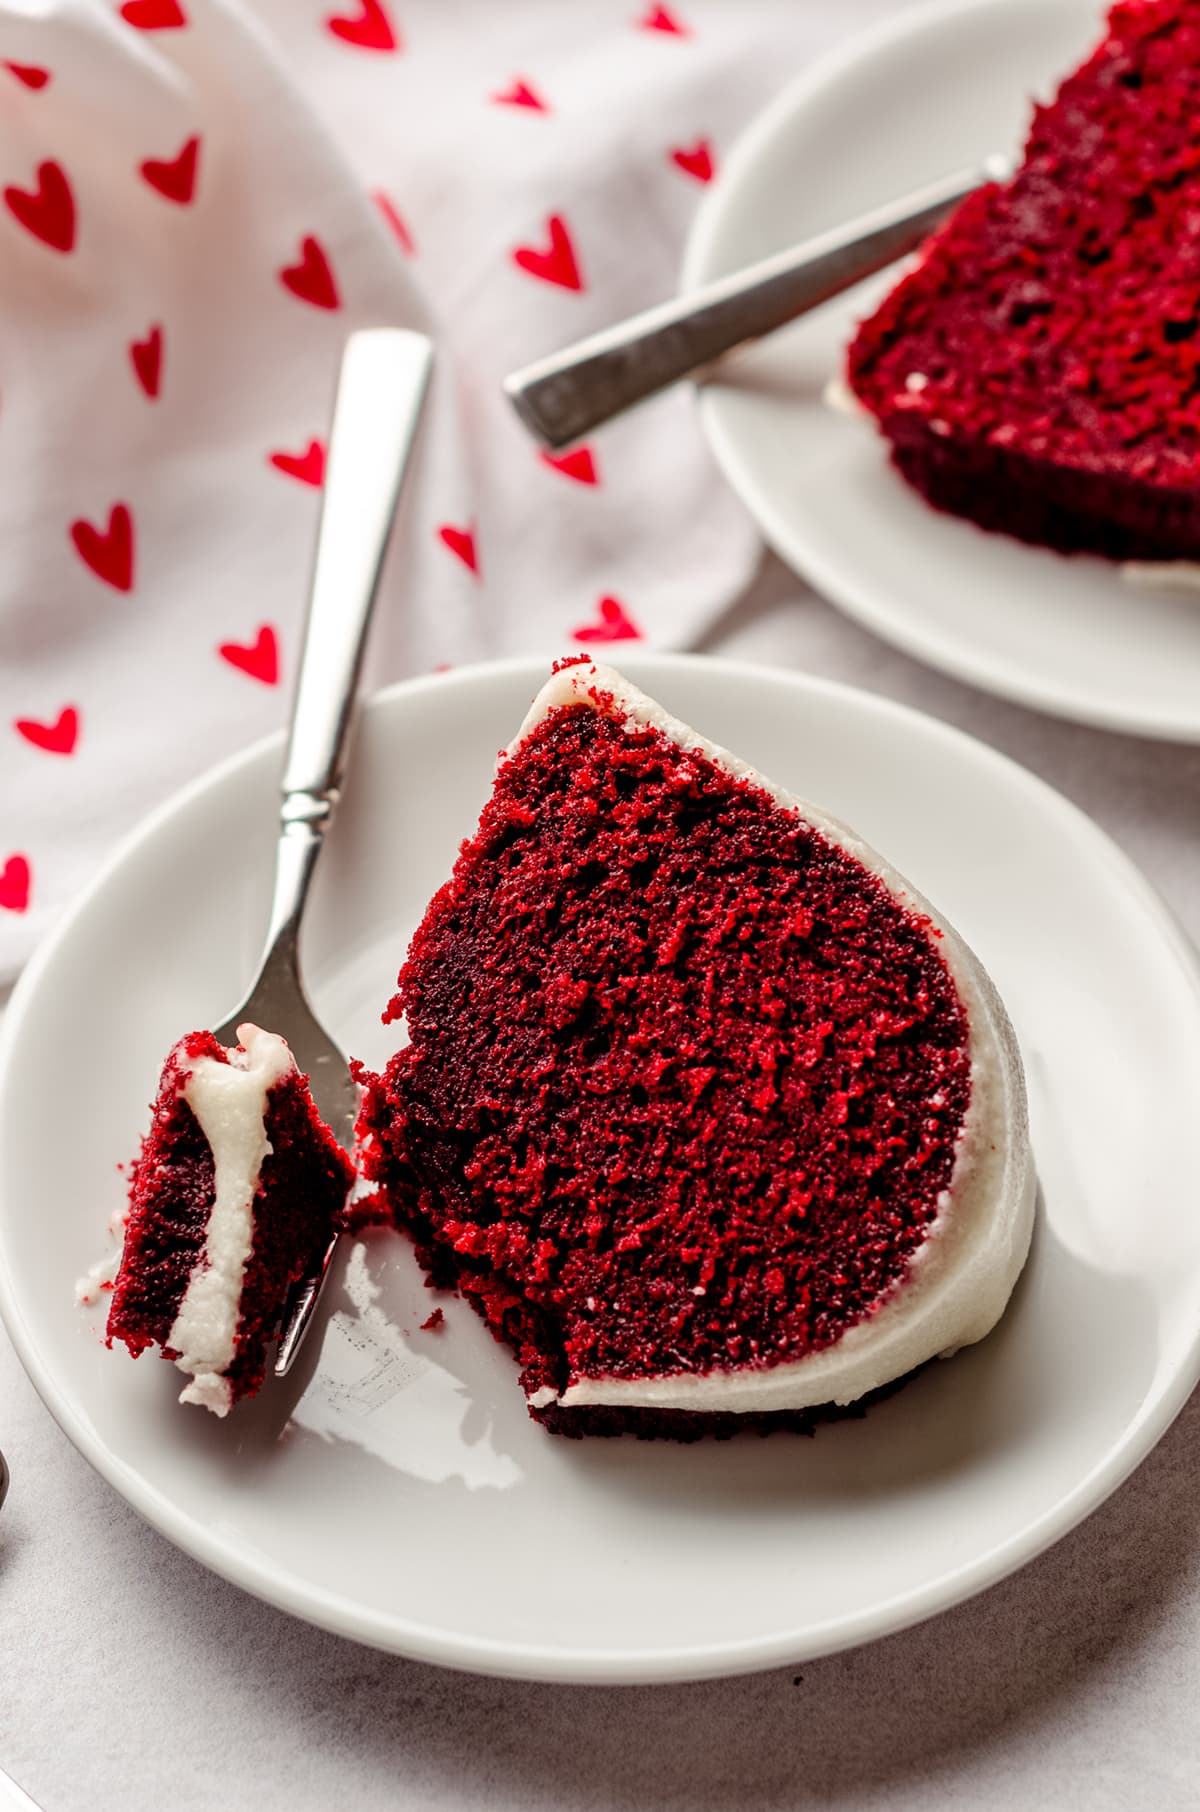
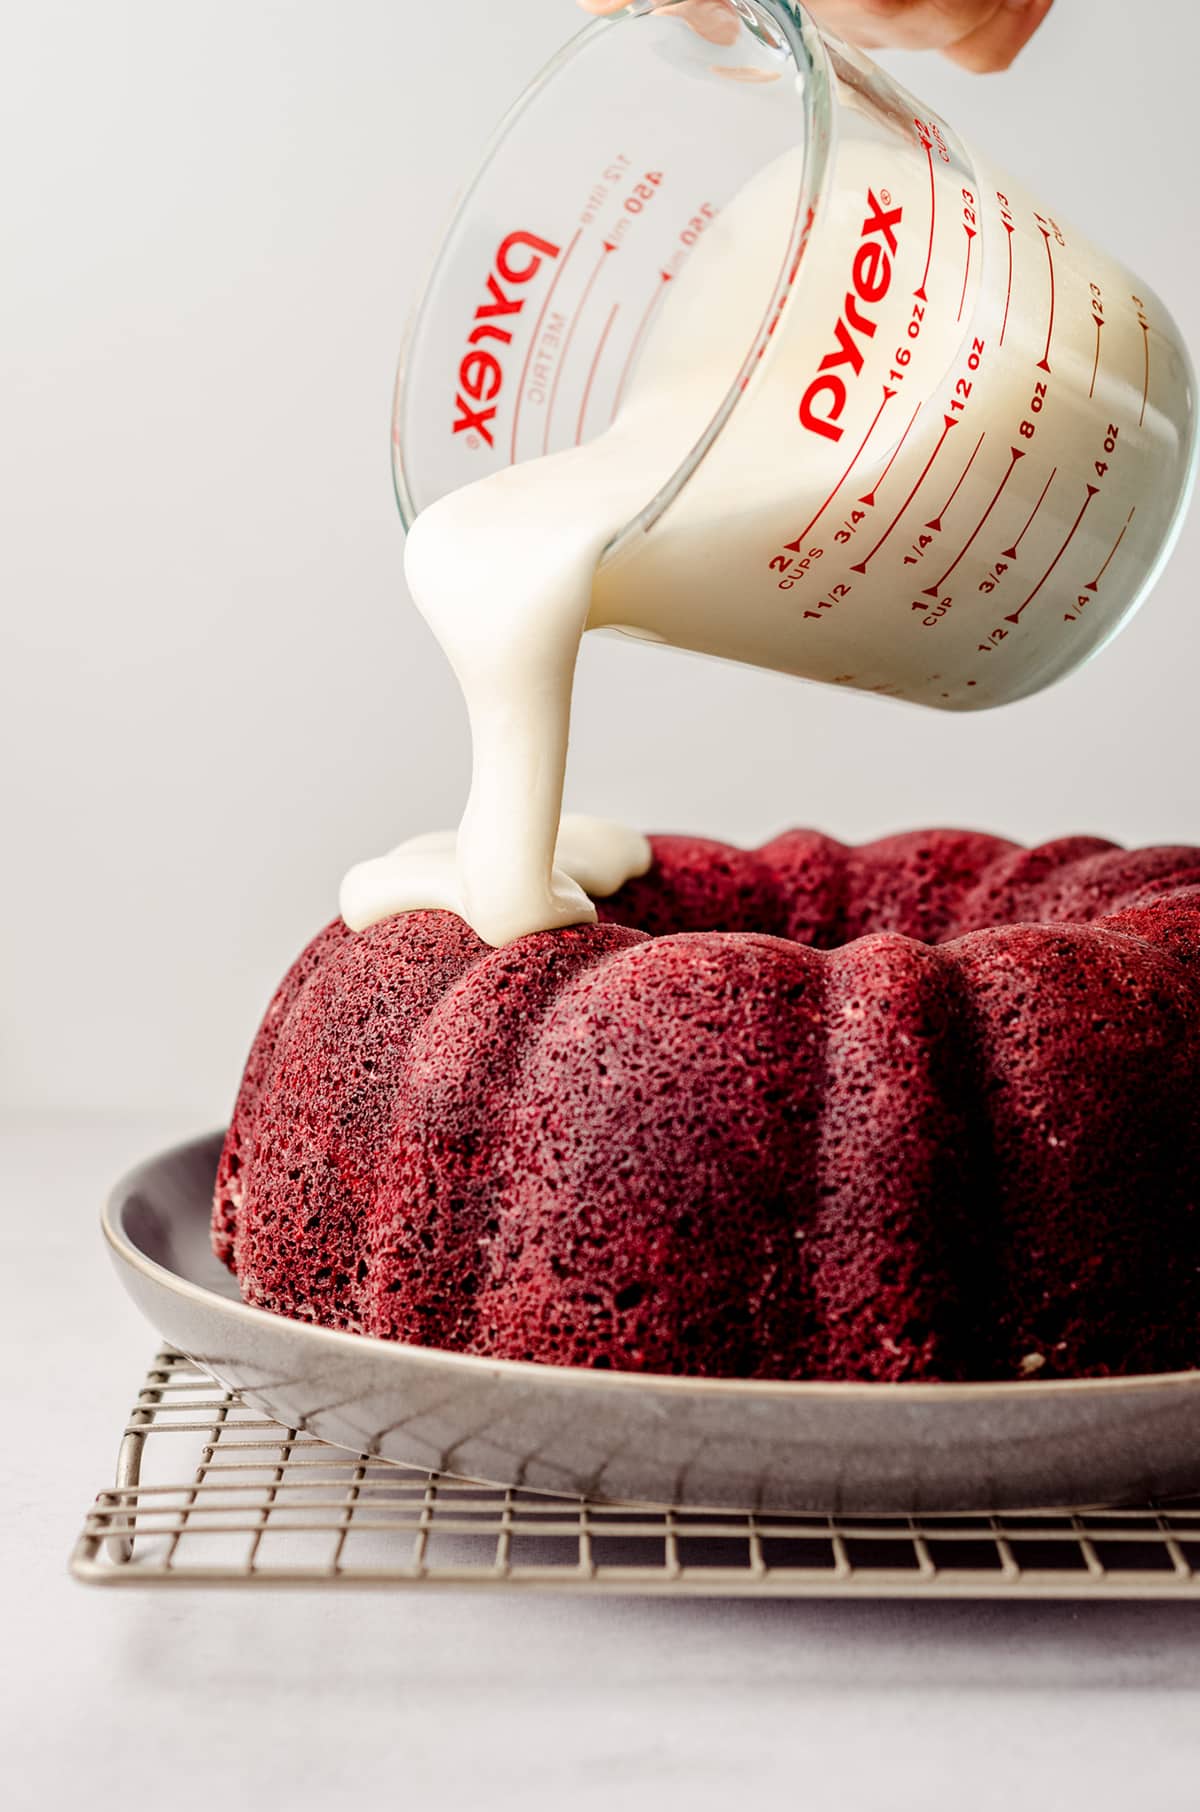
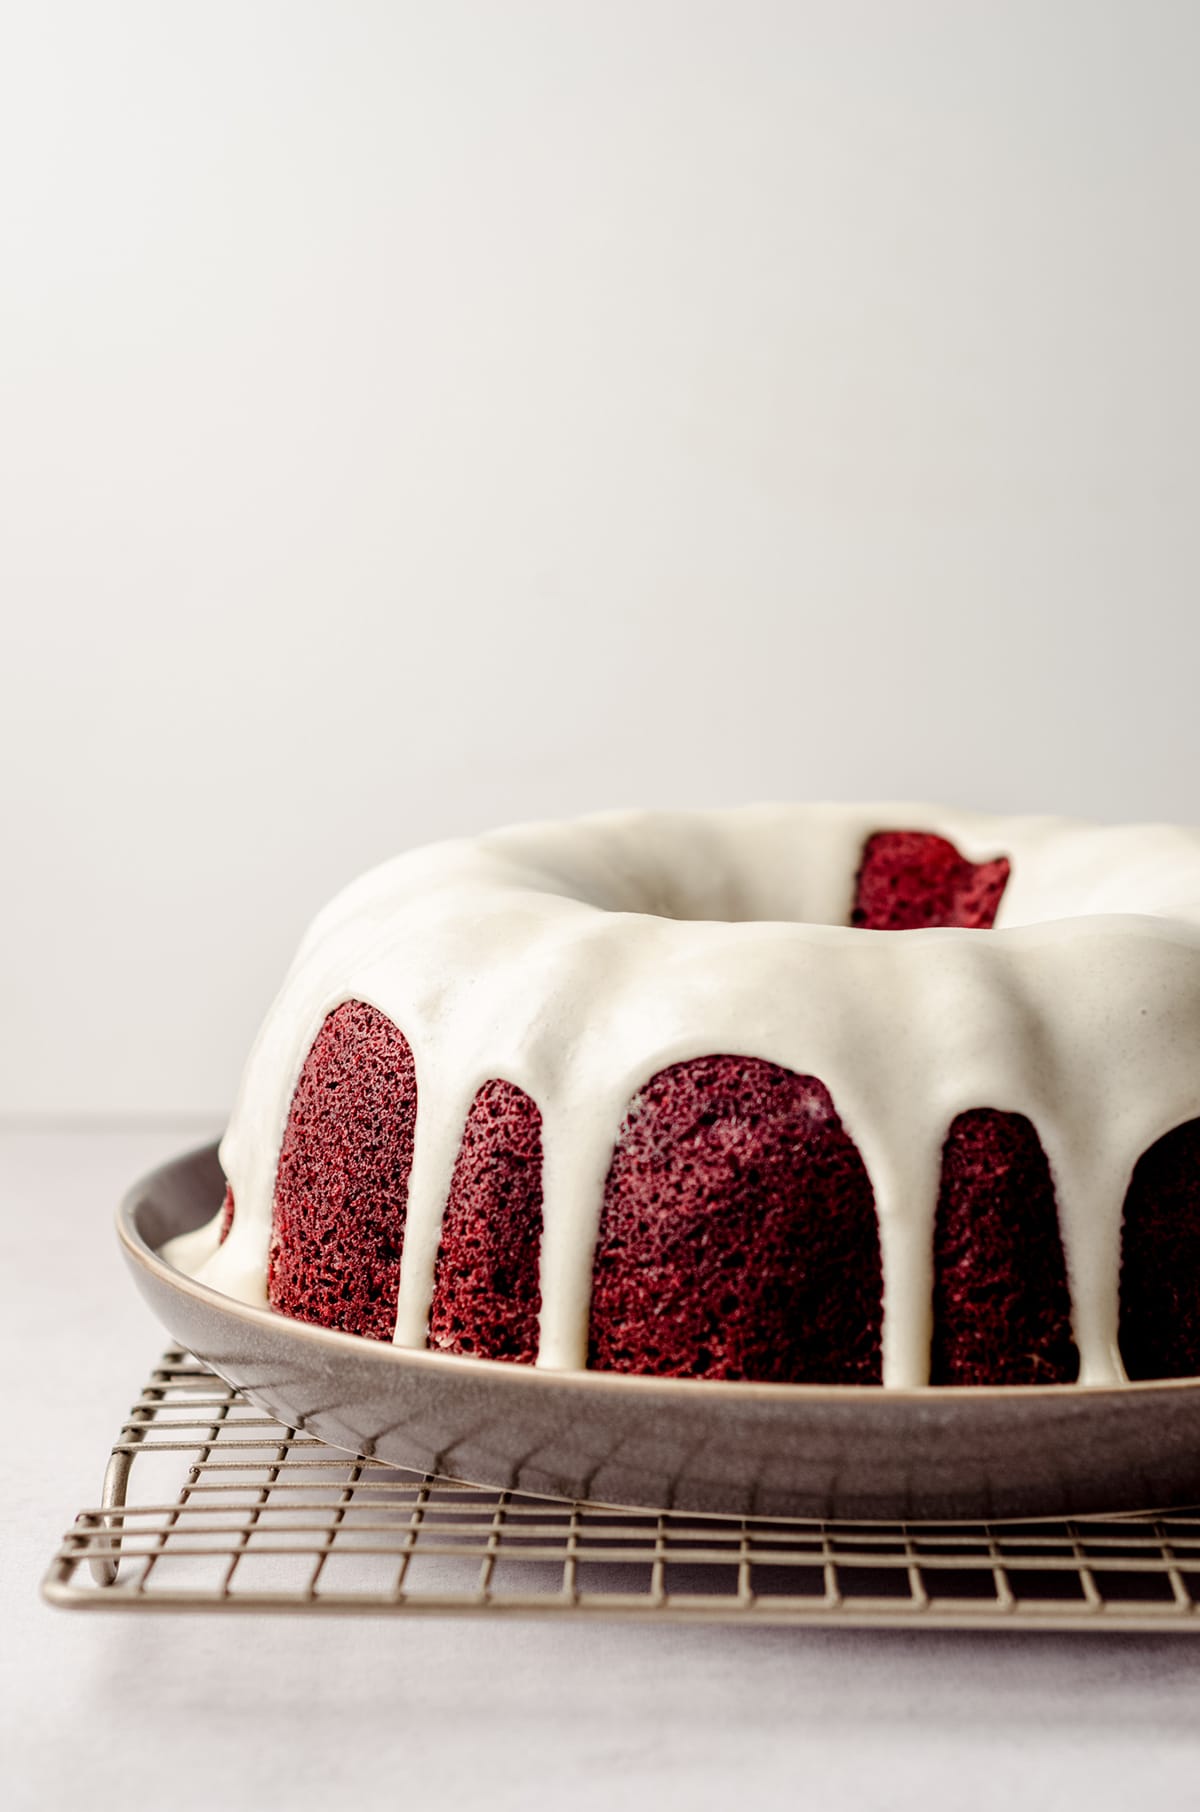
Once your red velvet bundt cake has had a good chance to cool, it’s time to get started with the crowning glory of red velvet cakes everywhere: the cream cheese icing.
This is a thinner, drippier (in a good way) version of my traditional cream cheese frosting. I think it’s absolutely perfect for this red velvet bundt cake, since it spreads so easily and coats the cake in an addictive and sweet cream cheese icing that pairs beautifully with red velvet.
If you’d like to, you can try more traditional and thick frosting recipes like my classic cream cheese frosting (halve the recipe), or even my chocolate fudge frosting (whole recipe).
If you wanted to create something like a Nothing Bundt Cake, you could use my easy royal icing (halve the recipe).
Alternatively, if you wanted to keep things simple, a quick dusting of powdered sugar just before serving is a great choice as well!
However you choose to top your cake, I’m sure you’ll enjoy this tender, moist, and slightly tangy classic recipe. My careful selection of butter + oil keeps the cake nice and moist and not at all dry like some red velvet cakes can tend to be.
The additional whipped egg whites really bring fabulous lift to the crumb, again, giving the cake a really fabulous texture that will keep you coming back for bite after bite.
Storing Leftover Red Velvet Cake Bundt
Red velvet bundt cake will stay fresh and moist covered and stored at room temperature for up to 4 days. You can preserve it a bit longer by storing it in the refrigerator for up to 1 week.

Grab yourself a bundt pan, set your cream cheese out to soften, and get started on making this elegant and simple red velvet bundt cake. I promise you won’t regret it!
I mean… Who ever regrets baking something delicious?
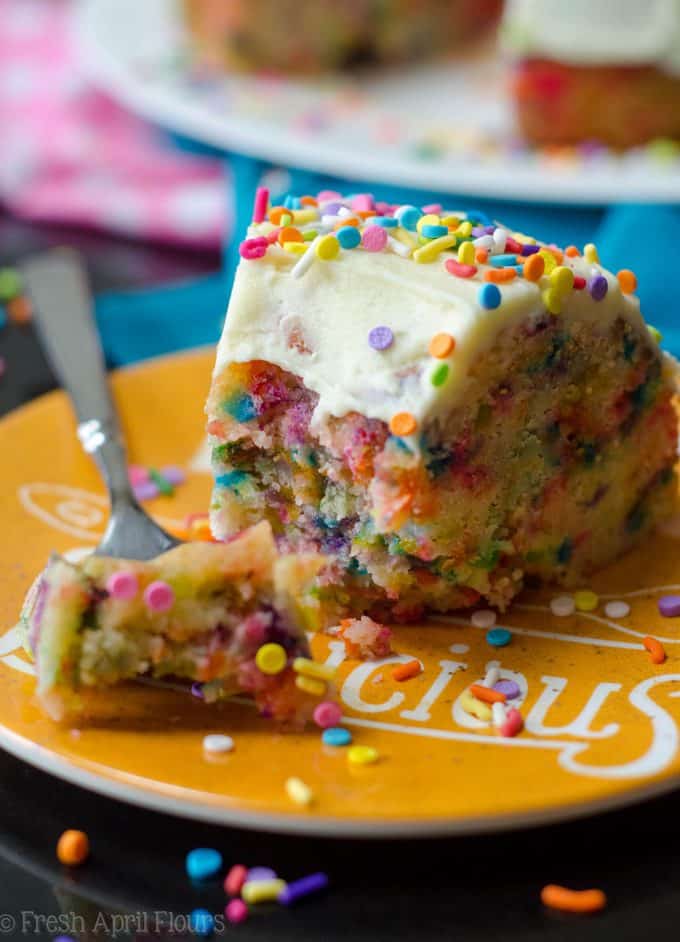
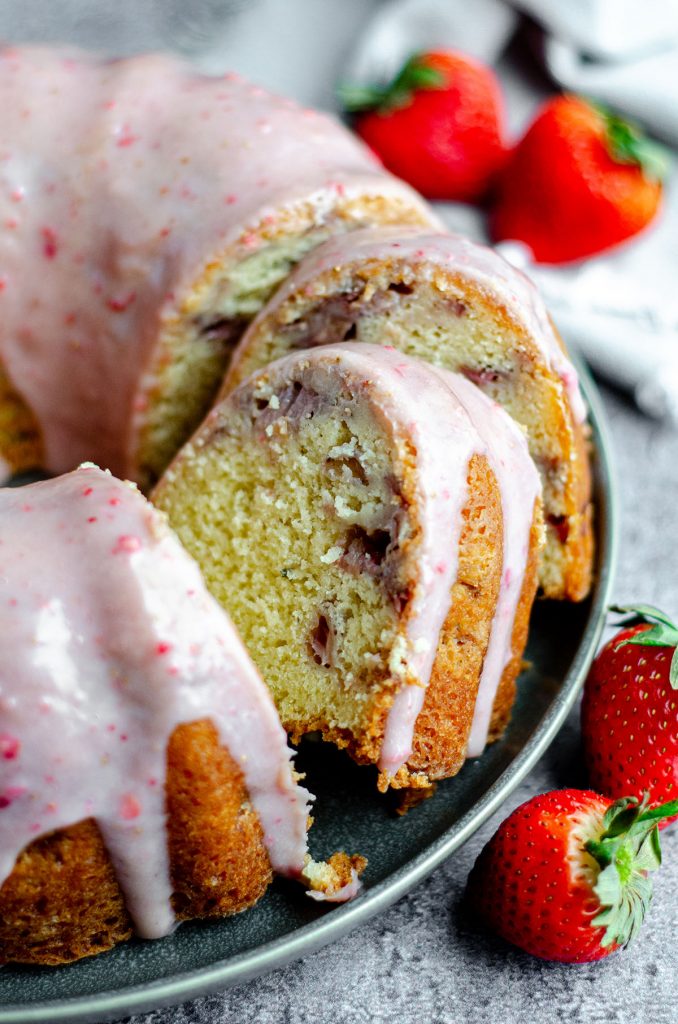
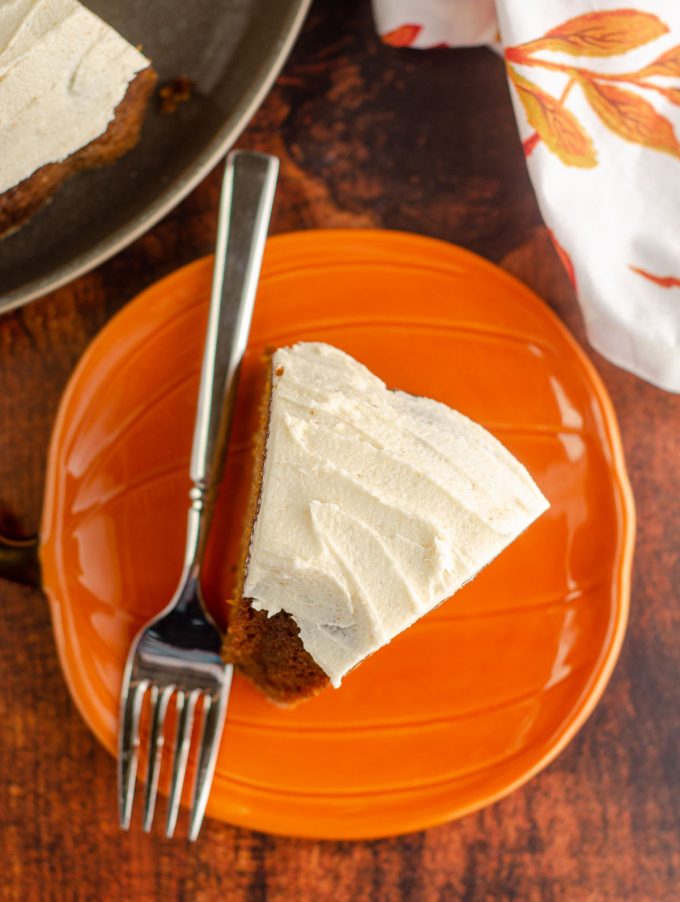
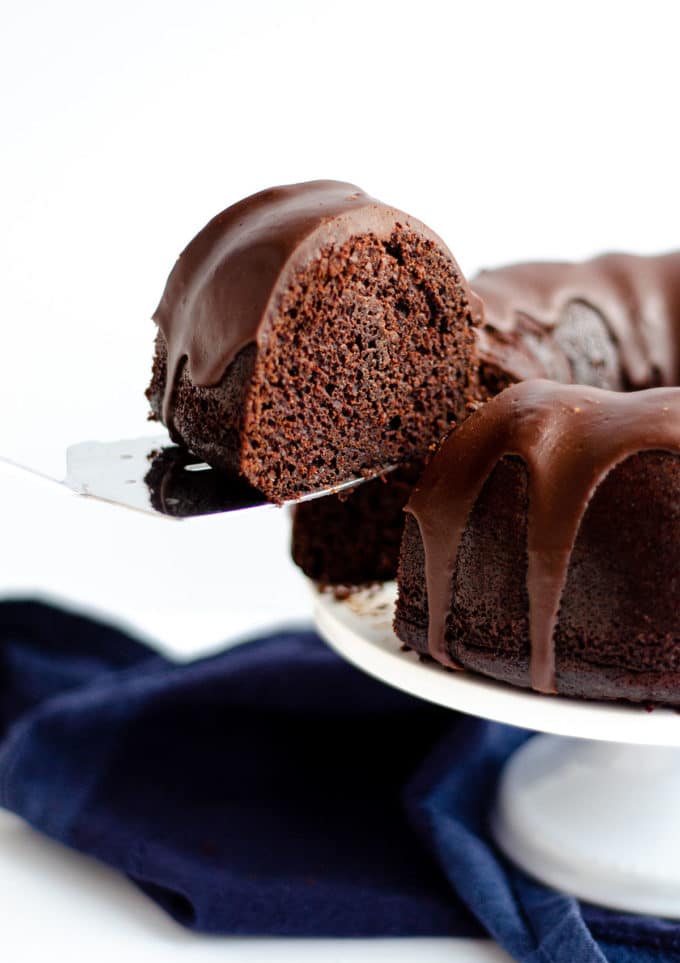
And while you’re at it, don’t forget to check out some of my other bundt cake recipes like my funfetti bundt cake, strawberry bundt cake, pumpkin bundt cake, or chocolate bundt cake. They are perfect for when you want a beautiful presentation without a whole lot of work!
Red Velvet Bundt
Ingredients
BUNDT CAKE
- 4 large eggs room temperature and separated
- 2 and ½ cups (300g) all-purpose flour be sure to measure properly
- ½ cup (60g) cornstarch
- 3 Tablespoons (22g) unsweetened cocoa powder
- 2 teaspoons baking soda
- 1 teaspoon salt
- ½ cup (113g) unsalted butter softened to room temperature
- 2 cups (400g) granulated sugar
- ⅔ cup (160mL) vegetable oil
- 3 teaspoons vanilla extract
- 2 teaspoons distilled white vinegar
- 3 teaspoons red gel coloring1
- 1 cup (240mL) buttermilk
CREAM CHEESE ICING
- 2 ounces (56g) full fat block cream cheese softened to room temperature
- 1 cup (120g) powdered sugar
- ½ teaspoon vanilla extract
- 2 Tablespoons (30mL) milk or cream
Instructions
BUNDT CAKE
- Place oven rack on the middle setting and preheat the oven to 350ºF (177ºC). Grease and flour (or use homemade cake release) a 10" bundt cake. Set aside.
- In a medium size bowl with a handheld mixer or the bowl of a stand mixer fitted with the whisk attachment, whip the egg whites until soft peaks form (approximately 2 minutes). Set aside or remove from mixer bowl and transfer to a smaller bowl.4 large eggs
- Sift the flour, cornstarch, cocoa powder, and baking soda, and salt together into a medium size bowl. Set aside.2 and ½ cups (300g) all-purpose flour, ½ cup (60g) cornstarch, 3 Tablespoons (22g) unsweetened cocoa powder, 2 teaspoons baking soda, 1 teaspoon salt
- In a large bowl with a handheld mixer or the bowl of a stand mixer fitted with the paddle attachment, cream the butter and sugar together on medium speed until light and fluffy (approximately 2-3 minutes).½ cup (113g) unsalted butter, 2 cups (400g) granulated sugar
- Add the vegetable oil and beat again until completely incorporated. Add the egg yolks, vanilla extract, vinegar, and food coloring and beat again on medium speed until everything is combined.⅔ cup (160mL) vegetable oil, 3 teaspoons vanilla extract, 2 teaspoons distilled white vinegar, 3 teaspoons red gel coloring1
- Turn the mixer down to low speed and add the dry ingredients in three additions, alternating with half of the buttermilk. Do not overmix batter. Gently fold the whipped egg whites into the batter with a spatula.1 cup (240mL) buttermilk
- Pour the batter into the prepared bundt pan. Bake cake for 40-44 minutes or until a toothpick inserted in the center comes out mostly clean. Remove from oven and allow to cool for 10 minutes on a wire cooling rack.
- Remove from oven and allow to cool for 10 minutes on a wire cooling rack. Using oven mitts, carefully flip the bundt cake onto your serving dish/platter. To do this: flip the serving dish/platter over and place on top of the cooling bundt pan. Flip everything over and allow cake to cool completely in the pan, sitting on the serving dish. When cake is completely cool, lift pan off of the cake.
CREAM CHEESE ICING
- When you are ready to ice the bundt cake, make the icing. In a large bowl with a handheld or the bowl of a stand mixer fitted with a paddle attachment, beat the cream cheese on high speed until smooth and creamy.2 ounces (56g) full fat block cream cheese
- With the mixer on low, add the powdered sugar, vanilla, and the milk or cream and continue to mix (add liquid slowly and stop at desired consistency or add more liquid if you'd like it even thinner). Increase mixer speed to medium-high and beat for 1 minute.1 cup (120g) powdered sugar, ½ teaspoon vanilla extract, 2 Tablespoons (30mL) milk or cream
- Slowly pour the icing evenly over the whole bundt cake and allow icing to set before serving (about 1-2 hours). Cake stays fresh covered at room temperature for up to 4 days. Cake may be covered and refrigerated for up to 7 days.
Notes
- Food coloring: I prefer gel color. If you only have liquid food coloring, use approximately 2 Tablespoons.
Nutrition Disclosure
All nutritional values are approximate and provided to the reader as a courtesy. Changing ingredients and/or quantities will alter the estimated nutritional calculations.
This recipe makes for a perfectly moist, sweet, delectable cake! Be sure to use Lynn’s cream cheese icing recipe as well as it pairs perfectly.
Thanks, Susan! So glad you got to try some 🙂
This is the perfect red velvet cake and the frosting is the best. I could spread it in everything! A delicious treat for many occasions. My family loves it.
I never knew the history behind this cake. How interesting. Your cake turned out perfectly.
That crumb is perfect and I love all of the detail for the perfect bundt cake!! So many great tips, making this soon!
Thanks so much, Kathleen!
Thanks, Michaela 🙂
Such a gorgeous red color…just perfect for celebrating Valentine’s Day!
Thank you, Colleen!
Oh yum! The frosting just pours over the cake and looks spectacular and so moist and delicious.
Thank you, Rebecca! I love me a good icing pour over a bundt!
Red velvet is one of my favorite cakes! and yours looks so elegant and perfect!! I’ll give your recipe a try
Thanks so much, Kathy!
This cake is so beautiful and such a great idea for Valentine’s day! I am so excited to make this, I know my husband will love it! Thanks for the idea and recipe!
Thanks so much, Kathryn!
This looks so tasty and pretty! Now I’m wondering if I can get a smaller pan for a smaller household. I’d love to make more often!
This would fit perfectly halved in a 6 cup bundt pan or halved and turned into a 6″ cake!
Such a pretty cake and what a gorgeous color!
Thanks so much, Heather!
I’ve never made or eaten anything red velvet, time to change that! Must go dig out the bundt pan!
Oh my gosh, YES!!
Stunning cake!This will win anyone’s heart! Love this cake and can’t wait to try it.
I love red velvet and this is one gorgeous cake! The perfect dessert for Valentine’s day although, I could eat this deliciousness any time of the year.
I love red velvet! This bundt cake is a beauty!
I JUST made this cake and can’t wait to dig in! Thanks for sharing this amazing recipe, Lynn!!
Thanks so much, Sue!
Thank you, Julie! I love this cake so much!
I am a seasoned baker. I followed the directions exactly. I baked the cookies until set-9 minutes. They are hard as can be.
Hi, there! First of all, you left this comment on a cake post, so I’m not sure where to even start with responding to your comment. If you meant to comment on my red velvet cookies, I’m not sure what to tell you as those have several 5-star reviews and I can personally say that when they are baked, they are super soft and chewy.
Made this Red Velvet Bundt cake for Super Bowl weekend and it was a hit! Everyone loved it! I will definitely make it again!
So happy to hear this, thank you!
This cake was delicious! I made it for a Super Bowl party and everyone loved it! I will make it again!
Thank you so much! 🙂