
Best Recipe for Fresh Peach Pie
As an Amazon Associate, I earn from qualifying purchases. Read the full disclosure here.
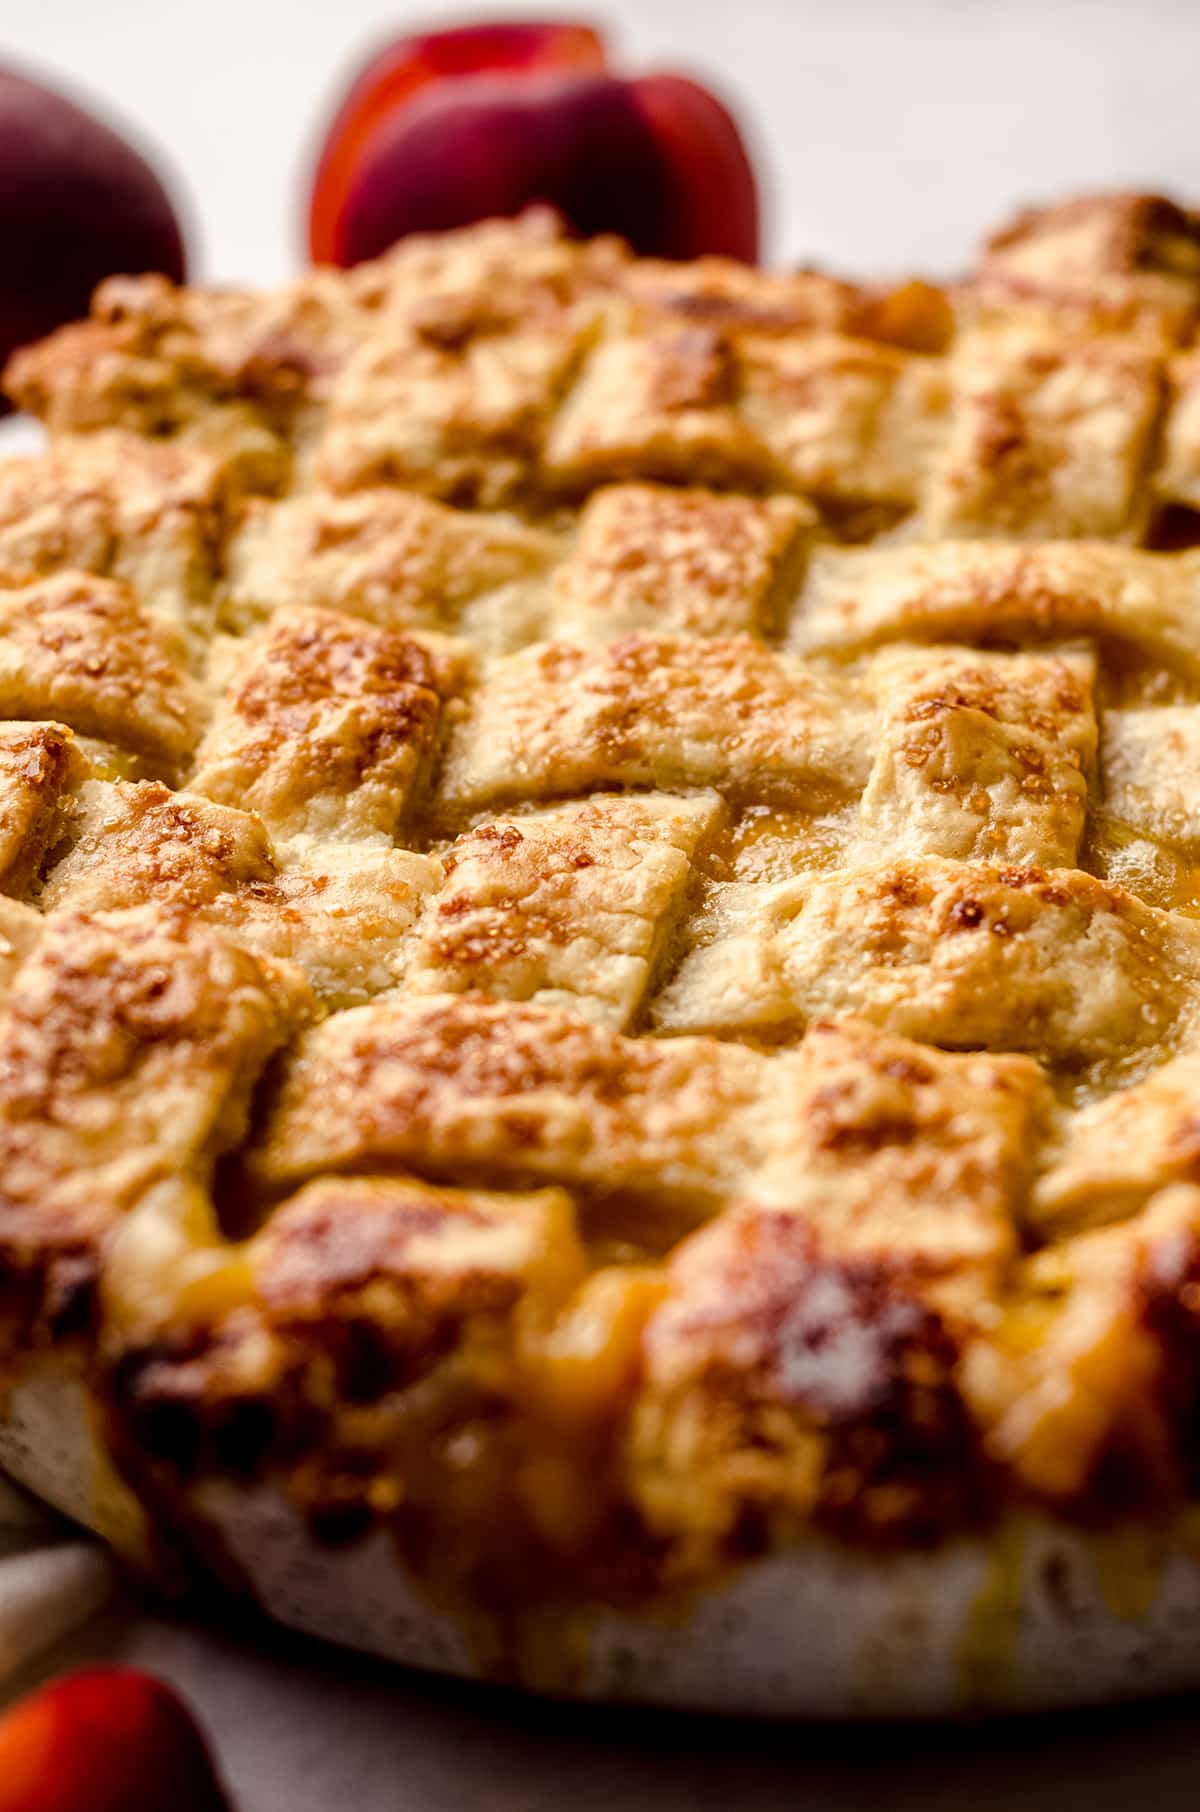
This homemade peach pie recipe features tender, juicy peaches inside a buttery and flaky homemade pie crust. Finish it off with a beautiful lattice top, a sturdy double crust, or a cinnamon streusel topping, and a scoop of fresh peach ice cream. And be sure to check out my blackberry peach pie next!

The Best Peach Pie Recipe with Fresh Peaches
Every year for the past 6 years I’ve had a monthly feature of a particular theme. Each month I share a recipe centered around that theme, for a total of 12 throughout the year. In the past I’ve done cakes, muffins, breads, brownies, and no bake recipes. This year, it’s all about the pies!
I came to the stark realization that, as a predominantly dessert blog, I had so few pie recipes! Naturally, I wanted to remedy that situation as quickly as possible so I immediately knew what my next theme would be: pies.
So far I’ve shared recipes for banoffee pie, chocolate chess pie, Butterfinger pie, coconut custard pie, lemon meringue pie, strawberry pretzel pie, and now this summer-inspired fresh peach pie.

It’s filled with all the peach season has to offer, and is sure to be one of the dessert highlights of the season. We all know there is nothing like fresh peaches, right!?
Well, think of all of the deliciousness of a warm, ripe peach and add in the flaky goodness of a homemade pie crust. How could you go wrong?
The answer is, my friends, is that you can’t. This old fashioned style pie is an absolute delight when served with a scoop of ice cream (although it’s perfectly fine without it) or dollop of whipped cream. It’s the perfect treat after a long day of work, or the perfect excuse to invite friends and family over.
Best of all? You’ll love how simple it is to make this fresh peach pie recipe from scratch. A little time spent slicing and chopping peaches, a quick simmer in a saucepan, and weaving a lattice crust adds up to a relatively easy preparation.
If you want to save time, you can easily opt for a double crust in place of a lattice crust OR use store-bought. Whatever you have to do, make sure this peach pie recipe happens sometime soon. You won’t regret it!
Peach Pie ingredients
There are just two elements to fresh peach pie: pie crust and peach filling. Each of them are pretty simple on their own, but come together to create a buttery, fruity, savory, yet sweet experience that just cannot be beat.
HOMEMADE PIE CRUST
For the most luscious, buttery fresh peach pie ever, I highly recommend you use my favorite homemade pie crust recipe. It’s a total cinch to pull together, and it tastes far better than any store bought crust that I’ve used.
To make the pie dough, you’ll need all purpose flour, sugar, salt, super cold unsalted butter, chilled vegetable shortening, and some ice water. Yup, that’s it!
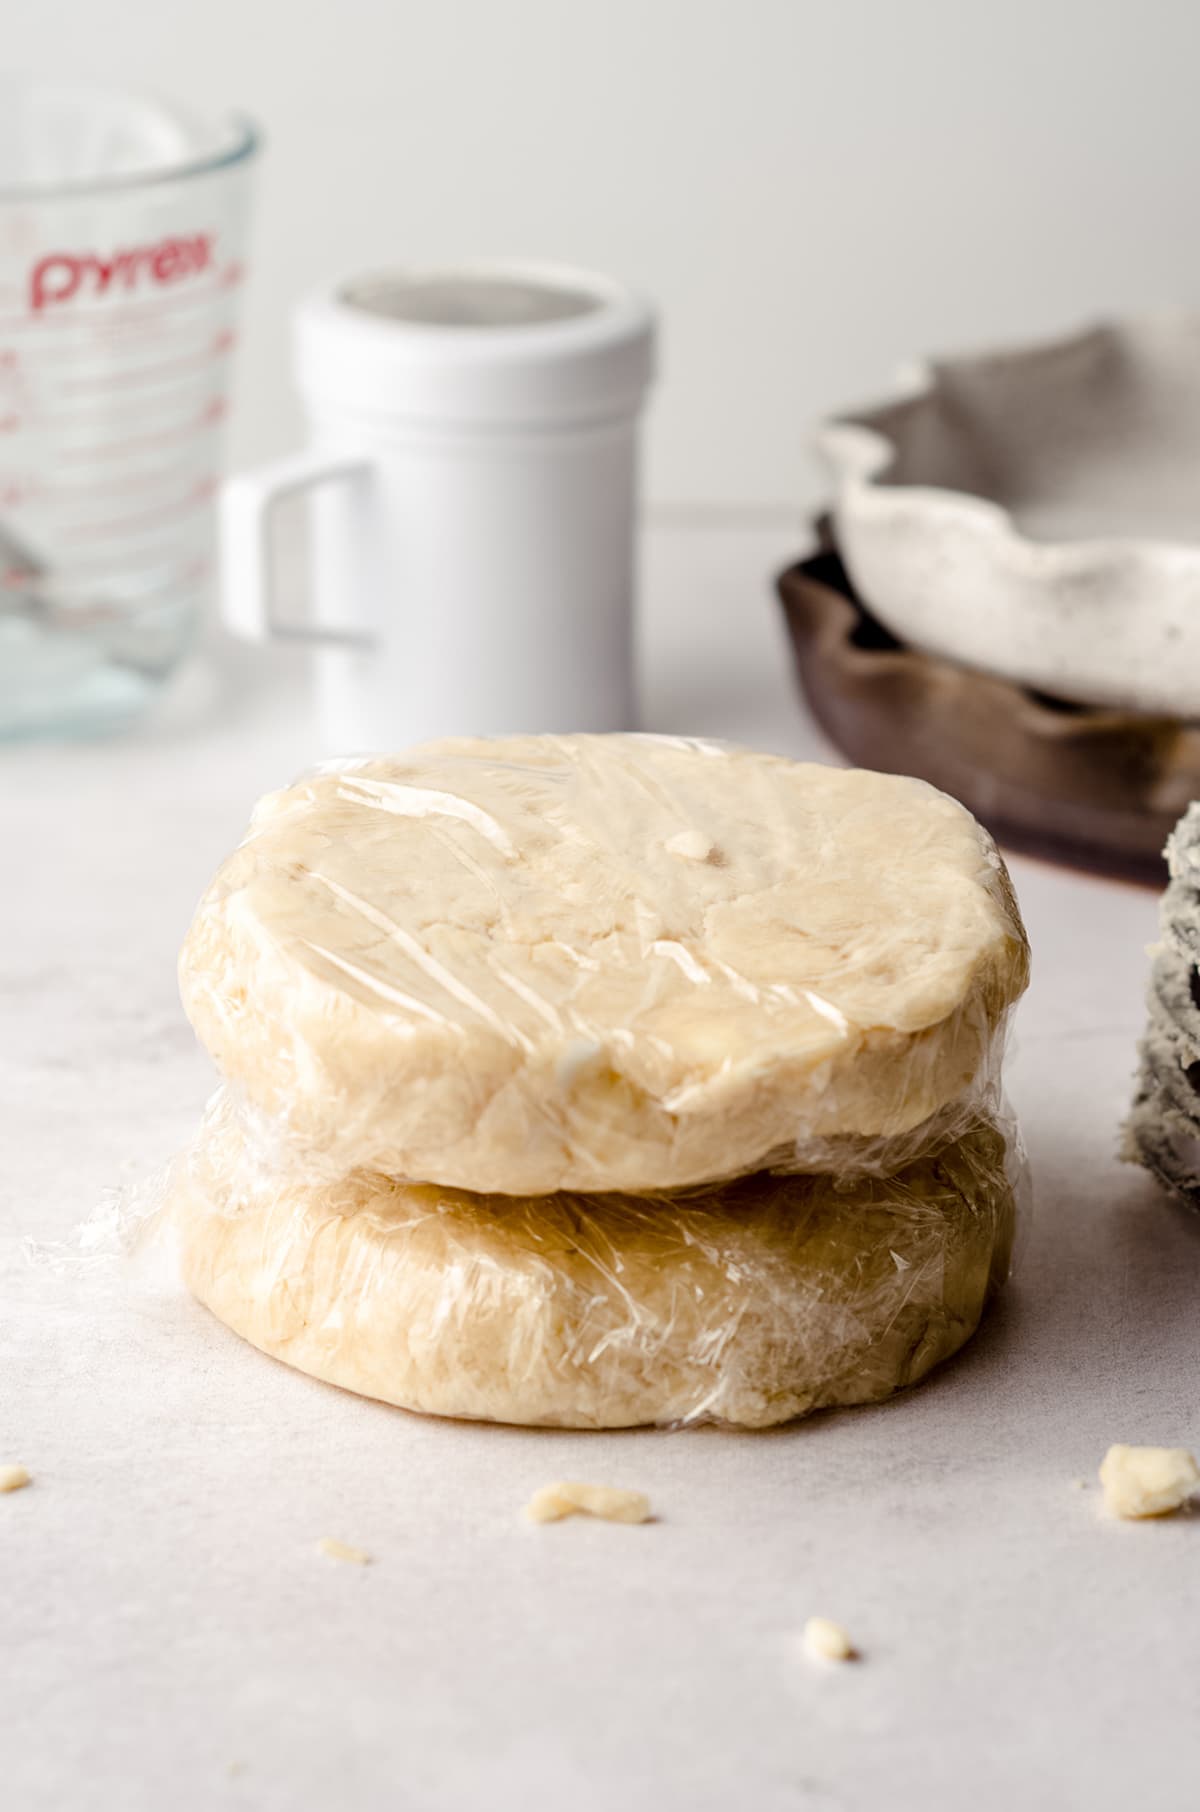
If you’re opting to use homemade crust, just make sure to prep the dough at least 2 hours beforehand. This will give it a chance to chill and firm up, making the whole rolling out process SO much easier.
You can make your homemade pie dough up to 5 days in advance, or you can make it in large batches and store in the freezer. Just remember to thaw it overnight in the fridge before using.
FRESH PEACH PIE FILLING
To give this pie ALLLLLL of the fresh peach flavor, we absolutely must use fresh peaches. While some people like to use canned peaches, they just don’t hold up in a pie, and the mushy texture just isn’t for me.
While I can’t recommend canned peaches, frozen peaches will do during the off season. They aren’t cooked prior to freezing, so they hold up better during baking. Just make sure to thaw them first and drain off any excess liquid.

BUT if you have access to fresh, in season peaches, you absolutely must use them. There is nothing as delicious, juicy, and flavor packed as a fresh, in season peach. They make phenomenal pies, cobblers, and baked goodies, so if they can be used, I insist that you do so!
In addition to 6 or 7 peaches (about 2 and ½ pounds), you’ll need some sugar, cornstarch, unsalted butter, lemon juice, and a few tablespoons of all-purpose flour. Thanks to the flavor from the peaches, we can keep things pretty simple and still get delicious results.

How to make Fresh Peach Pie
This recipe for fresh peach pie keeps things nice and simple. Crust, filling, top crust (or otherwise– see notes). That’s it!
STEP #1: PREPARE THE PIE PLATE
To get started, you’re going to want to grab one disk of homemade pie dough from the refrigerator. Make sure it has chilled for at least 2 hours, otherwise it won’t roll out properly and it’s just not going to be a good scene.
Place the disc of pie crust and roll it out into a circle. Gently lift it to line a 9″ pie crust. Some overhang is totally fine.
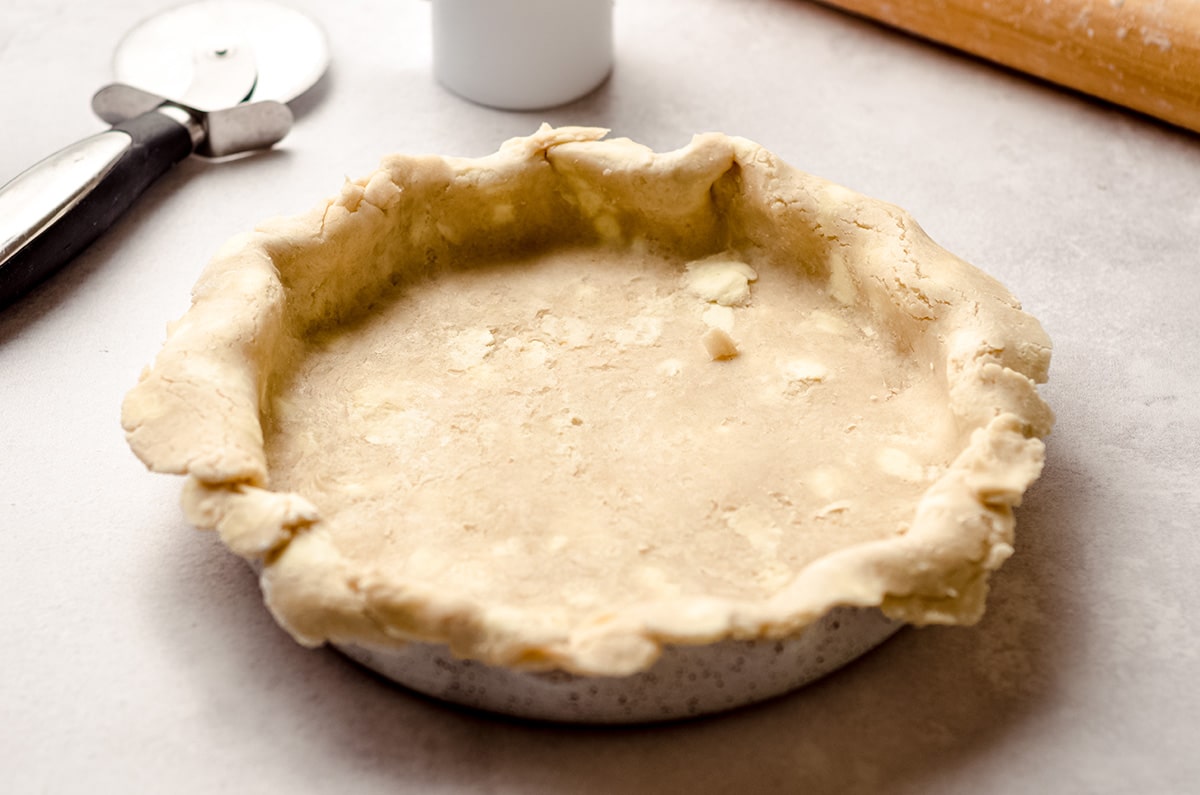
Once the pie plate has been lined with the crust, press it down gently to form into the pie plate and place in the refrigerator to chill while you prepare the peach filling.
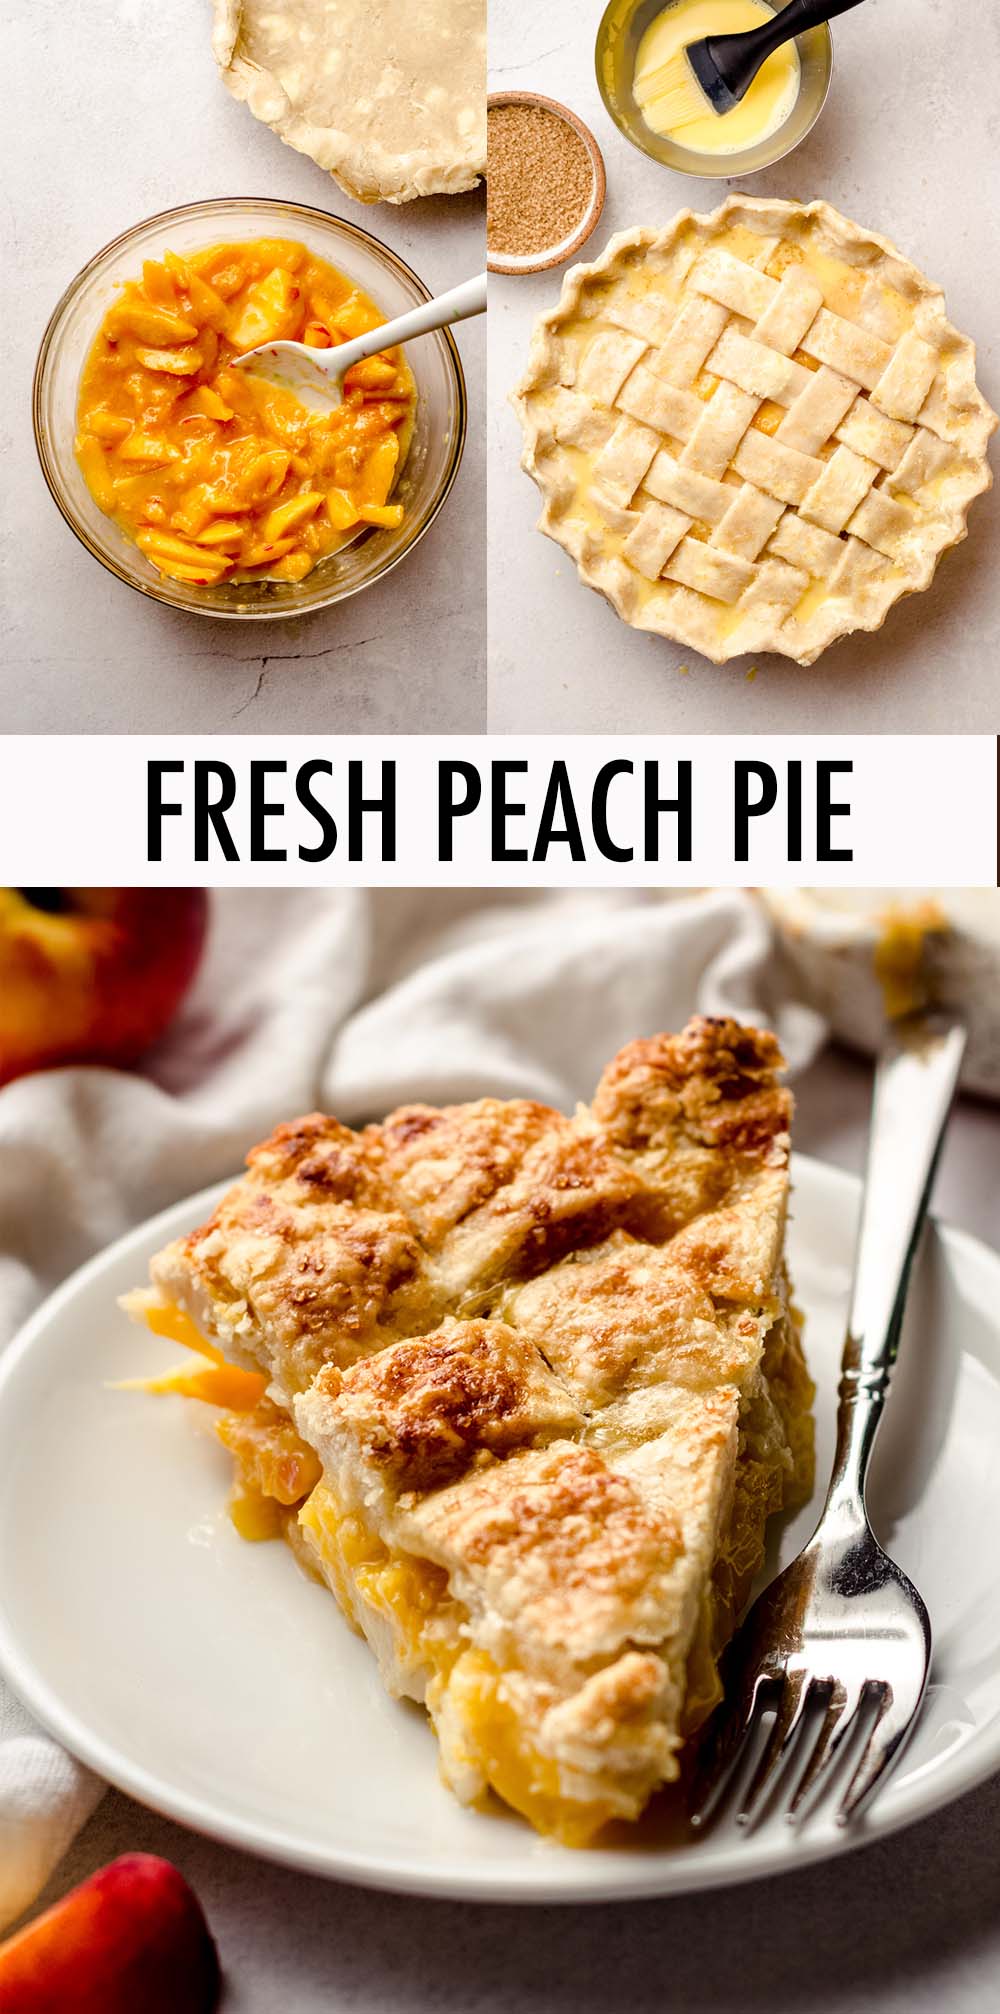
STEP #2: MAKE THE PEACH FILLING
To prepare your peach filling, you need to prepare the peaches 2 different ways – 1 of the peaches will need to be chopped, and the remaining 5 or 6 peaches sliced into ½” slices and placed in a large bowl.
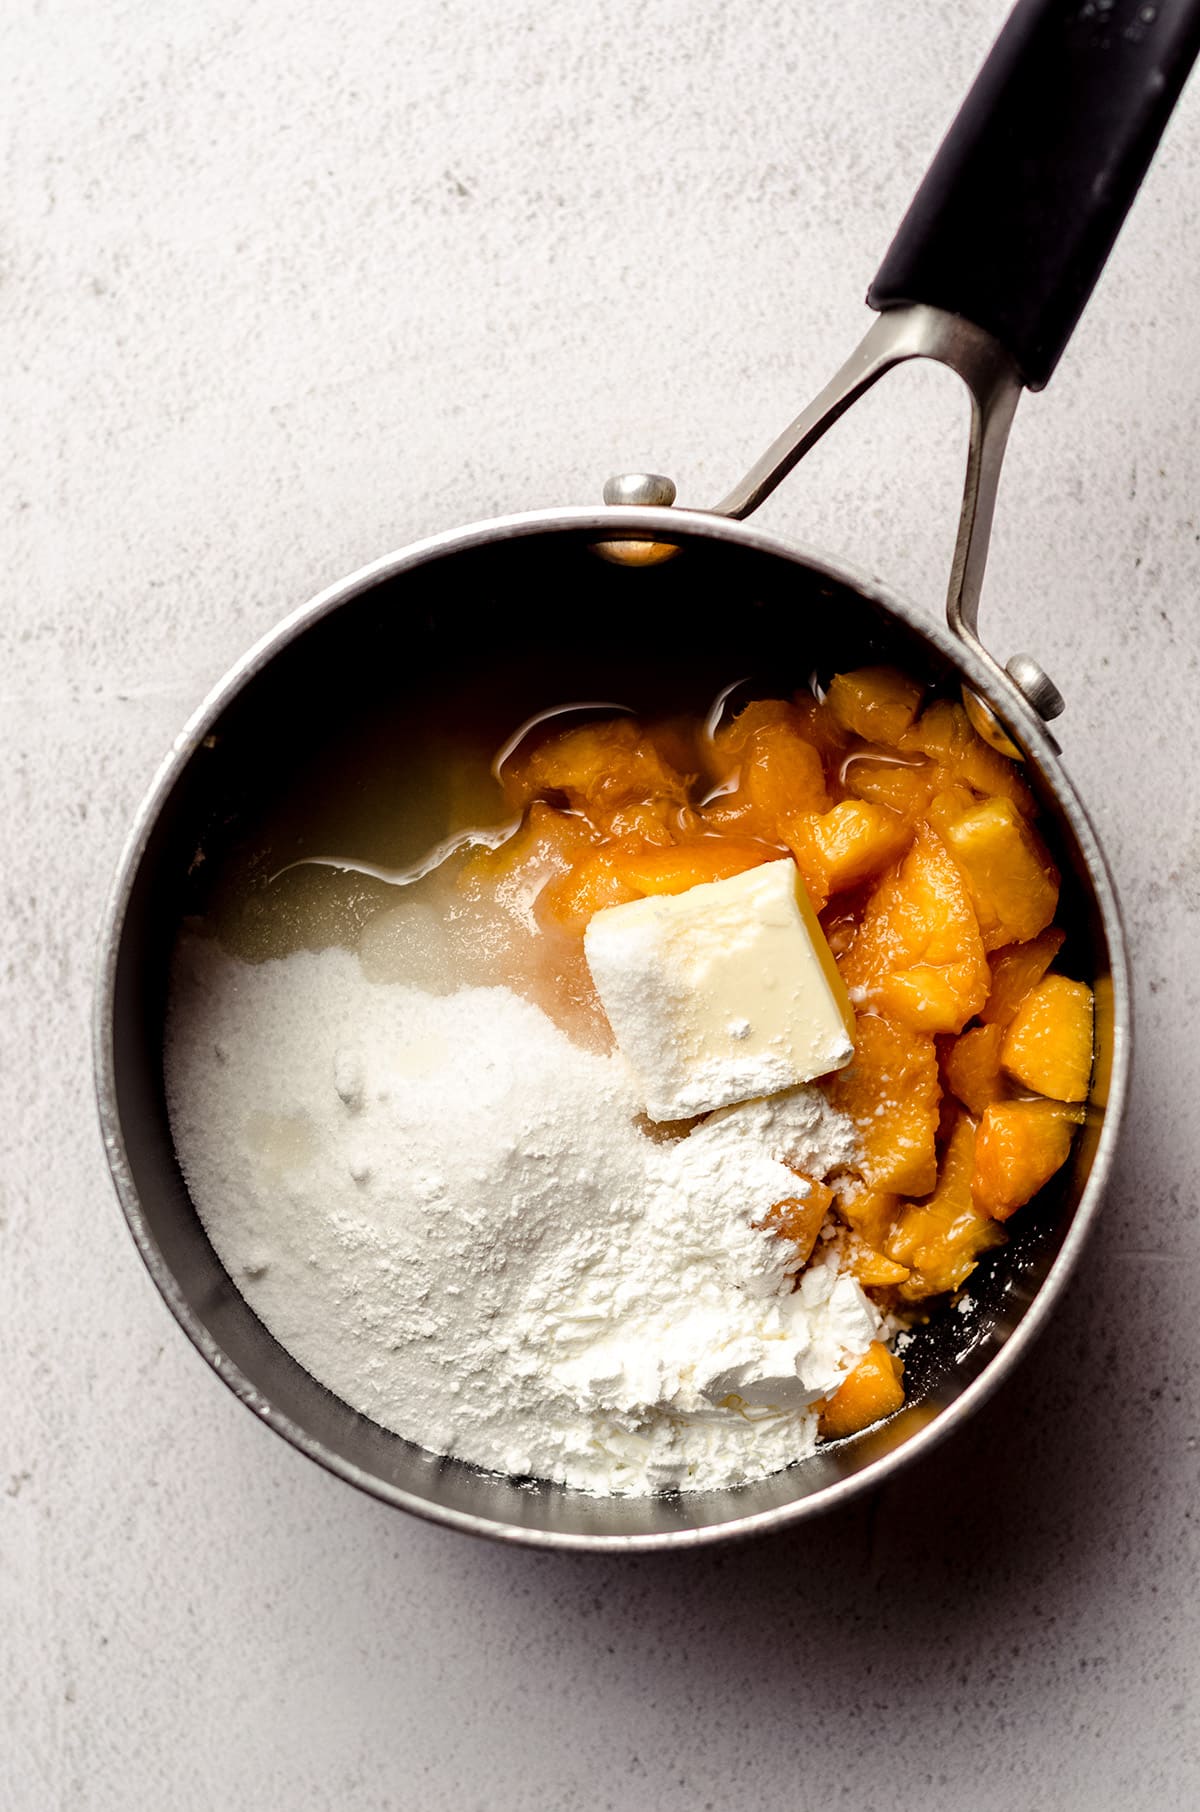
Add the chopped peach pieces into a small saucepan, leaving the slices in the large bowl. Add in the sugar, cornstarch, butter, and lemon juice. Heat the saucepan over medium heat while stirring often, bringing the mixture to a boil.
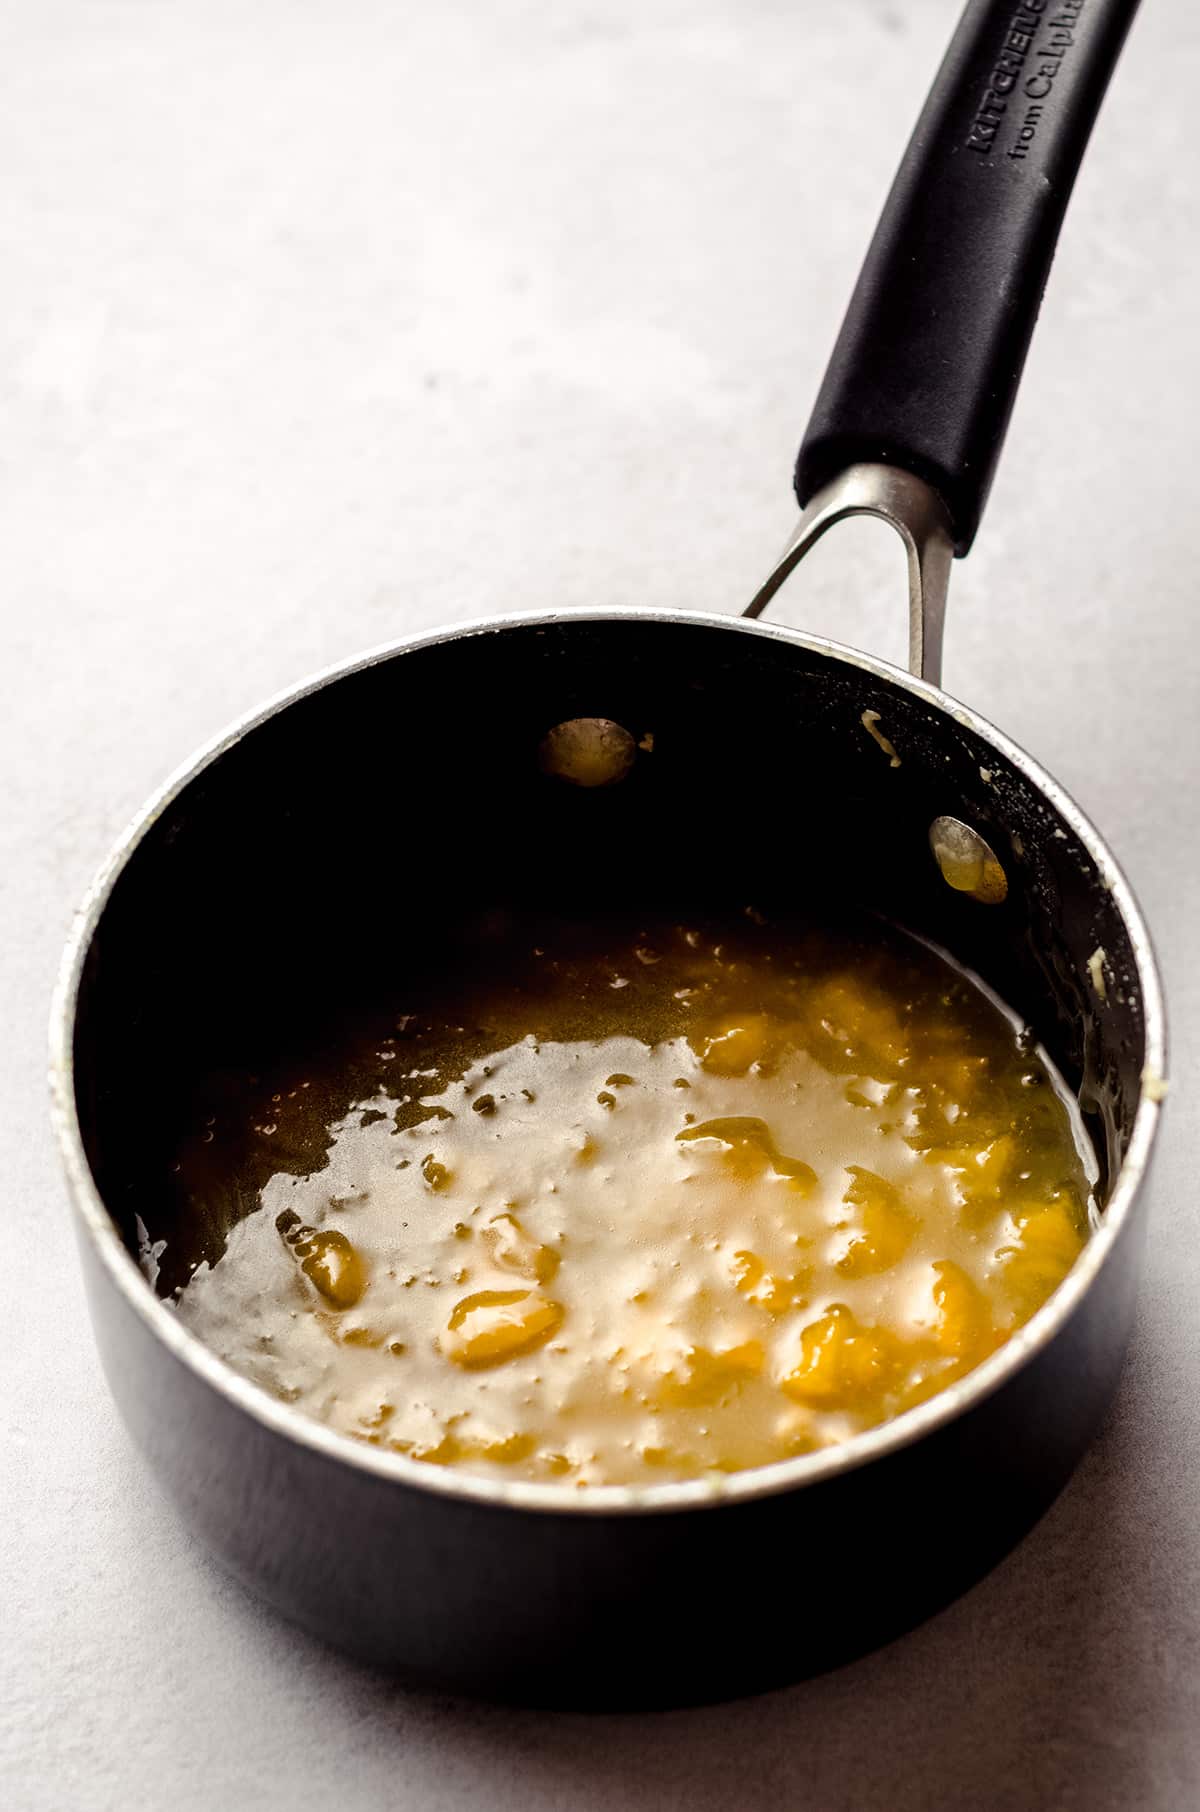
Once the peach mixture reaches a boil, reduce the heat to low and simmer for about 5 minutes, or until thick. Make sure to stir occasionally to prevent sticking.
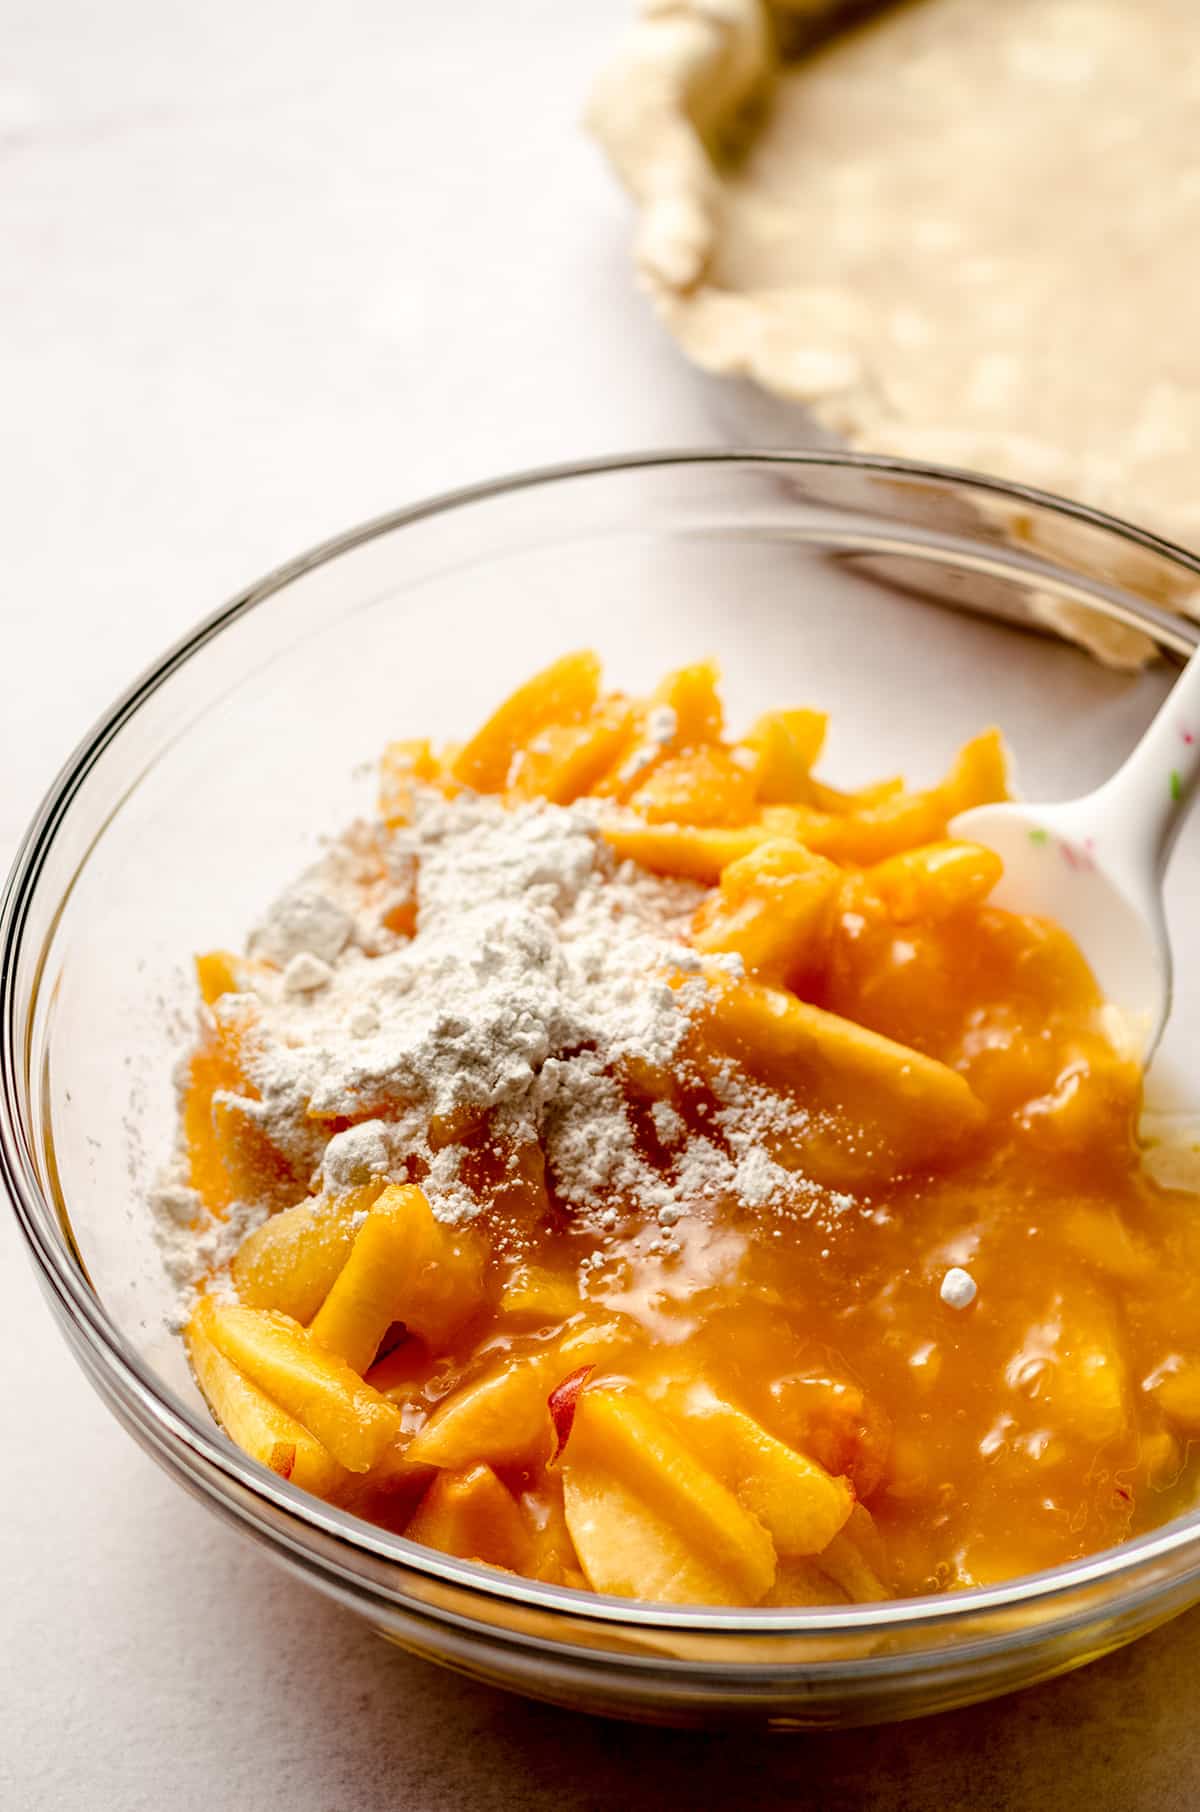
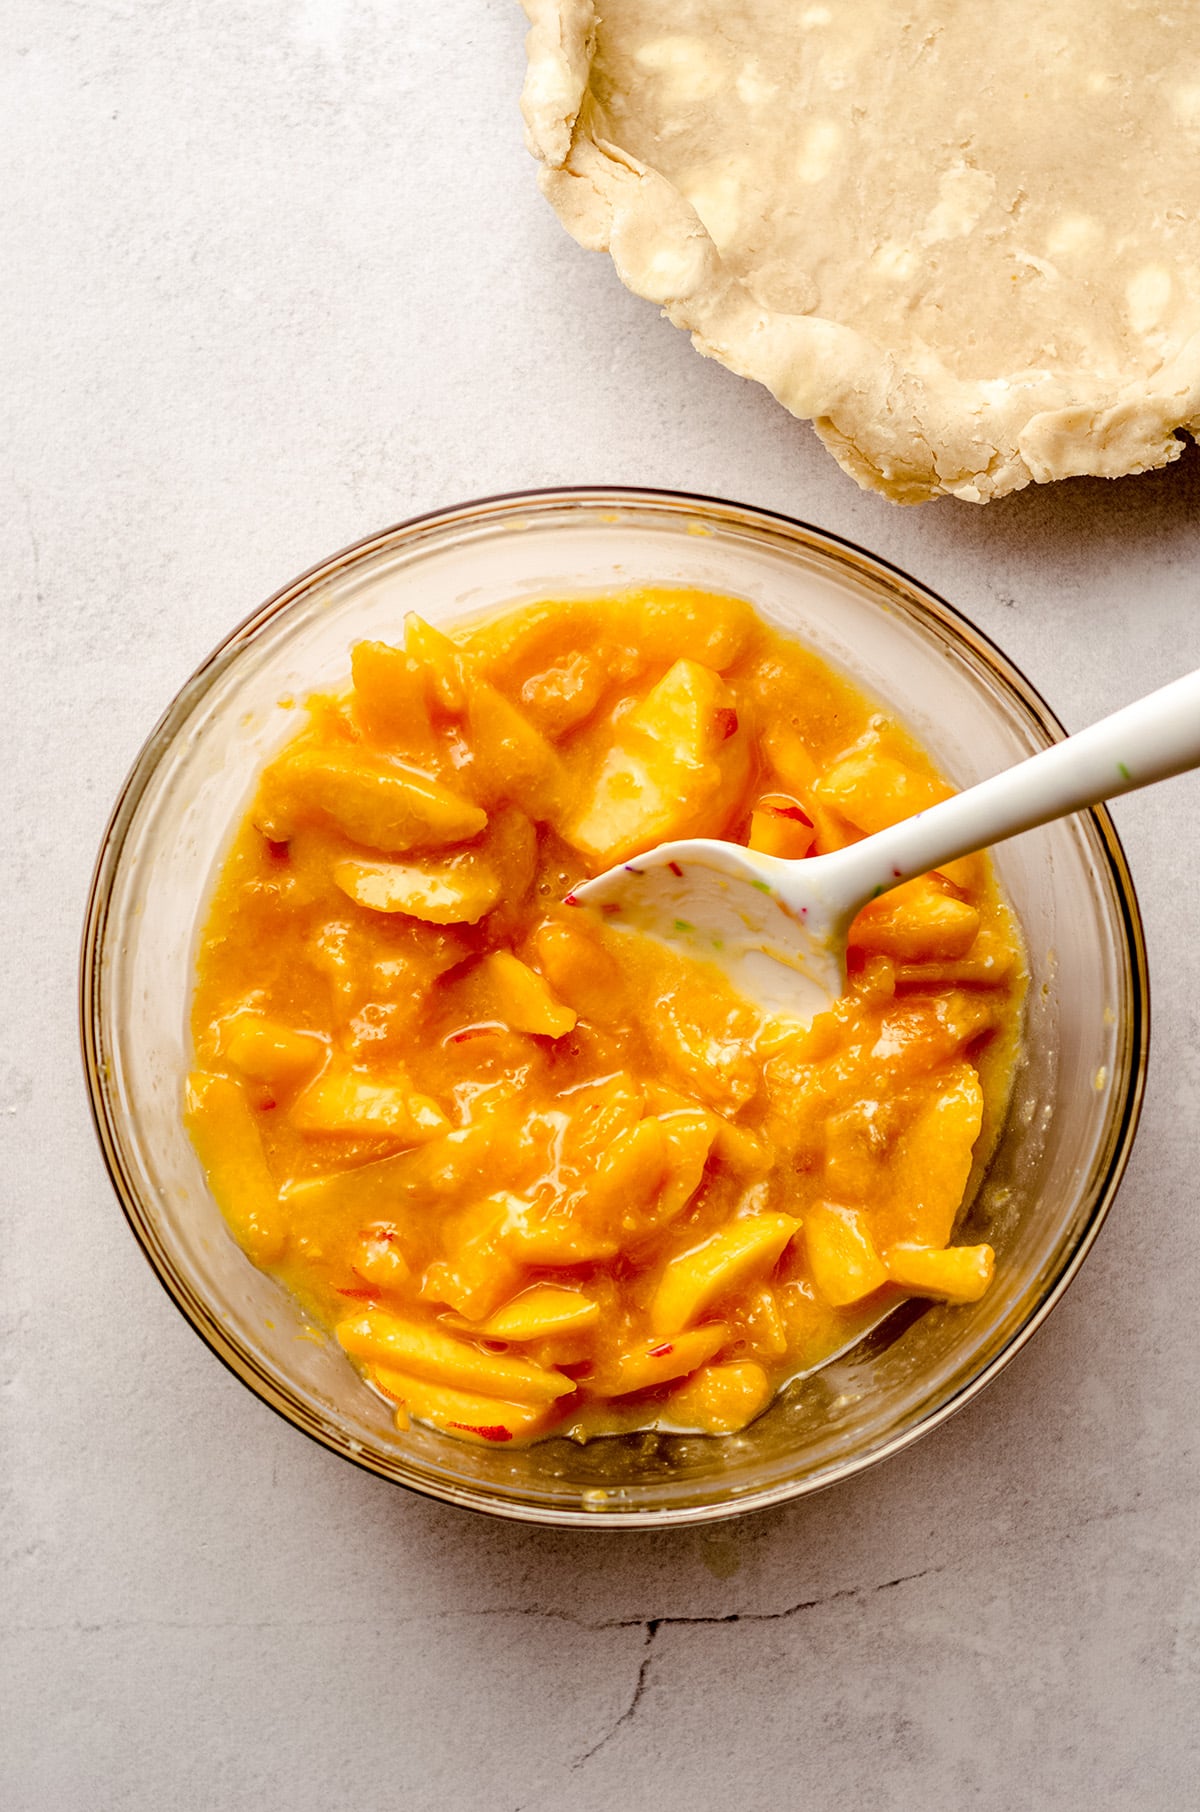
Once your peaches have simmered for about 5 minutes, remove the saucepan from the heat and pour into the bowl of prepared peach slices. Stir everything together really well.
Add in 2 tablespoons of flour and stir again to combine. If your peaches are super juicy and liquidy, you can add another tablespoon of flour to help them thicken up a bit. Set aside as you prep the next step: the lattice top.
STEP #3: PREPARE THE LATTICE TOP
Take the second disc of pie dough into a 12″ circle. This layer requires a bit more precision than the bottom crust, so I like to use a tape measure or a ruler here to get close to the exact size I need.

Another tip is to roll it out on a large circular surface (like a pizza stone or marble cutting board) so you can stick it in the fridge if you find the butter and shortening are melting too much.
You’ll know this is happening when the dough is difficult to roll out and hard to work with. Just stick it in the fridge for 10 minutes or so and try again. This really only happens during those really hot days, so no worries if you’re air conditioned and working quickly.
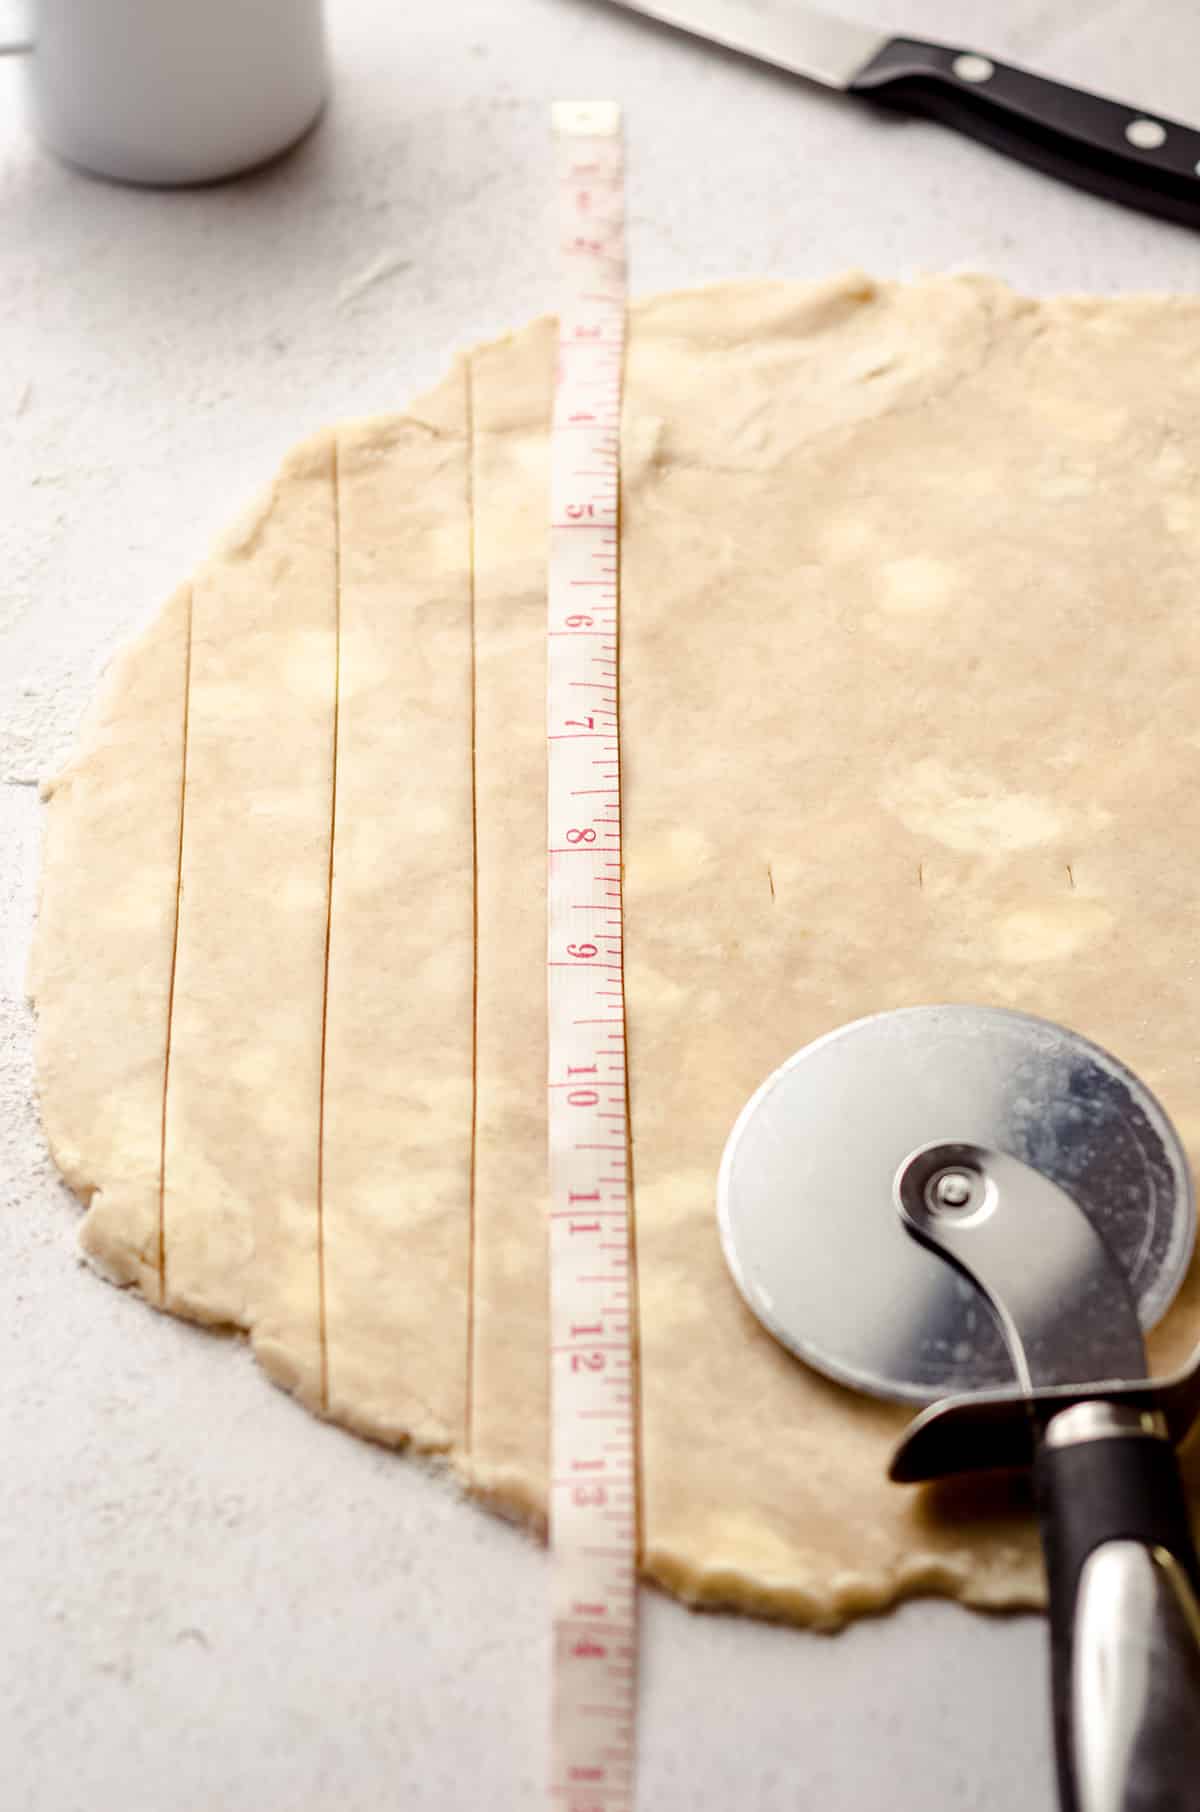
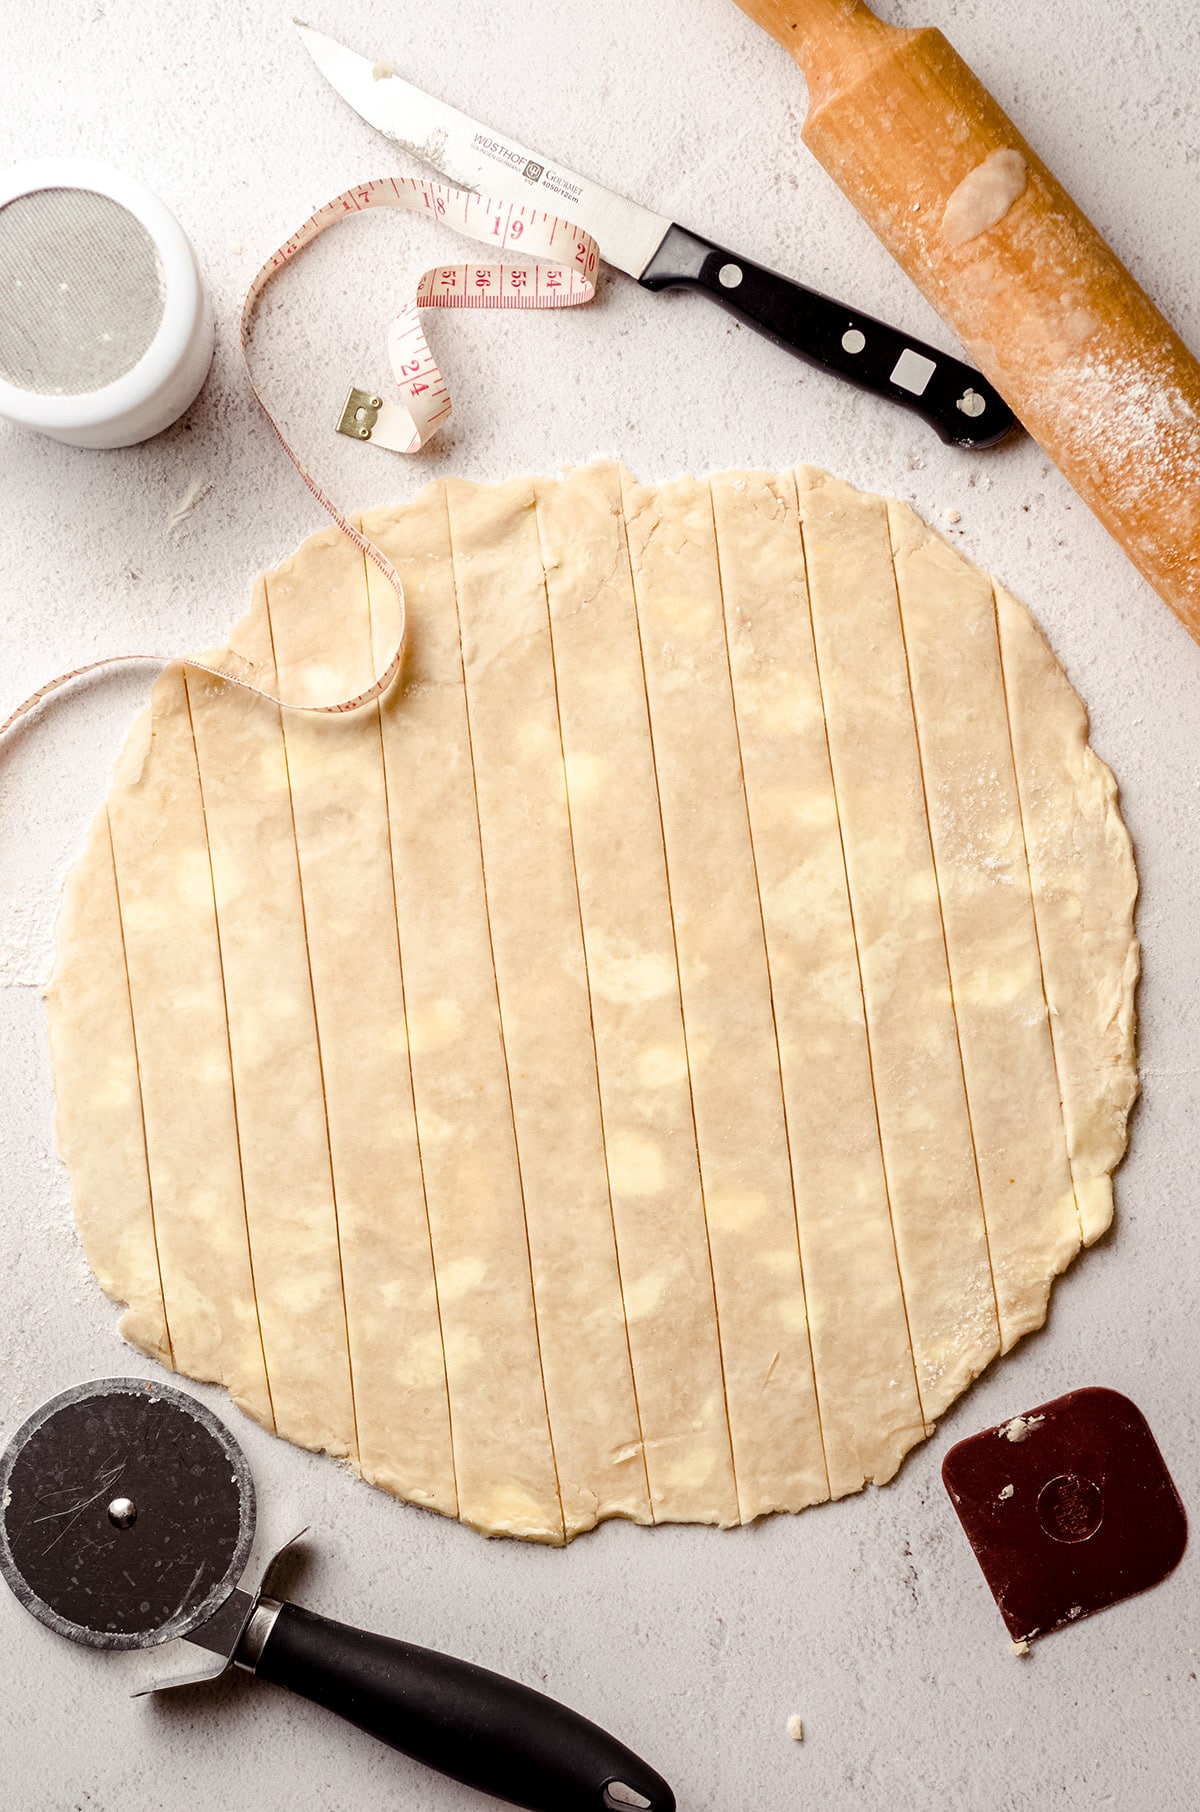
To cut your top crust into strips, use a measuring tape or ruler to score 1″ strips across the diameter of the pie crust. Run a pizza cutter or a sharp knife to cut a straight line along each of the 1″ marks. Once finished, you should have about 12 strips of dough.
If your butter and shortening has melted from a lot of handling, place the strips back in the fridge to firm up. If you didn’t use a large, round surface you can transfer them to a piece of parchment and lift them gently. After about 10 minutes, you should be ready to rock and roll again.
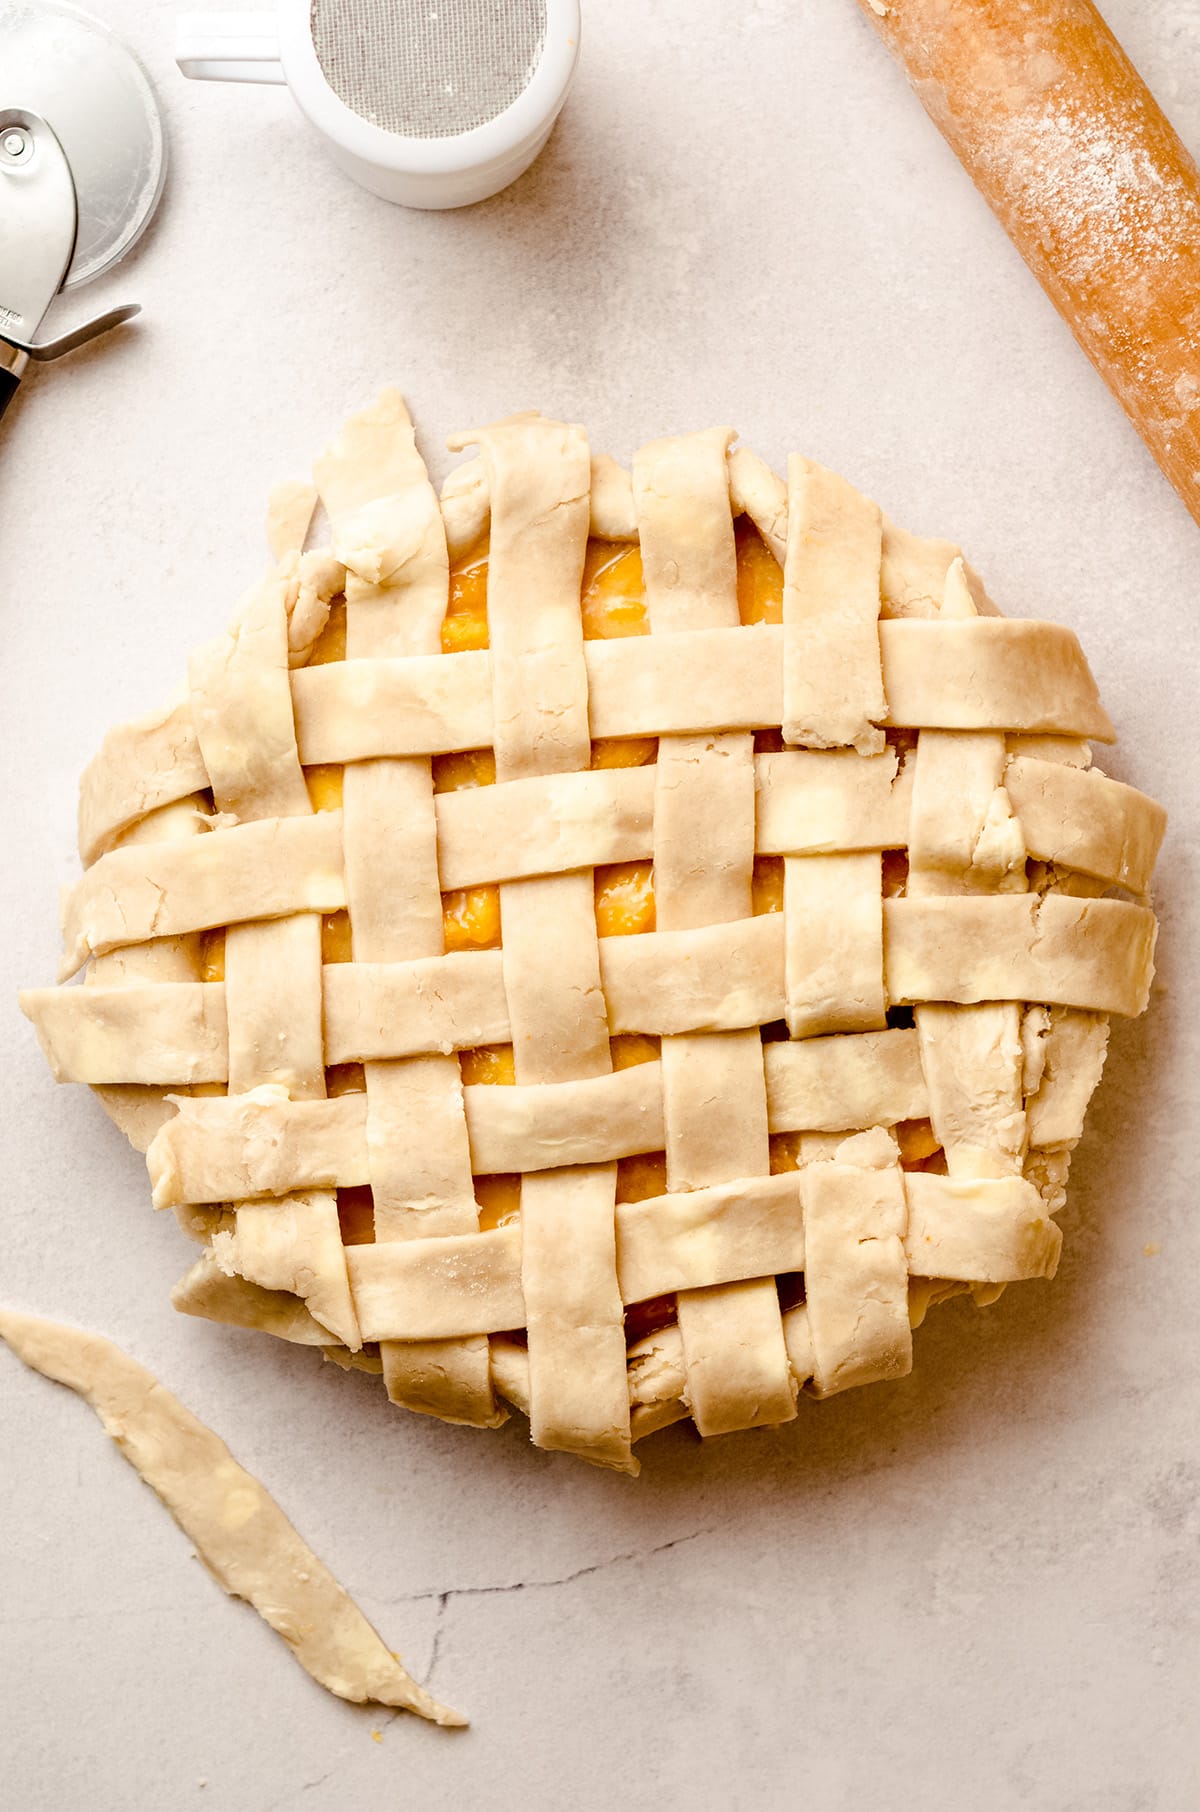
STEP #4: LATTICE THE CRUST
Now we’re ready to get to the fun part! First, we fill the pie with a delicious fresh peach filling, and then work the lattice layer. It requires a little bit of detail work, but the beautiful presentation is totally worth it.
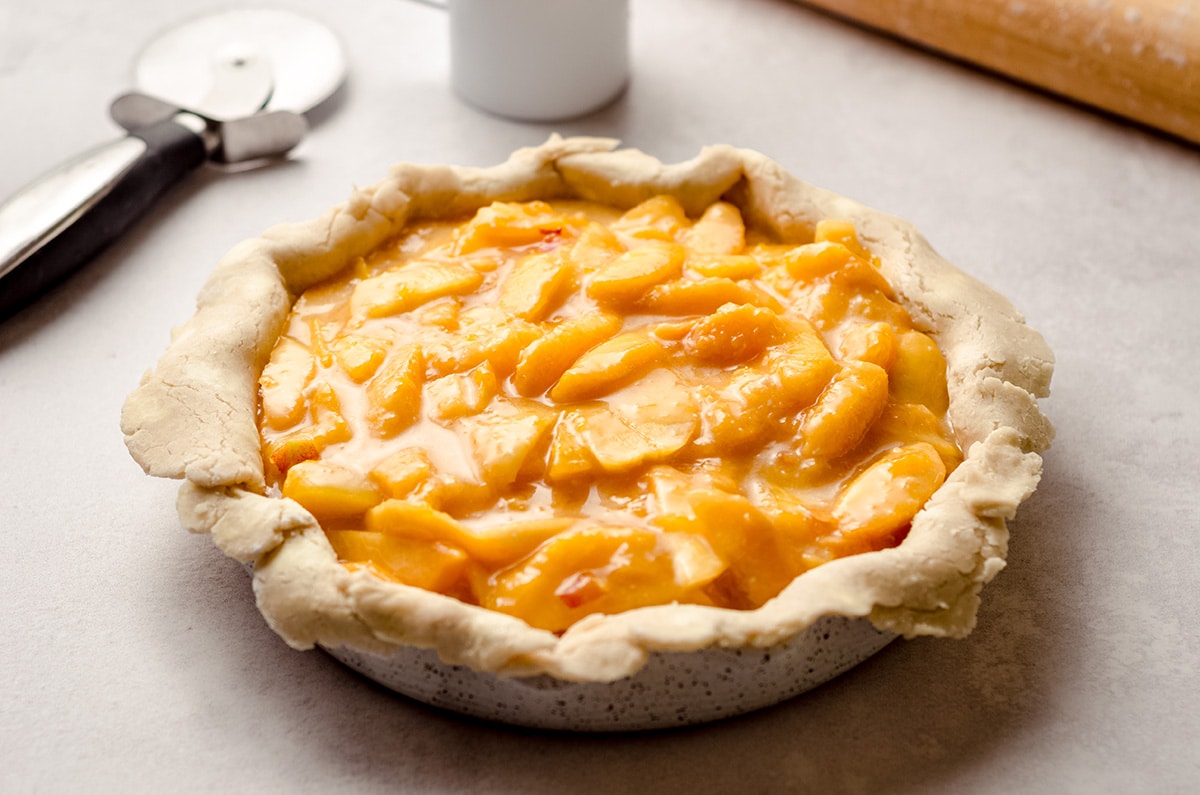
Take the pie plate out of the fridge, and pour the prepared peach filling (any any juice collected at the bottom of the bowl) into the crust. Spread them out into an even layer.
I go into detail (with step-by-step instructions) in my how to make a lattice crust tutorial, but I’ll give you a general rundown here so you can create a simple, yet pretty lattice crust for your peach pie.
Start off by placing the strips of pie dough in front of you. Starting with the left-most strip, number the strips from 1-12.
You can do this mentally, or with a piece of tape on whatever surface you’re working on. Work from left to right, with your first strip on the left being #1, and the final strip on the right being #12.
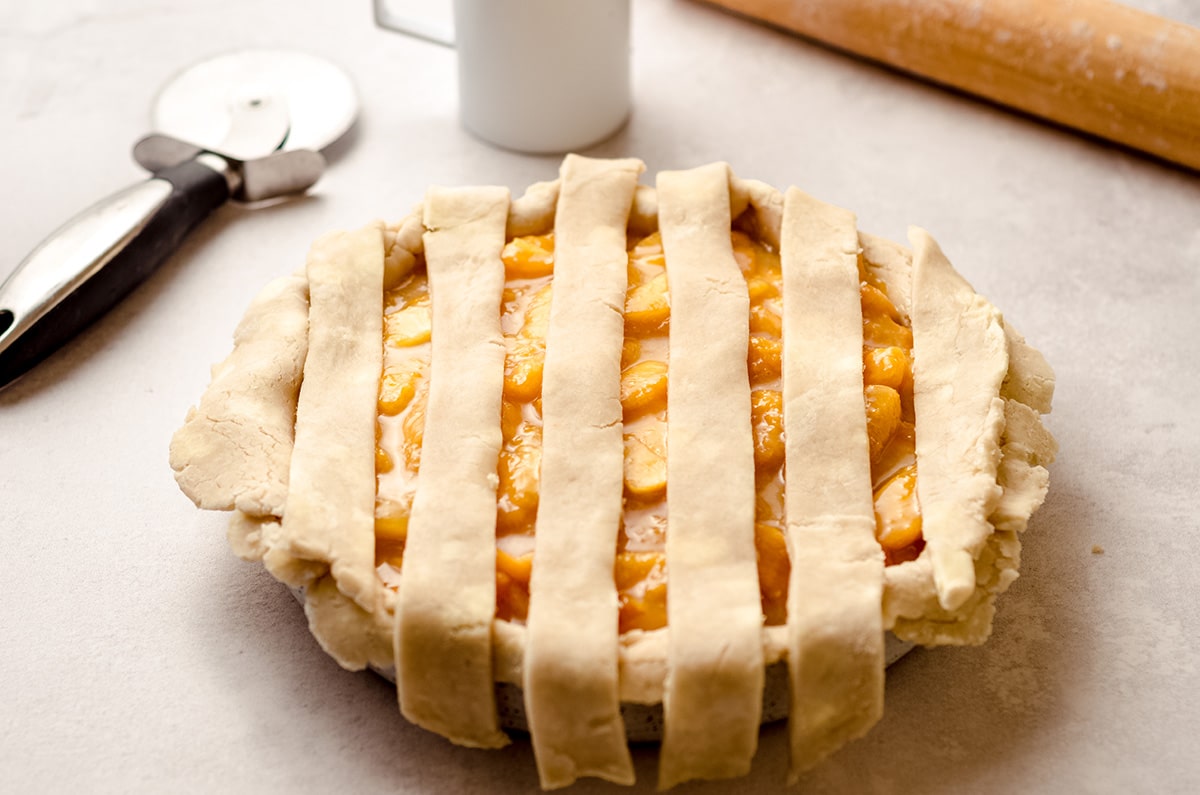
Working with every other strip (2, 4, 6, 8, 10, 12), lay 6 strips vertically on top of the peach filled pie. Make sure to evenly space them to get the best possible results. It should work out that shorter strips are on the edges of the pie, while longer strips are in the middle.
How to weave the lattice for Fresh Peach Pie
Again, for the full rundown, make sure you check out my how to make a lattice crust tutorial or the written instructions in the recipe card. Here’s the basic idea for how to weave your crust:
- Fold every other strip (2, 6, and 10) away from you, slightly past halfway so they’re lying on top of themselves.
- Pick up strip #7 and lay it slightly off center in the horizontal position.
- Unfold strips 2, 6, and 10 back over the pie and the strip you just lay, then fold back 4, 8, and 12.
- Repeat with strip #5, working toward yourself. Fold 2, 6, and 10 back again.
- Repeat with strip #3.
- Now, working toward the other side in the opposite direction (up from strip #7), fold strips 2, 6, and 10 toward you, then lay strip #9 across the pie. Fold back 4, 8 and 12.
- Repeat with strip #11. Fold 2, 6, and 10 back one last time.
- Finish with strip #1, if needed. Most often, I end up discarding the #1 strip, as there is ample coverage of the pie, but that varies each time.
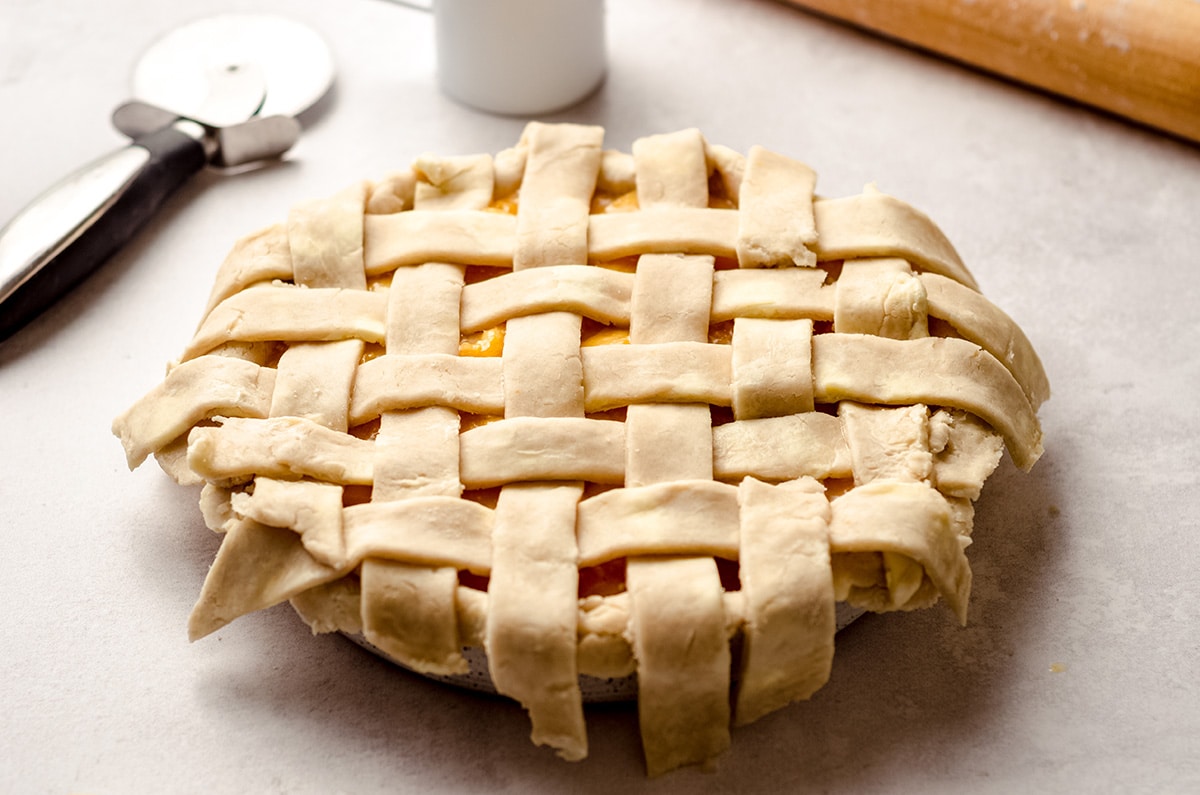
Once your lattice crust has been weaved, there is no need to cut off excess pie dough. Instead, just gather it together and pinch together the top strips with the bottom crust. Flute the edges using your thumb and forefinger.
STEP #5: CHILL THE PIE
Once your lattice crust has been added, place your pie in the refrigerator and chill for about 30 minutes. This will give everything the chance to firm up before baking, and prevents the pie crust from shrinking back too much.
STEP #6:EGG WASH AND BAKE THE PIE
When you have about 15-20 minutes left before the end of the chilling time, position a rack to the center position in your oven.
Then, preheat the oven to 400ºF and busy yourself with some clean up tasks (or just relax!) while you wait for the pie to finish chilling and the oven to heat.
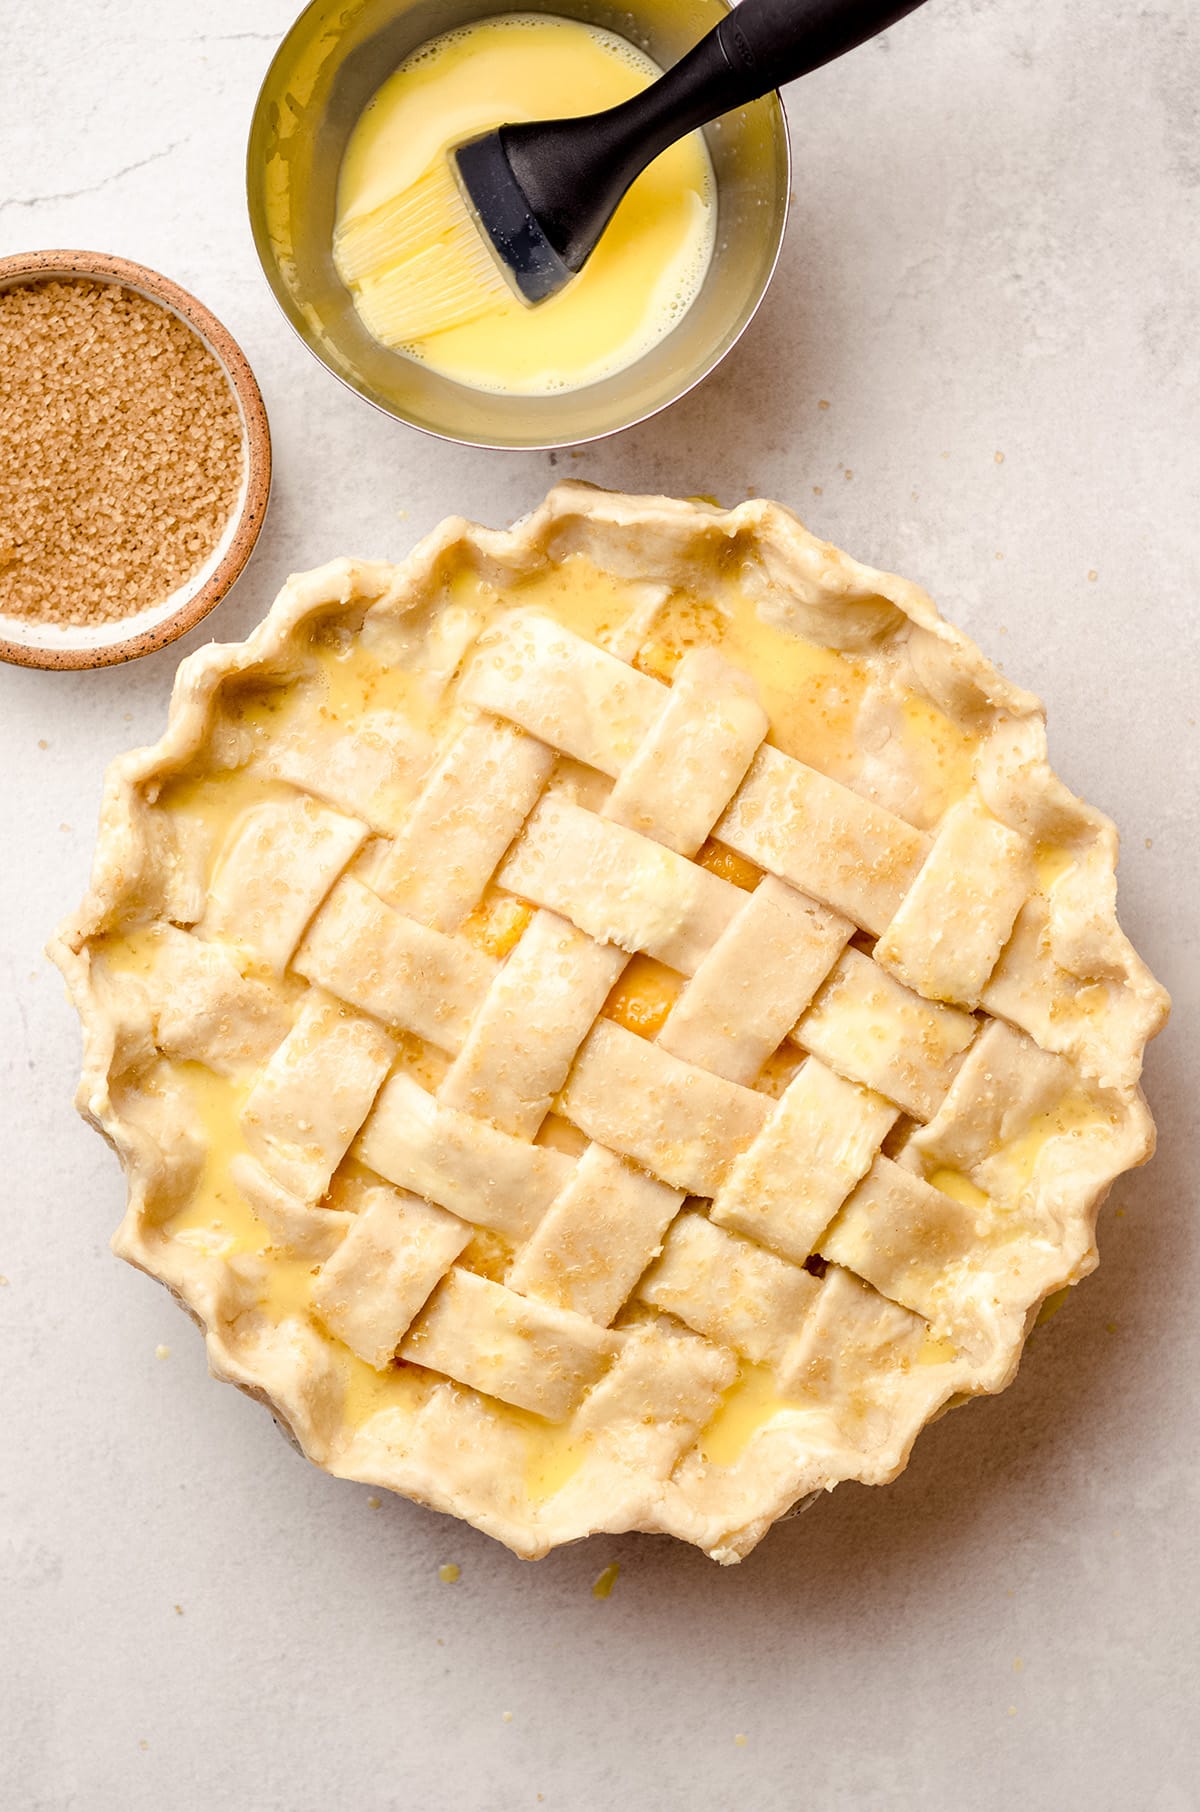
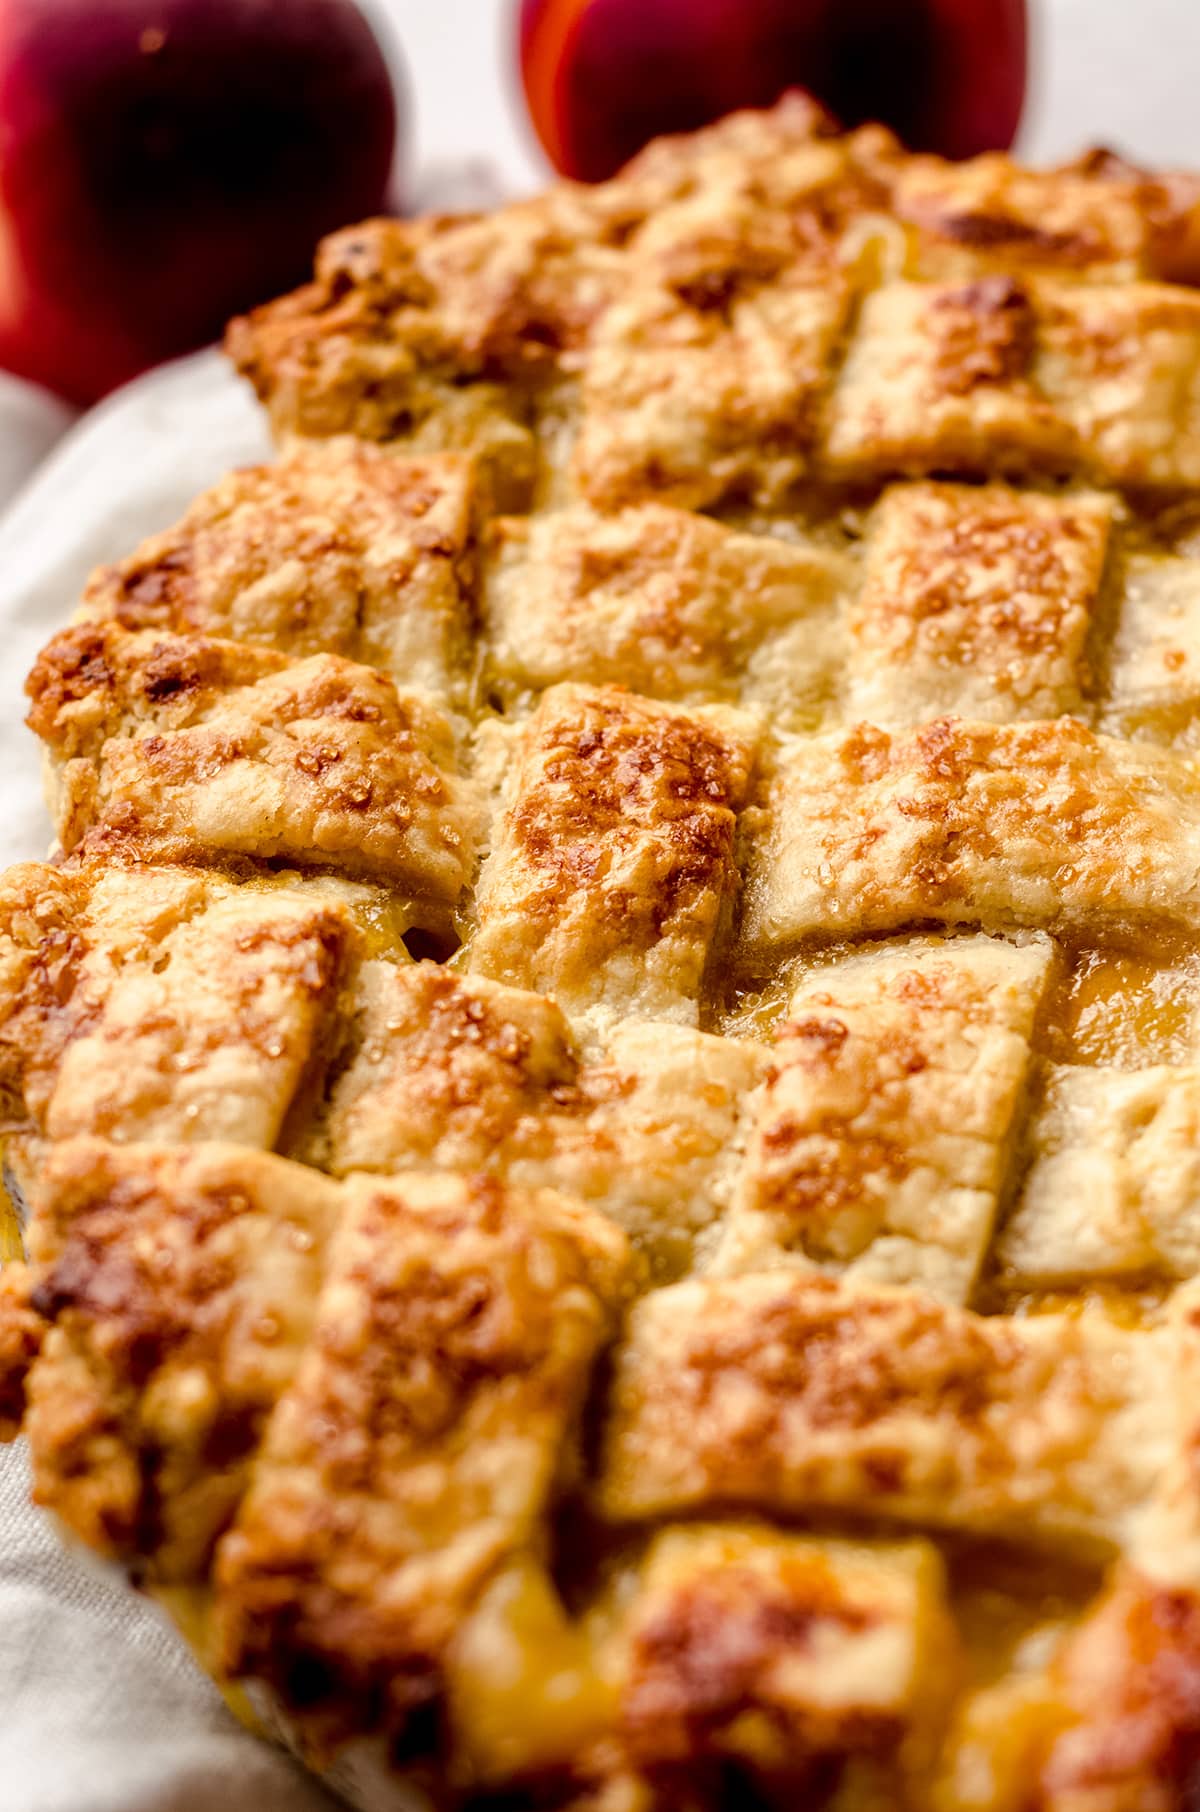
Once the chilling time is up, prepare an egg wash by combining 1 large egg with 1 teaspoon of water and whisking well. Then, prepare a small dish of coarse sugar. A sprinkling of coarse sugar gives it that bakery style crust that is just absolutely irresistible.
Brush the pie with the egg wash using a silicone or pastry brush, and then sprinkle with the coarse sugar.
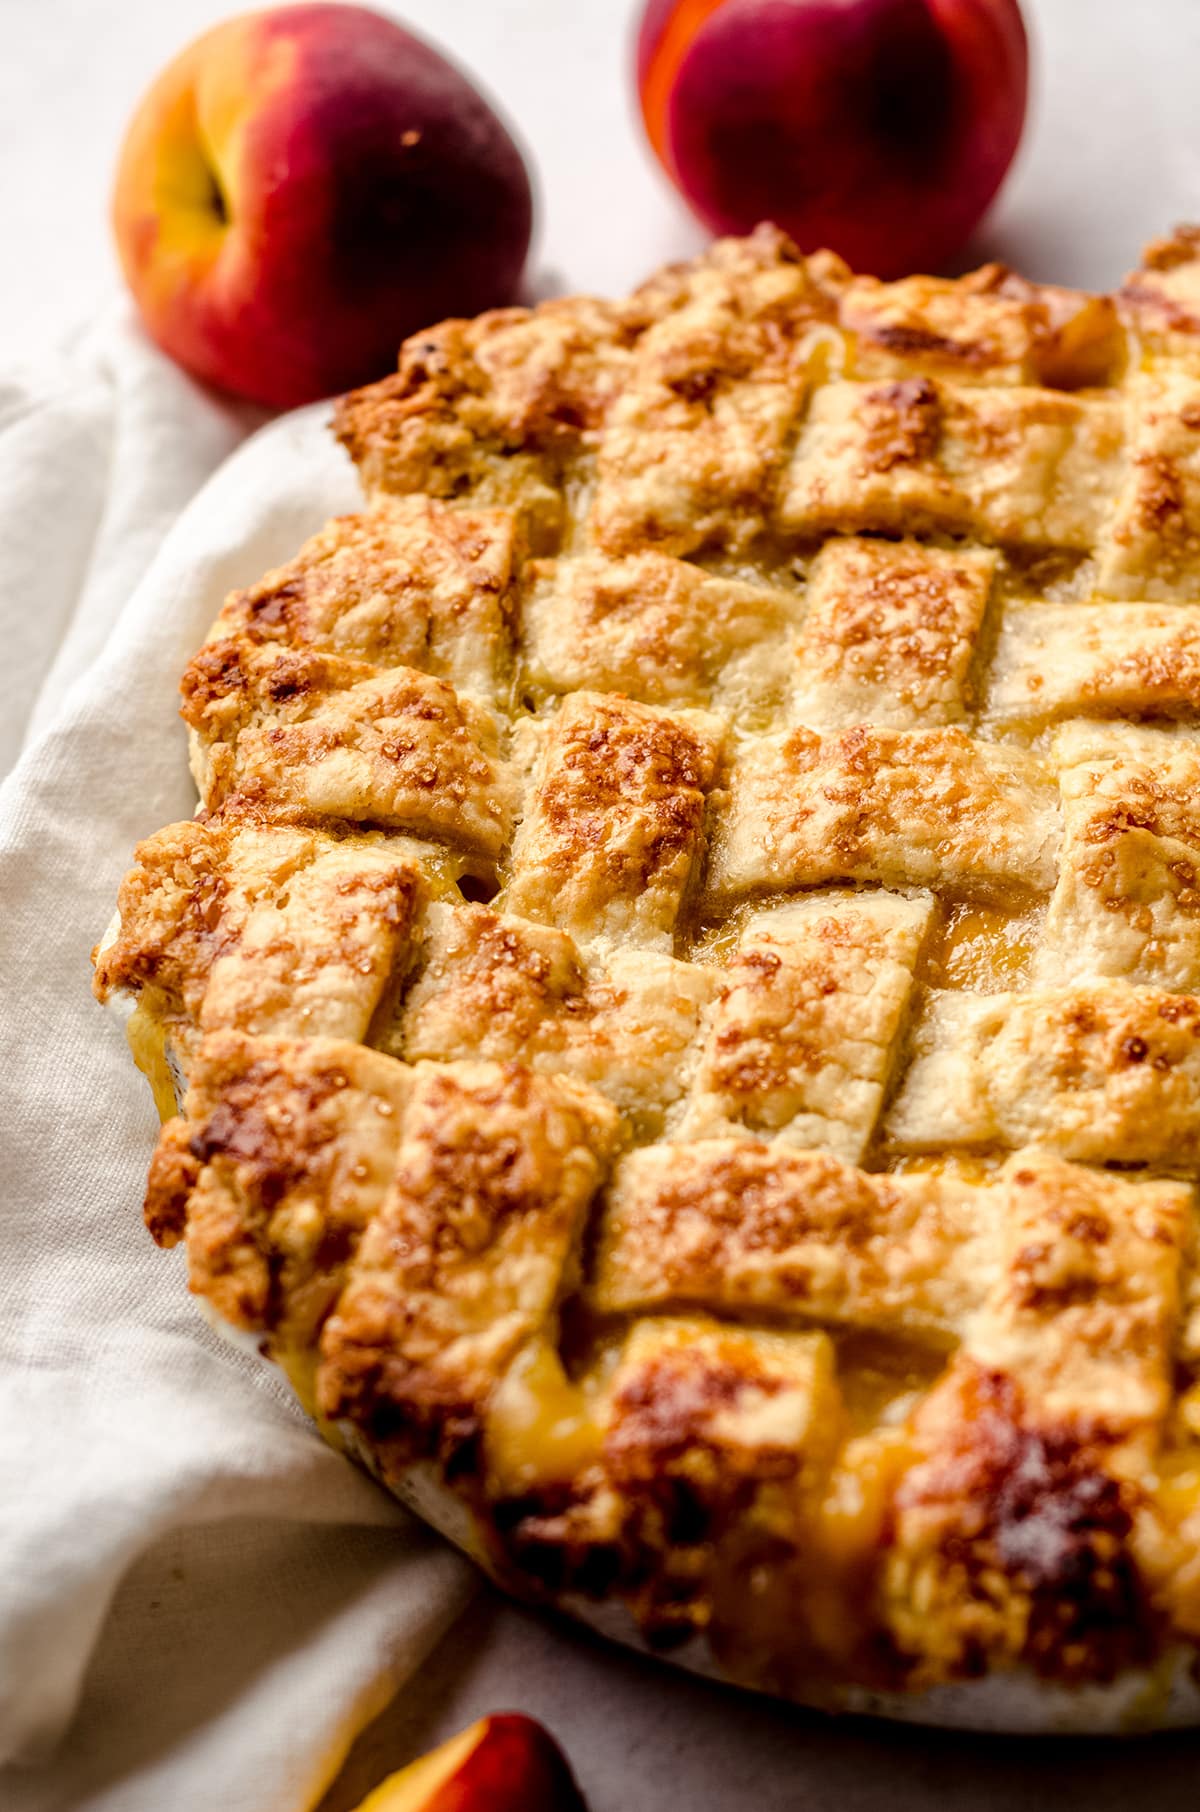
Place your prepared pie on a large baking sheet (to catch any overflow or drippings) and place in the oven. Bake for 50-60 minutes, or until the filling is bubbling and partially spilling out. The crust should be browned and flaky.
If your edges are starting to brown very quickly, you can always add a pie shield during baking or cover the edges with some aluminum foil. This will slow down the browning process on the edges, but it isn’t necessary for every pie, so just keep an eye on it.
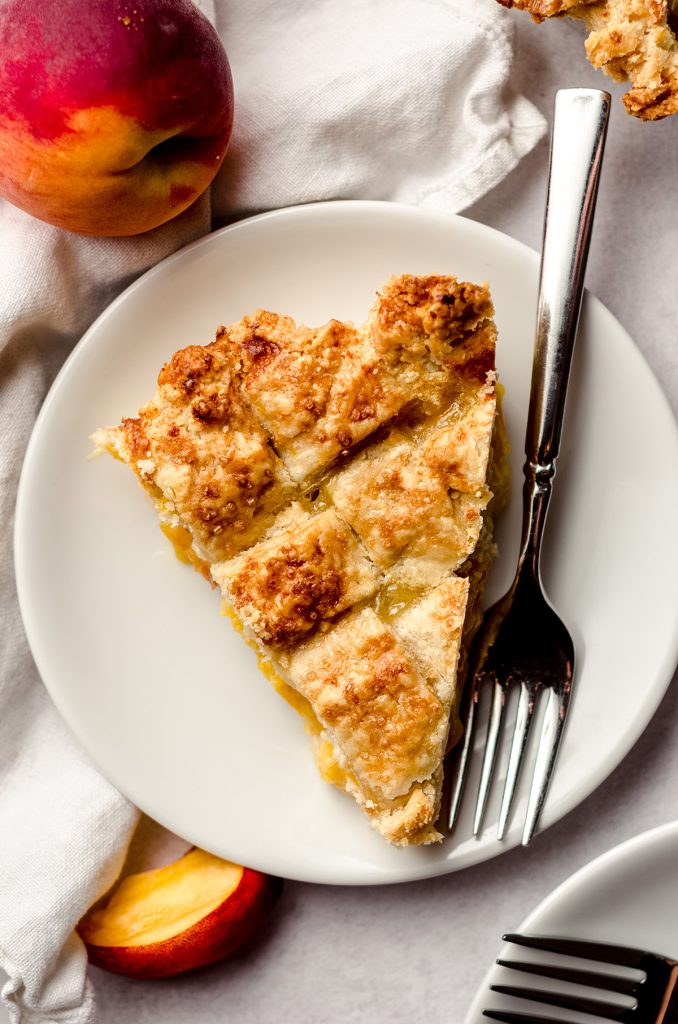
Once your pie is done, remove it from the oven and allow it to cool before slicing and serving. You can serve it warm, but honestly it is so much better chilled in my opinion! Since it is a fruit pie, it is super gooey and juicy, so having it chilled helps minimize that.
Either way, be prepared for some messy slices and just get ready to dig in and enjoy!

How to serve this recipe for Fresh Peach Pie
While peach pie is absolutely delicious all on its own, I like to serve my peach pie warmed up with a scoop of ice cream or topped with homemade whipped cream.
Storing this Peach Pie Recipe with Fresh Peaches
You can store your leftovers in the refrigerator for up to 5 days so long as they are covered tightly. Just make sure to cool the pie completely before storing it, as that warm air can cause condensation and premature spoilage (or at the very least, a wet pie!).
RECOMMENDED TOOLS
Use a pastry blender for making the pie crust.
This is my favorite ceramic pie plate, but if you’re new to pies, a glass one will help you see the crust browning on the sides and bottom for better monitoring of doneness.
This is my favorite rolling pin. It has held up for years with frequent use.
Use a citrus juicer for the lemon juice.
This is my favorite pastry brush.
Using a pie shield will help keep the pie crust from burning. You can always use foil if you want to skip another tool, but if you bake a lot of pies, I recommend having a proper shield on hand.
If you prefer, you can freeze the unbaked pie (skip the egg wash) for up to 3 months. Just wrap it tightly, and thaw in the refrigerator (not on the counter). Once thawed, bake it from cold.
CAN I FREEZE THIS HOMEMADE PEACH PIE?
Yes, you absolutely can freeze this easy peach pie, with one caveat: you should do so unbaked.
Baked fruit pies just doesn’t freeze as nicely, and you get all that fresh-baked taste when you freeze it and then bake it later. Just make sure to skip the egg wash step and wrap tightly with plastic wrap or foil.
To prepare, thaw your pie in the refrigerator (not on the counter) and bake it cold. Add the egg wash just before baking.
See? Easy peazy, fresh peach squeezy!

Fresh Peach Pie Recipe FAQs
Still craving more fresh peach flavor? Good news! I have a variety of peach recipes to help you celebrate everything that luscious peach season has to offer.
Get your peach fix with my peach curd, peach almond streusel muffins, a decadent slice of peach cheesecake, OR a bowl of my creamy homemade peach ice cream.


Fresh Peach Pie
Ingredients
- 1 full recipe homemade pie crust
- 6 to 7 fresh peaches1 about 2 and ½ pounds; peeled and sliced (but see notes2 first)
- ½ cup (100g) granulated sugar
- 2 Tablespoons (20g) cornstarch
- 1 Tablespoon (14g) unsalted butter
- 2 Tablespoons (30mL) lemon juice
- 2 to 3 Tablespoons (15-22g) all-purpose flour
- egg wash: 1 large egg + 1 teaspoon of water beaten
- coarse sugar for sprinkling if desired
Instructions
PREPARE THE FILLING
- Place the chopped peach pieces in a small saucepan with the sugar, cornstarch, butter, and lemon juice. Heat over medium heat while stirring, then bring mixture to a boil. Once boiling, reduce the heat to low and simmer for 5 minutes, stirring occasionally.6 to 7 fresh peaches1, ½ cup (100g) granulated sugar, 2 Tablespoons (20g) cornstarch, 1 Tablespoon (14g) unsalted butter, 2 Tablespoons (30mL) lemon juice
- After the peaches have simmered for 5 minutes, remove from heat then pour into the prepared bowl of sliced peaches. Stir to combine.
- Add 2 Tablespoons (15g) of the flour to the peaches and stir again to combine. If peaches seem extra juicy, add an additional Tablespoon (8g) of flour. Set aside.2 to 3 Tablespoons (15-22g) all-purpose flour
PREPARE THE PIE CRUST
- Remove one disc of pie crust from the refrigerator, roll it out, and line a 9" plate with the crust.1 full recipe homemade pie crust
- Place pie plate in the refrigerator to chill while you prepare the lattice strips3.
PREPARE THE LATTICE STRIPS
- Roll the second disc of pie crust into a 12" circle. I prefer to use a tape measure or ruler here so I can make it as exact as I can. I also like to do this on a large circular surface (like a pizza stone) that I can place in the fridge if the butter/shortening starts to melt too much.
- Use the measuring tape or ruler and a sharp knife to mark off 1" increments across the diameter of the pie crust. Turn your measuring device 90º and use your knife or a pizza cutter (my preference) to cut a straight line along each of the tick marks. You should now have 12 strips of dough. If the butter/shortening seems like it melted from a lot of touching, place the large round surface in the refrigerator for 10 minutes to firm up.
ASSEMBLE AND LATTICE THE PIE
- Pour the prepared peaches and any juice at the bottom of the bowl into the prepared pie crust. Spread the peaches out evenly.
- Place the strips of pie dough parallel in front of you. Starting with the left-most strip, number this one #1 (either mentally or with a piece of tape on whatever surface you're working on). Working to the right, number each strip until you have numbered all 12 strips.
- Picking up every other 1" strip (2, 4, 6, 8, 10, 12), lay 6 strips vertically and evenly spaced on top of the filled pie. The longer strips will be in the center of the pie and the shorter strips will be on the ends of the pie.
- Fold every other strip (2, 6, and 10) away from you, slightly past halfway so they’re lying on top of themselves. Pick up strip #7 and lay it on the pie perpendicular to the folded strips slightly off-center. Unfold strips 2, 6, and 10 back over the pie and the strip you just lay, then fold back 4, 8, and 12 and repeat with strip #5, working toward yourself/toward the closer side of the pie. Fold 2, 6, and 10 back again, and repeat with strip #3. You now have a lattice top on half of the pie.
- Working toward the other side of the pie in the opposite direction, fold strips 2, 6, and 10 toward you, then lay strip #9 across the pie. Fold back 4, 8 and 12 and repeat with strip #11, working away from yourself/toward the far side of the pie. Fold 2, 6, and 10 back one last time and finish with strip #1, if needed4.
- Do not cut off excess pie dough. Instead, gather and pinch together the top strips with the bottom crust, then flute the edges. Allow the pie to chill in the refrigerator for 30 minutes.
BAKE THE PIE
- When the pie has about 15-20 minutes left to chill, move a rack in the oven to the center position. Preheat the oven to 400ºF (204ºC).
- Brush the whole pie with the egg wash, then sprinkle with coarse sugar. Place the pie on a large baking sheet (to catch drippings) and place the baking sheet with the pie on it in the oven to bake for 50-60 minutes. The pie should be bubbly and partially spilling out when it is finished.egg wash: 1 large egg + 1 teaspoon of water, coarse sugar for sprinkling
- Remove the pie from the oven and allow it to cool before slicing and serving. This is a very gooey pie, and while I prefer it chilled, it is quite enjoyable warm. Just be sure you're prepared for messy slices. Store leftover pie in the refrigerator covered tightly up to 5 days. Unbaked peach pie (without egg wash) freezes well, up to 3 months. Thaw in the refrigerator (not at room temperature), then bake it cold.
Notes
- Fresh peaches: I do not recommend using canned peaches in this peach pie, since canned peaches are typically cooked. If you are looking to make peach pie out of season, use frozen peaches, which are not pre-cooked. Thaw in the refrigerator and discard any excessive liquid.
- Prepare peaches: chop 1 peach into small pieces. Slice the remaining 5 or 6 peaches into slices about ½” thick and place them in a large bowl.
- Lattice top: this is totally optional, but the messy nature of this fresh peach pie means it is much easier to serve and eat with a top crust. If you prefer not to lattice the top, you can just place the top crust on whole like I do with my double crust chicken pot pie or go for a streusel topping instead.
- The last strip: I often don’t use the very last strip, only because I like to space my lattice out a bit more to see the filling. Depending on how tight you lattice your strips, you may have space for it. If not, just discard or pinch into a thin spot on the edges before fluting.
Nutrition Disclosure
All nutritional values are approximate and provided to the reader as a courtesy. Changing ingredients and/or quantities will alter the estimated nutritional calculations.
This pie is amazing!! It got rave reviews all around and was super simple to make. It was my first time making lattice crust and it couldn’t have been explained better. I have no fear of lattice anymore 🙂
Thanks so much, Lauren!
The pie was easy and absolutely delicious! Perfect for all my fresh peaches. And the directions for the lattice, super helpful!!
A side note, my name is April Lynn so it made me doubly happy to use your recipe! 😉
Aww, I love that! Thanks, April 🙂
Followed this recipe exactly and everyone absolutely RAVED about it at the bbq I brought it to. This will be my go to peach pie recipe for the future.
Thanks so much, Melissa! We LOVE this pie and I’m glad you did, too!