
Homemade Cake Pops
As an Amazon Associate, I earn from qualifying purchases. Read the full disclosure here.
Learn how to make perfect cake pops at home with these step-by-step instructions that include troubleshooting tips.
Easy Cake Pops
Here’s the thing… Back in my Lucky Duck Cakes days, I was the queen of cake pops. Not to toot my own horn, but… Toot toot!
They were my favorite way to use up cake scraps, and they were perfect for so many different occasions. Different flavors, color combinations, vehicles for sprinkles, crushed cookies, nuts… They are just so fun.
In this cake pop recipe, I’m sharing with you my favorite method for putting together cake pops and, what I believe to be, the best recipe for cake pops.
I am also including a section for “Cake Pop Troubleshooting,” because I’ll be honest… Cake pops take some practice. BUT, the good news is, once you get the hang of it, tasty homemade cake pops are a breeze (and yes, I do still screw up sometimes and I can promise you the messed up ones still taste just as good)!
Before we get started, I want to say that my way is not the only way. Some people like to use a cake pop maker and bake fresh cake balls, giving you, essentially, a ball of cake on a stick.
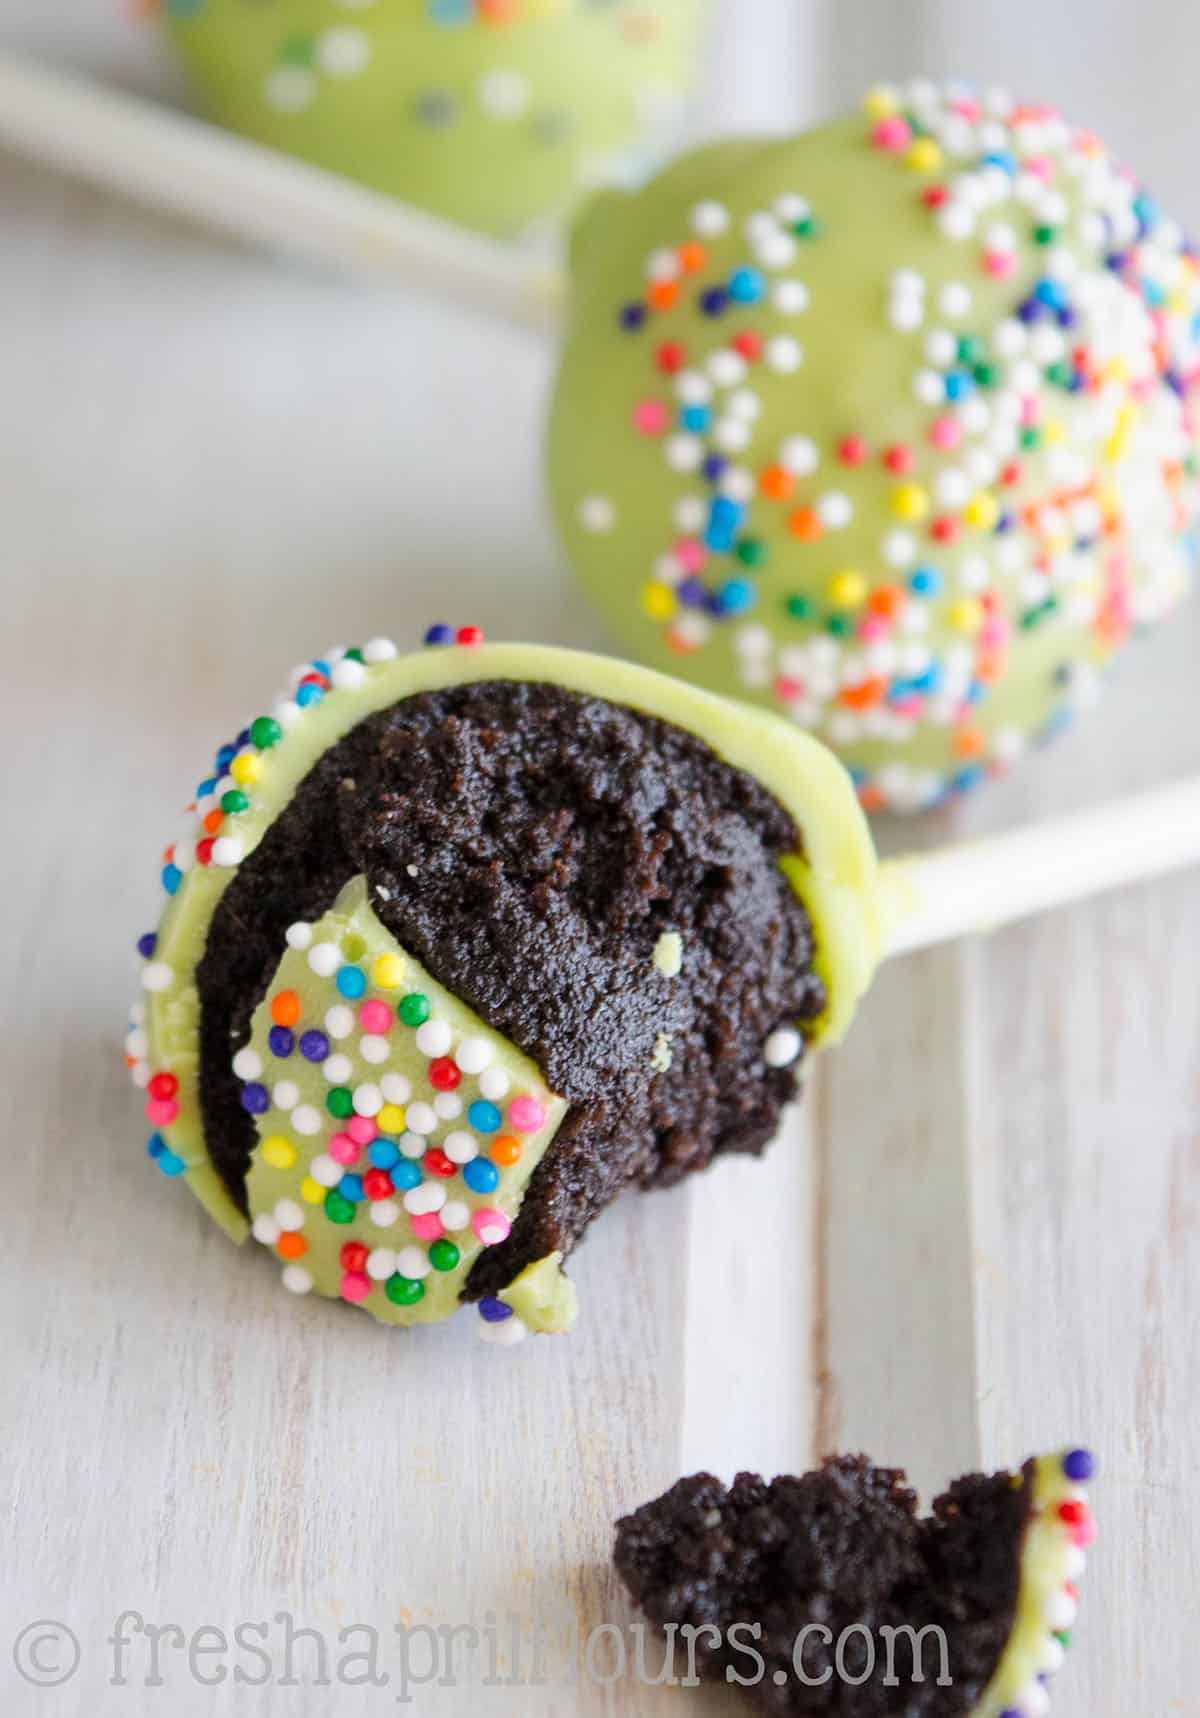
While that’s all fine and dandy, I find my fan favorite (and personal favorite) method of how to make a cake pop is one that is almost a truffle texture on the inside.
So… I want to show you how to make cake balls from scratch.
WHAT IS A CAKE POP?
A cake pop is similar to a lollipop, but it is made entirely from cake. The inside of the cake pop is made from crumbled cake crumbs, typically held together with frosting or icing, and coated in melted chocolate or candy melts. Cake pops sit as a ball of cake on top of a lollipop stick and are often decorated with sprinkles or occasionally piped designs.
Cake Pops Recipe ingredients
The list of ingredients you need for cake pops is really short. Like just 3 ingredients + a non-food ingredient.
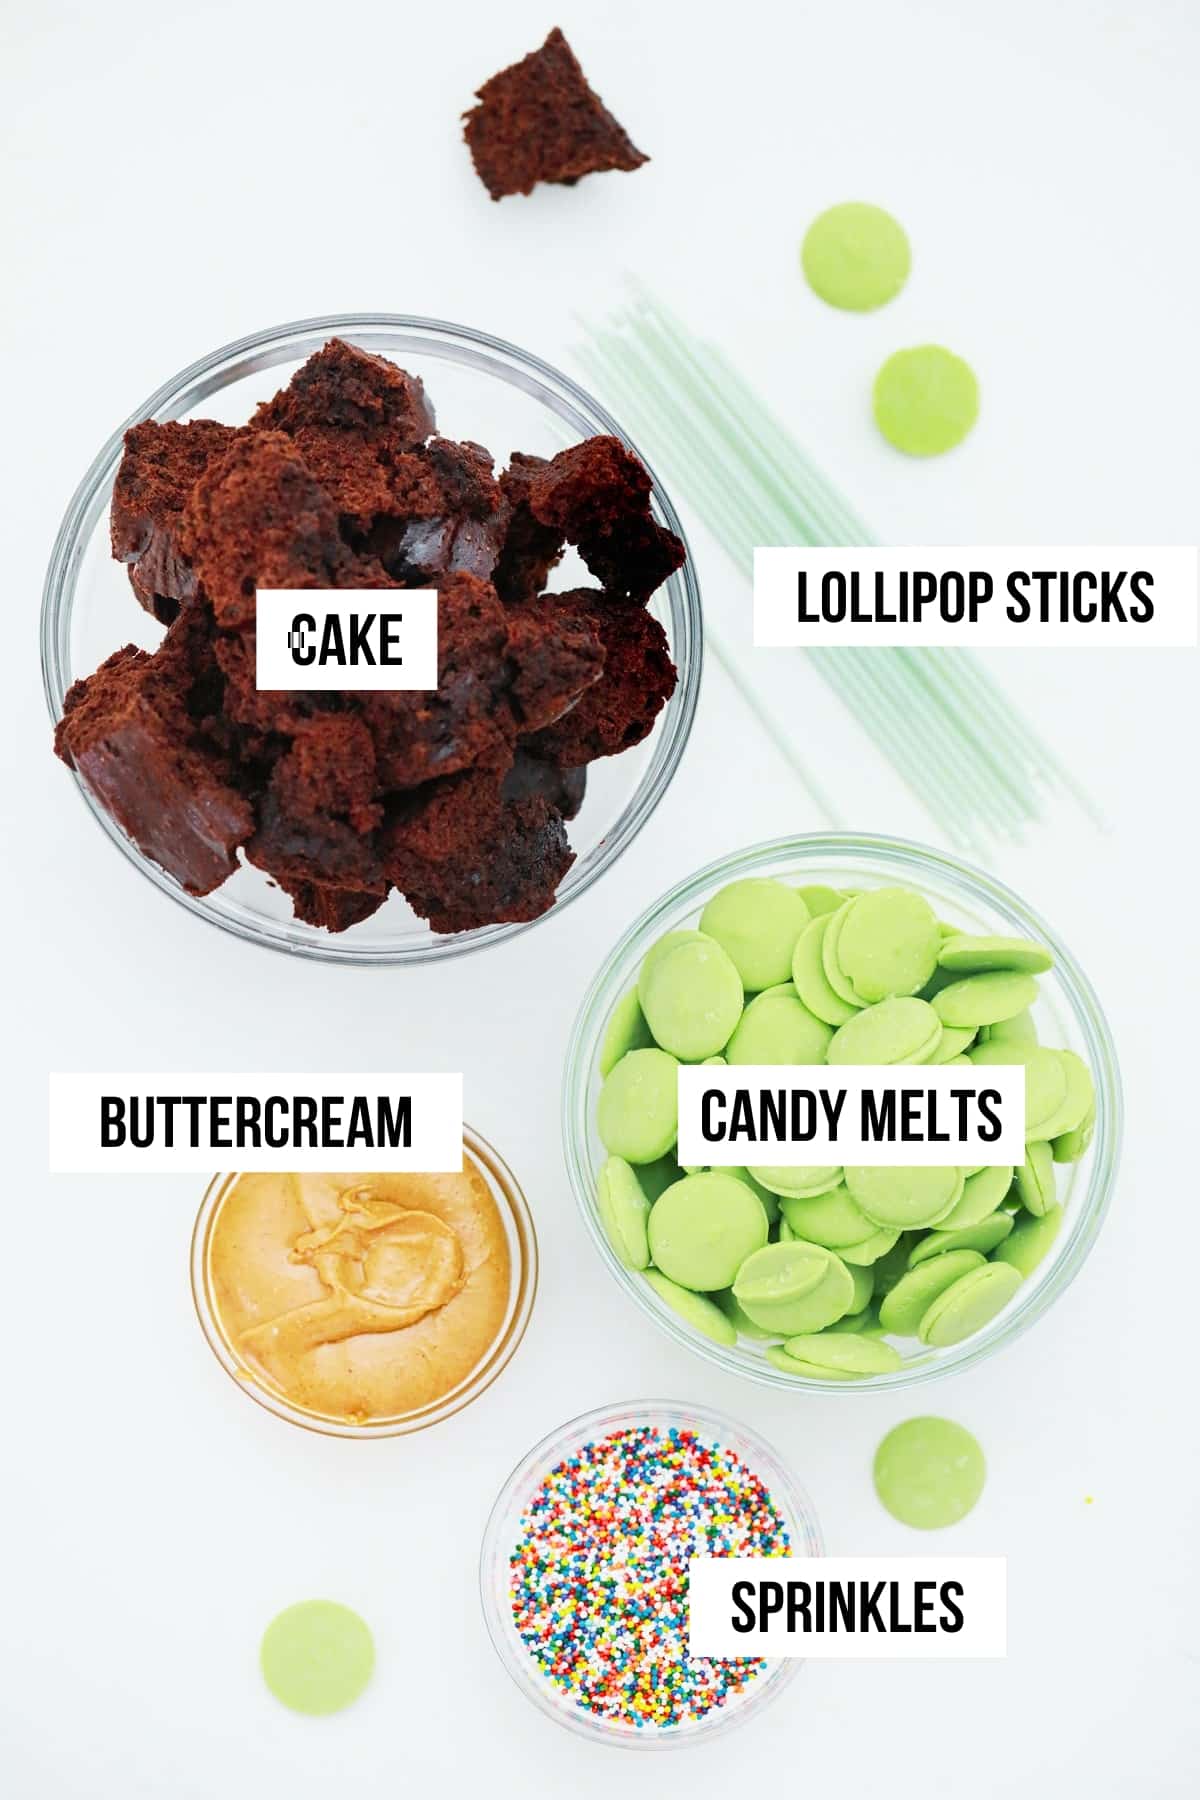
To make cake pops, you’ll need:
• cake
• buttercream
• candy melts or chocolate
• lollipop sticks
• sprinkles (optional but highly encouraged!)
ALWAYS USE STALE CAKE FOR HOMEMADE CAKE POPS
Another personal preference of mine is to work with stale(ish) cake. Why? Stale cake is drier than freshly baked cake, and while this may be the last thing you want your slice of cake to be, this is the very thing you want your cake pop cake to be– lots of room for soaking up frosting and increased ability to stick together!
I have totally used freshly baked cake as well, and I’ll make note in the step-by-step instructions on how to gauge your moistness level.
You’ll also need cake pop sticks (packaged as “lollipop sticks”).
Here are, in my opinion, the best sticks for scratch cake pops.
You can find these in any craft store or store with a baking section (WalMart, Target). I prefer the longer sticks (6″or sometimes 8″), but you may use shorter ones.
CAKE POP FLAVORS
You can use any flavor of cake to make cake pops. Whether it’s basic vanilla cake or chocolate cake or something more complex like carrot cake or strawberry cake, any cake flavor can be turned into a cake pop.
If desired, you can add extracts or flavorings to the cake pops to make them even more complex or to turn something like vanilla cake into lemon cake without adding a lot of extra liquid.
How to make Cake Pops Truffle-Like
I achieve my favorite truffle-like texture by mixing fully baked cake that has been crumbled into pieces with frosting. The texture is gooey, dense, and like the texture of a fudgy brownie.
I actually had a customer complain to me once that my cake pops were “underdone” in the middle, if that gives you any indication of how I like my pops! As I said, this is my preference, but you’re welcome to start with cake pop maker made cake balls (what?).

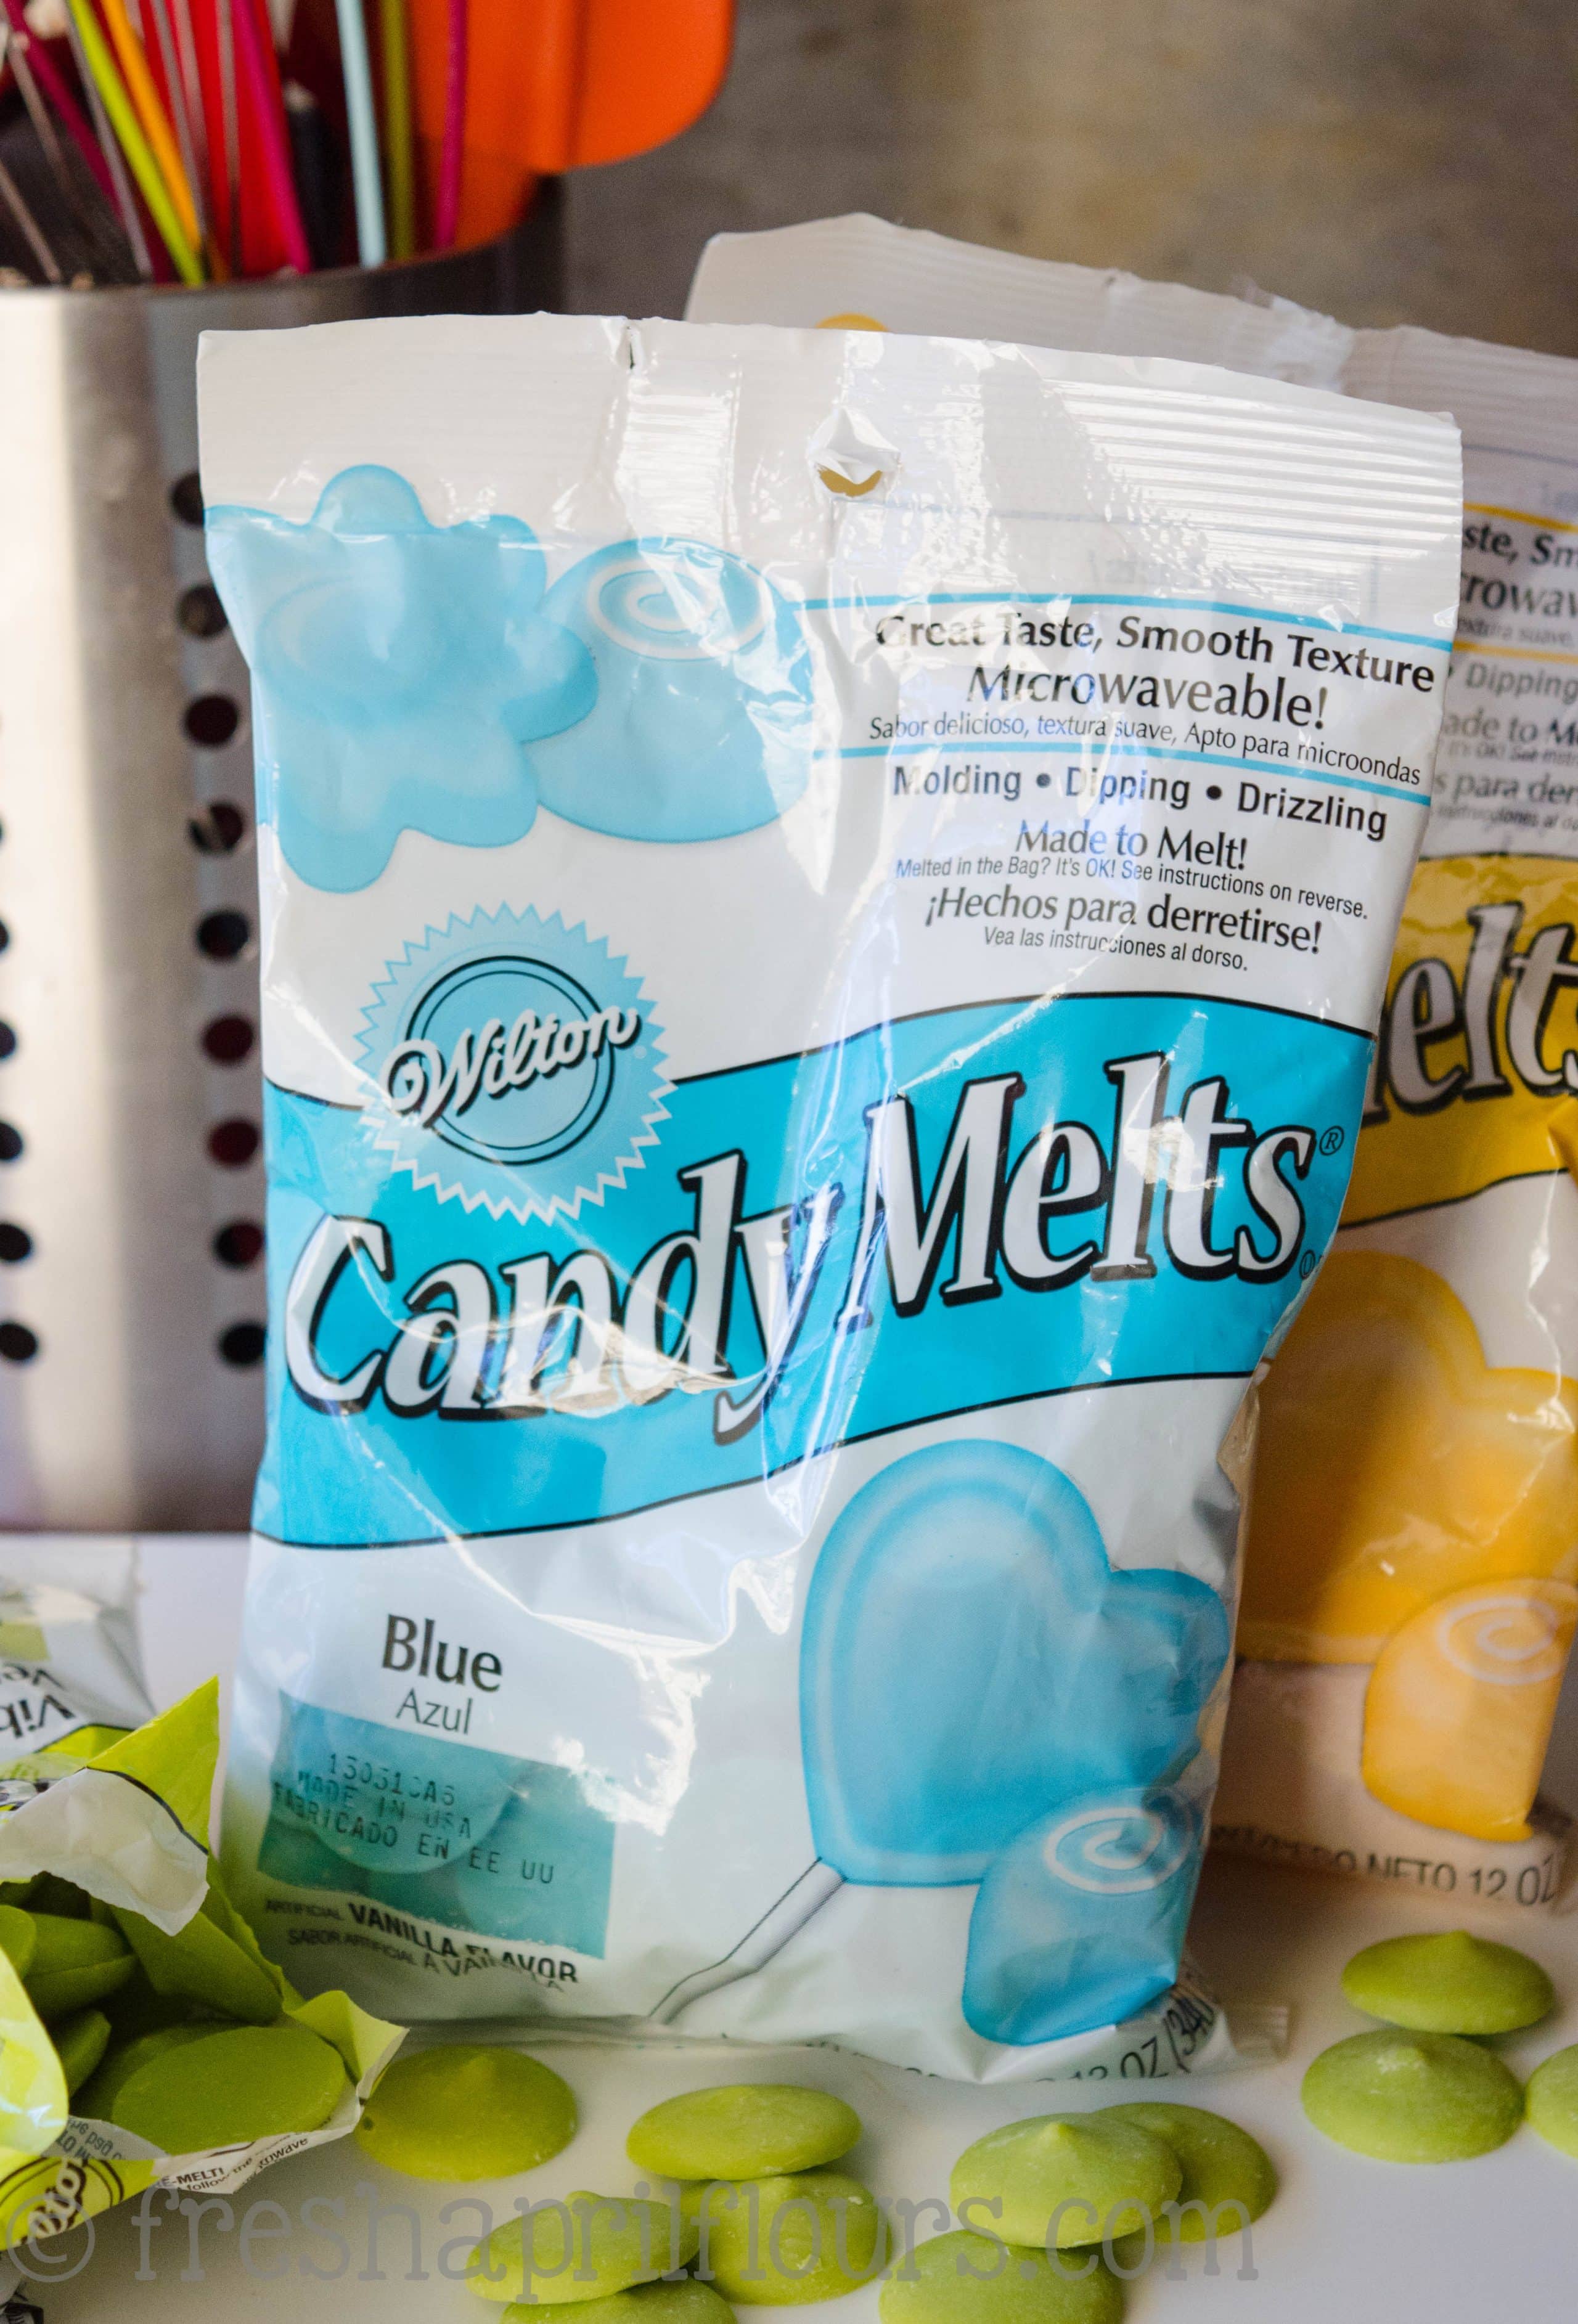
Best Candy Melt for Cake Pops
One last thing… I prefer using Wilton candy melts for my coating because they are made for purposes like this. You may also use quality baking chocolate, but you’ll need to add some shortening to the chocolate to keep everything super smooth.
I highly highly suggest using candy melts.
How to make Cake Pops Step by Step
First, line two baking sheets with foil or parchment and set aside.
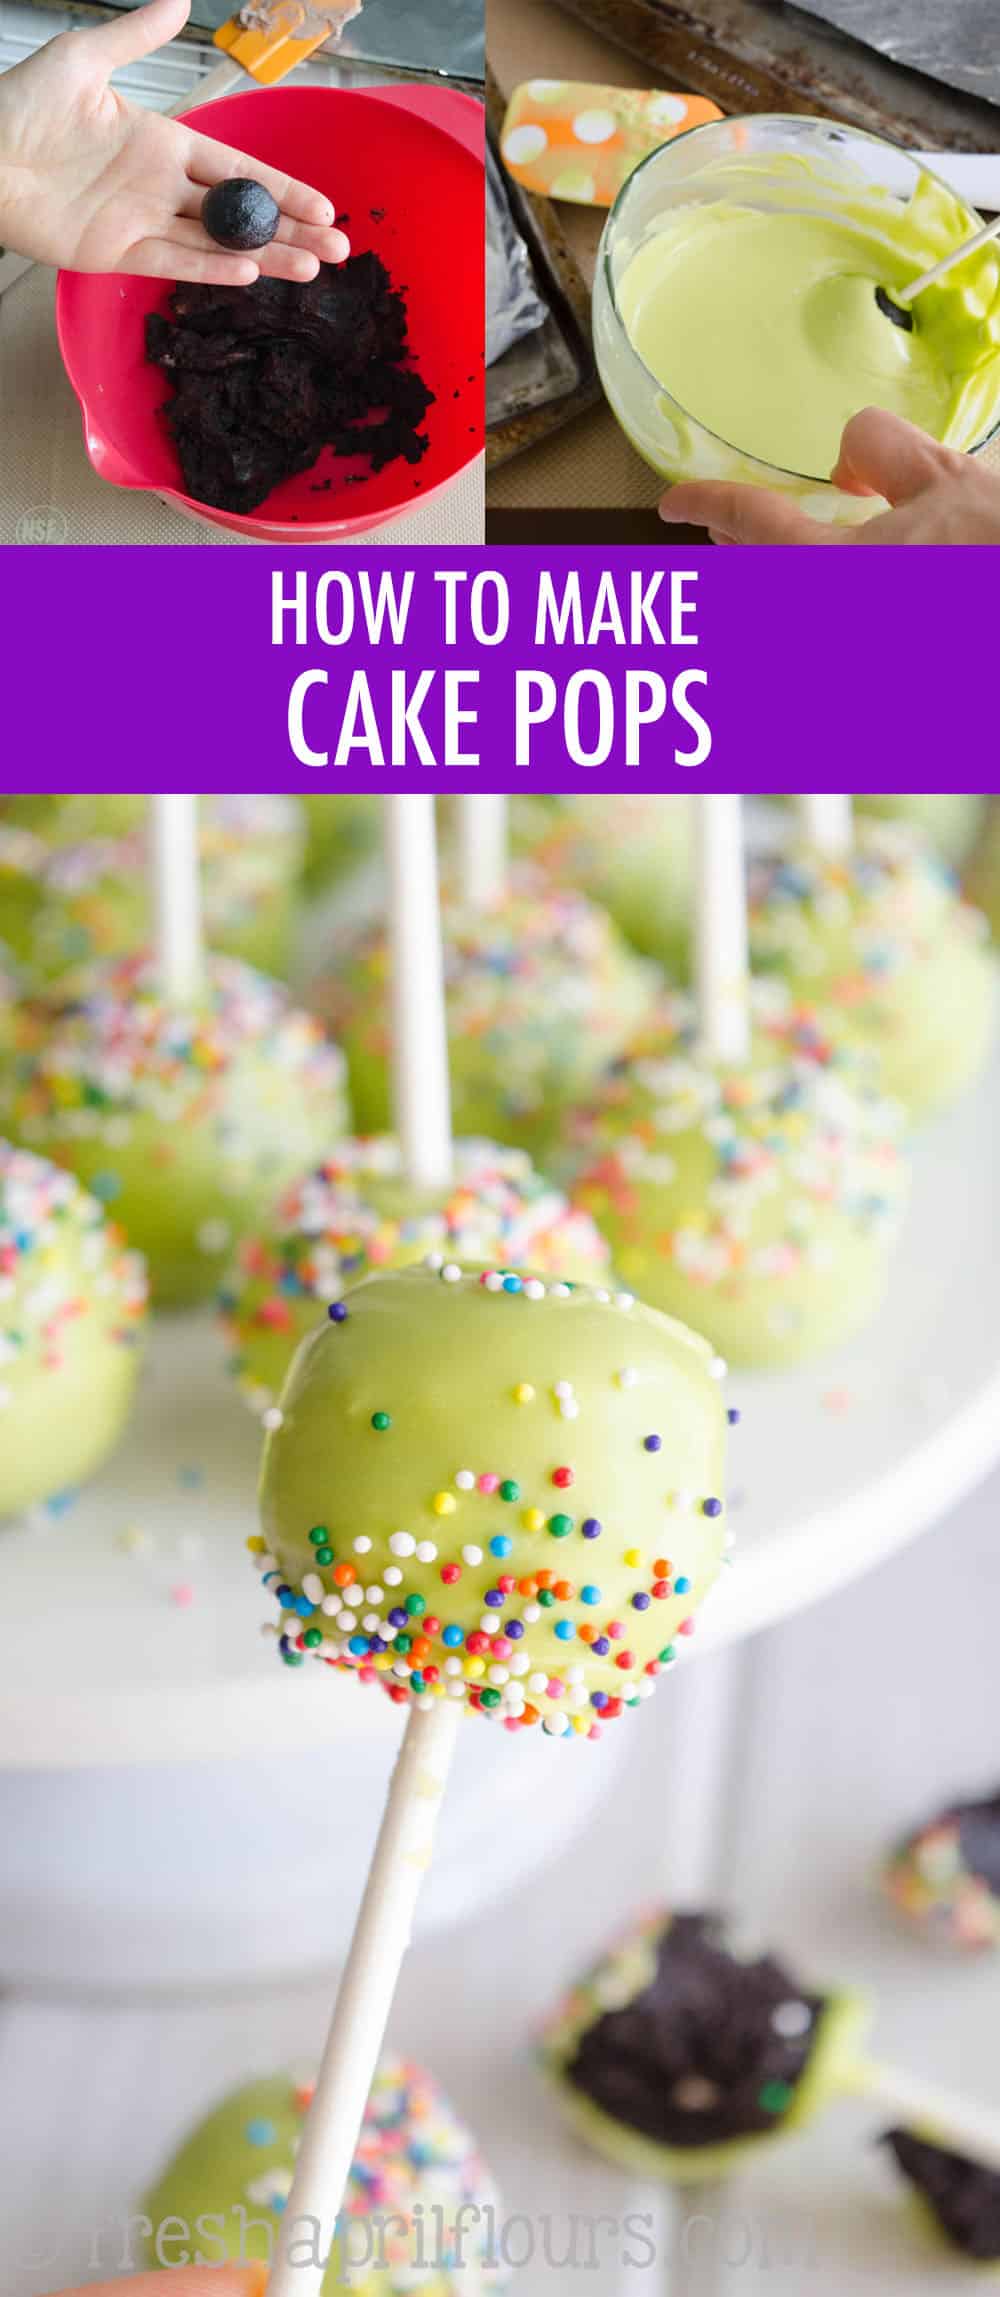
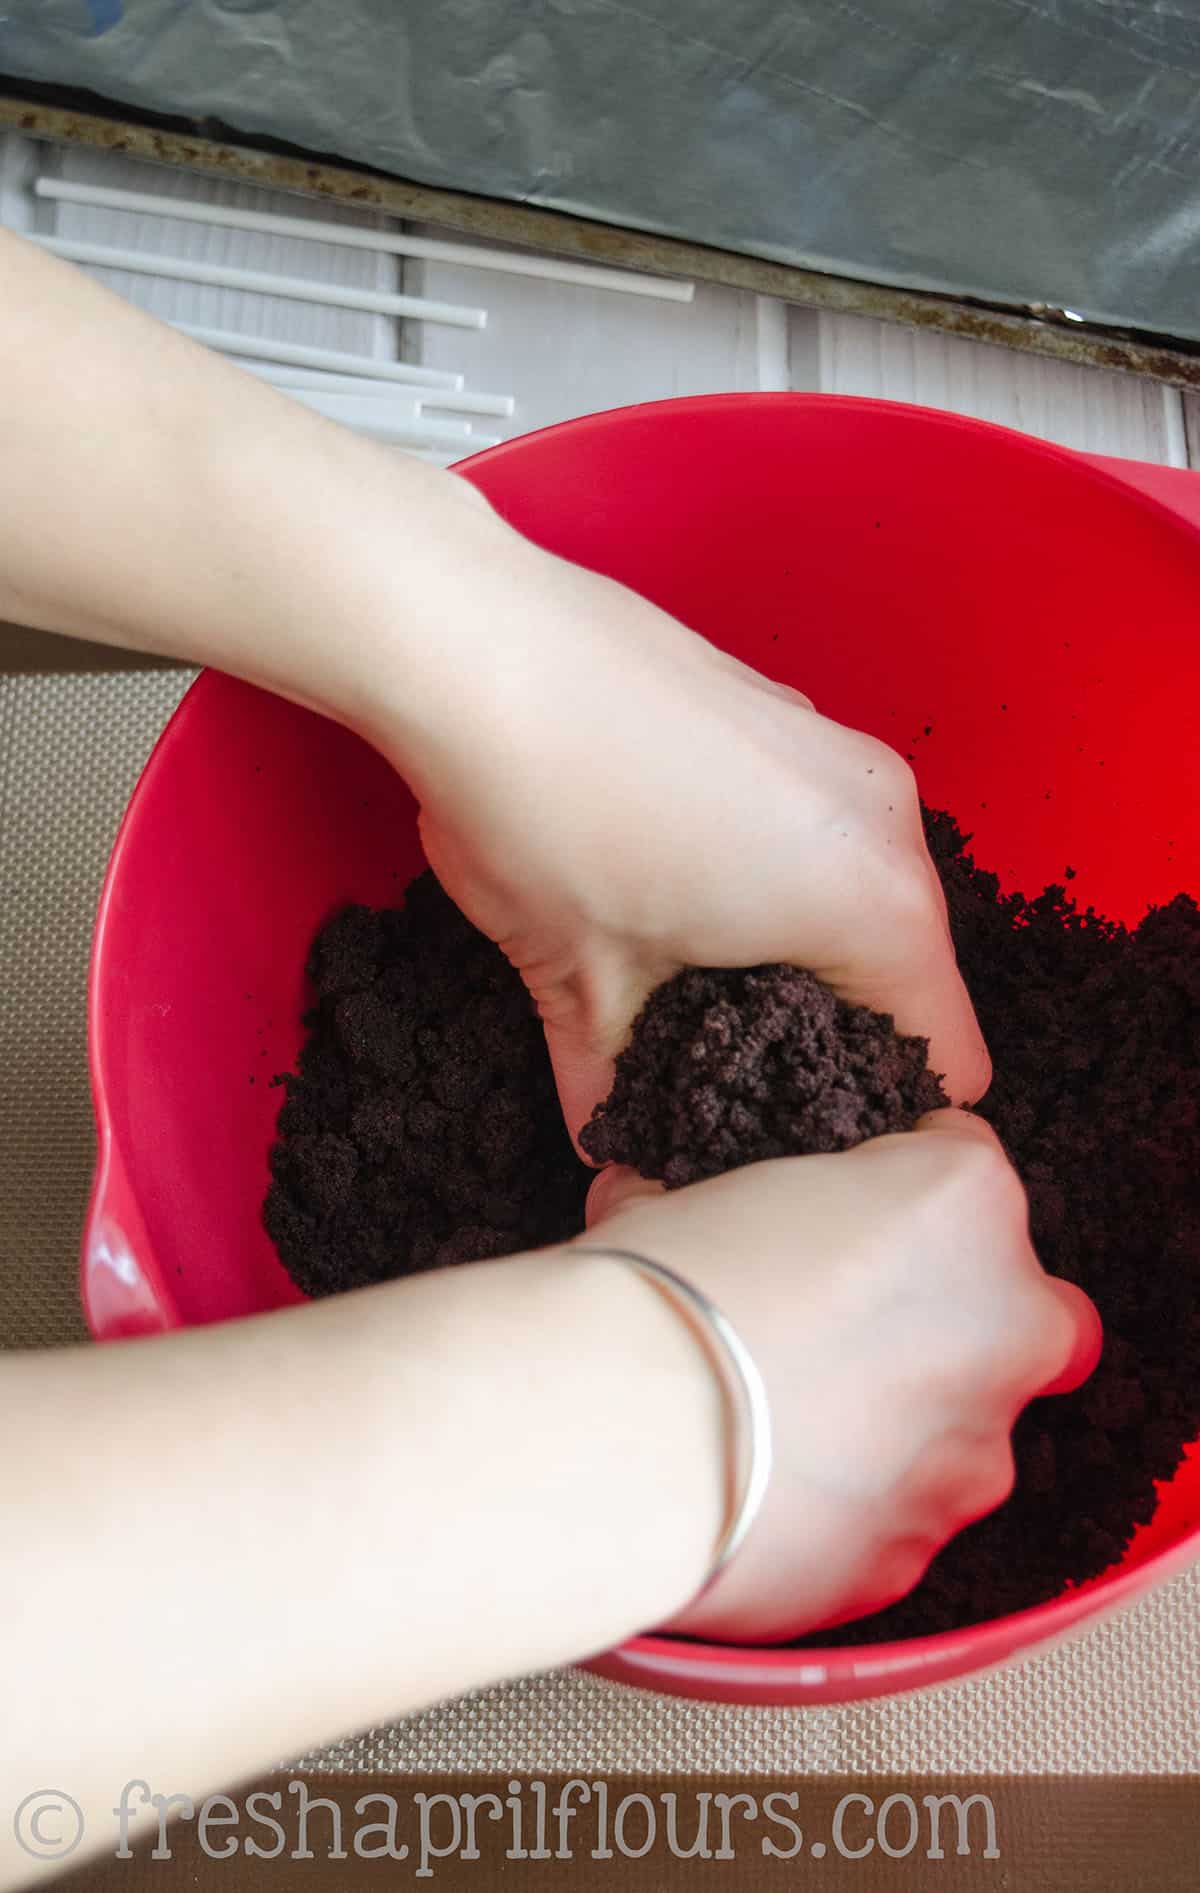
STEP 1: CRUMBLE THE CAKE
Crumble your cake (any flavor) into tiny pieces. I usually use my hands, but I’ve also used my stand mixer. Either way, you want this crumb to be very fine.
This was 3 cups of cake.
STEP 2: ADD THE FROSTING
Next, you’re going to add your frosting. This can be homemade frosting or store-bought, and any flavor you like. I love adding flavored frosting to my cake pops (and sometimes fresh zest if I’m going fruity)! This is also where you would add spices if you wanted to (add 1 teaspoon of spice, taste, and add more as necessary).
HOW MUCH FROSTING FOR CAKE POPS?
The cake to icing ratio for cake pops is totally up to you and the desired finished texture you want for your pops. My suggestion is to start with 3 cups of cake and ⅓ cup of frosting. Adjust as needed by simply going be feel.
I added ⅓ cup of frosting because my cake is usually very dry (since I use stale cake). If you have a moist cake, add 3 Tablespoons of frosting and go from there.
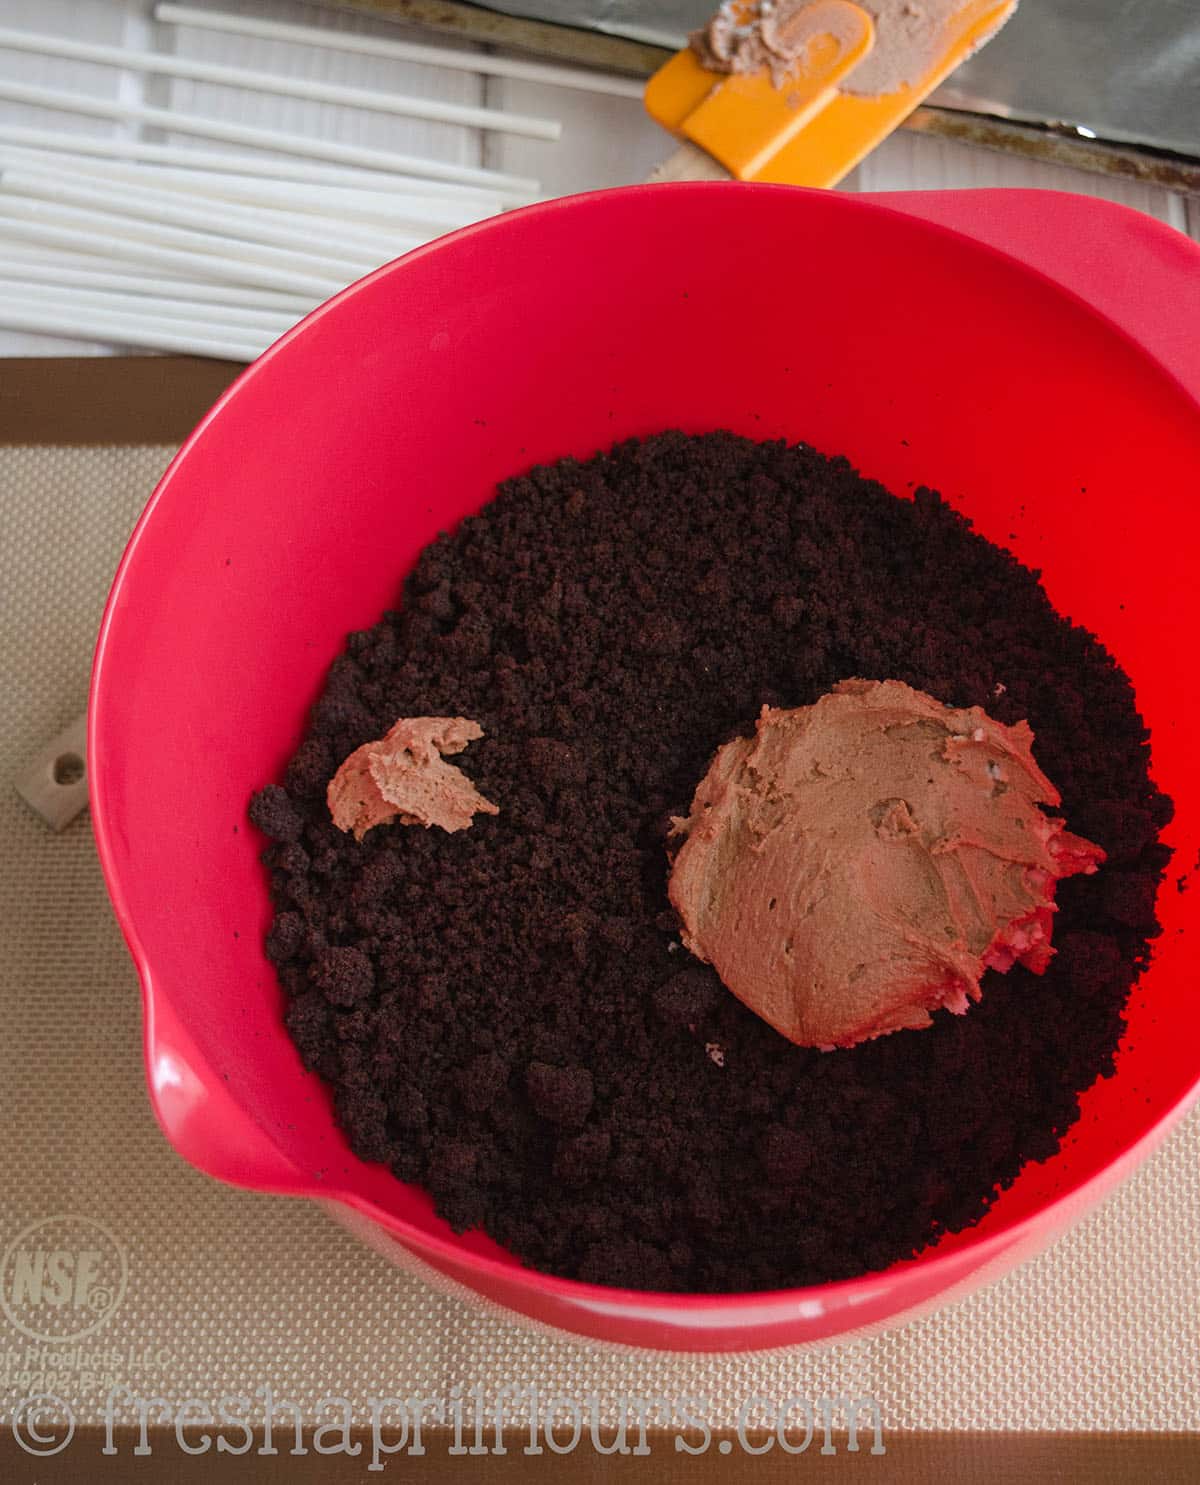
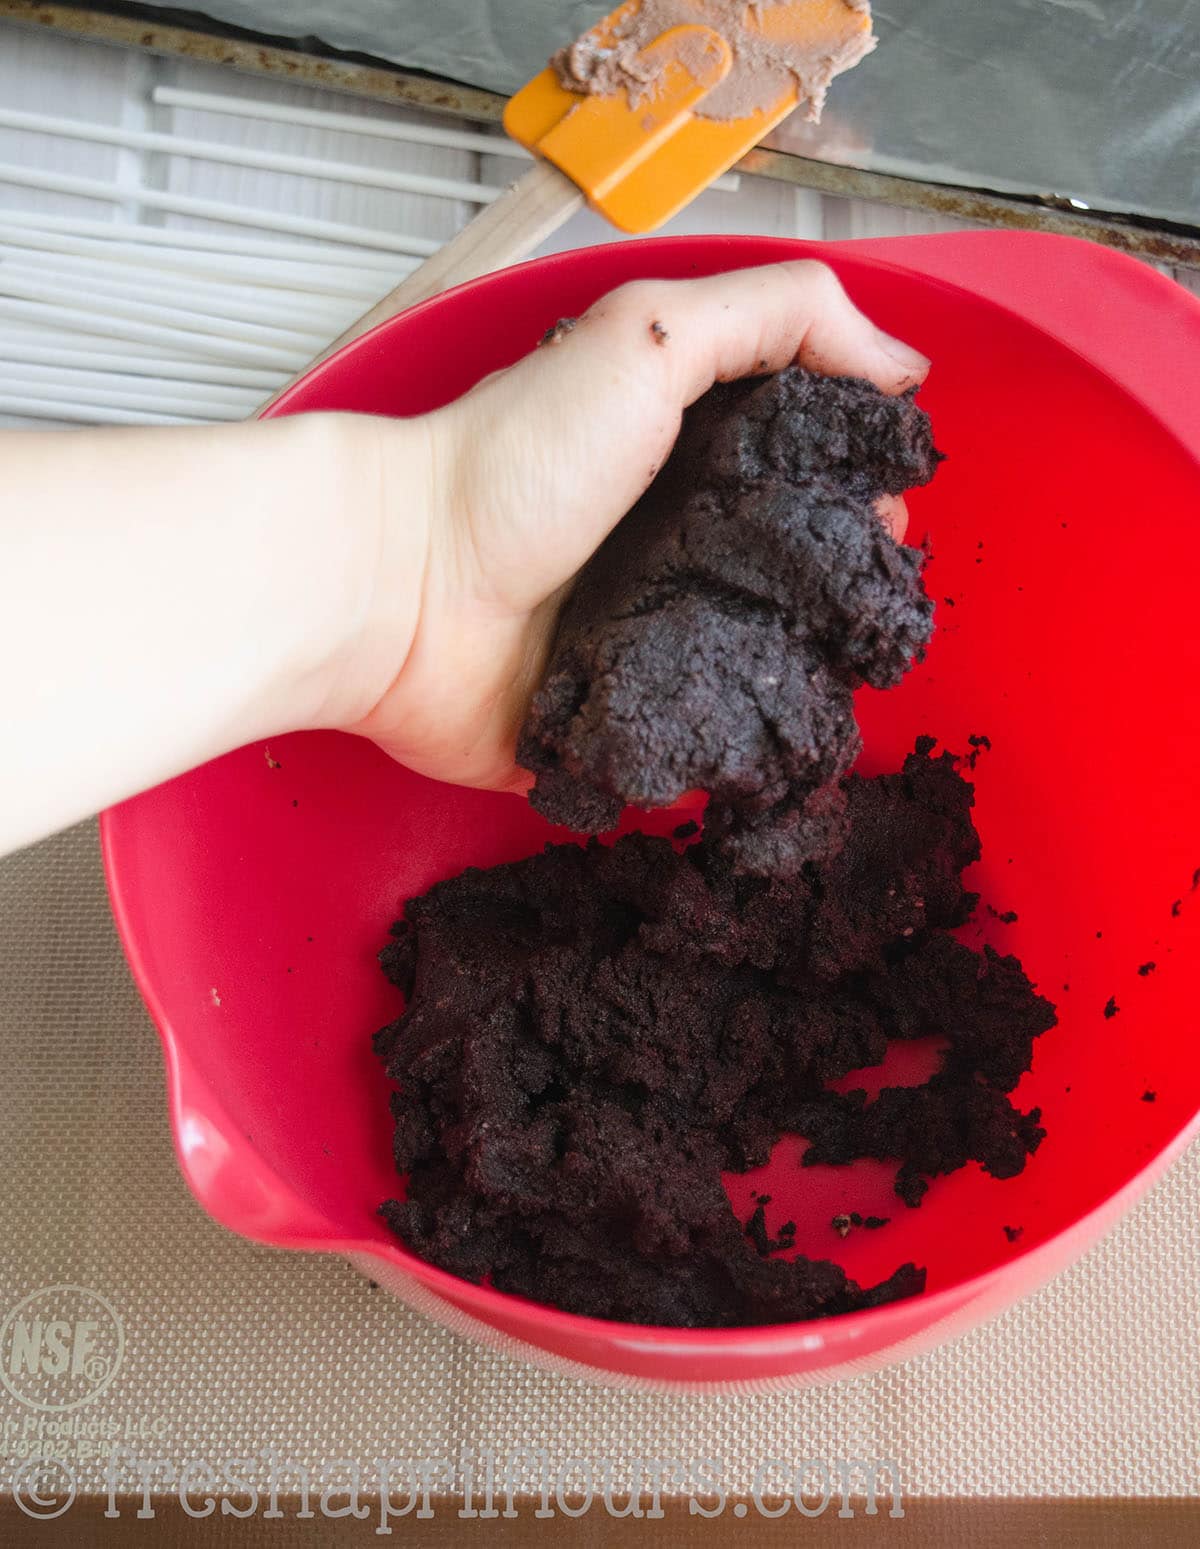
This is where you definitely want to get your hands dirty. Work the frosting into the cake by squeezing and pushing until everything is uniform in texture.
HOW TO MAKE CAKE POPS WITHOUT FROSTING
If you don’t have or don’t want to use frosting to hold your cake pops together, you can use a mixture of milk + vanilla extract instead. While I do not prefer this method, it is possible and it works.
You will have to work slowly and carefully to add the amount of milk + vanilla that works with your amount and texture of cake. You are looking for the perfect texture that will hold together without being soggy.
Easy Cake Pop Recipe icing
You’re looking for a texture that you can roll into a sturdy ball (meaning the ball should have a bit of give when you push on it but not squish completely).
Therefore, you’re looking for a frosting that is sturdy and not at all runny. My homemade frosting (linked in the recipe) or store bought should be totally fine for this.
STEP 3: SHAPE THE CAKE POPS
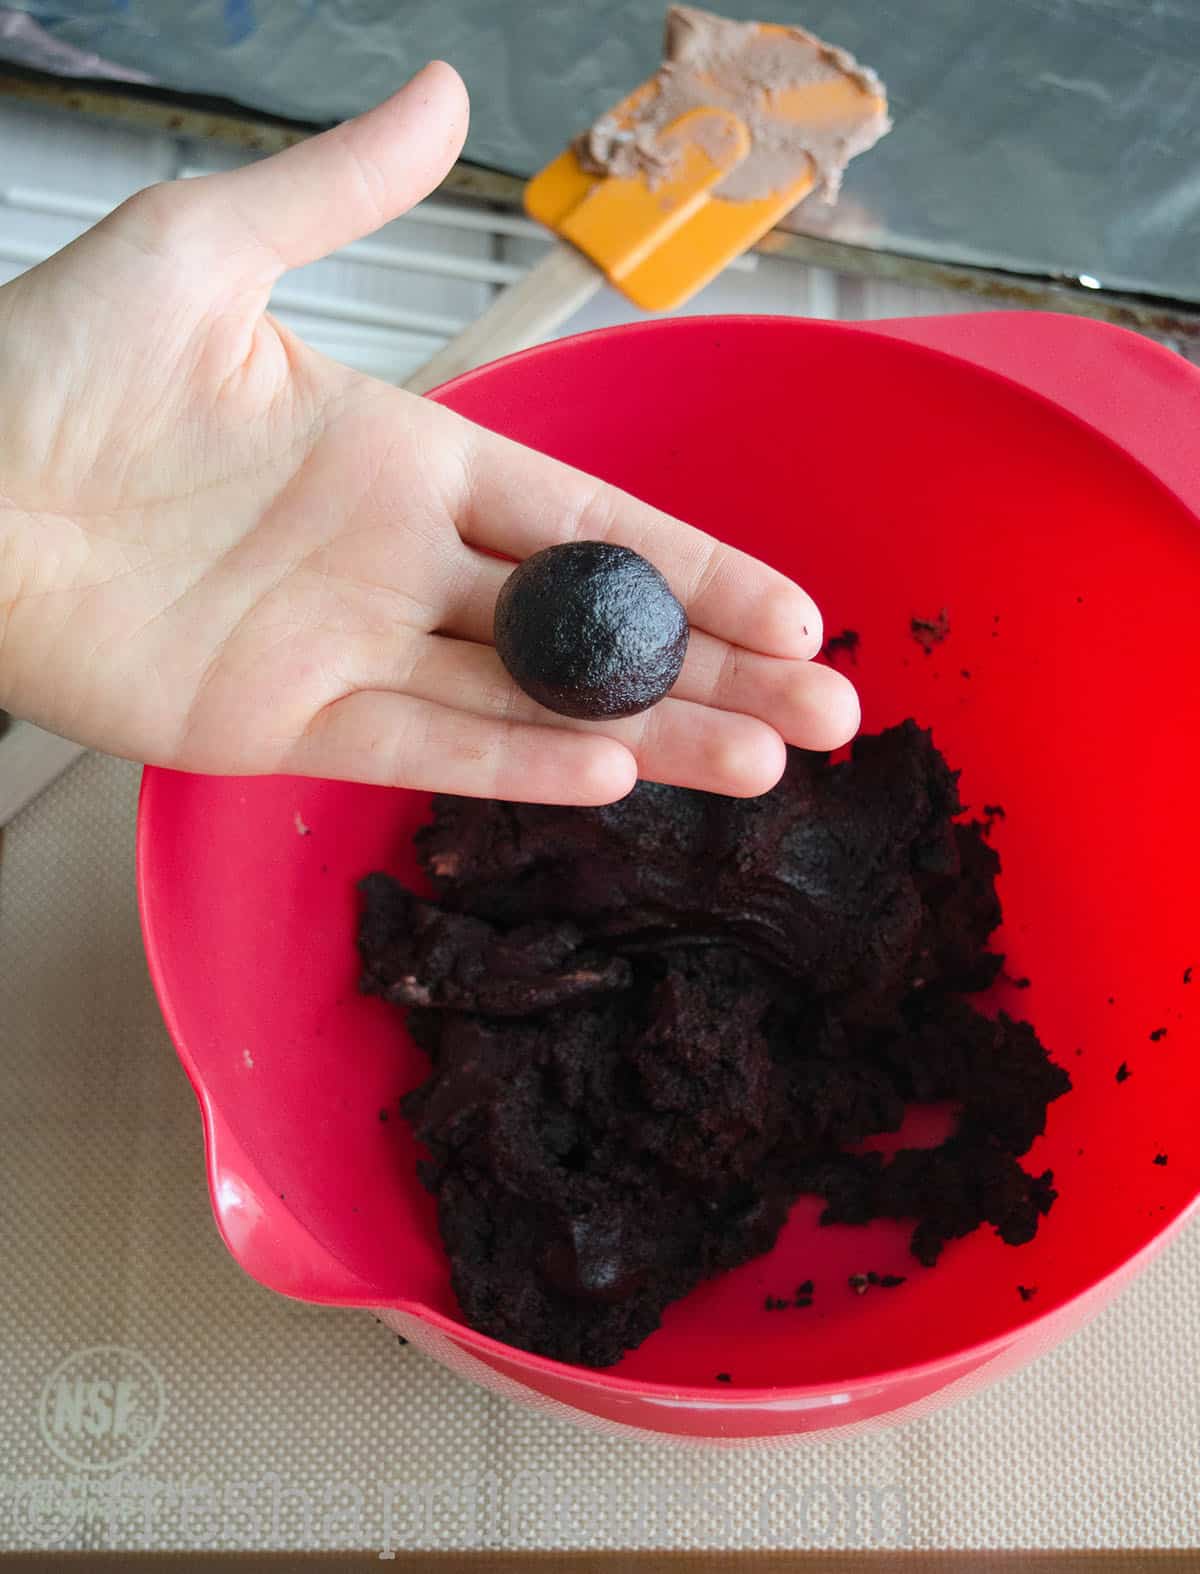
Roll all of the cake into balls approximately 1 Tablespoon in size. Use a Tablespoon measure if you are unsure how big this is. Try to keep the cake balls on the small side.
If they are too big, they will be too heavy, and you will definitely lose them in the dipping step. Place your cake balls onto one of your prepared baking sheets.
I got about 20 cake pop balls from my 3 cups of cake.
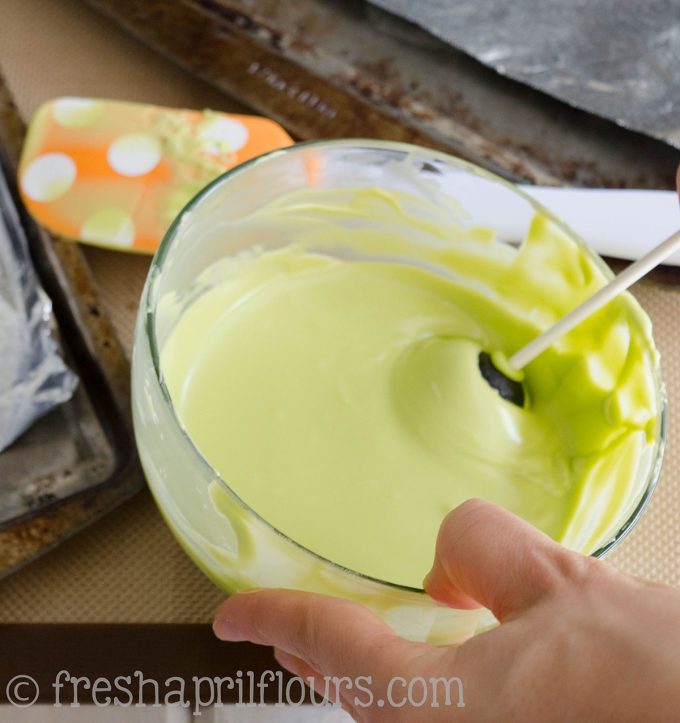
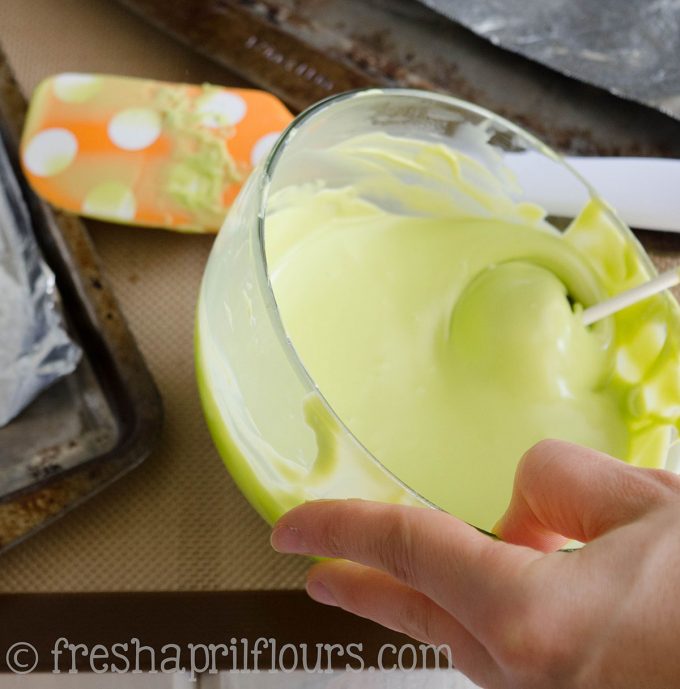
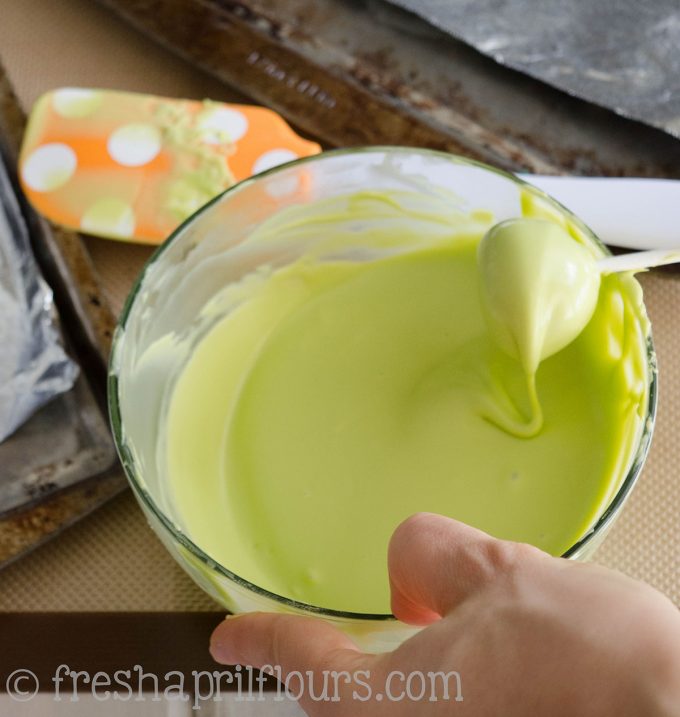
STEP 4: MELTING CHOCOLATE (OR CANDY MELTS) FOR CAKE POPS
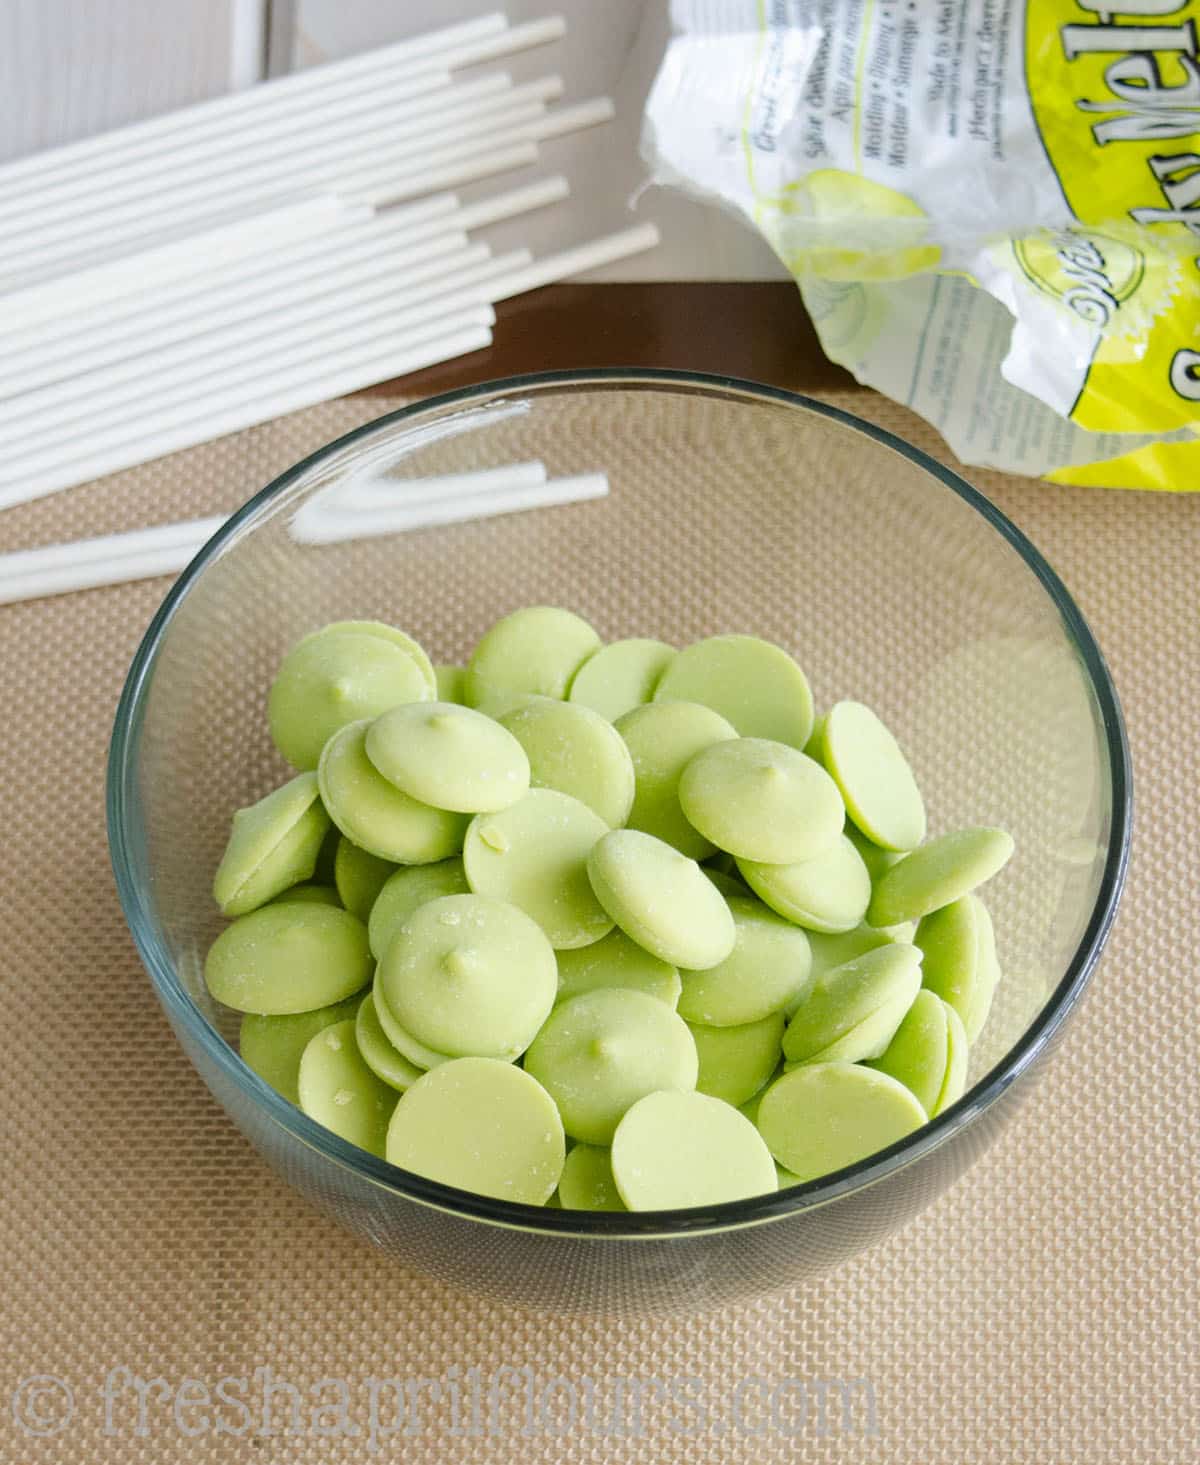
Place your candy melts (any color) in a glass or ceramic bowl (I say this because I’ve used plastic, and the heat distribution makes keeping the candy melts melted quite difficult). I typically use ½ to ¾ of a 12oz bag per 3 cups of cake.
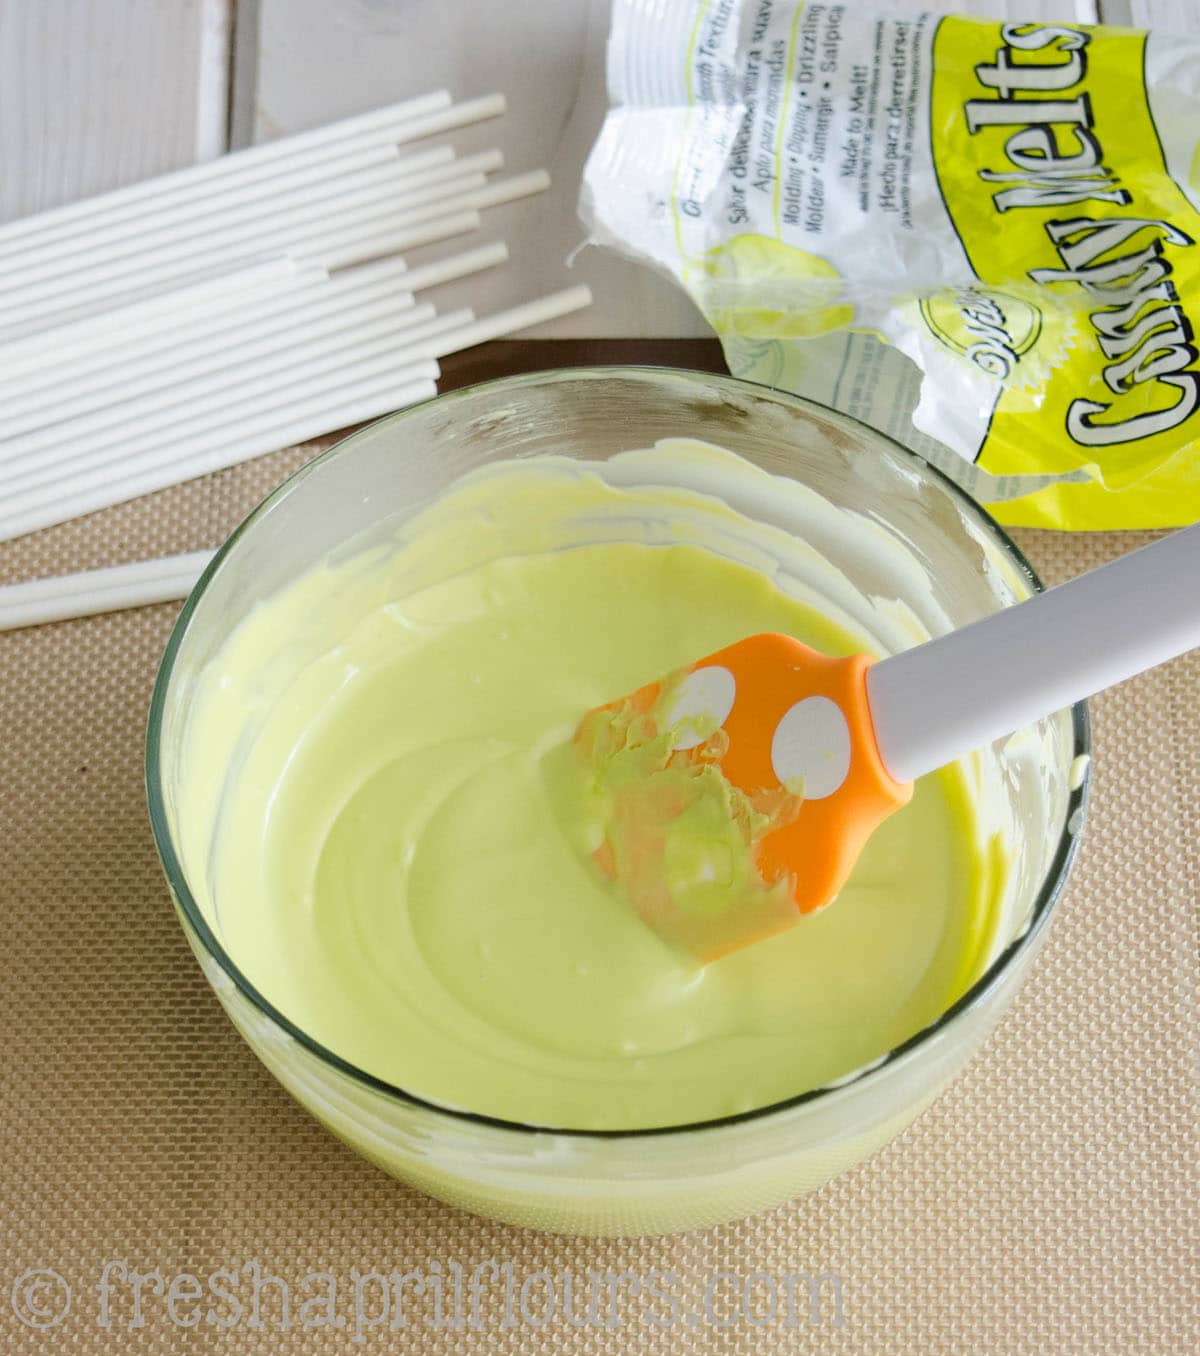
Heat on MEDIUM (50%) power for 30 seconds, stirring after each session in the microwave. It may seem silly to stir the melts the first couple times since they won’t seem to have melted at all, but trust me, the ones on the outside are hotter.
Stir them.
It usually takes me about 5-6 sessions of 30 seconds at MEDIUM power to achieve the texture I want. As the candy melts start getting meltier (??), stir them vigorously to continue the melting process outside of the microwave.
You do not want to scorch your candy melts.
It is possible to overheat them, and they will turn to a crumbly, dry mess. Stirring will help distribute the heat.
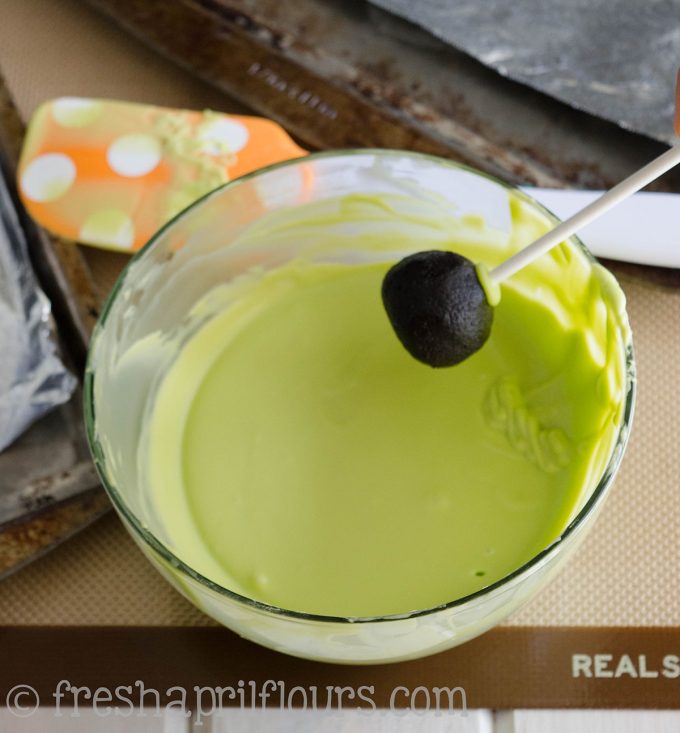
STEP 5: INSERT CAKE POP STICKS
Grab your cake pop sticks. Working with one stick at a time, dip the tip of a lollipop stick into your melted candy (about ½ an inch). Push this stick into a cake ball about halfway.
You don’t want to push it the whole way through, because it will poke out of the top of the ball.
The melted candy will form a little mound. This is just fine and what you want to happen.
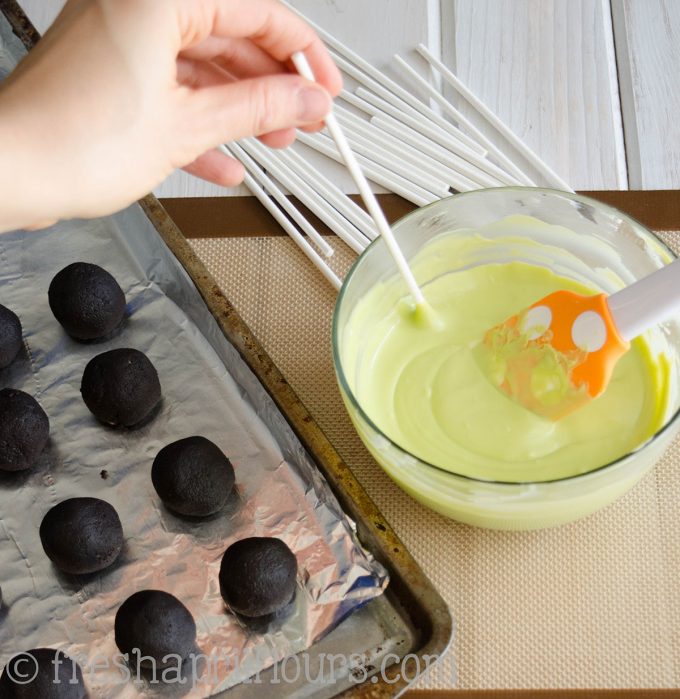
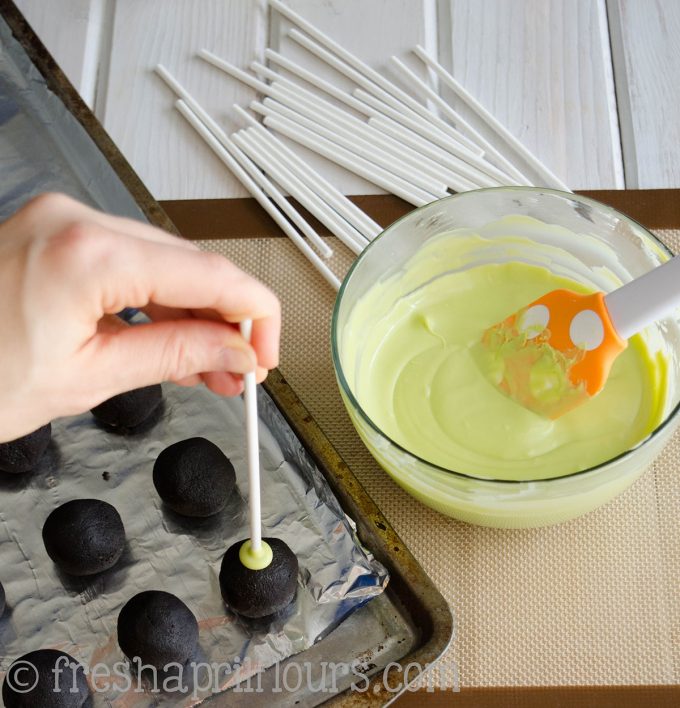
Repeat until all cake balls have sticks, and place in the freezer for 15 minutes.
STEP 6: DIP THE CAKE POPS
Once your cake balls have set up, it’s time to get to dipping! You may have to reheat your candy melts a little bit (start with 20 seconds on MEDIUM power), but do not work with hot melts!
The temperature differences will be too drastic and you’ll end up with cracks in your coating (more on that in the Troubleshooting section below). As long as you are able to stir your melts and they seem to still be in a fairly viscous state, reheating is not necessary.
Side note… Please excuse my blurry photos below. Turns out that even using a tripod, it is quite difficult to get action shots when you are constantly moving your photographic subject. I think you’ll be able to figure out what I’m showing you!
Working with one ball at a time, submerge the cake ball into the melts, making sure to cover the candy mound you created (more on what happens if you don’t do this in Troubleshooting section below).
I have a habit of tilting my bowl, but this is just the way I prefer to do it and find it makes things easier. Work quickly, as leaving the cake ball in the melts too long is a good way to lose it from the stick!
Lift the cake ball out of the melts and slowly twirl the stick to allow the excess coating to drip off. I also tap my stick LIGHTLY on the side of the bowl to help some of the coating drip off.
Pull the cake pop to the edge of the bowl and, while still twirling slowly, allow the bowl to scrape the excess from where the stick meets the pop.
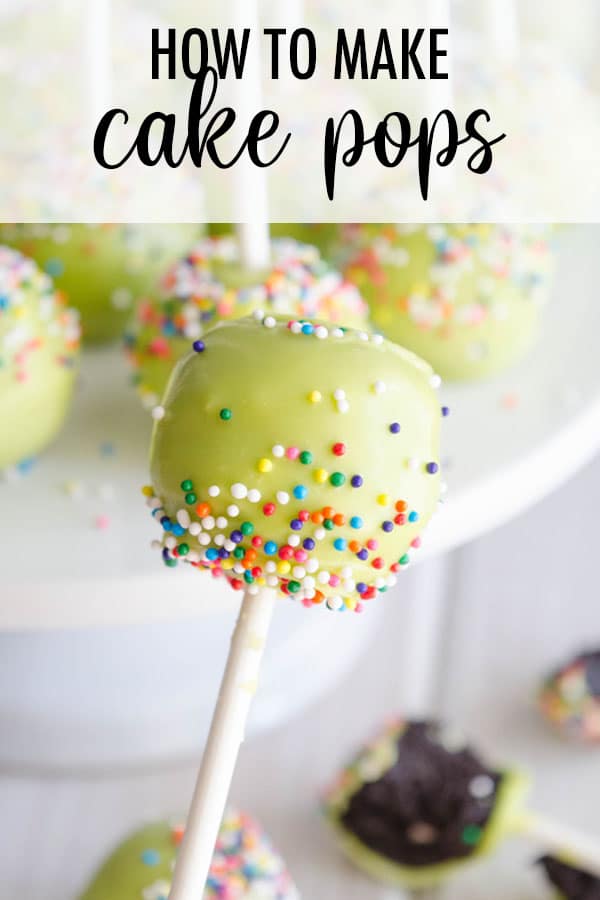
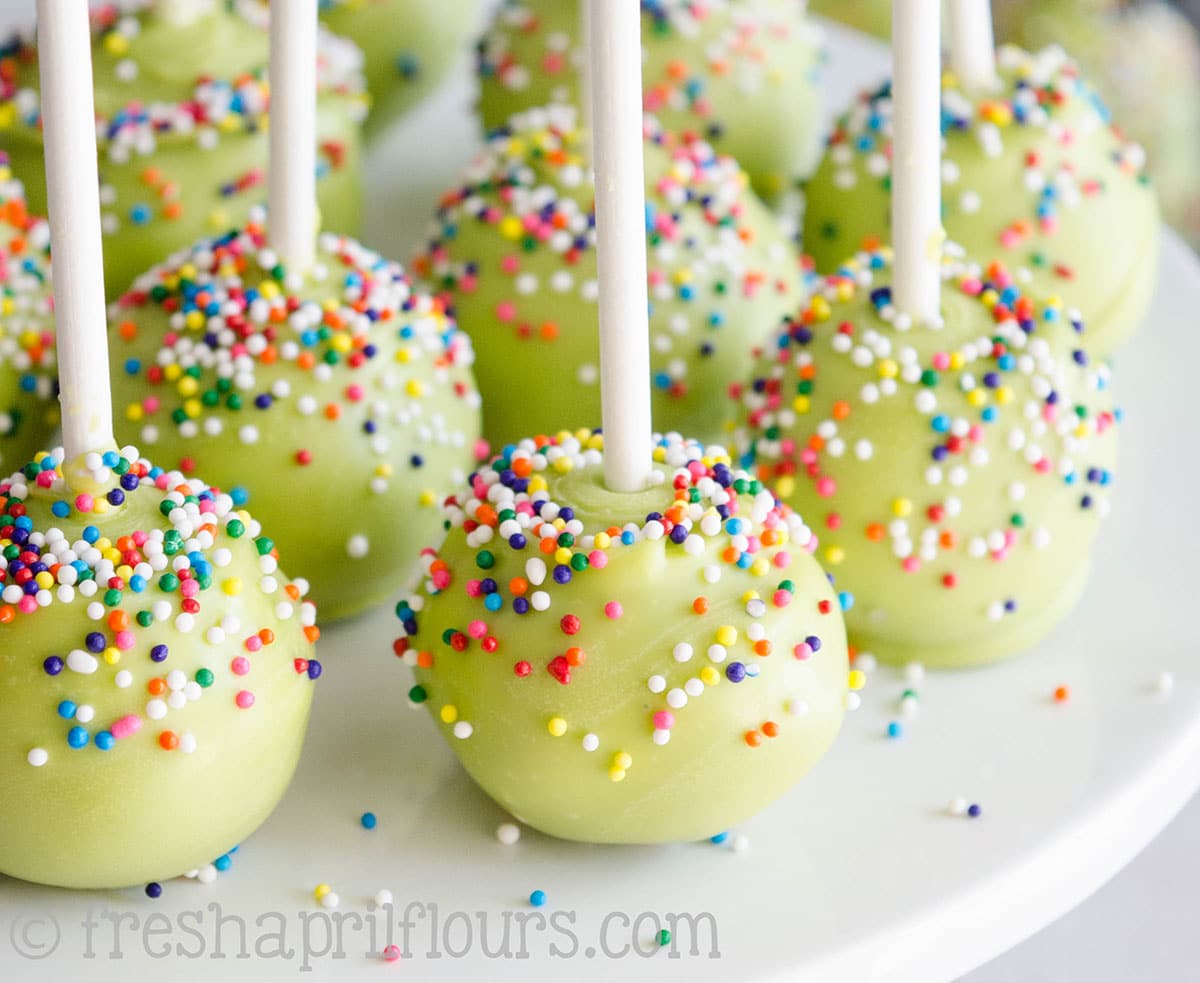
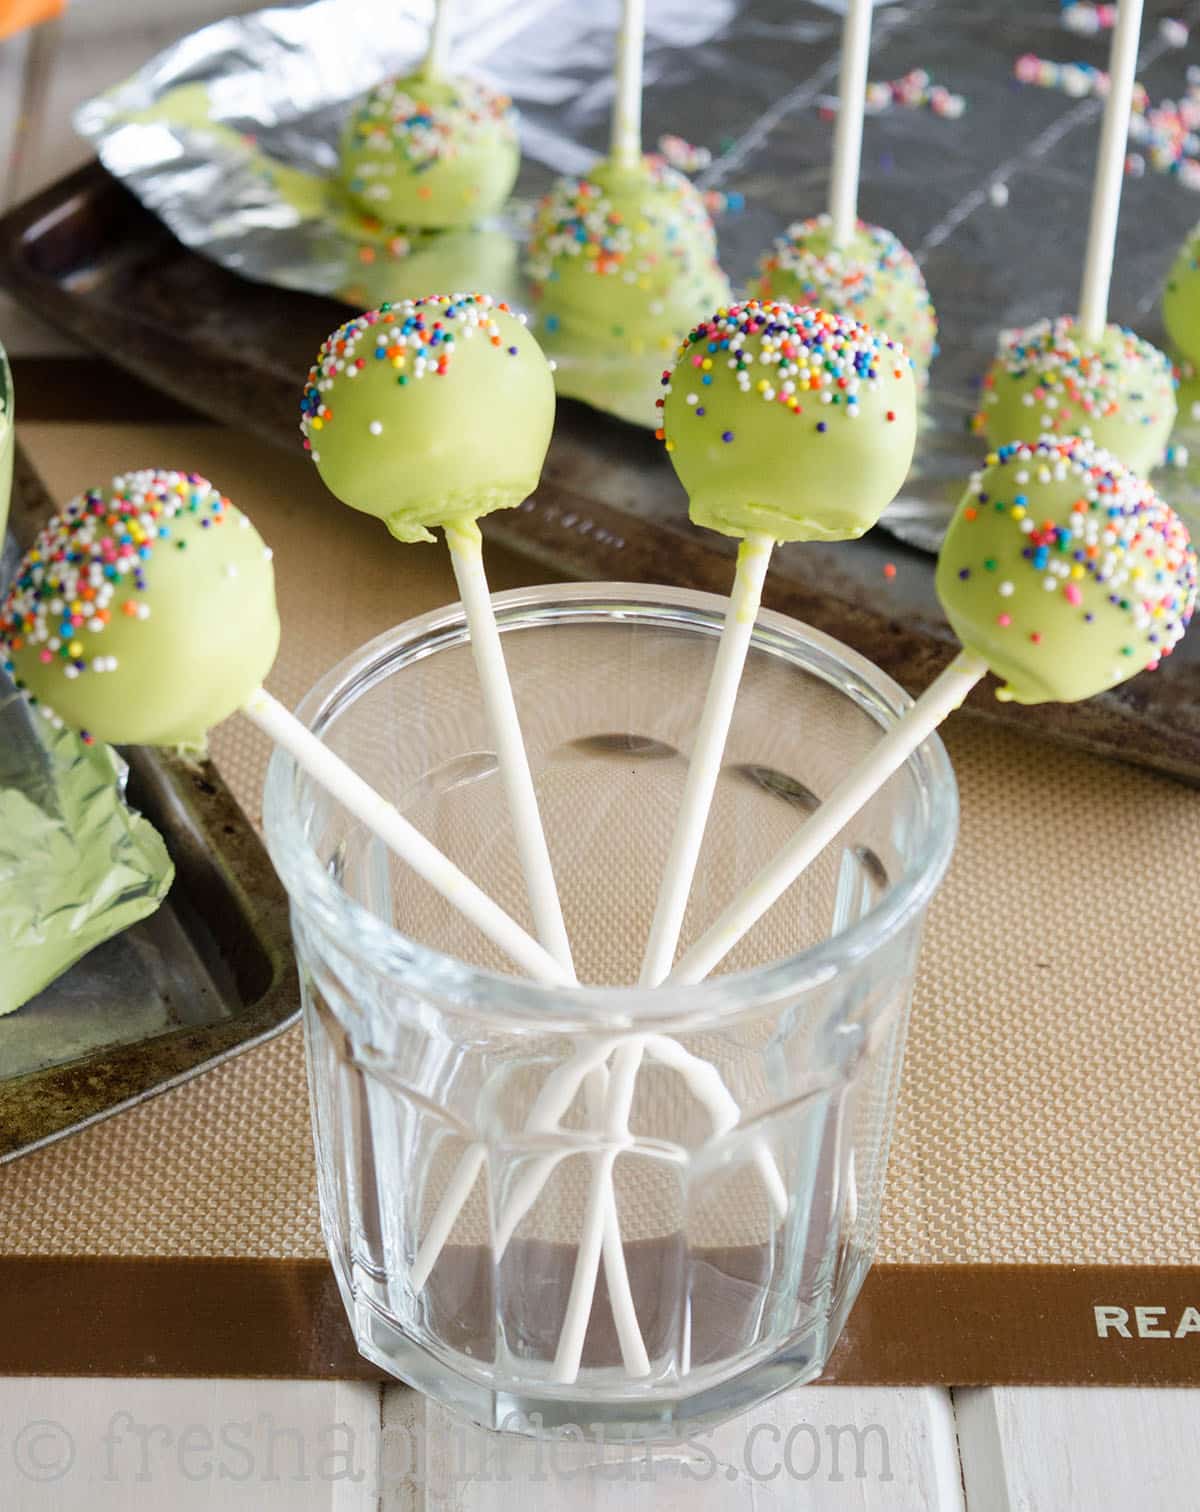
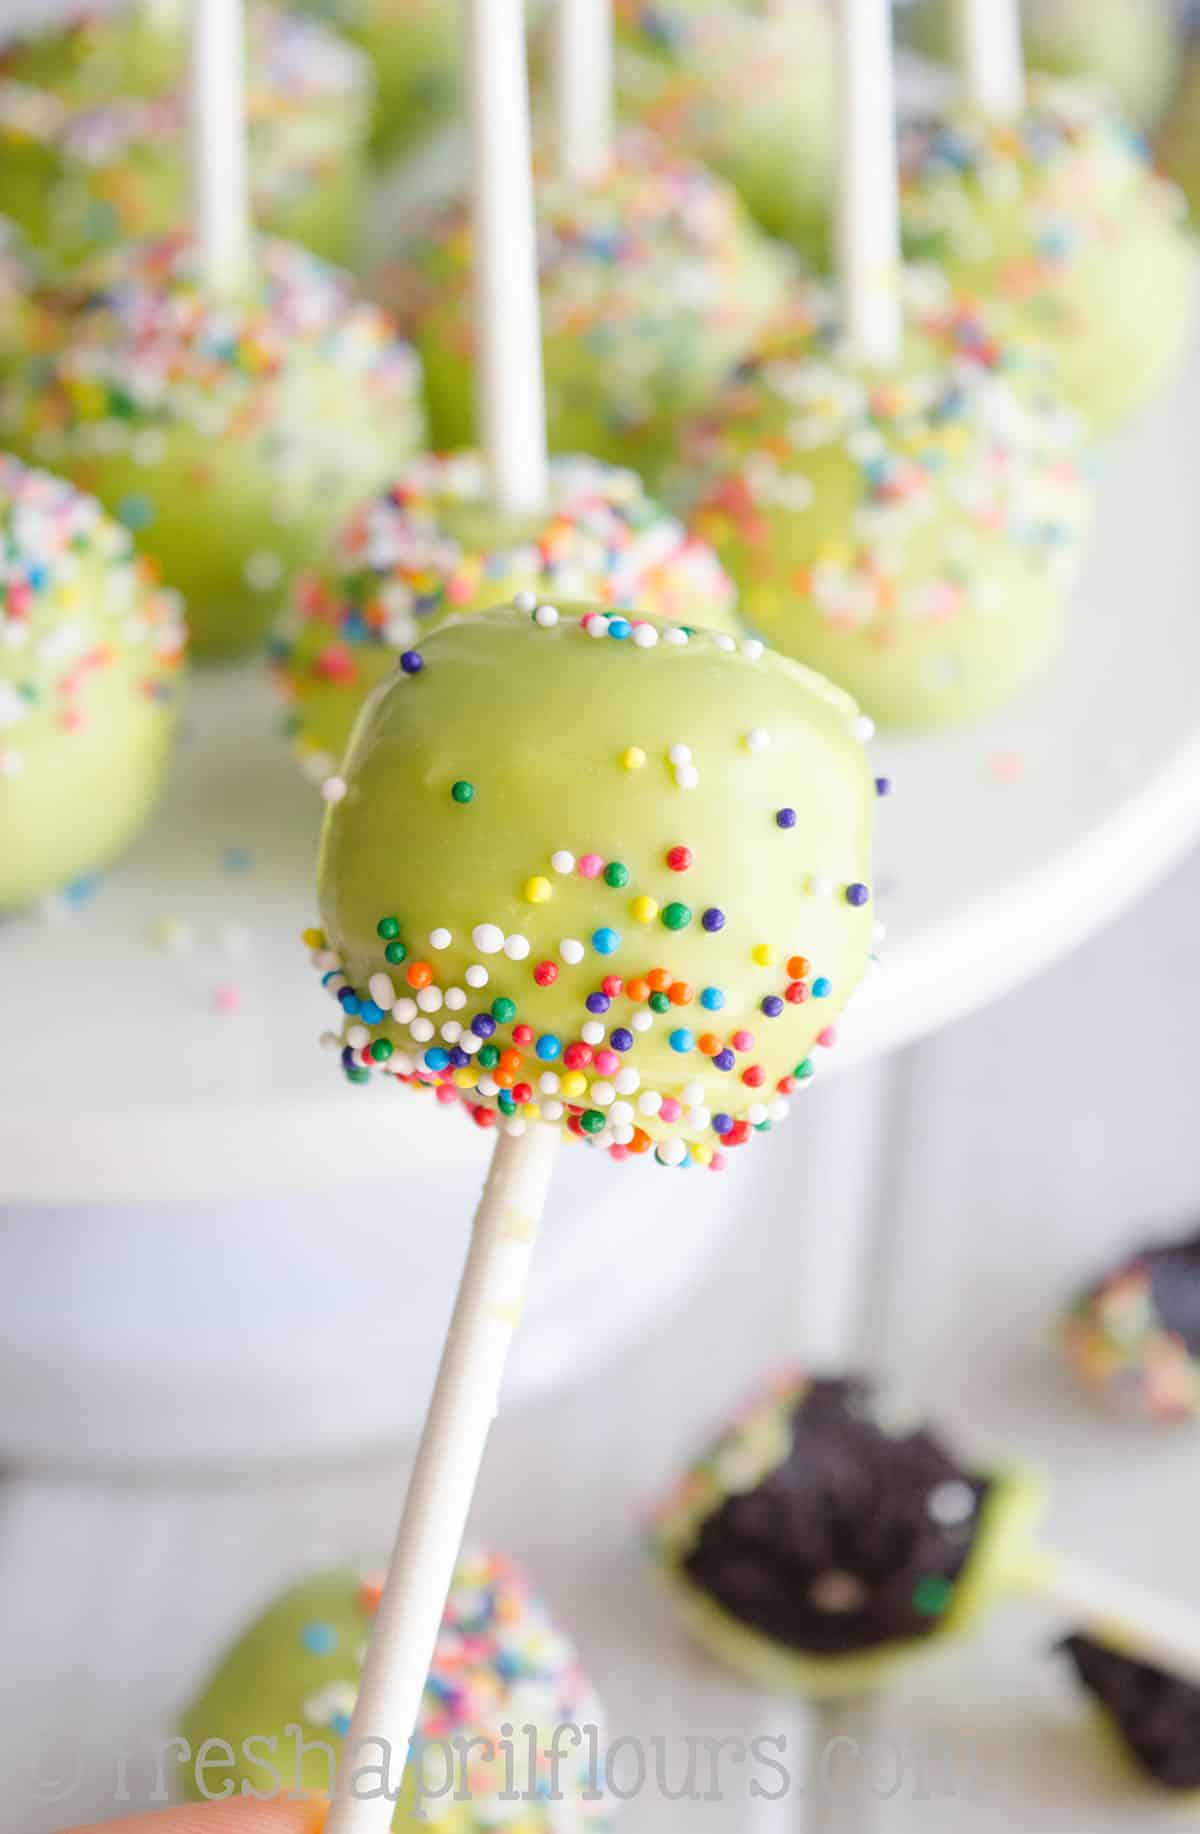
While the coating is still wet, decorate with sprinkles.
You may place your finished cake pops on your second baking sheet (which will make their tops a bit flat) OR you may do what I did here and allow them to dry right side up in a tall glass.
I have also used a large styrofoam block which is a super easy way to allow several cake pops to dry at once.
How to display Cake Pops
Once the pops are completely cool, they’re ready to enjoy! Package them up in plastic goodie bags or serve them as is on a plate or platter.
Troubleshooting Tips for Homemade Cake Pops
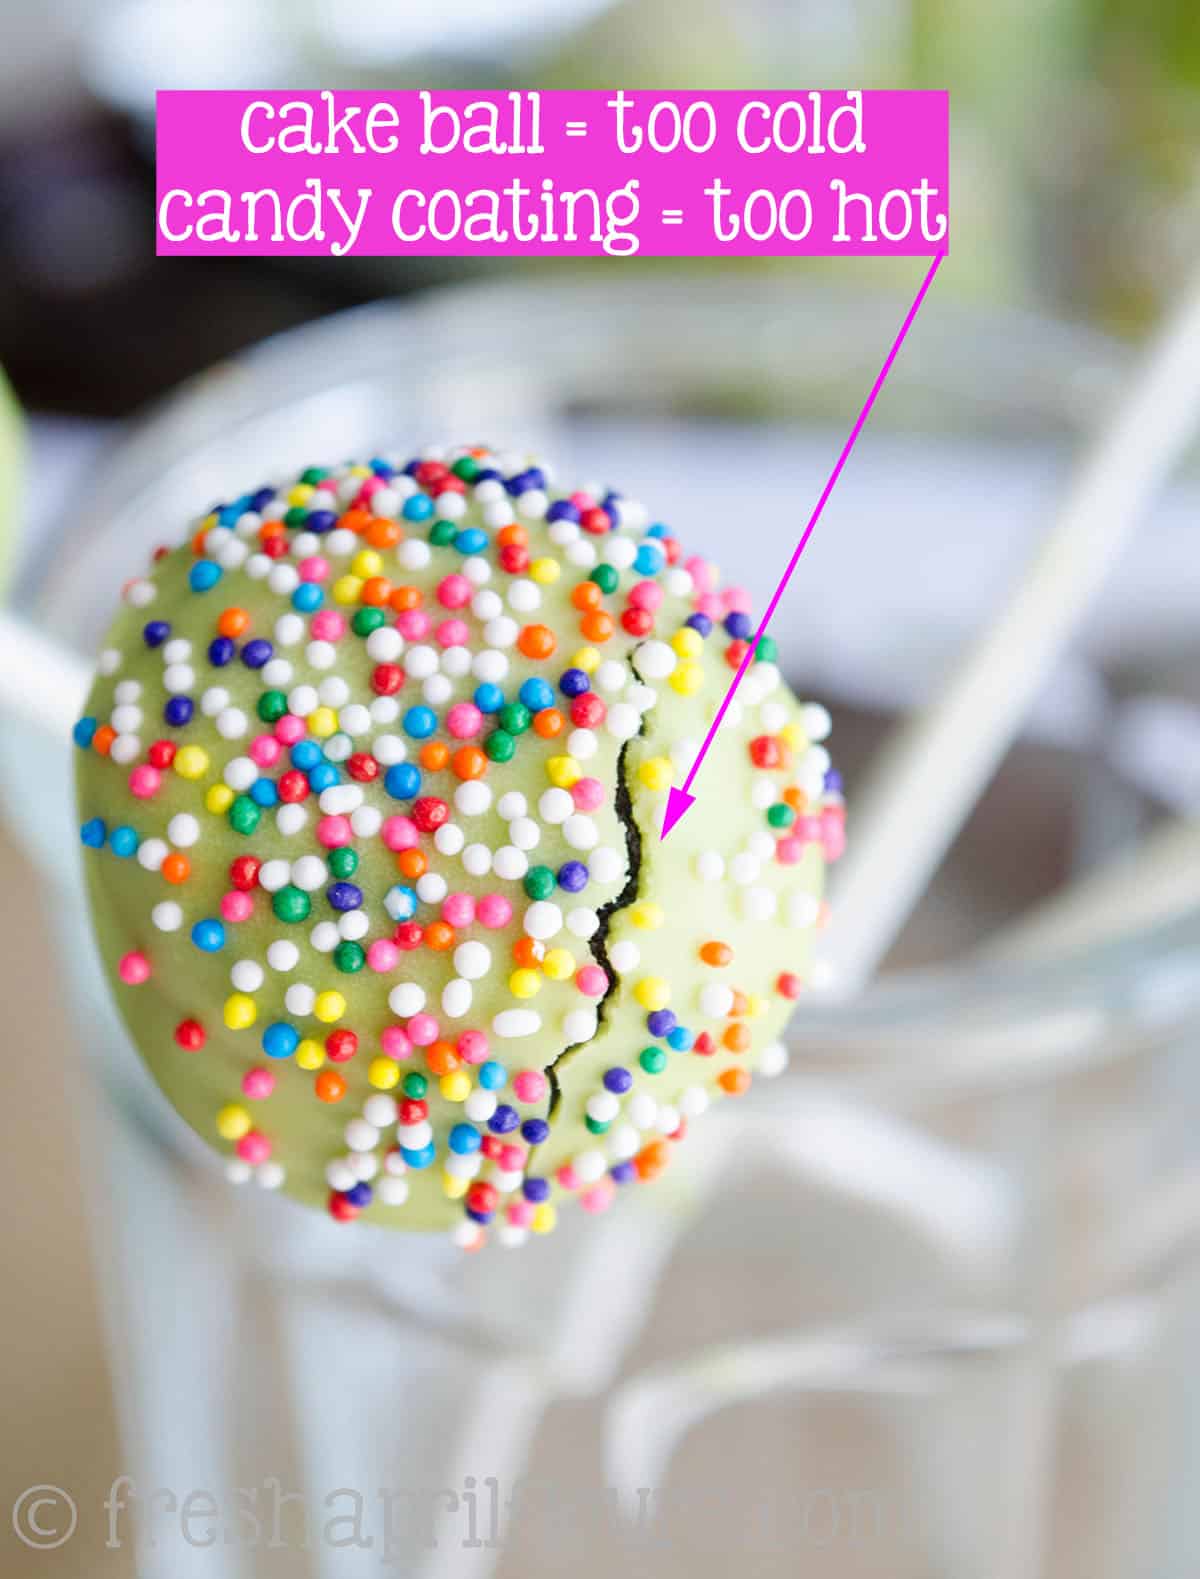
I stated above that if your melted candy coating are too hot and your cake balls are too cold, there will be earthquake city all over the surface of your cake pop.
How to avoid this: don’t leave your cake balls in the freezer for more than 15 minutes. This particularly cold cake ball was in the freezer for a half an hour. Plus, my candy coating was very hot. I did this on purpose so I could take a photo.
If your balls are in the freezer for longer than 15 minutes, allow them to sit at room temperature for a few more minutes before dipping. Likewise, allow your coating to cool for a few minutes if you’ve just reheated it.
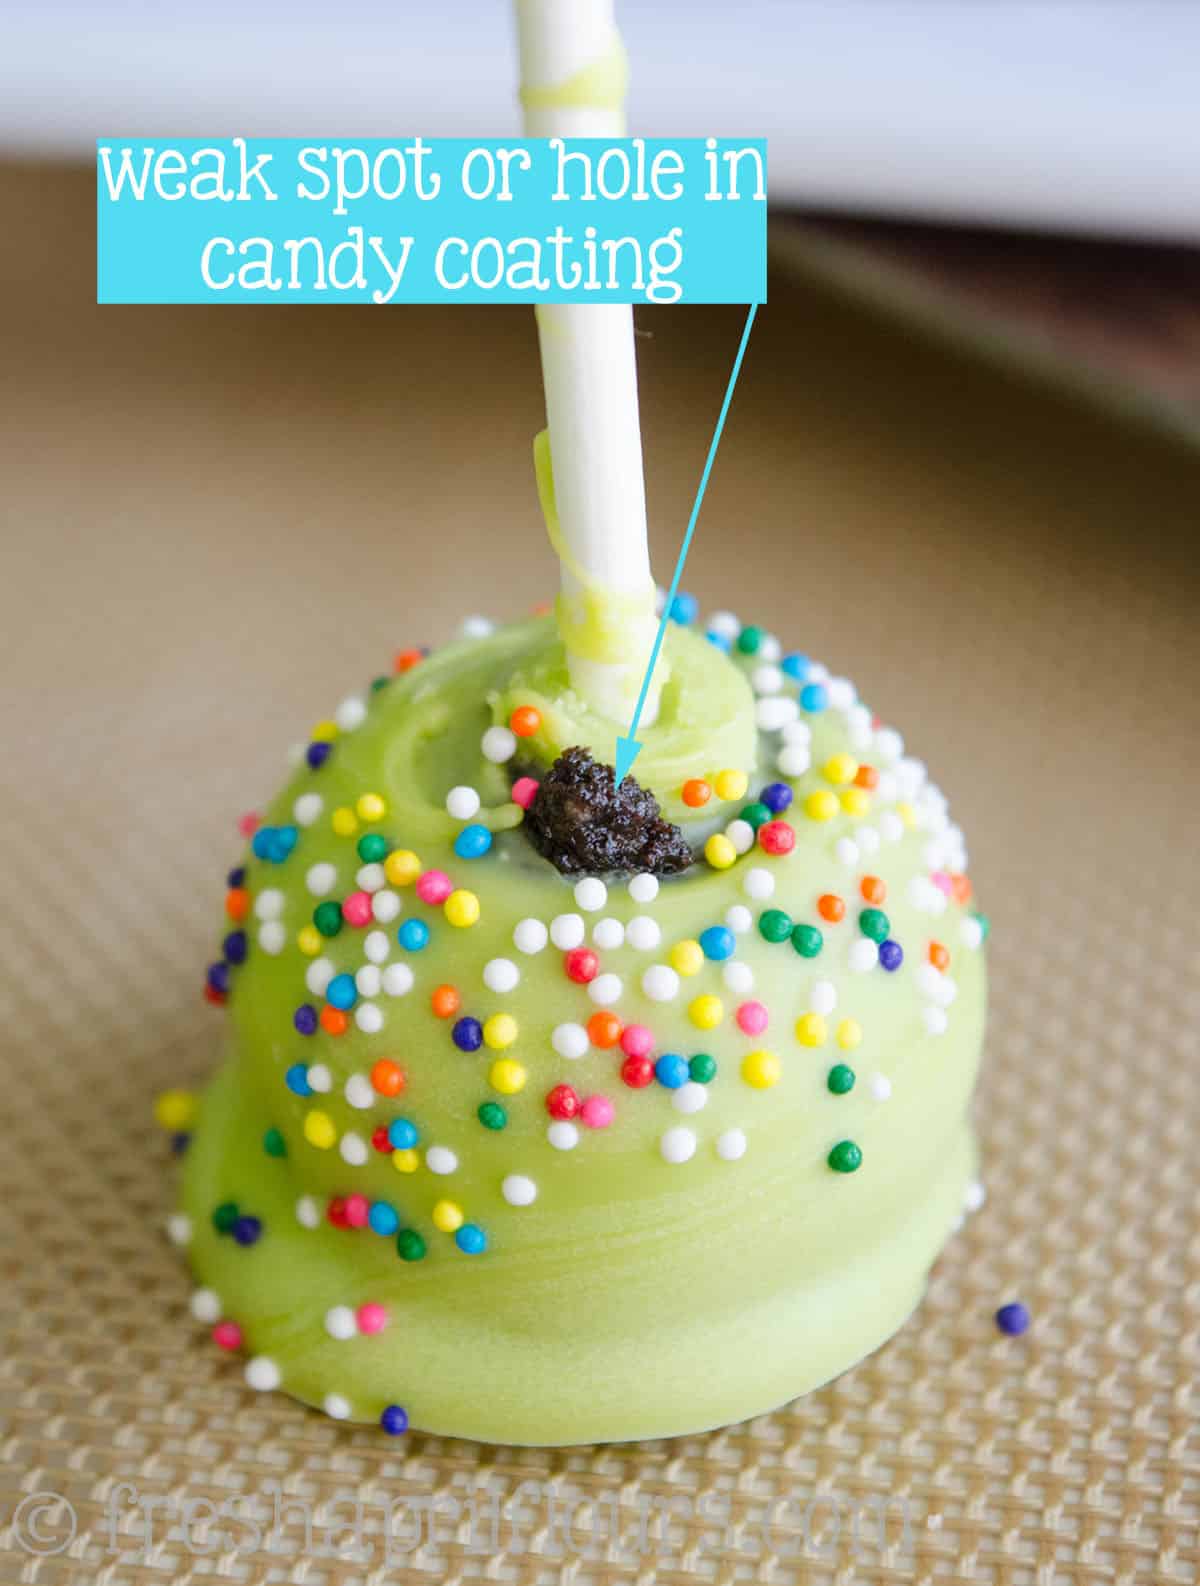
If you don’t cover the mound you made when you inserted the stick into the cake ball, your cake pop will do this really cute thing I like to call a “cake poop.” If there are holes, cracks, or weak spots in your coating, that cake will find a way out.
How to avoid this: cover all surfaces of the cake.
How to fix this: scrape off the cake and “patch” the spot with a toothpick and more candy coating.
Other problems that may arise in this recipe for Cake Pops
Your cake ball falls off the stick in your candy coating–> either your cake ball is too large OR you are spending too much time in your warm melts. Get in and get out!
Oil is leaching out of the cake pop onto the stick–> this is completely fine, and really only aesthetically displeasing. If it bothers you, use a cake that is less oily, and be sure not to use too much frosting. There is a lot of butter involved in frosting (especially homemade).
Your candy coating is hardening too quickly–> you’ve probably overheated your coating. You’re well on your way to scorching it, so be incredibly careful if you need to reheat it.
I hope you feel well-versed in cake pops now and will try making my easy cake pops recipe yourself! And if you’re looking for how to make vanilla cake pops, it’s as simple as swapping the chocolate cake pictured here for vanilla cake. Seriously simple!
Do not be intimidated by this recipe for Cake Pops
Through all the years of my cake baking and decorating, I constantly had to remind myself “it’s just cake.” The world will go on if your cake pop falls into the coating, or if your stick pokes through the top of the pop, or your sprinkles don’t stick in the prettiest way ever.
Practice makes perfect, and I still have mess ups here and there. And I used to get PAID to do this!
So put on some tunes, relax, maybe grab a little liquid courage, and get to cake popping. You’ll be a pro in no time!
How to decorate cake pops
I prefer to decorate my cake pops with non-pareil sprinkles, but have also piped designs like baseball stitches and animal faces. Less is more when it comes to cake pops, but anything you can think of to add some flair or match your occasion will make them stand out on a dessert table.
How to store Cake Pops
HOW LONG DO CAKE POPS LAST?
Store cake pops at room temperature or in the fridge. They stay fresh at room temperature up to 2 weeks. In the fridge, they will stay fresh for 3 weeks.
DO CAKE POPS NEED TO BE REFRIGERATED?
In general, cake pops do not need to be refrigerated, but if you live in a warmer or humid climate, you may find that keeping them in the refrigerator makes them last longer as they are less likely to weep.
CAN YOU FREEZE CAKE POPS?
You can easily freeze cake pops. Store them wrapped tightly in foil or plastic wrap or in a zip-top bag. You can eat them frozen or allow them to thaw in the refrigerator or at room temperature. Be aware that the coating may weep and any sprinkles or designs you may have piped onto the outside of the cake pop may also run, but the taste will not be affected.
CAKE POPS FAQS
Need another way to use up leftover cake and frosting? Consider my birthday cake ice cream!
More Favorites from Fresh April Flours
Homemade Cake Pops
Ingredients
- 3 cups crumbled cake1 any flavor
- ⅓ cup frosting2
- approximately 20 cake pop sticks
- 1- 12 oz bag (340g) candy melts any color3
- sprinkles optional
Instructions
PREPARE THE CAKE
- Line two baking sheets with foil or parchment and set aside.
- In a large bowl, crumble your cake into tiny pieces. I usually use my hands, but I've also used my stand mixer. Either way, you want this crumb to be very fine.3 cups crumbled cake1
- Add your frosting. If you would like to add citrus zest for extra flavor, add that now, too. This is also where you would add spices if you wanted to (add 1 teaspoon of spice, taste, and add more as necessary). For these photos, I added the whole ⅓ cup of frosting because my cake was very dry. If you have a moist cake, add 3 Tablespoons of frosting and go from there.⅓ cup frosting2
- Work the frosting into the crumbled cake (preferably with your hands) by squeezing and pushing until everything is uniform in texture. You're looking for a texture that you can roll into a sturdy ball (meaning the ball should have a bit of give when you push on it but not squish completely).
ROLL INTO BALLS
- Roll all of the cake into balls approximately 1 Tablespoon in size with the palm of your hand. Use a Tablespoon measure if you are unsure how big this is. Try to keep the cake balls on the small side. If they are too big, they will be too heavy, and you will definitely lose them in the dipping step. Place your cake balls onto one of your prepared baking sheets.
INSERT STICKS
- Place your candy melts in a glass or ceramic heat safe bowl. I typically use ½ to ¾ of a 12oz bag per 3 cups of cake. Heat on MEDIUM (50%) power for 30 seconds, stirring after each session in the microwave. It may seem silly to stir the melts the first couple times since they won't seem to have melted at all, but trust me, the ones on the outside are hotter. It usually takes me about 5-6 sessions of 30 seconds at MEDIUM power to achieve the texture I want.1- 12 oz bag (340g) candy melts
- As the candy melts start getting more smooth, stir them vigorously to continue the melting process outside of the microwave. You do not want to scorch your candy melts. It is possible to overheat them, and they will turn to a crumbly, dry mess. Stirring will help distribute the heat.
- Working with one cake pop stick at a time, dip one end of the stick into your melted candy melt mixture (about ½ an inch). Push this stick into a cake ball about halfway. You don't want to push it the whole way through, because it will poke out of the top of the ball. The melted candy will form a little mound. This is just fine and what you want to happen. Repeat until all cake balls have sticks, and place in the freezer for 15 minutes.approximately 20 cake pop sticks
DIP THE CAKE POPS
- Once your cake balls have set up, they are ready to dip. You may have to reheat your candy melts a little bit (start with 20 seconds on MEDIUM power), but do not work with super hot melts. The temperature differences will be too drastic and you’ll end up with cracks in your coating. As long as you are able to stir your melts and they seem to still be in a fairly viscous state, reheating is not necessary.
- Working with one ball at a time, submerge the cake ball into the melts, making sure to cover the candy mound you created. I like to tilt my bowl, but this is just the way I prefer to do it and find it makes things easier. Work quickly, as leaving the cake ball in the melts too long is a good way to lose it from the stick.
- Lift the cake ball out of the melts and slowly twirl the stick to allow the excess to drip off. I also tap my stick LIGHTLY on the side of the bowl to help some of the coating drip off.
- Pull the cake pop to the edge of the bowl and allow the bowl to scrape the excess from where the stick meets the pop.
- While the coating is still wet, decorate cake pops with sprinkles.
ALLOW CAKE POPS TO SET
- You may place your finished cake pops on your second baking sheet (which will make their tops a bit flat) OR you may rest them in a tall glass and allow them to cool right side up. You could also use a large styrofoam block which is a super easy way to allow several cake pops to dry at once.
- Once the pops are completely cool, they’re ready to enjoy. Package them up in plastic goodie bags or serve them as is on a plate or platter. Cake pops stay fresh at room temperature up to 2 weeks. In the fridge, they will stay fresh for 3 weeks.
Notes
- Cake: you can use homemade cake (here are all of my cake recipes) or a box mix. If you want to use boxed mix, make sure you bake it a couple days ahead of time so it has time to go a little bit stale.
- Frosting: you can use homemade or store-bought. Store-bought tends to be a bit runnier, so go by feel of your cake pops when deciding whether or not to add more frosting to your cake crumbs.
- Colored coating: you may also use quality baking chocolate. Add a teaspoon of shortening per 8oz of chocolate. White chocolate will not take well to a large amount food or gel coloring, so if you would like boldly colored cake pops, it’s best to use candy melts.
Nutrition Disclosure
All nutritional values are approximate and provided to the reader as a courtesy. Changing ingredients and/or quantities will alter the estimated nutritional calculations.
Hi Lynn,
I’ll be making cake pops for my gender reveal party coming up this Saturday. I’d like to try to make them tonight or tomorrow to free up time for making food at the end of the week. Would tonight or tomorrow night be too early to make these? If I store them in an air tight container, would they stay fresh enough for Saturday? Appreciate your assistance! 🙂
Hi, Keri! SO sorry I’m just now seeing this comment. Cake pops last quite awhile, so it’s perfectly fine to make them well in advance. How did they turn out? Would love to see a picture of them!
I have made quite a few cake pops using different “chocolate” and find a simple chocolate flavoured cake covering is the best. I also spoon the “chocolate” over the pop. Works a treat👍🏻
When you say 3 cups of cake do you mean batter before it’s baked or crumbled up equals 3 cups ? Thanks my name is lauren
Crumbled cake!
The one problem I ran into last time I made cake pops that I have yet to find an answer for online is the candy melts “shifting” as soon as I dunk them. I dunk them and pull them up then as the candy melt coating is sliding off (which is normal to get the excess off) the coating actually looks as if its separating. The best word I can use is shifting. Like the plates of the planet! It leaves the end result with lines and bumps. Did I over heat my chocolate or is it too hot? Is the chocolate too loose? The melts never ceased (I use a double boiler approach with a glass bowl).
Hey, Lisa! I’ve not run into that problem, but my two guesses would be that 1) maybe, yes, your chocolate is too warm. I’d start there. The other is that 2) are you using chocolate chips? Something with a stabilizer in it? That can sometimes mess with the fluidity of chocolate. If that’s not the issue, I’d troubleshoot the temperature first and see if that helps! Let me know!
I’ve had that happen to me when my melts were not consistently the same temperature throughout. I found there were cooler spots causing the shifting. Once I realized this and adjusted for it making my melts the same temp throughout using the glass bowl double boiler the shifting stopped. Hope that helps you !
This tutorial is 💯% on point! Any question I had was answered. If you follow her steps, you end up with flawless cake pops. At my own fault, my first batch I left out of the freezer too long and they ended up falling off the sticks when I dipped them in melting chocolate. I salvaged them but the second batch was perfection! Lynn really knows what’s poppin 👌🏻
Loveeeee this. Thanks, Sham!
Everytime I make upside down cake pops the cake shows through the bottom.
How do I make upside down cakepops that don’t have cake show through??
Hey, Rebecca– it’s kind of tough to avoid, but you can try using a greased piece of parchment or wax paper and see if that helps!
i use daek chocolate coating but after 2 days it was melt in room teampeture ,hot weather
If it’s hot where you are, you may want to keep them in the fridge!
love the thoughts but what tempuratures should you cook them at and for how long
If you’re asking about baking times, you didn’t read anything at all…
ok first of all b1+ch you need to read your post because i red it twice and you only talk about not letting them over cook, or don’t let them sit in the freezer too long or temperatures for the Chocolate Medium and still no temperatures to cook the pops so if your b1+ch azz is saying i didn’t read it, well i did and twice after to instigate that i didn’t read this )l$h1+
Ok, but the whole time I talk about using leftover, already baked cake. I believe in your ability to find a cake recipe– they’re all over my site and even linked in the recipe card.
WTH, Ray? Rude a little???
Thanks for this! Really helpful tutorial!
Thanks so much, Kim!
I followed the steps to make these cake pops but did chocolate cake with chocolate frosting and pink candy coating for Valentine’s Day and these came out ADORABLE. I made them for one daughters preschool class and one daughters daycare. My daughters daycare provider didn’t believe I made them and said she would pay me to make her some for the holidays! So if you want some professional looking cake pops look no further!!
Thanks so much, Kelsey! I love this 🙂
How much frosting would you use for a box of cake? I saw that you said a box of cake can approximately make 60 and your recipe is for 20. So instead of 3 tablespoons you would do 9 tablespoons?
Hi, Ariana– that’s where I would start, yes! Let me know how it goes 🙂
Do you have a link to the frosting you make for cake pops? Newby. Thanks! This is helpful.
Hi, Katy! Welcome 🙂 here are all of my frosting recipes. I used the chocolate buttercream specifically for these cake pops. Enjoy!
There are so many cake pop recipes out there and I think this is the most “scientific” and accurate one I’ve seen yet. The notes are extremely helpful but personally, I would love to see a note on thinning the candy melts. I really don’t like a thick layer on the cake pop. Otherwise, this page is a one-stop-shop for making cake pops.
Thank you, Jill! This means a lot to me as I’ve spent a lot of time making this tutorial super informative. As far as thinning the candy melts, I’d probably just opt for vegetable shortening or vegetable oil. Or you can switch to melted chocolate (bar, not chips) as that seems to be thinner in general. And a QUICK dip in the coating, no matter what you use.