
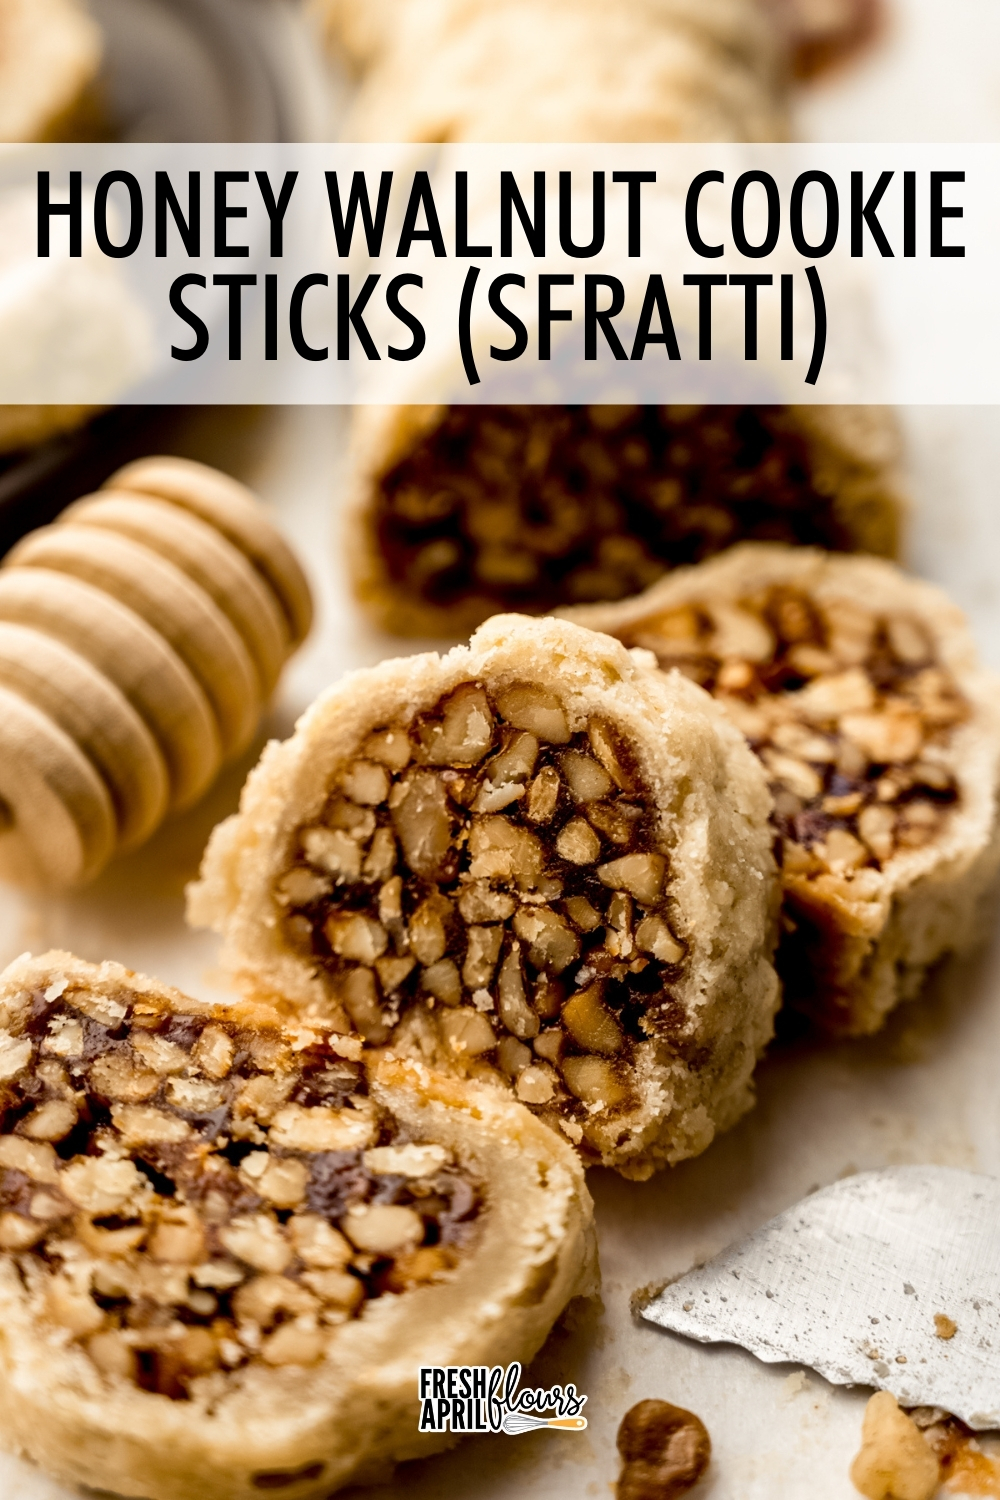
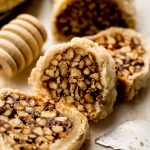
Honey Walnut Cookie Sticks (Sfratti)
As an Amazon Associate, I earn from qualifying purchases. Read the full disclosure here.
Buttery, flaky pie crust surrounds a rich, spiced honey walnut filling in these traditional Italian cookies. This recipe is a family heirloom with deep roots and a flavor that tastes as special as it feels.

THIS IS THE MOST SENTIMENTAL RECIPE ON MY SITE
It’s funny– we “food bloggers,” as we were once called when our internet-only jobs were still a novelty, used to get teased for sharing personal stories before the recipe. And honestly, that’s just how we wrote. As our roles evolved into “content creators” and “recipe developers,” that storytelling mostly disappeared.
But this post needs it. If you’re not into the personal side of this recipe, feel free to jump to the ingredients or straight to the recipe card– though I strongly encourage reading the ingredients and instructions, since this one is a bit more involved than my typical bakes.
Back in 2015, my dad taught me how to make this cookie (here’s the post I made on my Instagram to commemorate that day). It came to America from Italy with my paternal great-grandmother, who passed it down to my grandmother (the Eva behind this Italian anise bread and this Parmesan parsley bread). And then, my dad taught himself to make it because, of course, there was never a written recipe from those original Italian women (shocker).
The weekend that he taught me, I had just found out I was pregnant with our first son. We weren’t ready to share the news yet, and my dad had a small cold, but he was determined to teach me anyway.
A couple of weeks later, we finally shared our long-hoped-for pregnancy with my parents… And also learned my dad had lung cancer (that small cold never went away).
He beat that cancer, getting the all-clear just a month before our son was born. Two years later we welcomed another little boy, and my dad got far more time with his grandsons than we ever expected before he passed in the summer of 2025 from a resurgence of the cancer he chose, with our unwavering support, not to treat.
The ironic part? I put these cookies on my content calendar long before he got sick again– a full-circle moment, ten years later. I was excited to make them entirely on my own for the first time and couldn’t wait for him to try them.
That didn’t happen, of course, but this updated recipe has the exact bones of his, scaled down to a reasonable batch size (the original yielded an ungodly amount of cookies). It reflects ten years of baking experience, teaching others the way he taught me, and a recipe that truly feels like an heirloom.
I’ve rephotographed the cookies, but you’ll still see a few of the original photos with his hands in them alongside the very aggressive watermark I used to slap on everything (cringe). I hope you can feel my (and my dad’s) love for this recipe through the instructions and photos.
If you’ve read this far, thank you for helping me honor my dad’s memory. I hope this recipe finds its way into your kitchen– and eat one in memory of Ron for me, would ya?
THE (BRIEF) HISTORY OF SFRATTI
Before we get to the modern-day version of this cookie, it’s worth acknowledging its roots, because they’re not Italian-American at all, but Jewish. In the 1600s, Jewish communities throughout Italy, especially in Rome, were forced from their homes by the Medici rulers.
Many resettled in the small mountain town of Pitigliano, where they rebuilt their community, establishing a synagogue and bakeries so they could keep making the breads and pastries central to their culture. From that resilience came sfratti: simple stick-shaped pastries filled with walnuts, cinnamon, honey, and orange peel.
The name sfratti comes from sfratto, meaning “eviction,” and the shape symbolizes the wooden staffs authorities used to knock on doors and, according to the story, to force Jewish families from their homes. Over time, these honey-walnut cookie sticks became beloved by non-Jewish Italians as well and eventually a staple of the Italian Christmas season.
So yes– while these little cookie sticks have Jewish origins, they also have Italian evolution, and now a place in my own family’s story and possibly yours. How’s that for multi-cultural/generational?
SFRATTI INGREDIENTS
For as involved as the process is for making these cookies, the ingredient list is very short.

Here is what you’ll need and why:
PIE DOUGH: you can use homemade or store-bought, but I will, of course, always encourage you to use homemade! My pie crust recipe makes two rounds, and the store-bought version usually comes with two as well. You’ll only need one pie dough round for this recipe, so you can either cut my recipe in half or save the second disc (or second premade dough) for another pie. Or pie crust cookies!
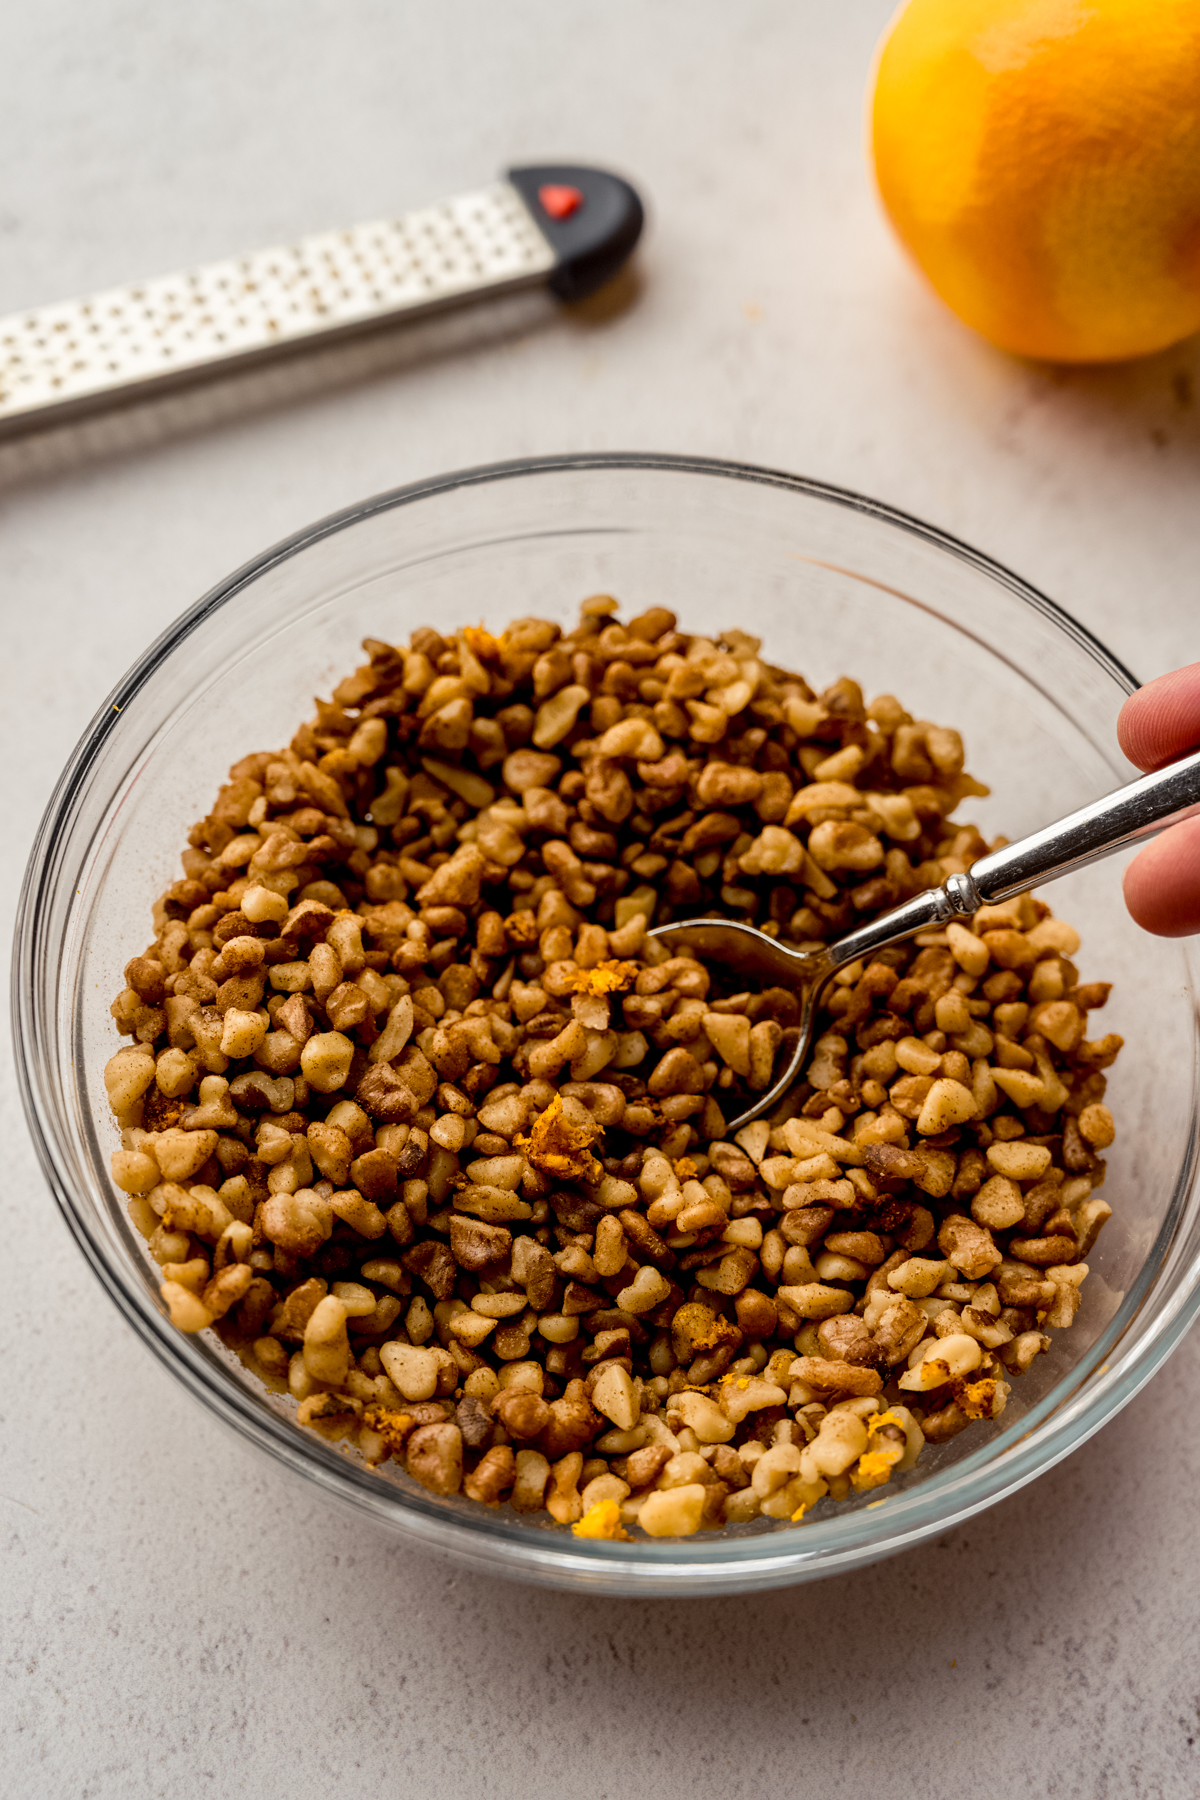
WALNUTS: this is the main ingredient for the filling. You’ll want finely chopped walnuts, which I purchase as such from the get-go. I find that hand chopping the nuts doesn’t get them fine enough, and using my nut chopper makes them too fine. Use your preference or what you can find!
ORANGE ZEST: just like in my pecan pie tarts, orange/walnut/spices go so well together. My dad used jarred zest for this recipe as well as fresh orange zest, and both yield amazing flavor. Again, use your preference or what you have on hand.
GROUND CINNAMON & CLOVES: these spices are the perfect complement to the honey and the walnuts (and the orange!). If you don’t like cloves, you can omit them, but I strongly urge you to keep them in. They’re subtle and there are lots of other flavors going on that marry well with it.
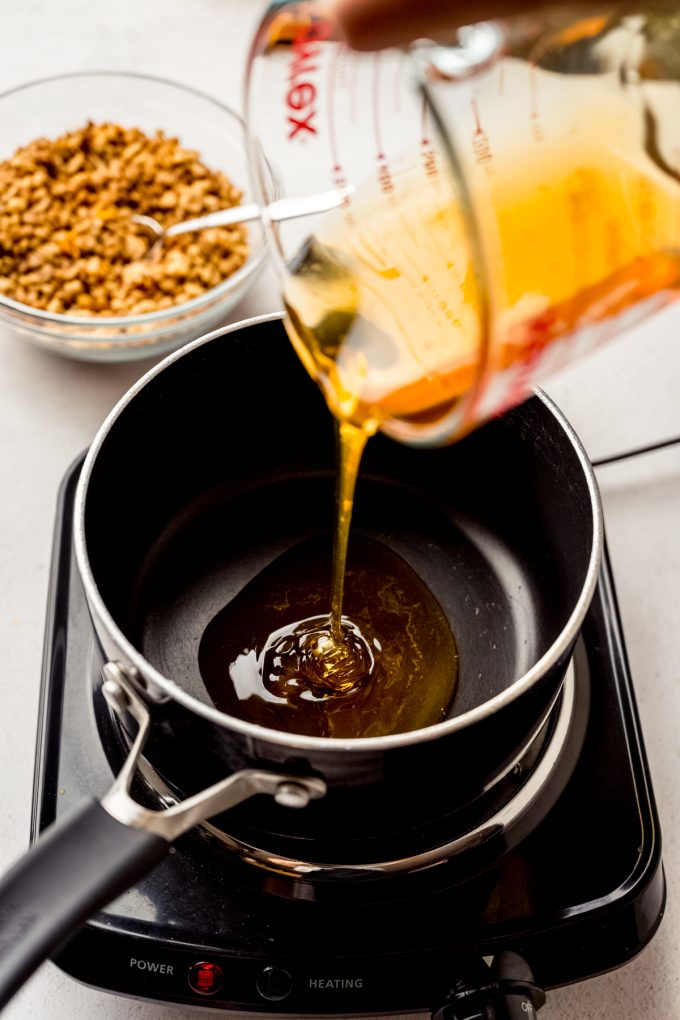
HONEY: this is the glue that holds everything together. We have never used raw honey for this recipe, so the timing may be off if you use that. You’ll want regular bottled/jarred honey for these cookies.
STEP-BY-STEP WITH photos: HOW TO MAKE HONEY WALNUT COOKIE STICKS
Before you start this recipe, make sure your pie dough is fully chilled if you’ve made it from scratch or thawed completely if you’re using premade dough.
I’ve also included a video in the recipe card that I encourage you to watch before you tackle this recipe. Read this instruction list below, take in all the photos, watch the video, then read through the recipe card so you are the most prepared as possible to succeed on the first try!
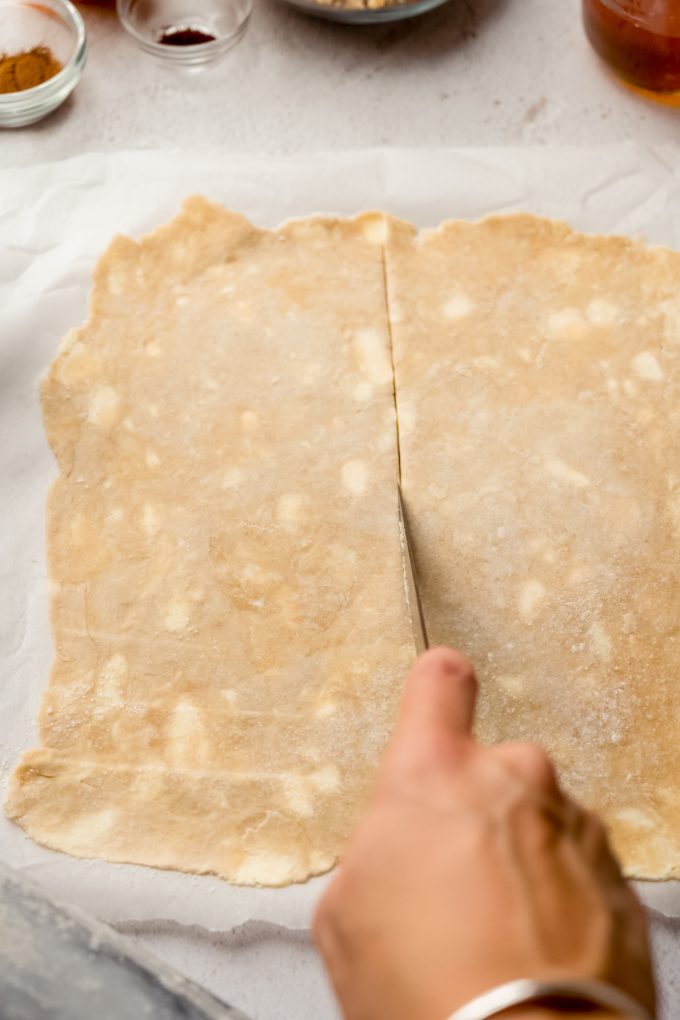
Prepare the pie dough: start my rolling a disc of pie dough out into a square at least 10″ but ideally 12″ on each side. Use a knife or pizza cutter to split the dough in half to make two rectangles approximately 6″ by 12″ (or whatever size your square is). Let this dough chill in the refrigerator until you need it and while you make the filling of the recipe.

Combine the filling ingredients: the walnuts and the spices should be ready to go before you start on cooking the honey in the next step. This will make the work flow much more easily!
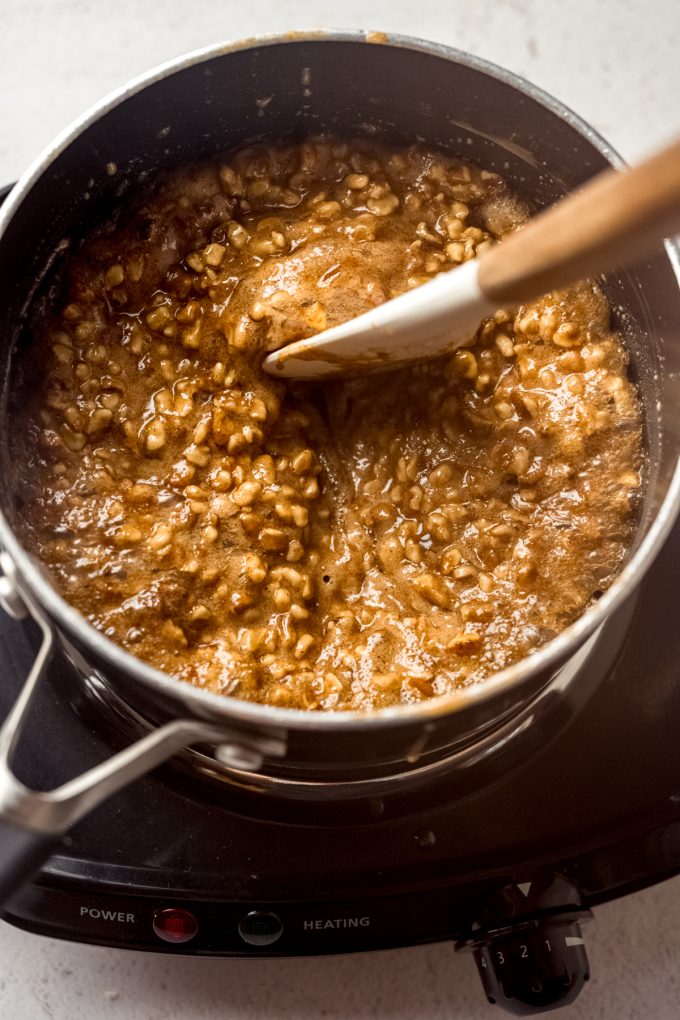
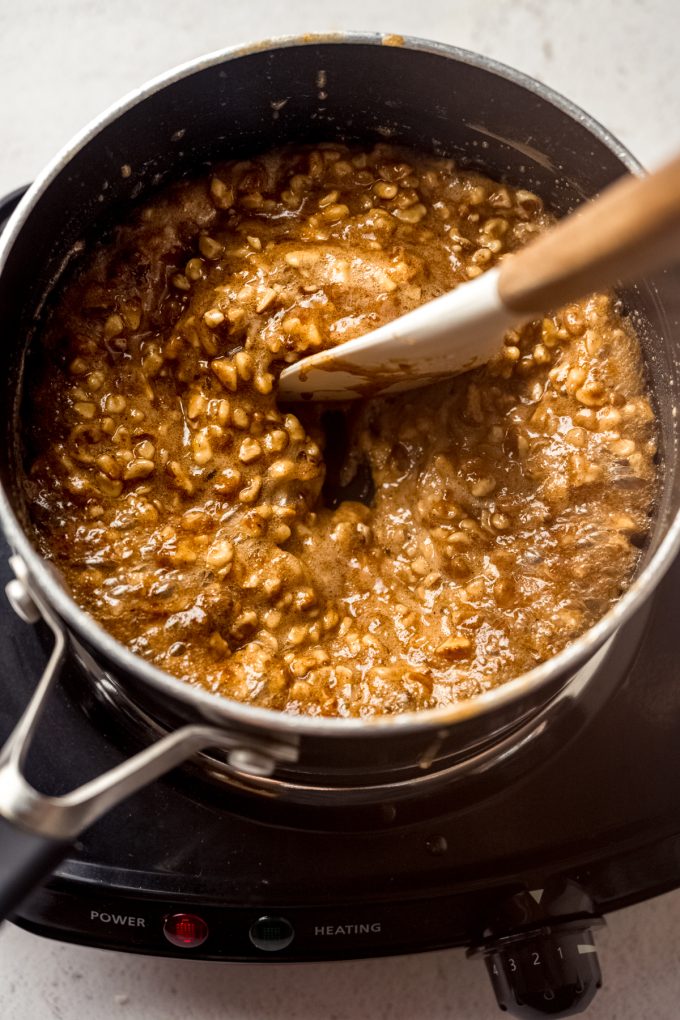
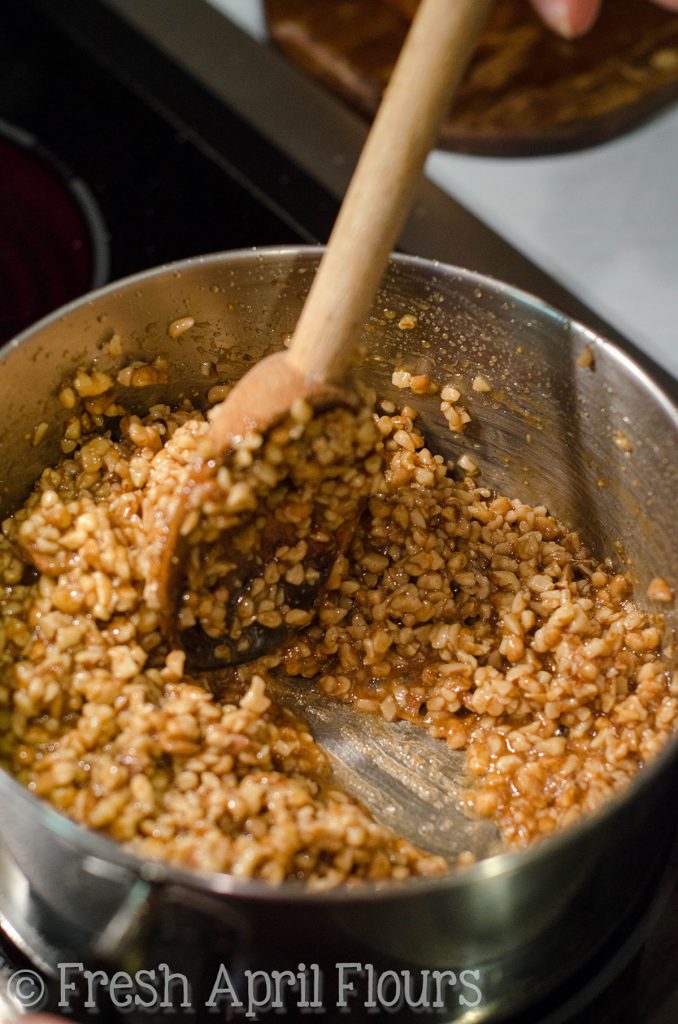
Boil the honey: you’ll do this in a saucepan over high heat. Be careful as the boiling honey will foam up, but it will not overflow the pan. When the honey is fully boiling and foamed up, add the nut mixture and reduce the temperature to medium heat.
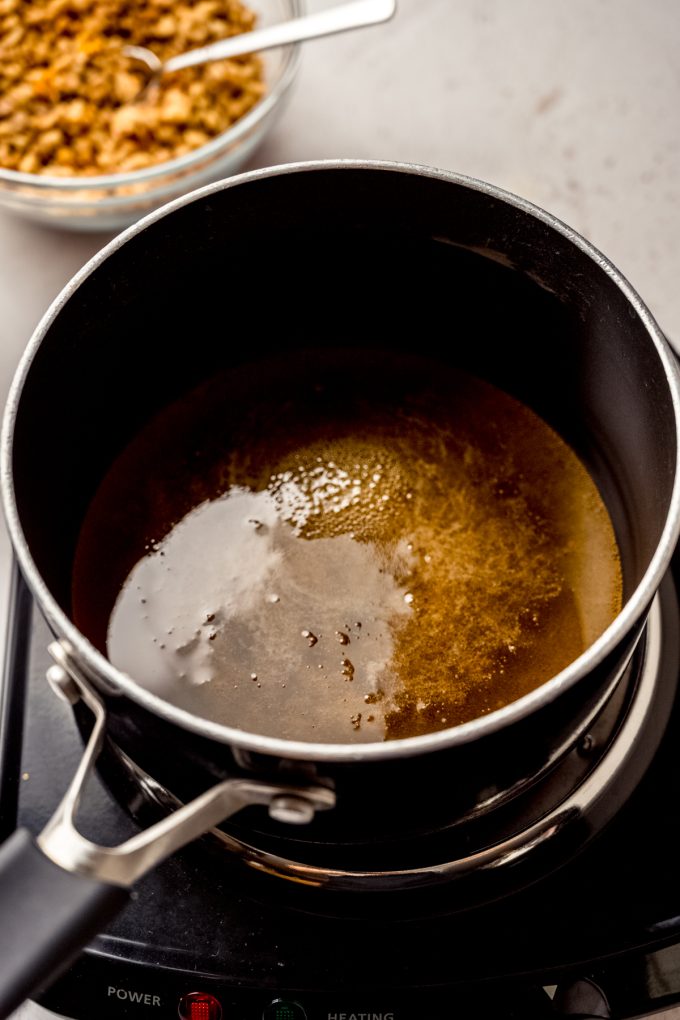

Cook the mixture: set a timer for 5 minutes, then use a spatula or wooden spoon to stir the mixture constantly while it cooks. The mixture may be simmering but you should not let it come to a boil again.
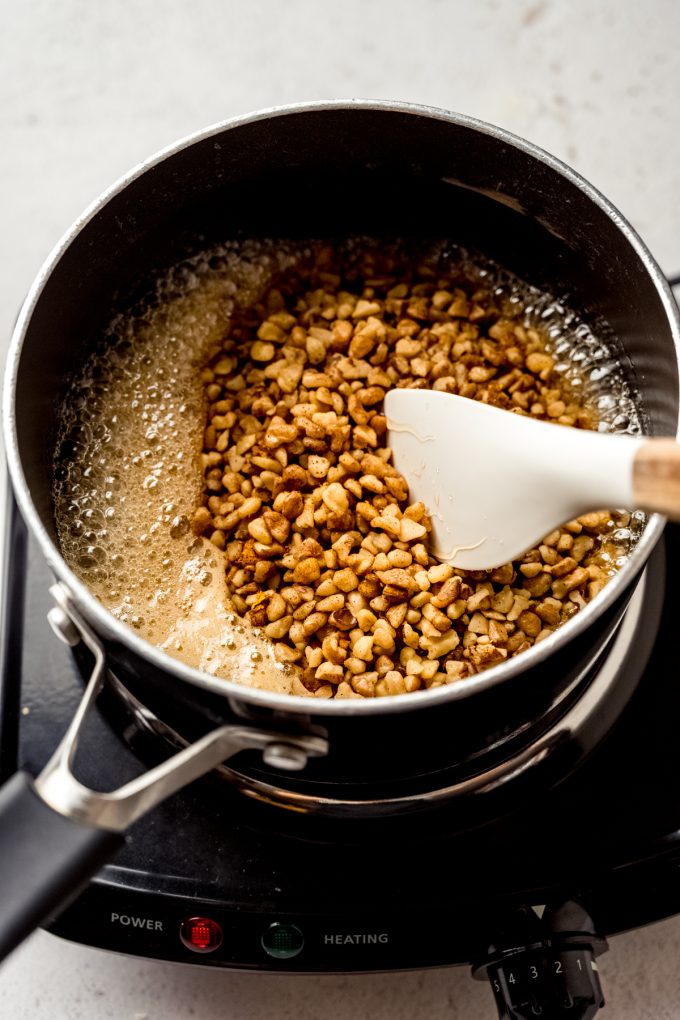

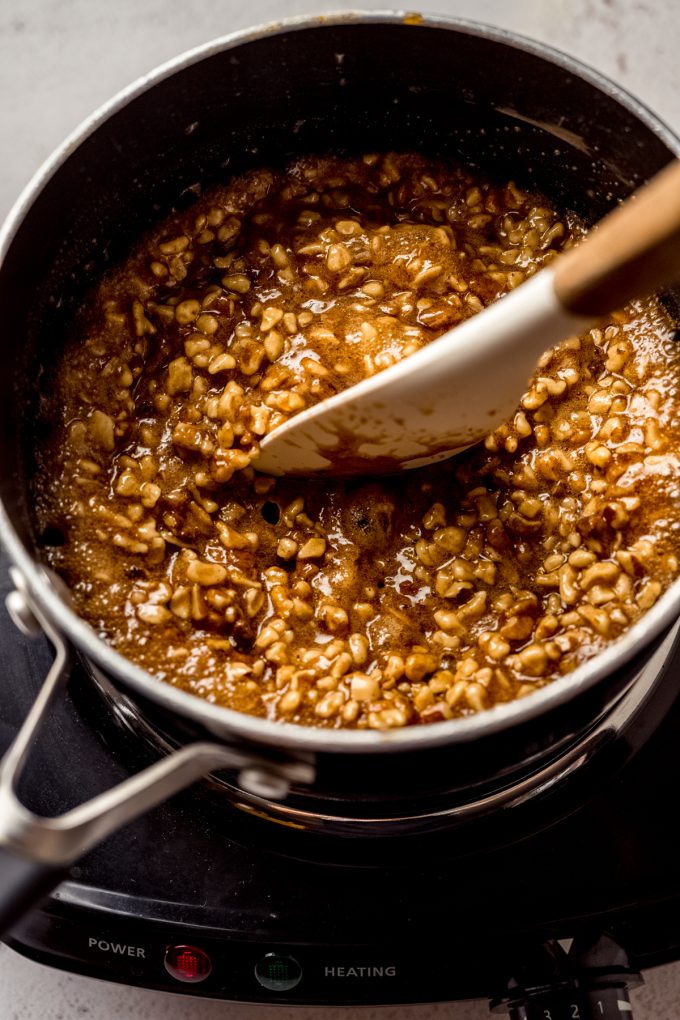
Watch for the mixture to be done: as you stir, the mixture will start to thicken. Make a line through the mixture with your spatular or spoon and watch the honey liquefy into the trail. As the mixture thickens, this liquefying will happen much more slowly, which is what you want.
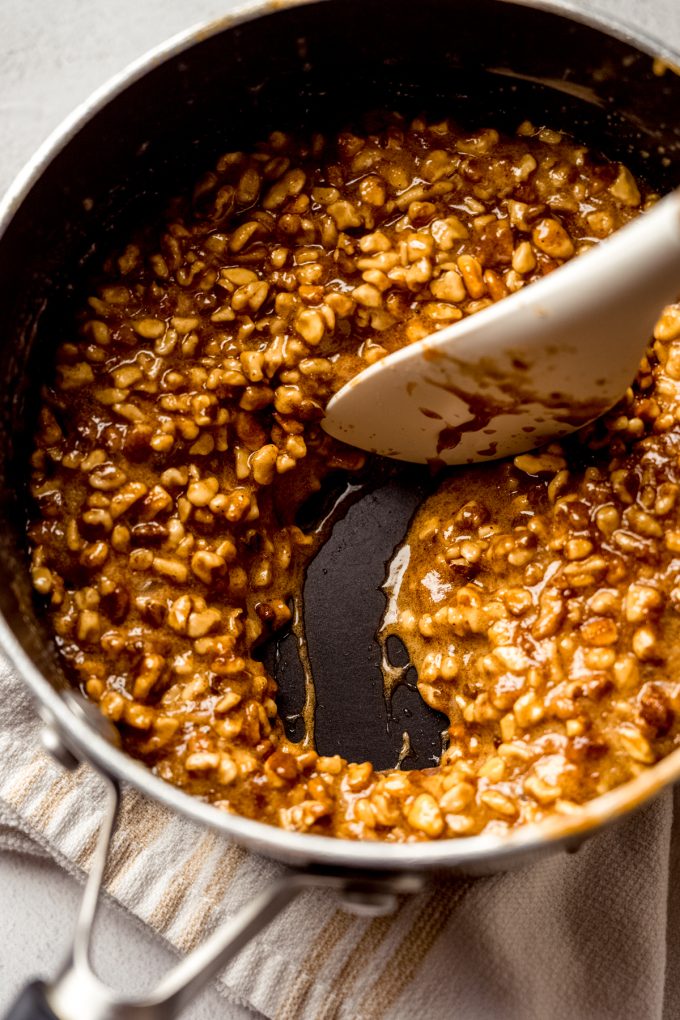
Allow the mixture to cool: when the 5 minutes are up and your mixture is behaving the way you want it to, remove it from the heat and allow it to cool for 30 minutes.
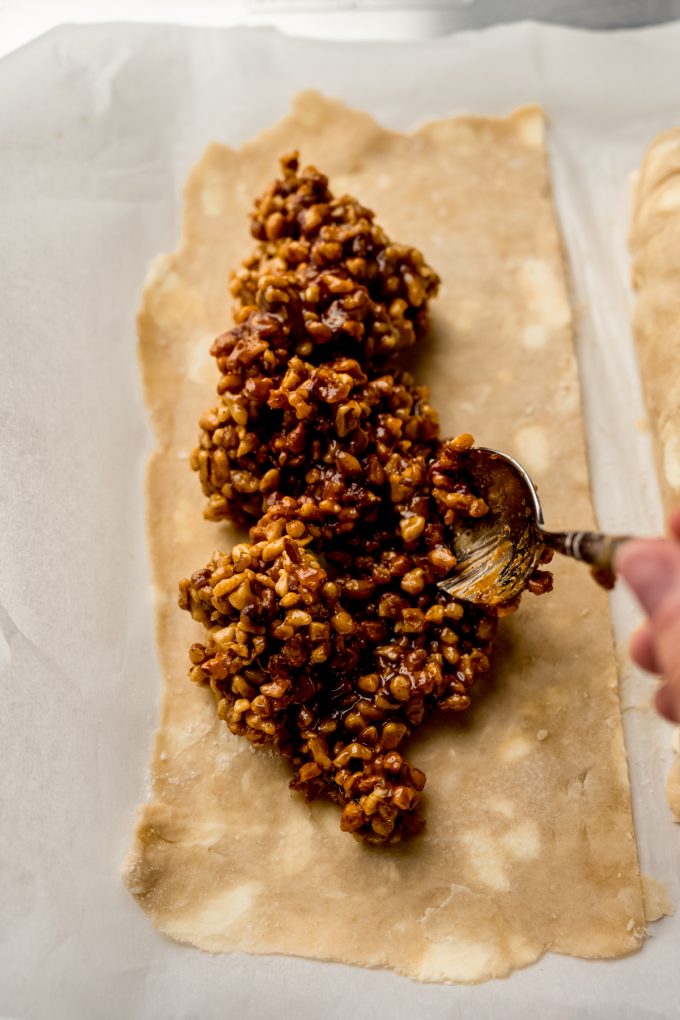
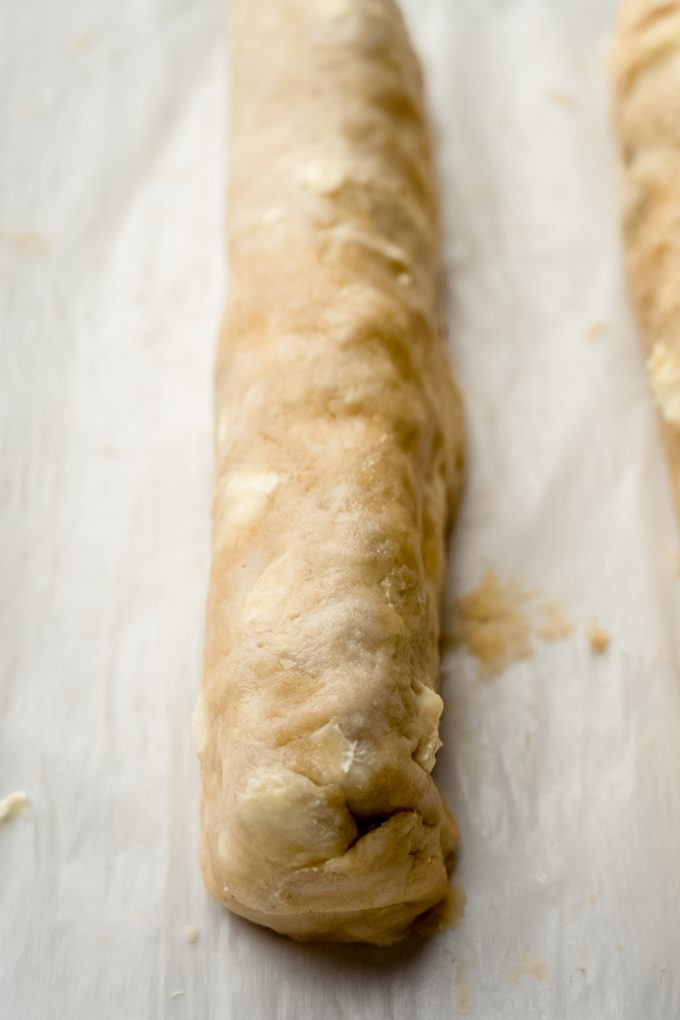
Assemble the cookie sticks: when the mixture has cooled, preheat the oven and remove the chilled pie dough from the refrigerator. Working with the long side of one of the rectangles, line the edge of the rectangle with about half of the filling mixture in the shape of a log that will sit inside the dough once rolled up. Leave about ½” border around the ends and the edge of the dough.
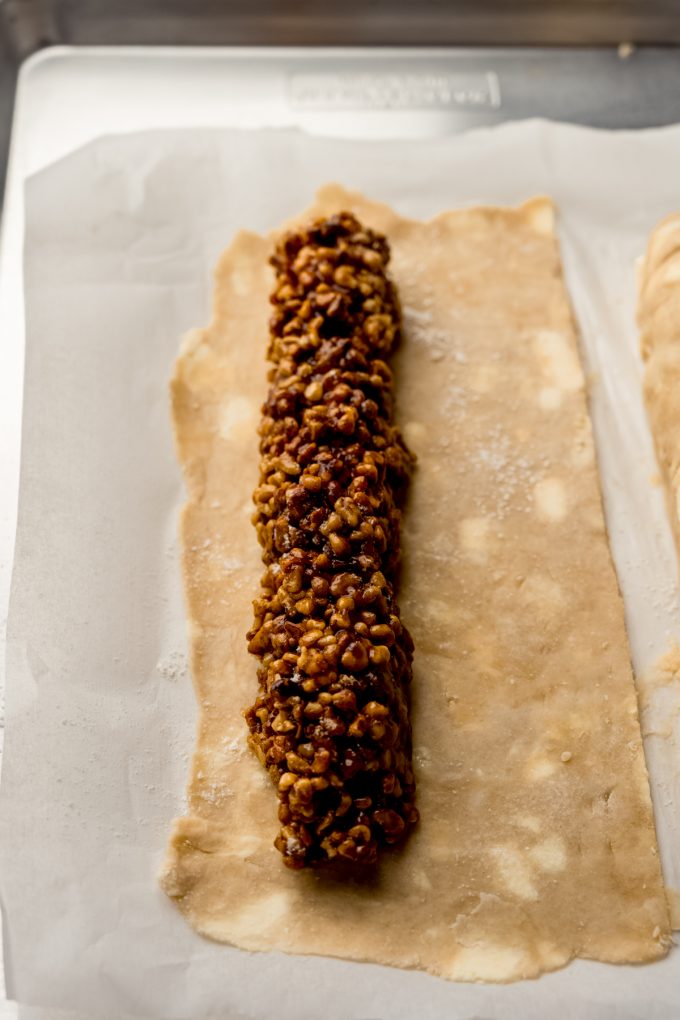
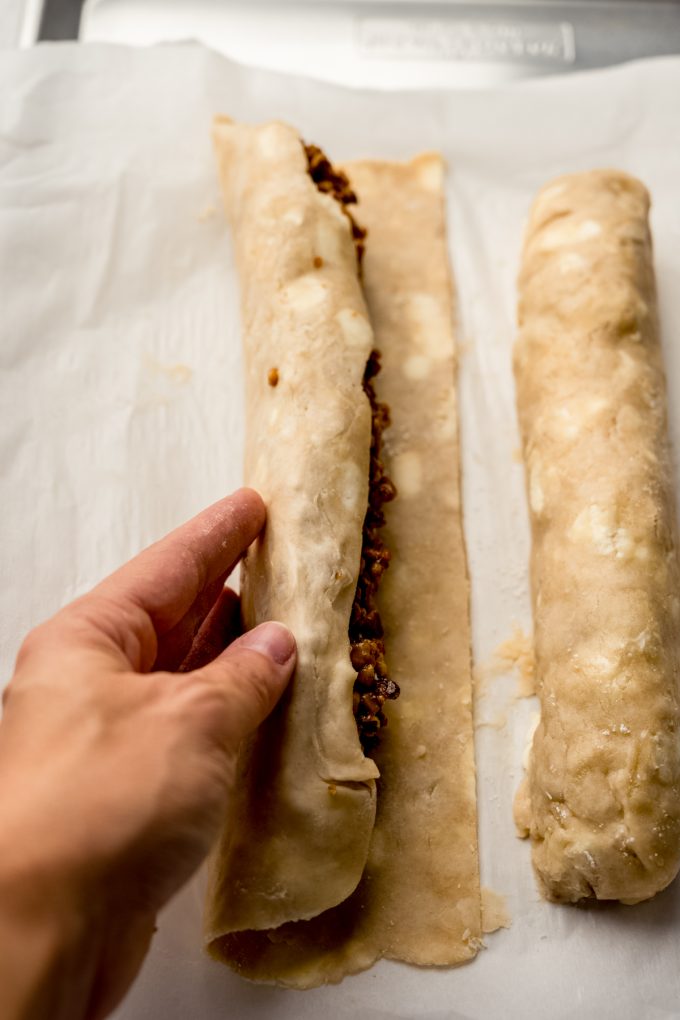
Roll into logs: lightly flour your hands, then press the filling together to make a cohesive log. It will be jaggy, but try to press spaces together so there are no gaps in the filling. Carefully roll the crust over the log, using your hands to press any filling or crust back together as you go. Be patient and go slowly! Roll the log all the way to the opposite end of the rectangle, then press the excess dough on the sides closed with your fingers to encase the log. Repeat with the second rectangle and remaining filling.
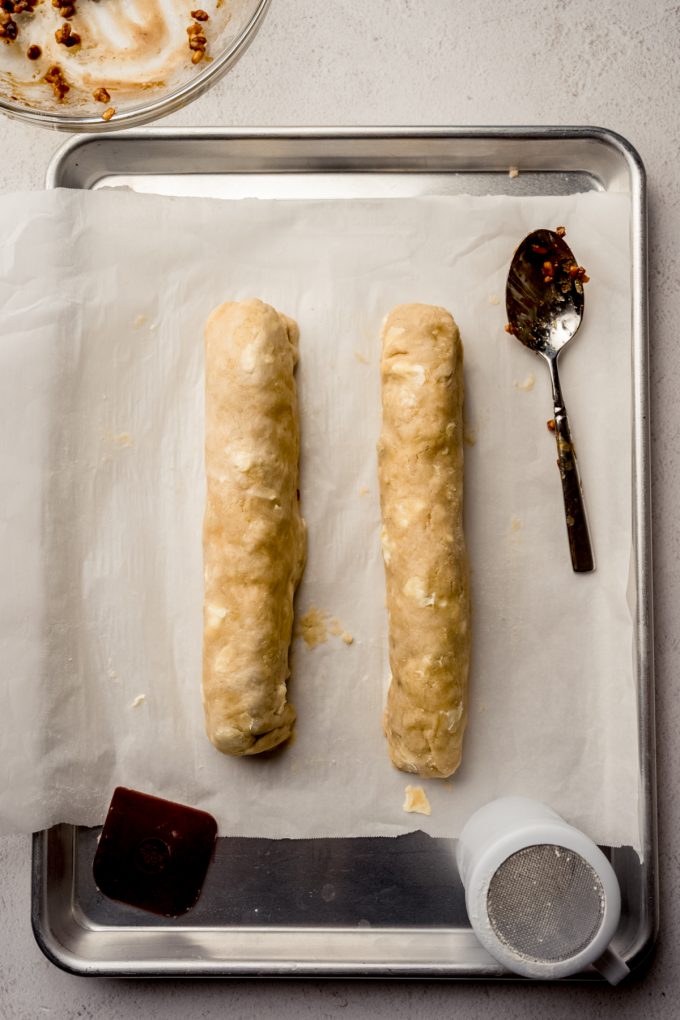

Bake: you’ll bake these sfratti until the crust just starts to turn golden. They will need to cool completely before you can slice and enjoy them (waiting is the hardest part of the whole thing!).
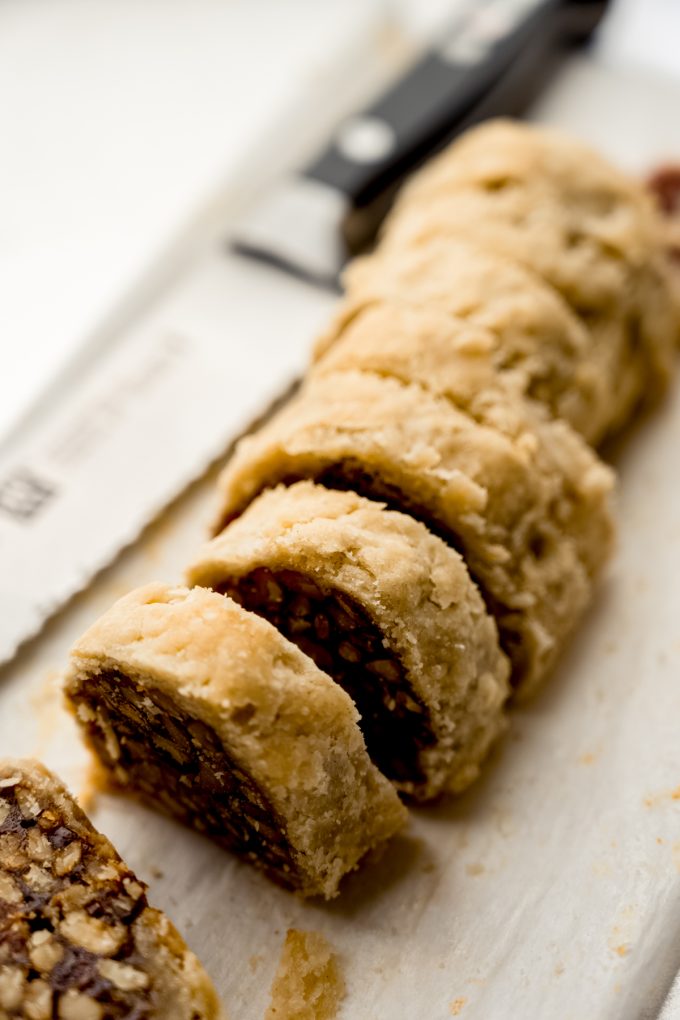
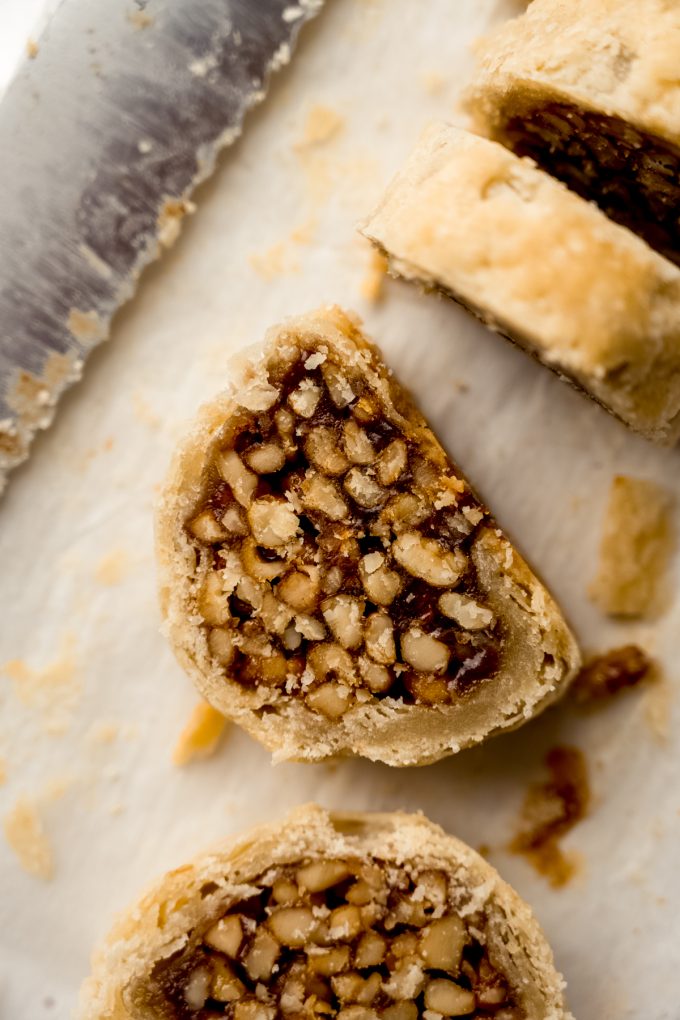
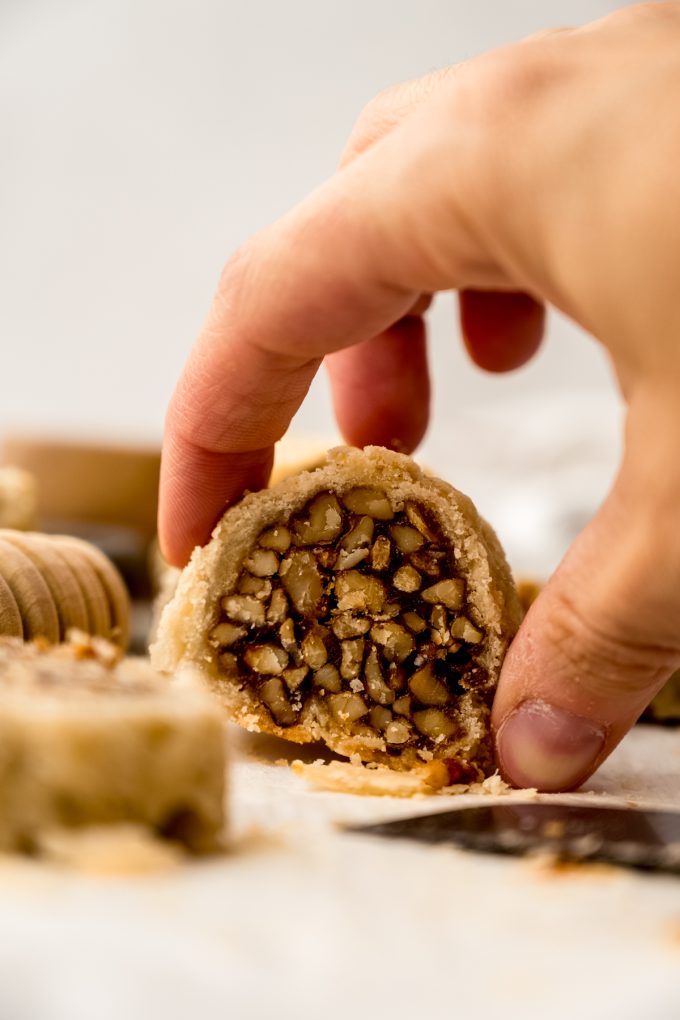
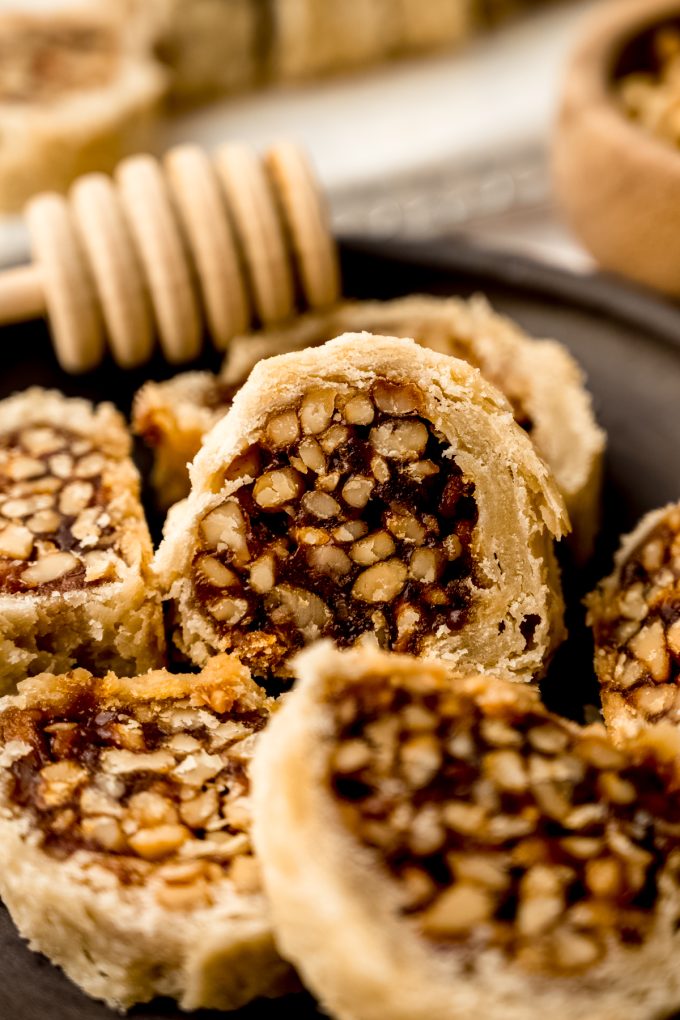
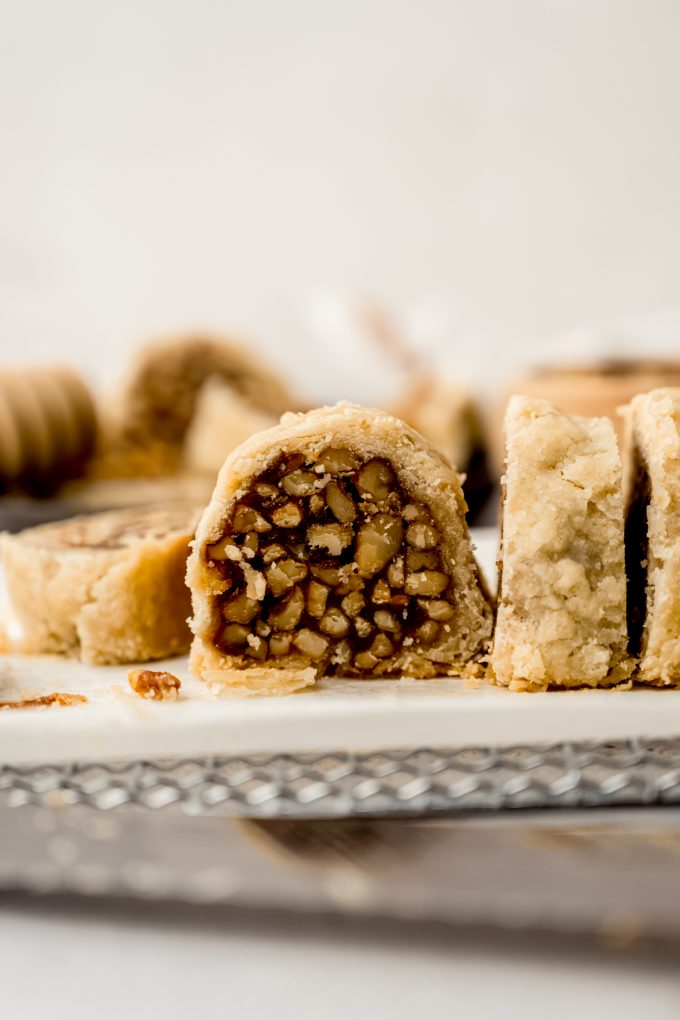
Let me just tell you that this cookie is unlike any other cookie you’ve ever had or made. Although it starts out a bit like baklava, the nuts on the inside of the cookie sticks are a bit more solid and crunchier, so it’s slightly less of a “sticky” nut mixture (though still sticky in its own kind of glorious way) and more a cohesive slice.
The pie crust, especially if you use my scratch recipe, is flaky and messy (in the best way possible) and if I say so myself, sfratti is perfect for dipping into coffee. In fact, eating your sfratti with coffee is a must, as Ron’s favorite beverage was black coffee at the frequency of all day long.
In the text of the original 2015 version of this post, I wrote: “Passed down recipes are the best kind, and I hope to become a sfratti pro so these cookies will last forever in the DeAngelis/April family.”
I think I’ve done my dad (and grandmother and great-grandmother!) proud. I even had a serious nostalgic and grief-stricken moment when I tasted the first cookie. So it would truly be an honor for you to make this recipe and an even bigger one for you to add it to your family’s traditions.

Honey Walnut Cookie Sticks (Sfratti)
Ingredients
- ½ recipe homemade pie crust1 chilled
- 2 cups (240g) finely chopped walnuts2
- zest of one orange3
- 1 teaspoon ground cinnamon
- ⅙ teaspoon ground cloves
- ⅔ cup (255g) honey
Instructions
- Before you begin: be sure your pie crust is chilled (homemade) or thawed (frozen).
- On a lightly floured baking mat or piece of parchment paper, roll the dough into a square at least 10" on each side, ideally 12" on each side. Mine usually winds up around 11" on each side. Use a knife or pizza cutter to split the dough in half to make two rectangles approximately 6" by 12" (or whatever size your square is). Transfer the mat or paper to a baking sheet and chill in the refrigerator until you need it.½ recipe homemade pie crust1
- In a medium size bowl, toss together the walnuts, orange zest, cinnamon, and cloves. Set aside.2 cups (240g) finely chopped walnuts2, zest of one orange3, 1 teaspoon ground cinnamon, ⅙ teaspoon ground cloves
- In a medium saucepan over high heat, bring the honey to a boil. Be careful as it will foam up. When the honey is fully boiling and foamed up, add the nut mixture and reduce the temperature to medium heat.⅔ cup (255g) honey
- Set a timer for 5 minutes, then use a spatula or wooden spoon to stir the mixture constantly while it cooks. The mixture may be simmering but do not let it come to a boil again.
- As you stir, the mixture will start to thicken. Make a line through the mixture with your spatular or spoon and watch the honey liquefy into the trail. As the mixture thickens, this liquefying will happen much more slowly, which is what you want4 (watch the video in the recipe card so you know what to look for). When the 5 minutes are up, remove the mixture from the heat and allow it to cool for 30 minutes and not much longer– we don't want the mixture to set.
- When the mixture has cooled, preheat the oven to 350ºF (177ºC). Remove the chilled pie dough from the refrigerator.
- Working with the long side of one of the rectangles, line the edge of the rectangle with about half of the filling mixture5 in the shape of a log that will sit inside the dough once rolled up. Leave about ½" border around the ends and the edge of the dough.
- Lightly flour your hands, then press the filling together to make a cohesive log. It will be jaggy, but try to press spaces together so there are no gaps in the filling.
- Carefully roll the crust over the log, using your hands to press any filling or crust back together as you go. Be patient and go slowly! Roll the log all the way to the opposite end of the rectangle, then press the excess dough on the sides closed with your fingers to encase the log. Repeat with the second rectangle and remaining filling.
- Bake the logs until golden brown, about 30-35 minutes. Remove from the oven and allow to cool completely before cutting the logs into slices to serve. Unsliced sticks will stay fresh wrapped in foil or plastic wrap at room temperature up to one week. Sliced cookies will stay fresh in an airtight container at room temperature up to one week. Unsliced sticks freeze well, up to 3 months. Thaw in refrigerator overnight. Sliced cookies freeze well, up to 3 months. Thaw in refrigerator overnight.
Video
Notes
- Pie crust: my pie dough recipe, as written, makes two discs. You can either halve it and use that or save the other disc for another recipe. Frozen store bought pie crust is also fine– you will only need one (a package usually has two). Thaw overnight in refrigerator before use.
- Finely chopped nuts: I buy the nuts labeled “finely chopped” because I find I can’t get the nuts small enough chopping them by hand, but they are too fine if I chop them with my nut chopper.
- Orange zest: I have used both fresh and jarred orange zest for these cookies. If using jarred, use 2 teaspoons.
- Mixture consistency: it is crucial you don’t let the mixture boil again and that the liquid thickens without disappearing. Be sure you watch the video and look at the pictures to help you know what to look for.
- Shaping the log: the original way my dad taught me to do this was to dust a piece of parchment with flour and shape the logs off of the dough, then transfer them to the dough. I left a picture of this process in the post above if you would rather do it this way.
Nutrition Disclosure
All nutritional values are approximate and provided to the reader as a courtesy. Changing ingredients and/or quantities will alter the estimated nutritional calculations.
WOOHOO! You have no idea how long I’ve been waiting for this recipe 😀 Way to end the 12 days with a BANG, Lynn! These look delish, and I just know Anthony’s fam is going to LOVE them. Also, what a neat history behind these cookies! Thanks for sharing! <3
Ugh, LEAH. I tried so hard to cut the recipe down, but it’s just not meant to be. I may have to try again another time and adjust my times and such. My suggestion if you’d like to make this recipe: make 2 sticks GF and then the others, use store bought gluten FULL pie crusts (or, make your own?!). That way it’s not too laborious or expensive!
This is so cool! I love recipes that are passed down through generations! My grandma is Ukrainian so she has taught me how to make some traditional Ukrainian food (like perogies!). The history of them is also very interesting!
I love that, Naomi!
Oh my word, these look so delicious, Lynn! What a fascinating history – I love learning about the background of such things. We have a colonial gingerbread recipe with a story behind it from the war of 1812. Very cool.
I made your lemon cookies on Saturday and everyone devoured them! Seriously addicted.
I think the history makes them taste better and the labor of love more worth it! So glad everyone loved the lemon cookies. I made my third batch today!
Aww family recipes are always extra special! Thank you for sharing with us! And thanks for taking all those step by step photos – so thoughtful. These cookies really do look like works of art – amazing.
I just made these. However, I used Pecans instead. Only cause I don’t like Walnuts.
How thick do you roll the crust, they look so yummy can’t wait to make!
Hi Terri– I roll it fairly thin, about 1/4″ thickness. If using pre-made crust, this is easy, and you don’t have to roll it out at all. If you’re using your own, go for the 1/4″.
????? sad.. my pastry is prepared.. I just made the filling and it doesn’t look like yours. it actually looks and smells burnt tho I cooked it on medium low for the 5 minutes and then again for 5min after adding the nut mixture but it also seems runnier than yours??? what might I have done wrong.. I want to try again
Hi Liz– I’m sorry to hear this didn’t work out! If it looks and smells burned then it probably is, but if you say it’s runnier, that also makes me wonder if it’s not cooked enough. I would try with a lower temp on the stove next time and really make sure your honey is JUST done liquefying.
Can these be made with Phyllo instead of pie crust?
I’m not sure the result would be the same, but you could certainly try it!
These were a big hit this year, but I wasn’t happy with the crust. It flaked off very easily. I very rarely make recipes with pie crust, so I’m not sure what I did wrong.
Hi there– I don’t think you did anything wrong. The crust is definitely very flaky! My dad has a little less flaking using store-bought crusts, but it’s definitely a normal characteristic of the cookie.
How many cup,s in 12oz,s?
I weigh all of the nuts I use, and 12 ounces of honey is 1 and 1/2 cups.
I just got done making these, they came out GREAT love you pie crust recipe I will be using it for my pies.
So you used 3/4 of a cup of nuts,I bought 12 oz of honey is that right?
I think I use to many nuts there was no flavor, they did look great though.
I saw someone’s question about the honey. 12 ounces is a cup and a half. However, your answer to her was 3/4 cup. I bought a 12 ounce bottle of honey and planned to use the whole thing, according to your recipe. Will that be too much honey?
That was my mistake on the previous comment. I have now edited it and changed it. I don’t ever measure my honey in a measuring cup, so 12 ounces will be the right amount.
Thanks so much for your quick response! I can’t wait to make these. They remind my husband of his mother’s honey walnut cookies, which he’s never been able to duplicate. Until now!
I hope they do the trick! These cookies taste like my childhood, for sure! Please let me know how they turn out 🙂
Thank a lot for the lovely recipe. I made it, and came out very well.
Hi. I was wondering if the nut “logs” could be laid out on a piece of parchment to cool instead of on flour?
I’m not sure– I’ve never tried it any other way! This was the way my grandmother always did it, and I never questioned it, haha. I think the flour insures the logs don’t stick, because they are VERY sticky.
These look fabulous! Could fillo dough be substituted for the pie crust?
I’ve never tried that! I think it would be pretty messy, though, since cutting through the nut filling crumbles the crust a bit already. If you try it, let me know!
Hi. Can these be made early and frozen? Or how long can they be stored? Tx
Step 9 has that information 🙂
Can I use Pillsbury pie crusts—in refrigerated section at the store. There are 2 crusts in one box. Do you think that would be enough, or need 2 boxes?
Hey, Linda– my dad always used pre-made crusts when he taught this recipe to me. You’ll need 3 boxes: this makes 6 logs!
Hi Lynn,
I am hoping to make these for xmas and I was wondering if its possible to make these, freeze them unbaked and the bake them closer to xmas, so at least the heavy lifting is done beforehand and they’re freshly baked on xmas. Is this possible?
Magda
Hey, Magda– that should work just fine. I would just be sure to thaw them completely before baking!
Wish I could share the pic, they’re beautiful and delicious. I suggest adding a little salt to the nut honey mixture
I’m so happy to hear that, Theresa!