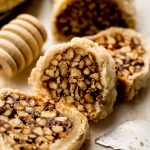
Honey Walnut Cookie Sticks (Sfratti)
Buttery, flaky pie crust surrounds a rich, spiced honey walnut filling in these traditional Italian cookies. This recipe is a family heirloom with deep roots and a flavor that tastes as special as it feels.
Servings: 16 cookie slices
Ingredients
- ½ recipe homemade pie crust1 chilled
- 2 cups (240g) finely chopped walnuts2
- zest of one orange3
- 1 teaspoon ground cinnamon
- ⅙ teaspoon ground cloves
- ⅔ cup (255g) honey
Need to keep track of your ingredients?Check out my Printable Ingredient List!
Instructions
- Before you begin: be sure your pie crust is chilled (homemade) or thawed (frozen).
- On a lightly floured baking mat or piece of parchment paper, roll the dough into a square at least 10" on each side, ideally 12" on each side. Mine usually winds up around 11" on each side. Use a knife or pizza cutter to split the dough in half to make two rectangles approximately 6" by 12" (or whatever size your square is). Transfer the mat or paper to a baking sheet and chill in the refrigerator until you need it.½ recipe homemade pie crust1
- In a medium size bowl, toss together the walnuts, orange zest, cinnamon, and cloves. Set aside.2 cups (240g) finely chopped walnuts2, zest of one orange3, 1 teaspoon ground cinnamon, ⅙ teaspoon ground cloves
- In a medium saucepan over high heat, bring the honey to a boil. Be careful as it will foam up. When the honey is fully boiling and foamed up, add the nut mixture and reduce the temperature to medium heat.⅔ cup (255g) honey
- Set a timer for 5 minutes, then use a spatula or wooden spoon to stir the mixture constantly while it cooks. The mixture may be simmering but do not let it come to a boil again.
- As you stir, the mixture will start to thicken. Make a line through the mixture with your spatular or spoon and watch the honey liquefy into the trail. As the mixture thickens, this liquefying will happen much more slowly, which is what you want4 (watch the video in the recipe card so you know what to look for). When the 5 minutes are up, remove the mixture from the heat and allow it to cool for 30 minutes and not much longer-- we don't want the mixture to set.
- When the mixture has cooled, preheat the oven to 350ºF (177ºC). Remove the chilled pie dough from the refrigerator.
- Working with the long side of one of the rectangles, line the edge of the rectangle with about half of the filling mixture5 in the shape of a log that will sit inside the dough once rolled up. Leave about ½" border around the ends and the edge of the dough.
- Lightly flour your hands, then press the filling together to make a cohesive log. It will be jaggy, but try to press spaces together so there are no gaps in the filling.
- Carefully roll the crust over the log, using your hands to press any filling or crust back together as you go. Be patient and go slowly! Roll the log all the way to the opposite end of the rectangle, then press the excess dough on the sides closed with your fingers to encase the log. Repeat with the second rectangle and remaining filling.
- Bake the logs until golden brown, about 30-35 minutes. Remove from the oven and allow to cool completely before cutting the logs into slices to serve. Unsliced sticks will stay fresh wrapped in foil or plastic wrap at room temperature up to one week. Sliced cookies will stay fresh in an airtight container at room temperature up to one week. Unsliced sticks freeze well, up to 3 months. Thaw in refrigerator overnight. Sliced cookies freeze well, up to 3 months. Thaw in refrigerator overnight.
Video
Notes
- Pie crust: my pie dough recipe, as written, makes two discs. You can either halve it and use that or save the other disc for another recipe. Frozen store bought pie crust is also fine-- you will only need one (a package usually has two). Thaw overnight in refrigerator before use.
- Finely chopped nuts: I buy the nuts labeled "finely chopped" because I find I can't get the nuts small enough chopping them by hand, but they are too fine if I chop them with my nut chopper.
- Orange zest: I have used both fresh and jarred orange zest for these cookies. If using jarred, use 2 teaspoons.
- Mixture consistency: it is crucial you don't let the mixture boil again and that the liquid thickens without disappearing. Be sure you watch the video and look at the pictures to help you know what to look for.
- Shaping the log: the original way my dad taught me to do this was to dust a piece of parchment with flour and shape the logs off of the dough, then transfer them to the dough. I left a picture of this process in the post above if you would rather do it this way.
Nutrition Disclosure
All nutritional values are approximate and provided to the reader as a courtesy. Changing ingredients and/or quantities will alter the estimated nutritional calculations.
Serving: 1cookie slice | Calories: 168kcal | Carbohydrates: 17g | Protein: 3g | Fat: 11g | Saturated Fat: 1g | Polyunsaturated Fat: 7g | Monounsaturated Fat: 2g | Sodium: 26mg | Potassium: 79mg | Fiber: 1g | Sugar: 12g | Vitamin A: 3IU | Vitamin C: 0.3mg | Calcium: 18mg | Iron: 1mg
