
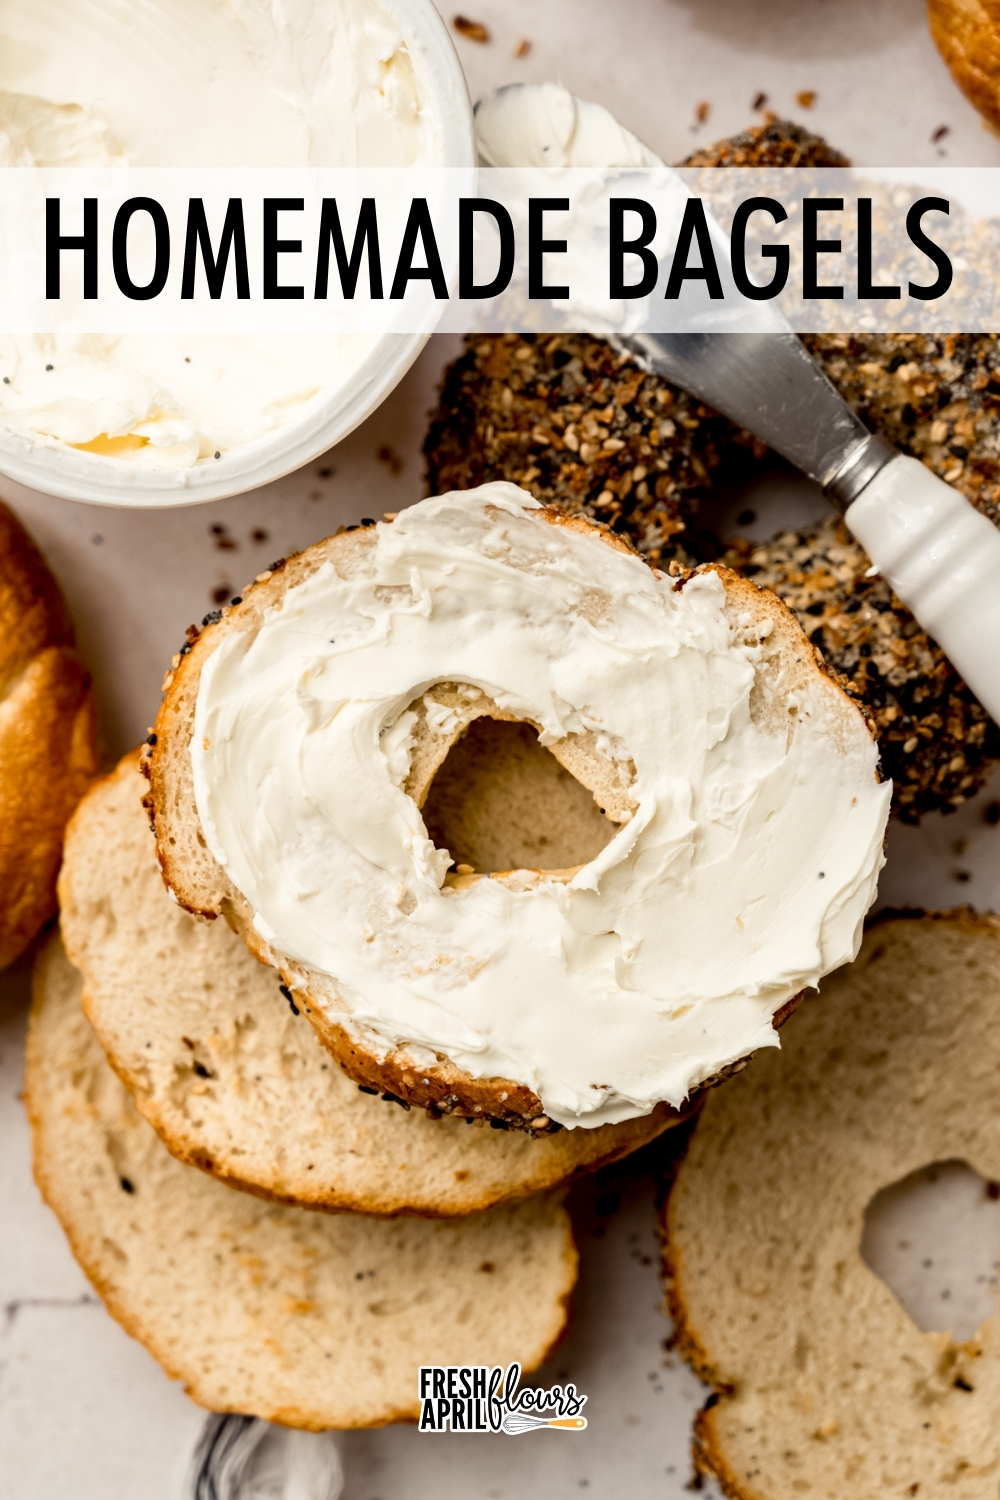
Homemade Bagels
As an Amazon Associate, I earn from qualifying purchases. Read the full disclosure here.
This homemade bagel recipe will help you make perfectly chewy, bakery-style bagels right in your own kitchen using simple ingredients and basic tools– no special equipment or advanced skills required. See my post about baking with yeast for answers to all of your common FAQs.
The Recipe I Thought Would Be Complicated (It Wasn’t)
Let’s just get this out of the way: bagels seem like a baking project to save for a rainy weekend, don’t they?
They give off that bakery mystique that comes alongside “this must require a special apprenticeship in New York” energy, so when I penciled this recipe into my content calendar, I generously buffered extra testing time because I was sure I’d need it.
Guess what? I did not.
These homemade bagels are shockingly straightforward. The process is easier to navigate than cinnamon rolls and far less fussy than a twisted babka. There’s no delicate filling swirl and no complicated shaping– just a simple, sturdy dough that does exactly what it’s supposed to do.
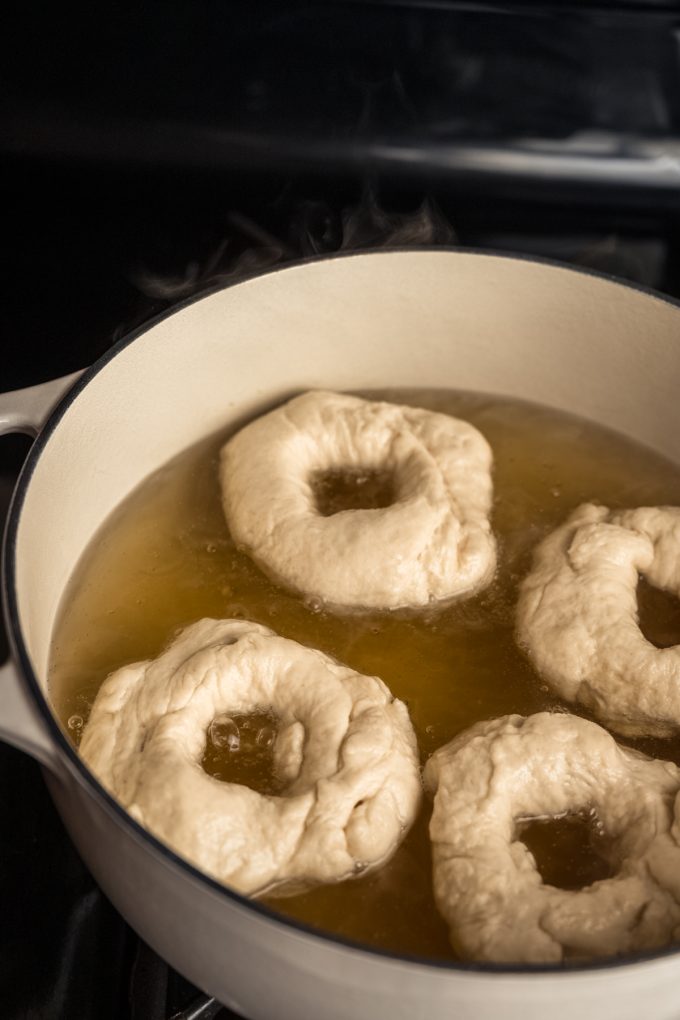
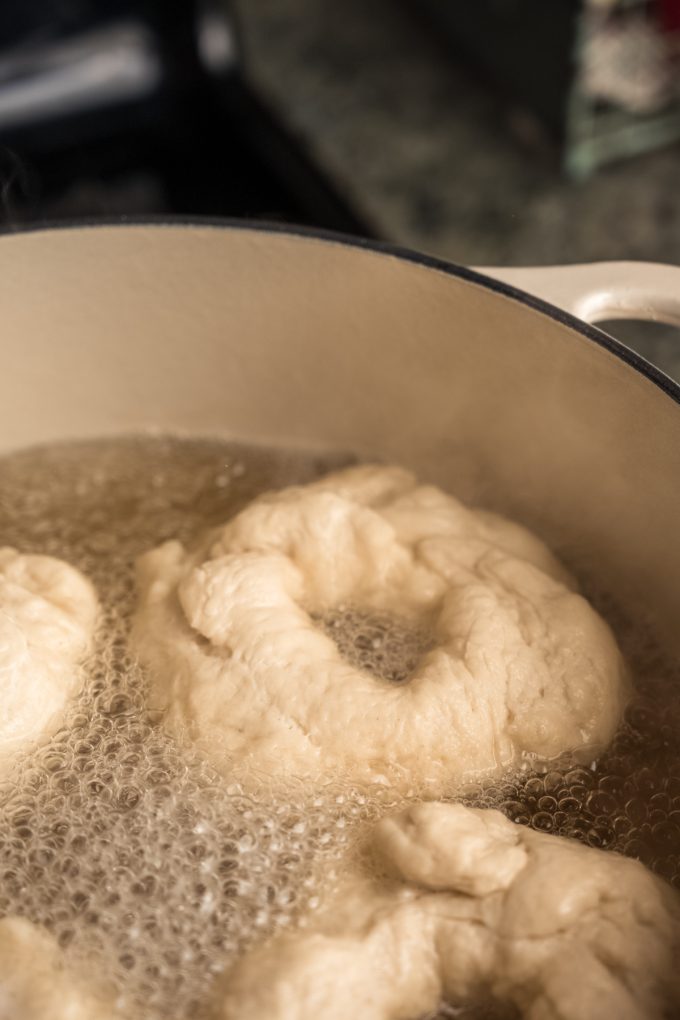
Ok ok, yes, there is an extra step that may seem complicated which is a quick boil in a water bath. But before you panic, this is not deep frying. We are not hauling out a vat of oil and a thermometer and questioning our life choices. This is simply a pot of boiling water with honey, and each bagel takes a quick 60ish seconds swim on each side swim. That’s it. And it’s the most important step in the entire recipe (but we’ll get there).
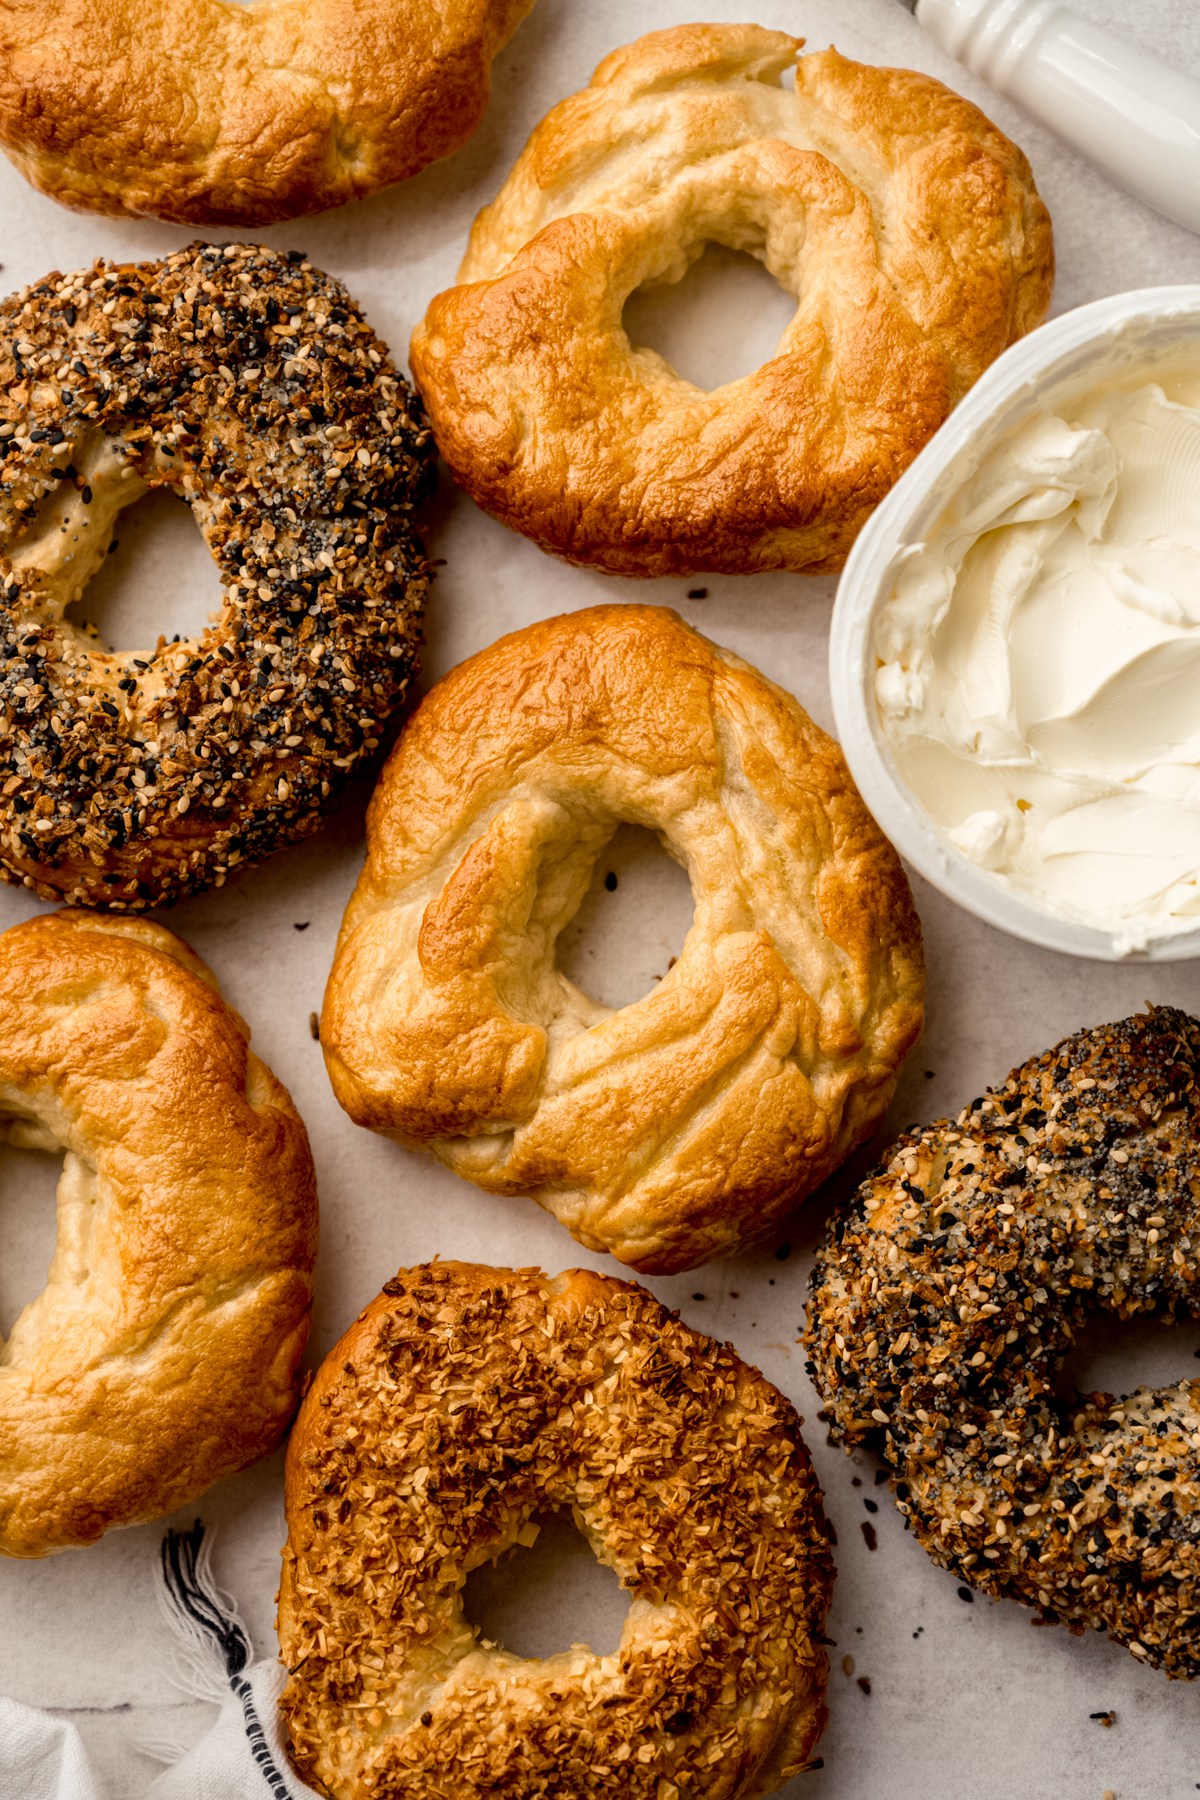
CUSTOMIZE THE SIZE AND THE FLAVOR
This recipe makes 8 bagels and can easily be halved if you want a smaller batch. Keep in mind, though, it doesn’t double well– not because it’s complicated, but because your mixer will hate you. The dough is thick, and overloading your bowl isn’t worth it. The good news is that the process is simple enough that you can mix a second batch right after the first and just keep the workflow going.
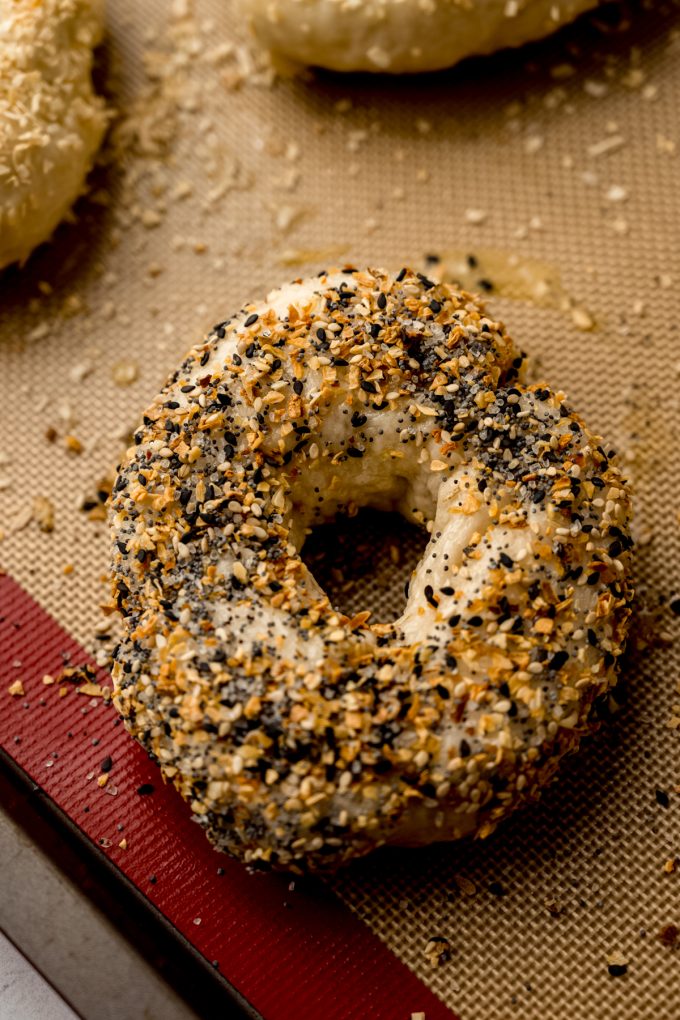
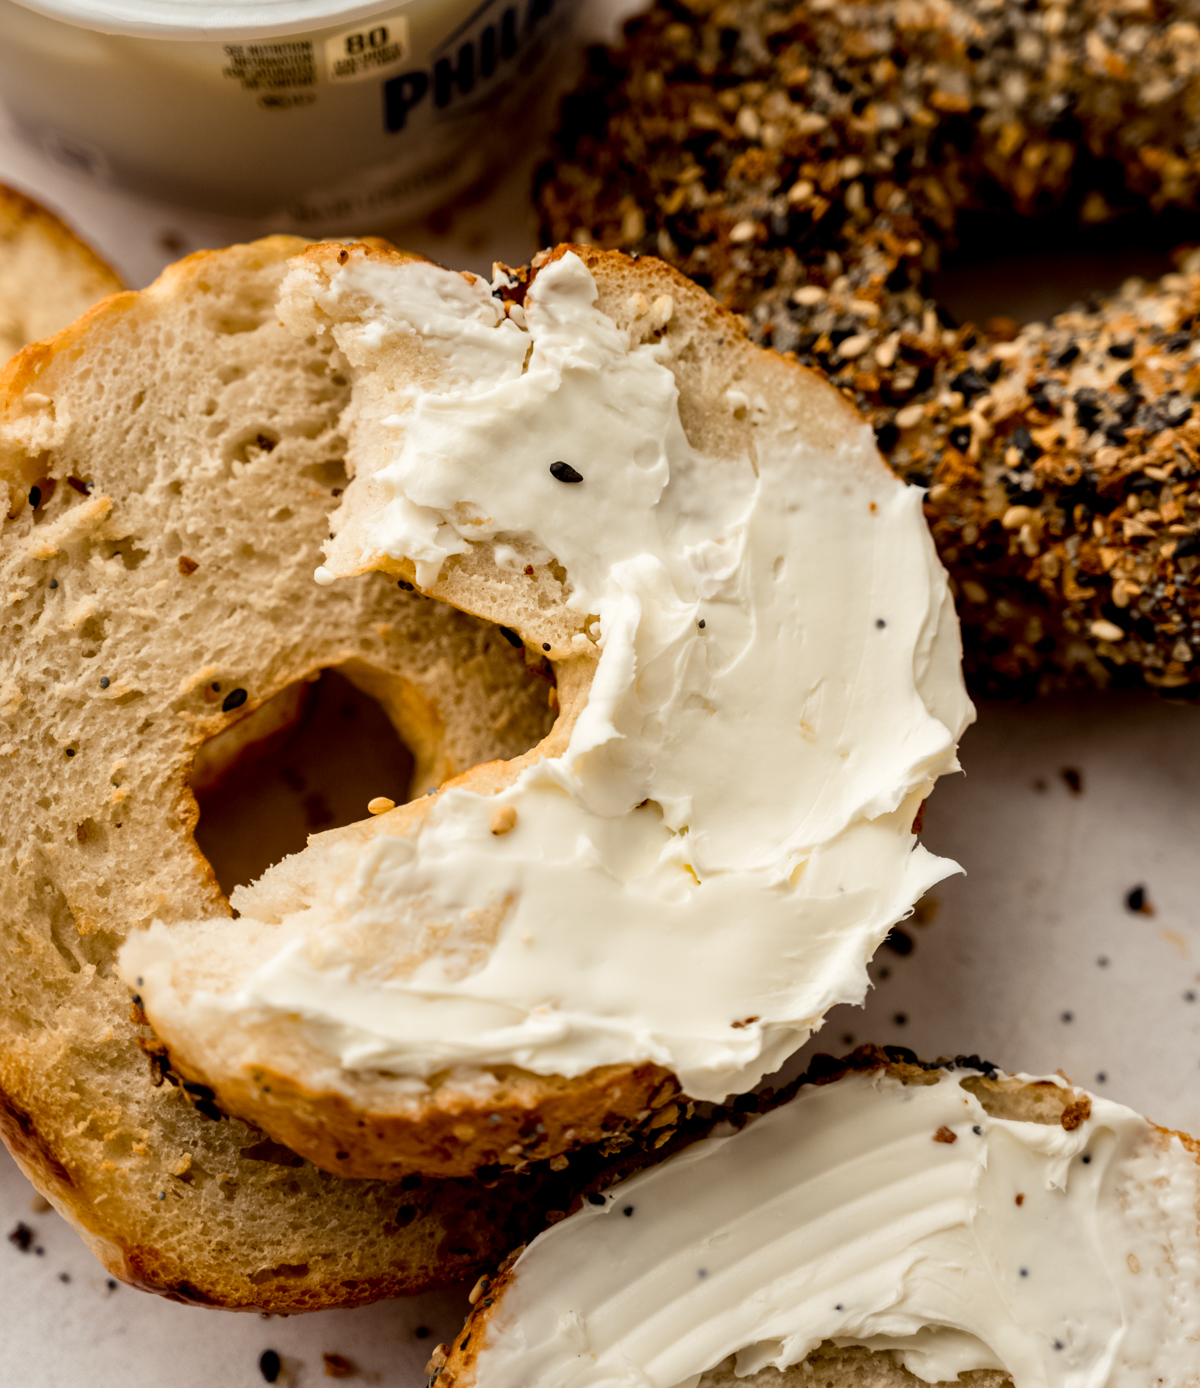
As far as toppings go, I urge you to go wild. Pretty much anything that can stick to the outside is fair game. Think everything seasoning, sesame seeds, poppy seeds, salt, minced onions…
From start to finish, you’re about 3 hours away from fresh, chewy bagels. These bagels stay perfectly chewy for a few days and freeze beautifully, so you can toast one on demand and feel like the kind of person who casually makes their own bagels. Because now you are.
GRAB THESE SIMPLE INGREDIENTS
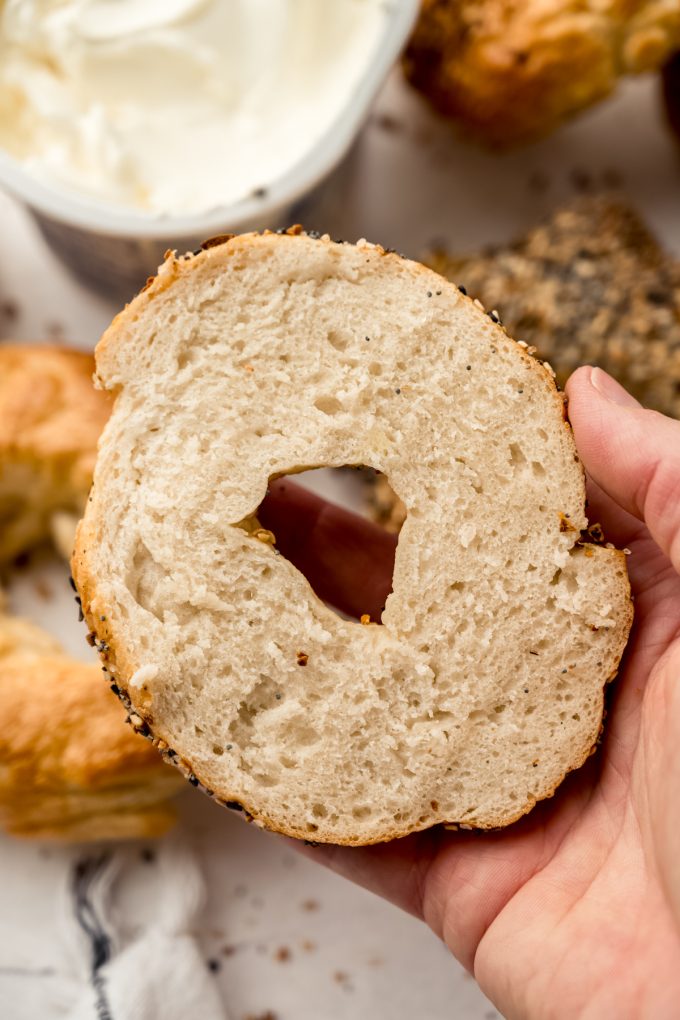
Unlike some of the other yeast dough recipes on my site like cinnamon rolls and dinner rolls, bagels use what is called a lean dough. There’s no butter, milk, or eggs in the dough, which means we have a chewy dough with a distinct “bite” and an airy internal texture with a strong gluten structure– everything we love about bagels!
Here’s what you’ll need and why:
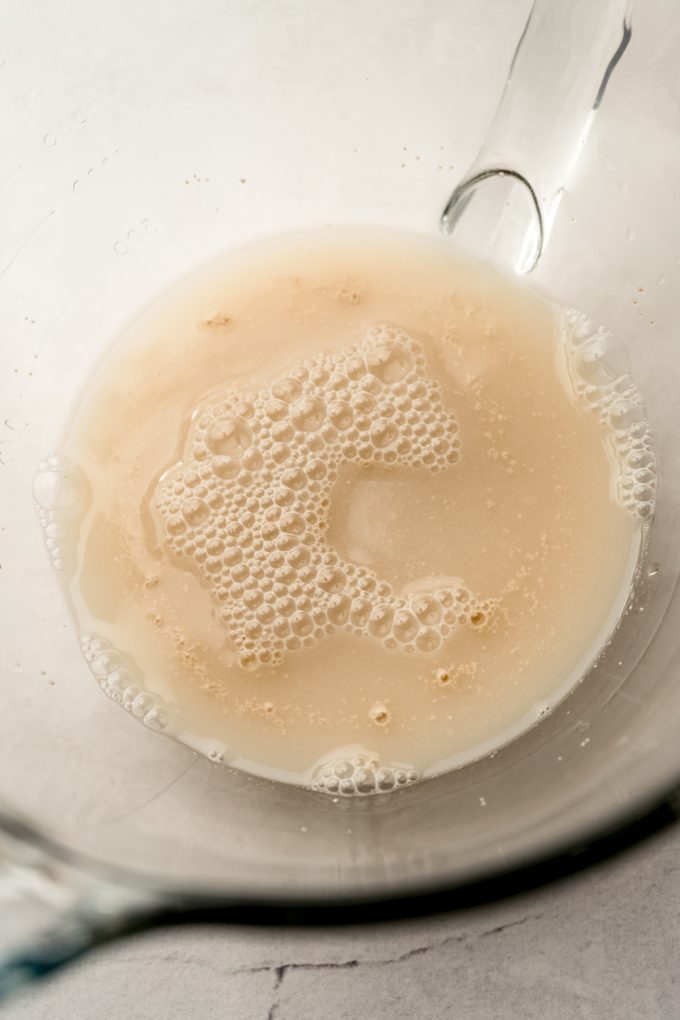
WARM WATER: this is what we’re using to activate the yeast. Aim for about between 100–110°F (38–43°C). This temperature is important because without moisture and warmth, yeast won’t thrive.
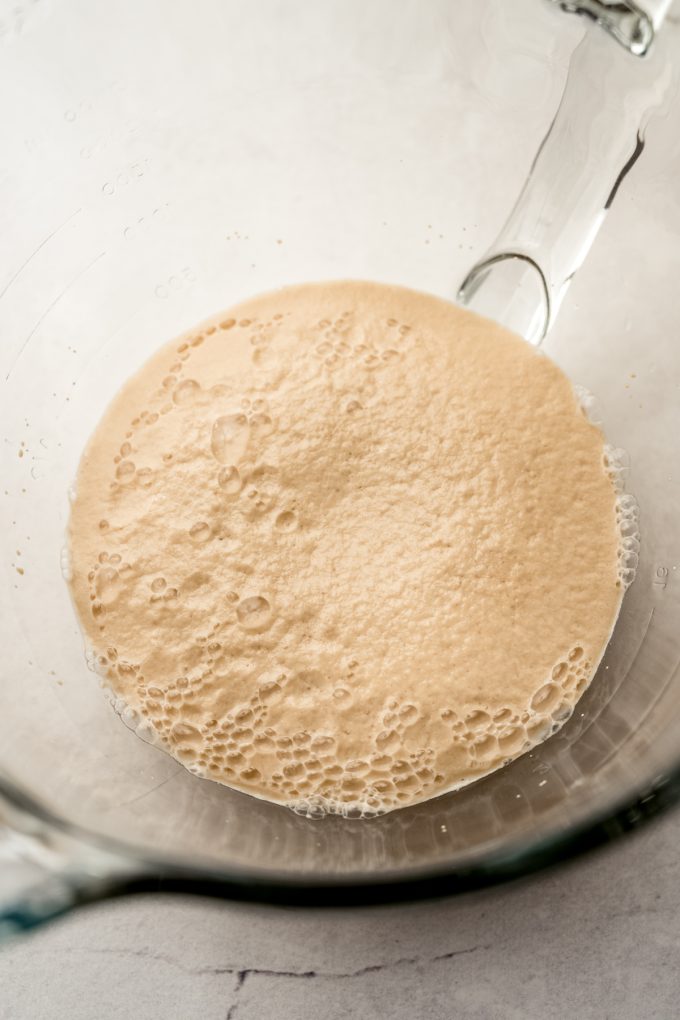
DRY ACTIVE YEAST: this is commercial yeast you find in the grocery store. You can use instant yeast, if you prefer. Skip the blooming step and just combine all of the ingredients in your bowl.
GRANULATED SUGAR: this will give the yeast something to feed off of and lightly sweeten the dough itself.
BREAD FLOUR: it is imperative you use bread flour in this recipe, as the protein content is higher than it is in all-purpose flour, which leads to chewiness and lots of gluten development.
SALT: there is a decent amount of salt in bagel dough, and for good reason. Without it, there’s not much flavor, since we’re working with a lean dough.
HONEY: you’ll need this for the boiling bath. Do not skip it! The sugar helps with the caramelization and crispness of the outside of the bagel.
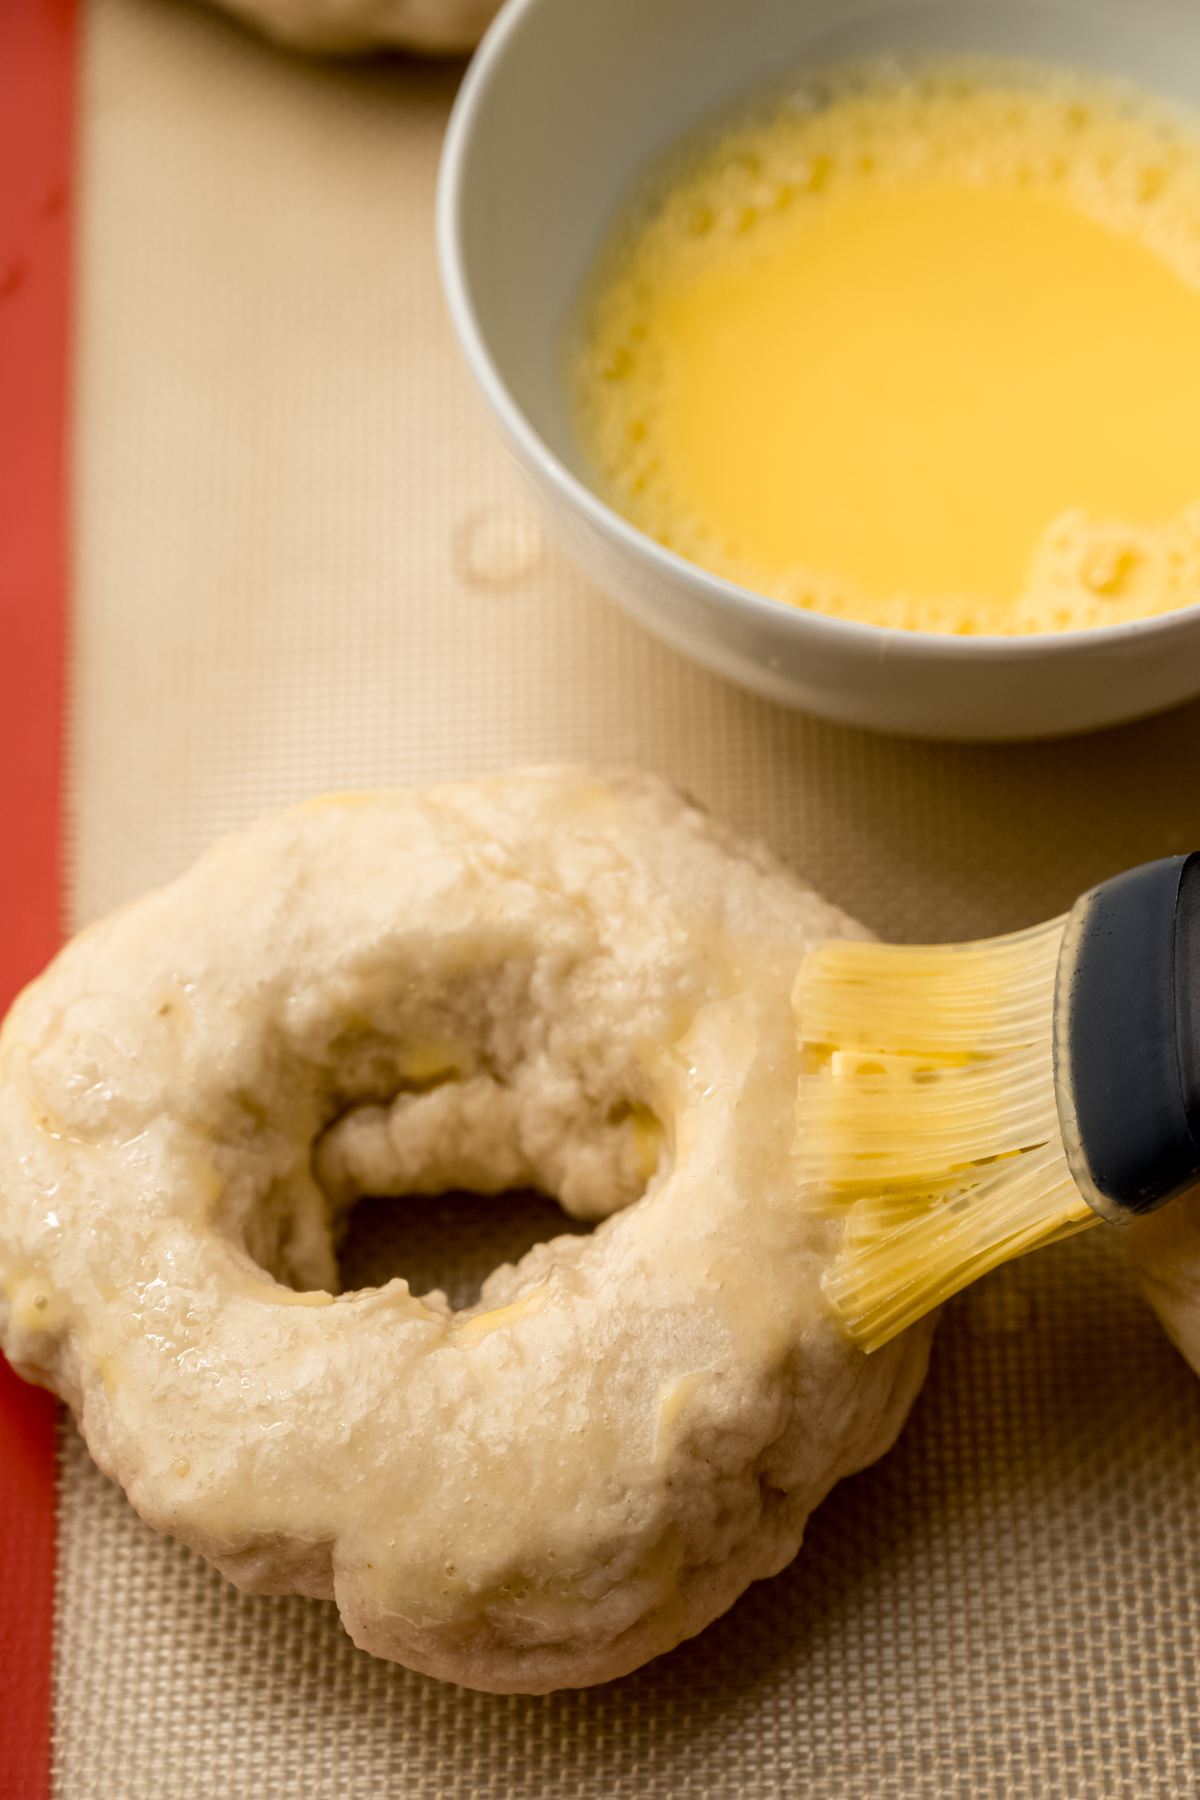
EGG WASH: I know I said this is a lean dough, but the egg wash is just applied to the outside of the bagels for color and shine. I like to use a whole egg for browning, but if you want your bagels less brown, you can use just an egg white + water instead.
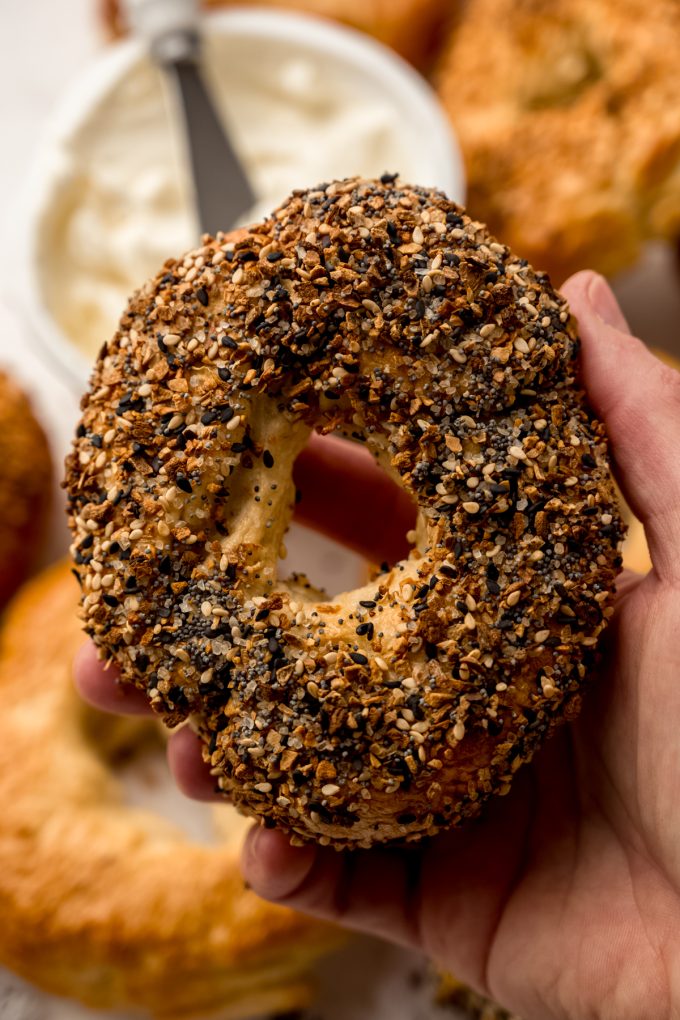
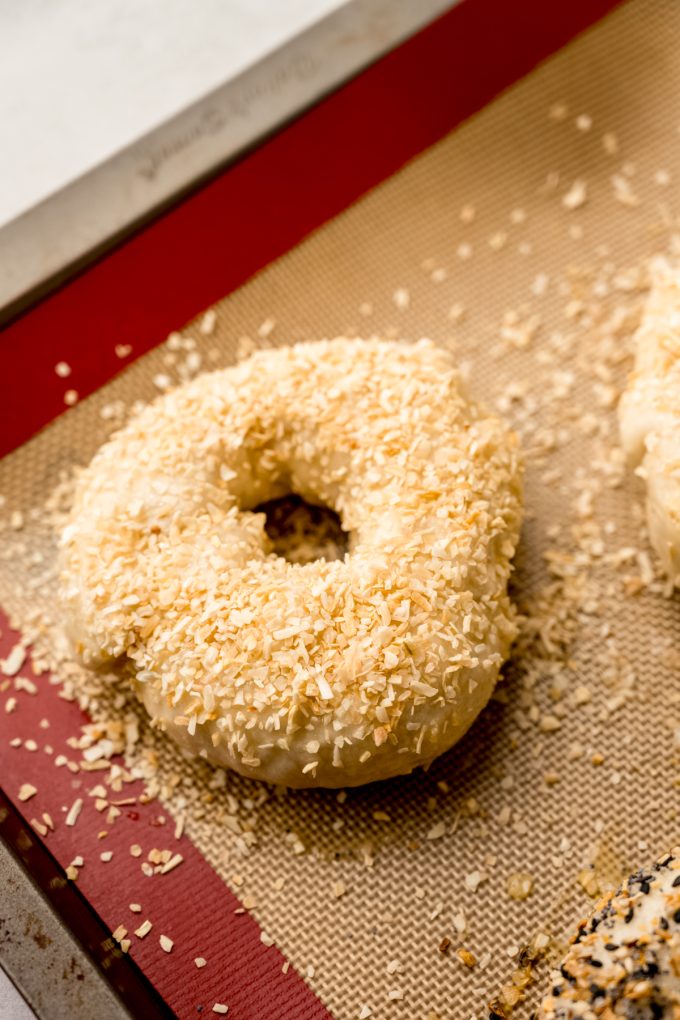
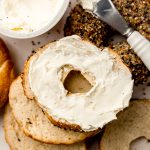
TOPPINGS (IF DESIRED): honestly, go nuts here. I went with everything seasoning and minced onions, but really anything that can stick to the outside of the bagel is fair game. You can even roll some shredded cheese into the balls of dough as well as stick some on the outside. Get creative with it!
KEY STEPS: HOW TO MAKE HOMEMADE BAGELS
The process of making bagel dough is quite simple, but if you’re unfamiliar with the process of working with yeast dough, feel free to read through my post about baking with yeast to give you some guidance. Everything is outlined in detail in the recipe card below (plus there’s a video!) but there are a few steps I want to highlight so you know why you’re doing them and why they’re important.
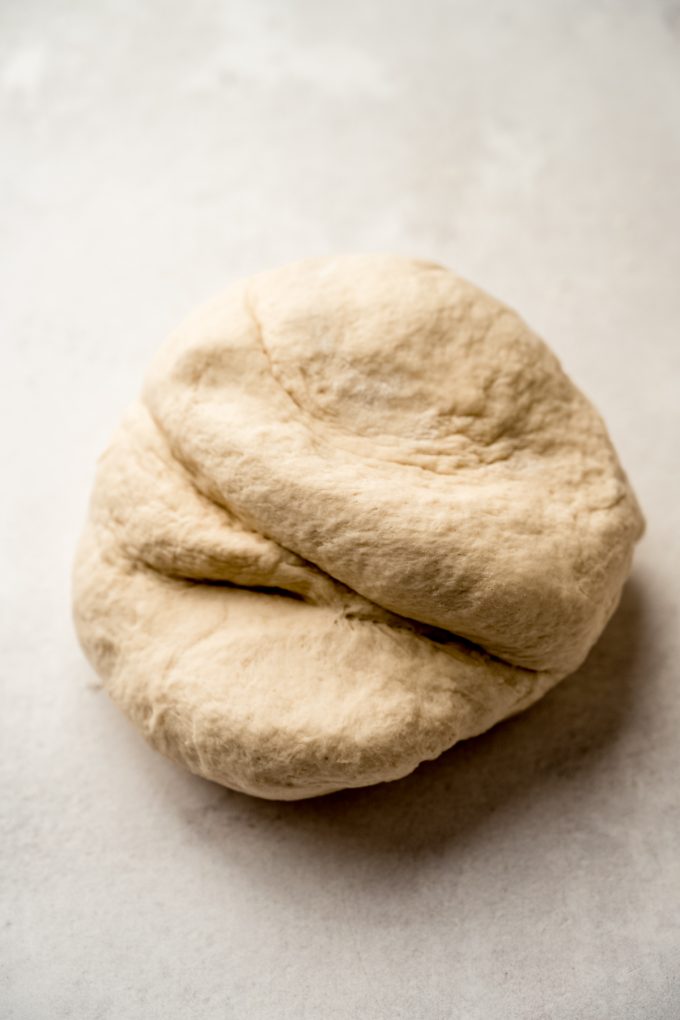
EXPECT A STIFF DOUGH
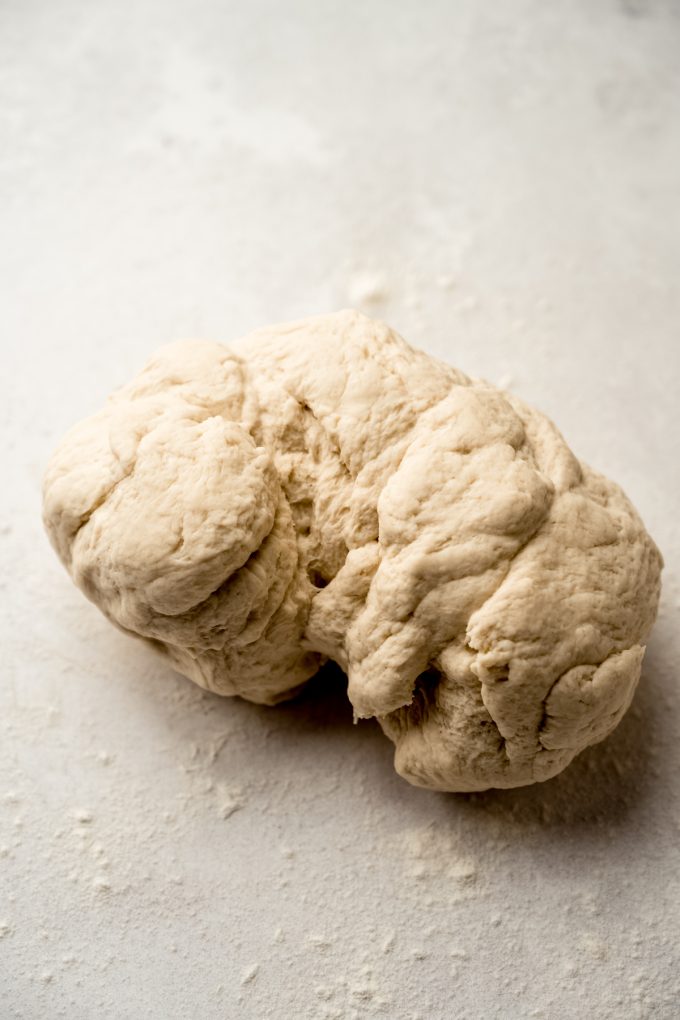
While your dough may start out shaggy, it will quickly turn into a stiff clump. This might sound unappealing but it’s what you want! Bagel dough is low hydration, meaning the ratio of liquid to flour is low, and all of that leads to chew. Pull-apart breads and herbed rolls are soft, supple, and fluffy. That’s great for them! But bagels are a different breed.
Be sure you’re kneading the dough thoroughly: look for a surface that feels a little stiffer than PlayDough, is not very sticky, and bounces back slowly when you press your finger into it.
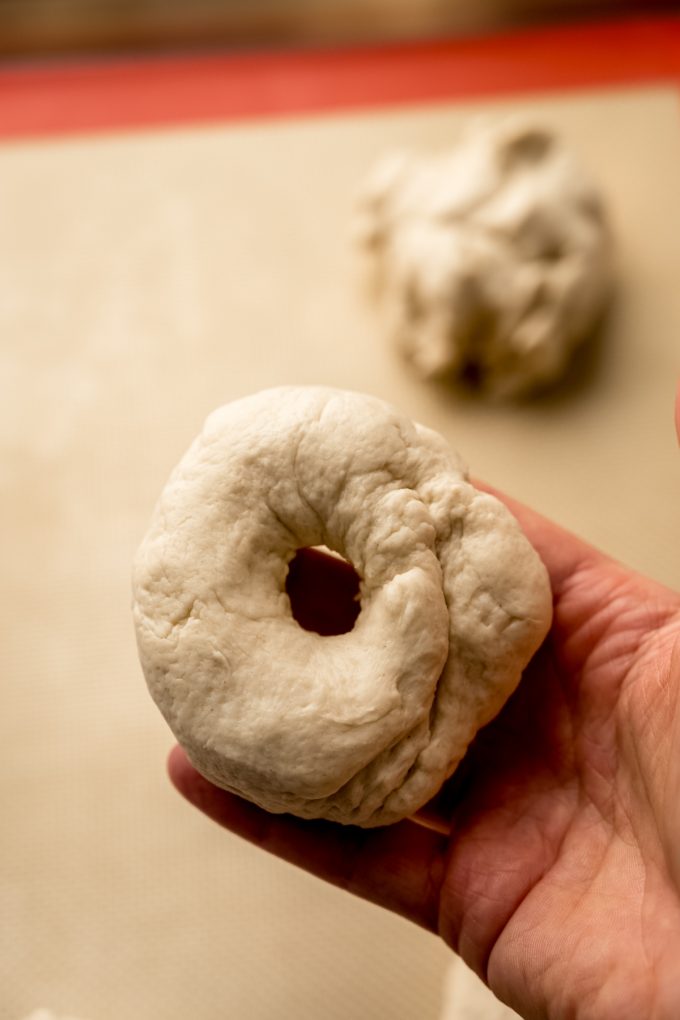
HOW TO SHAPE BAGELS
This does not have to be perfect, so set that expectation aside right now. In fact, I think that the more rustic a bagel looks, the more fun the bites are!
To shape them, poke your finger through a disc of dough, then use your fingers to stretch it out. The bagels will rest for a bit before their boil, and you’ll stretch them again. Resting allows the gluten to relax which encourages it to stretch that second time. You’re aiming for a hole about 1.5″ in diameter. It will shrink a bit in the oven, and that’s ok.
WHY ARE WE BOILING BAGELS?
Boiling bagels is what gives them their signature shine! The shock in the hot water bath creates a crisp and shiny coating by gelatinizing the natural starches in the dough. Think of it also as a “setting” of the outer layer of dough, so the bagels don’t puff up completely into dinner rolls without a hole in the center.
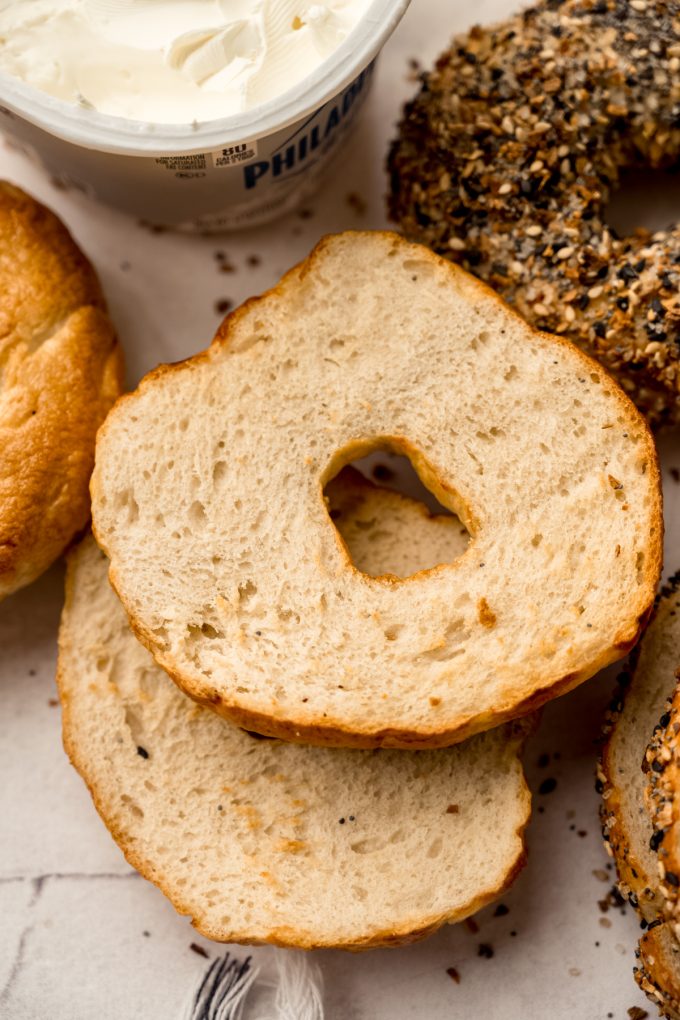
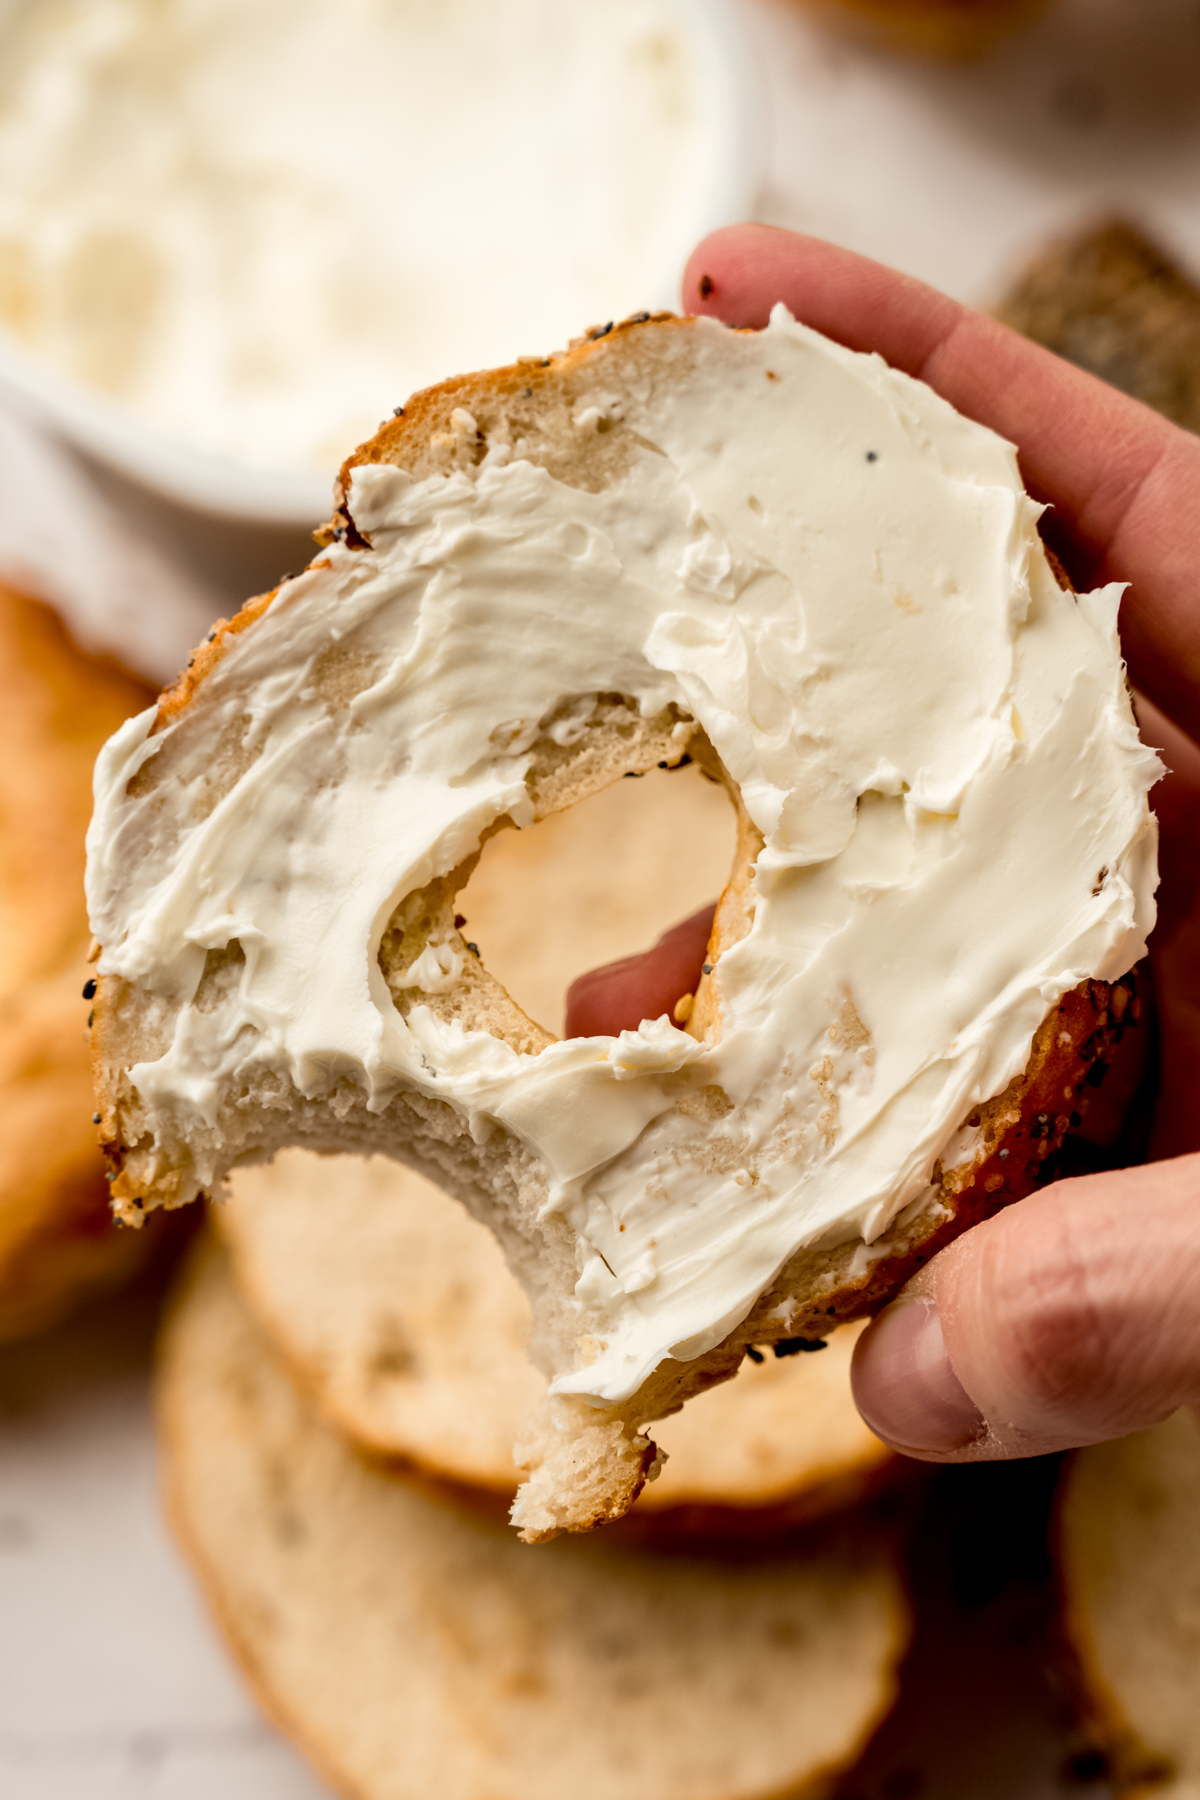
SLICE, TOAST, AND USE YOUR FAVORITE SPREAD
You’ll want the bagels to cool completely before slicing them, as slicing into warm bread allows moisture to escape, leading to dry bread. The good news is, though, that they cool pretty quickly!
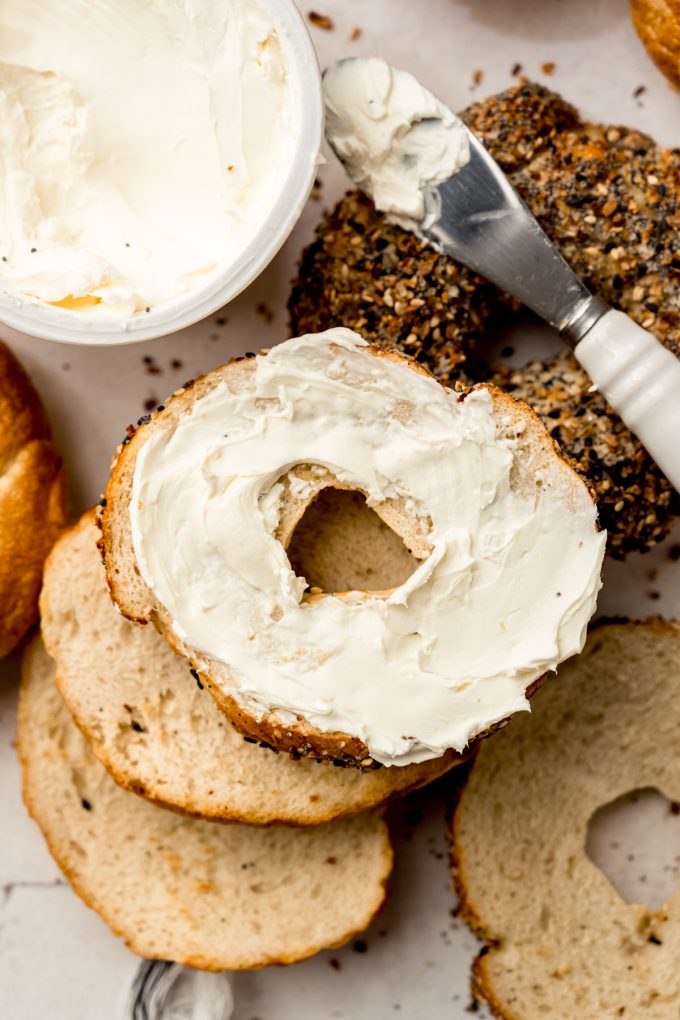
I am a cream cheese kind of girlie, but this homemade blackberry butter has been a favorite around our house (and we’ve swapped in and out many berries along the way!), you can add some homemade pesto if you’ve went the everything/onion way, and you already know I love some homemade apple butter!
And of course, brown butter or cinnamon honey butter are two classics that are on regular rotation here because DUH. Oh oh and don’t forget salted cashew honey butter— that’s a recipe you’ll want again and again.

Homemade Bagel Recipe
Ingredients
BAGEL DOUGH
- 1 and ½ cups (360mL) warm water between 100–110°F (38–43°C)
- 1 Tablespoon (9g) dry active yeast
- 1 Tablespoon (15g) granulated sugar
- 4 and ¼ cups (510g) bread flour1 be sure to measure properly
- 2 teaspoons salt
WATER BATH
- 8 cups (1920mL) water
- ¼ cup (84g) honey
COATING
- egg wash: 1 egg2 + 1 Tablespoon water
- spice blends, toppings, or seeds3 as desired
Instructions
BAGEL DOUGH
- In a large bowl or the bowl of a stand mixer, combine the warm water, yeast, and granulated sugar. Whisk or stir everything together and then allow to rest for 5-10 minutes to activate the yeast.1 and ½ cups (360mL) warm water, 1 Tablespoon (9g) dry active yeast, 1 Tablespoon (15g) granulated sugar
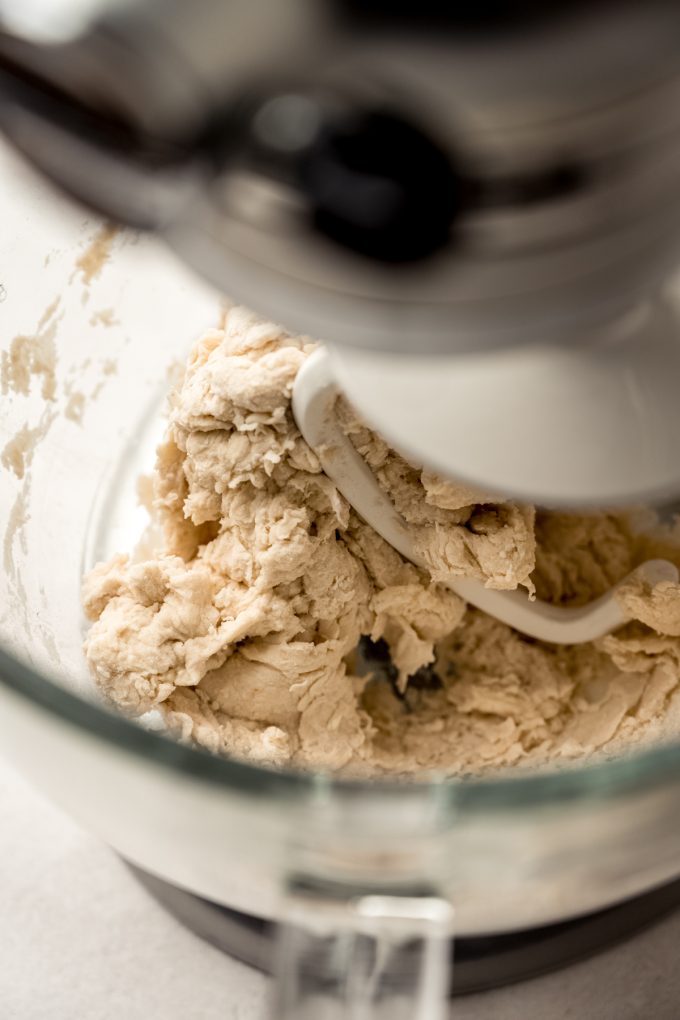
- When the yeast is ready, add the flour and the salt, then fit the mixer with the hook attachment (or use a wooden spoon or silicone spatula if using a large bowl). Turn the mixer to medium speed and allow the dough to come together. It should start to form a large mass around the hook or spoon. If it doesn't and it seems too sticky, add 1 Tablespoon of flour at a time and continue to mix. The dough should be stiff and seem a little dry, but it should not be crumbly. If it is, add 1 teaspoon of water and continue to mix until the dough comes together.4 and ¼ cups (510g) bread flour1, 2 teaspoons salt
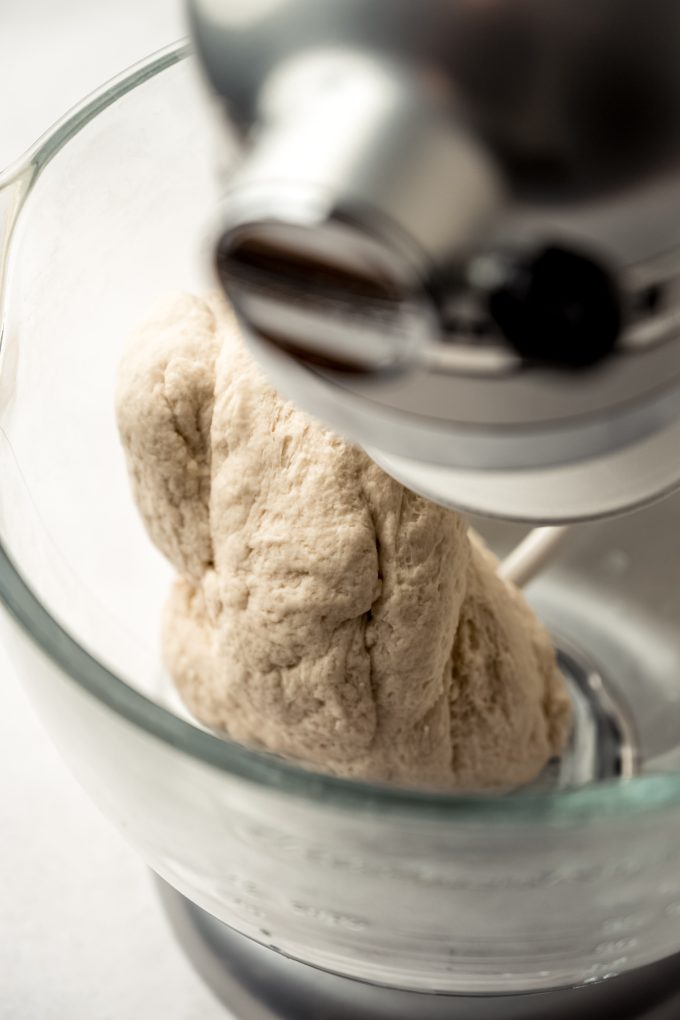
- When the dough is the proper consistency, knead it with the dough hook or by hand on a lightly floured surface for another 5-7 minutes until the dough becomes smooth and elastic. You likely won't need to add any flour, but if you do, add 1 teaspoon at a time. You want a slightly tacky dough, similar to PlayDoh but a bit firmer.
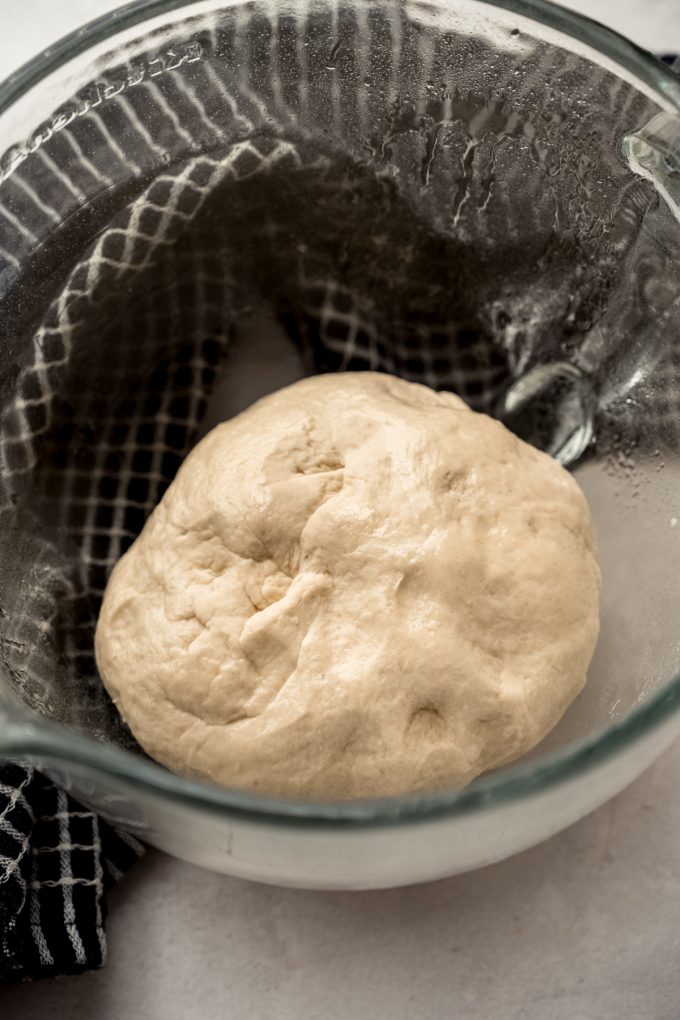
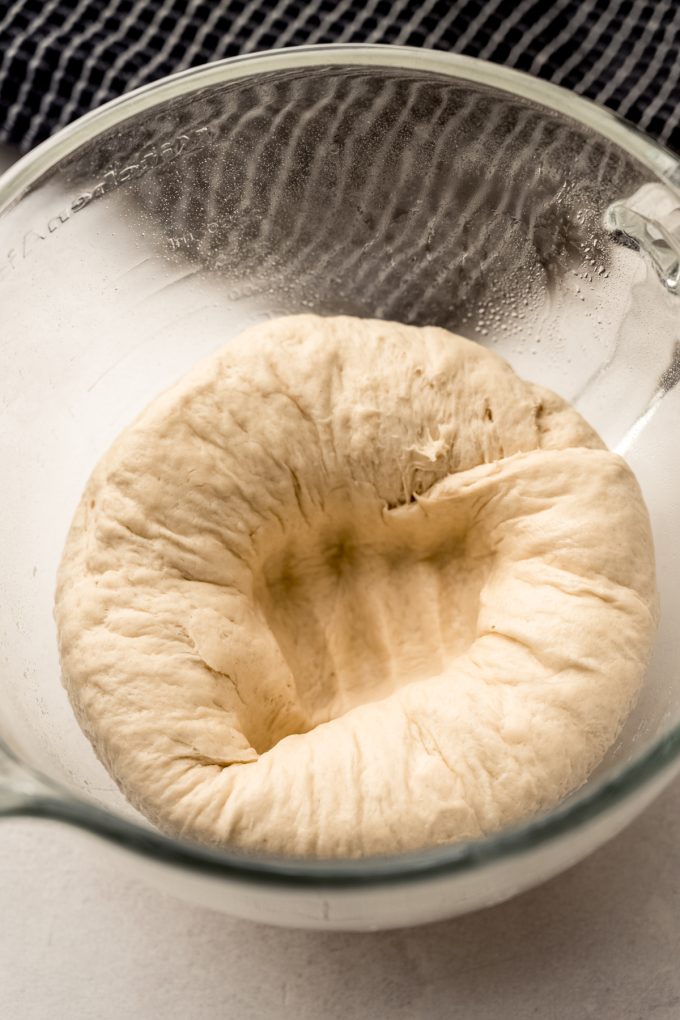
- Lightly grease your bowl with nonstick spray, butter, or oil, then place the ball of dough in the bowl, turning it over to coat it on all sides. Cover the bowl with a clean kitchen towel and allow it to rise at room temperature for 90-120 minutes, or until it has roughly doubled in size.
- When the dough has risen, line two large baking sheets with parchment paper or silicone baking mats and set them aside.
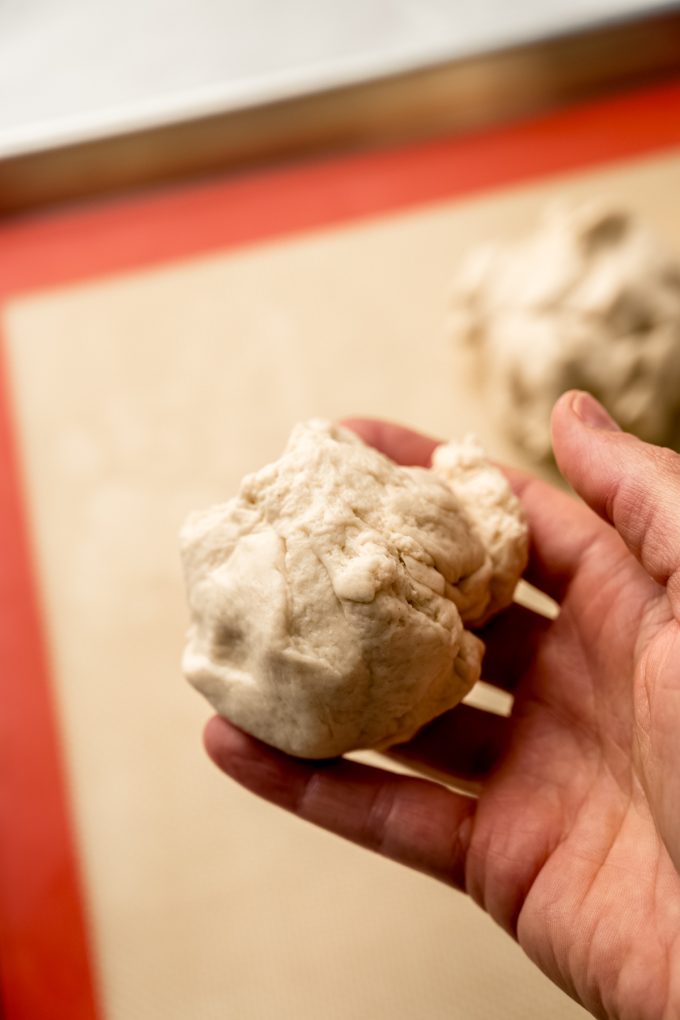
- Punch down the dough to release the air, then lightly flour your work surface. Turn out the dough onto the surface, then divide it into 8 equal pieces (mine were all about 4 ounces/113g each).
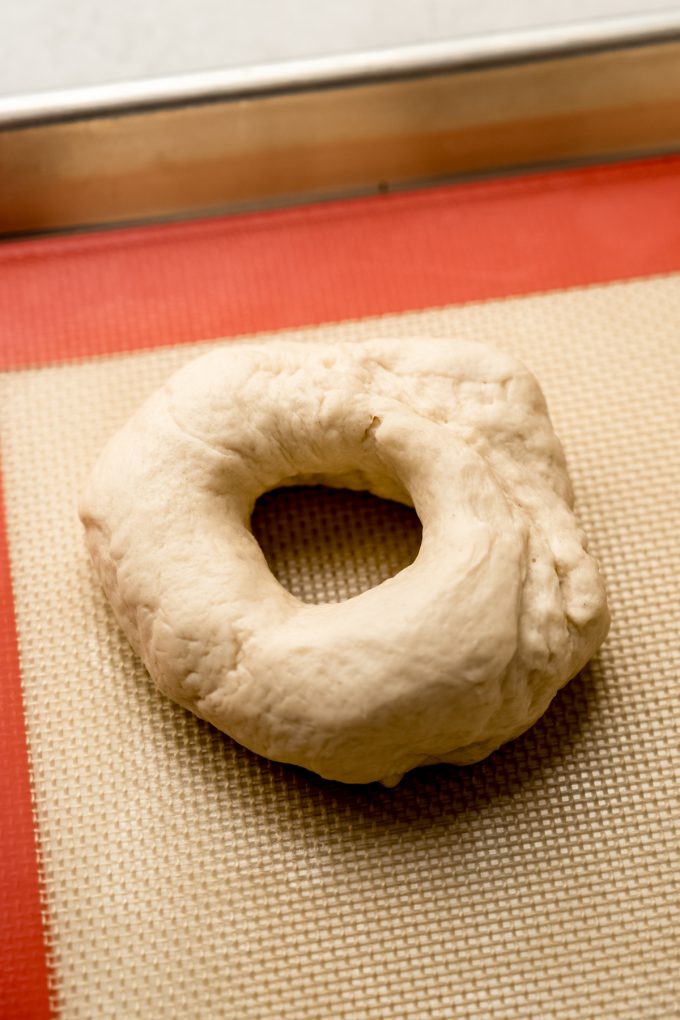
- Shape each piece of dough into a ball, then press your index finger through the center of each ball and gently stretch the dough to make a hole. Place rings onto the prepared baking sheet, then loosely cover the shaped bagels and allow them to rest for 10 minutes. While the dough rests, preheat the oven and start the water bath.
- Preheat the oven to 425°F (218°C) and allow it to heat for at least 20 minutes (ignore the beep indicating that it's ready).
WATER BATH
- Fill a large wide pot (I used my Dutch oven) with 8 cups of water, then whisk in the honey. Heat the water over high heat, allow it to come to a boil, then reduce the heat to medium-high.8 cups (1920mL) water, ¼ cup (84g) honey
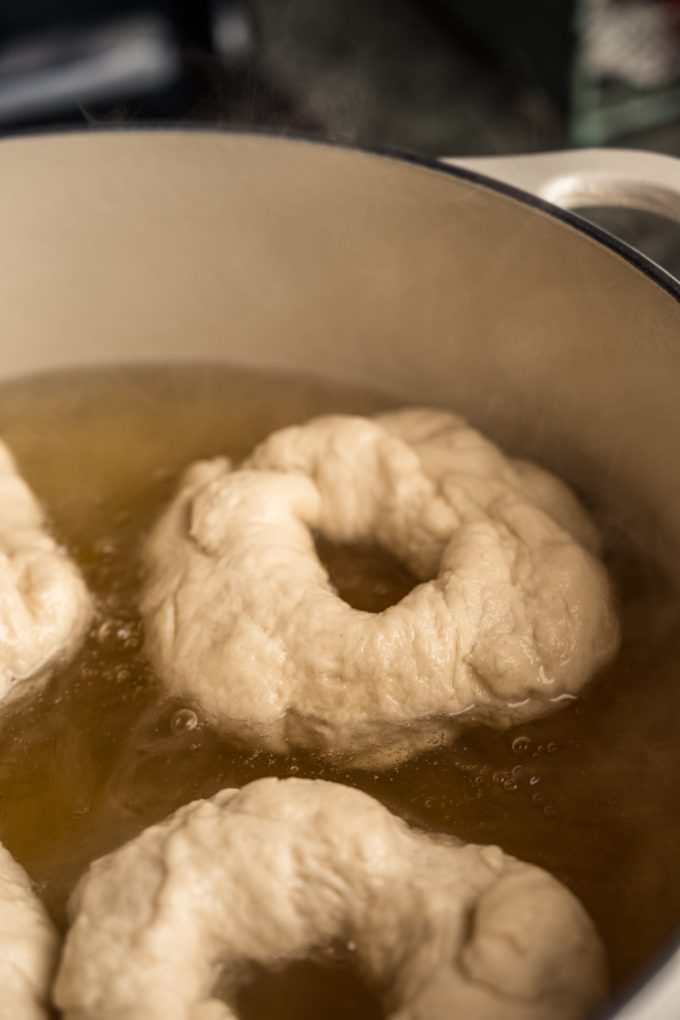
- Before dropping the bagels into the water bath, stretch and widen the bagel holes to about 1.5" using your hands, then drop 4 bagels, one at a time, into the bath. Boil the bagels for 60-90 seconds, then use a spatula to flip each bagel over and boil for an additional 60-90 seconds.
- Using a slotted spoon or spatula, lift one bagel out of the water, let the excess water drain off, then place the bagel back onto the lined baking sheets. Repeat with remaining bagels until all of the bagels have been boiled.
COATING
- Use a pastry brush to brush the egg wash on the tops and all around the sides of each bagel. If you are adding toppings, dip the tops of the bagels into the toppings immediately after applying the egg wash, then place the bagels back onto the baking sheet.egg wash: 1 egg2 + 1 Tablespoon water, spice blends, toppings, or seeds3 as desired
- Bake the bagels for 20–24 minutes, rotating the pans halfway through, until the bagels are dark golden brown (or your preferred brownness). Allow the bagels to cool on the baking sheets for 10 minutes, then transfer to a cooling rack to cool completely.
- Once the bagels are completely cool, slice and enjoy however you want. Cover leftover bagels tightly and store them at room temperature for up to 4 days or in the refrigerator for up to 1 week. Bagels freeze well, up to 3 months. Thaw at room temperature, or pre-slice and toast from frozen.
Video
Notes
- Bread flour: while I typically use all-purpose for all of my bread recipes, this is a time when bread flour is imperative to create the proper texture of bagels.
- Egg wash: I like to use a whole egg, which aids in color/browning. If you prefer a lighter colored bagel, you can simply use an egg white + water for more of a glossy finish than a slightly glossy + light brown finish.
- Toppings: I used an everything seasoning as well as dried minced onions for some of my bagels. You can also use sesame seeds or poppy seeds.
Nutrition Disclosure
All nutritional values are approximate and provided to the reader as a courtesy. Changing ingredients and/or quantities will alter the estimated nutritional calculations.
Such good bagels! I’ve been looking for an excuse to try making bagels and this recipe made it easy! Very good flavor and they turned out perfect!
Thank you so much, Corrine!
I was a little hesitant but was pleased with the end result. I made everything bagels shapes were a little off but the taste was great!
Thanks so much, Carol!