
Hanukkah Oreos
As an Amazon Associate, I earn from qualifying purchases. Read the full disclosure here.
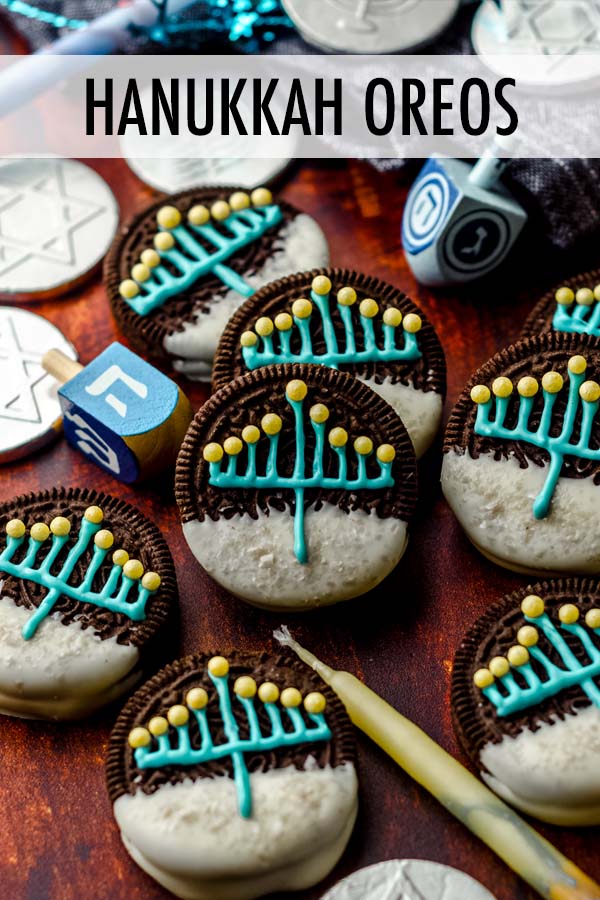
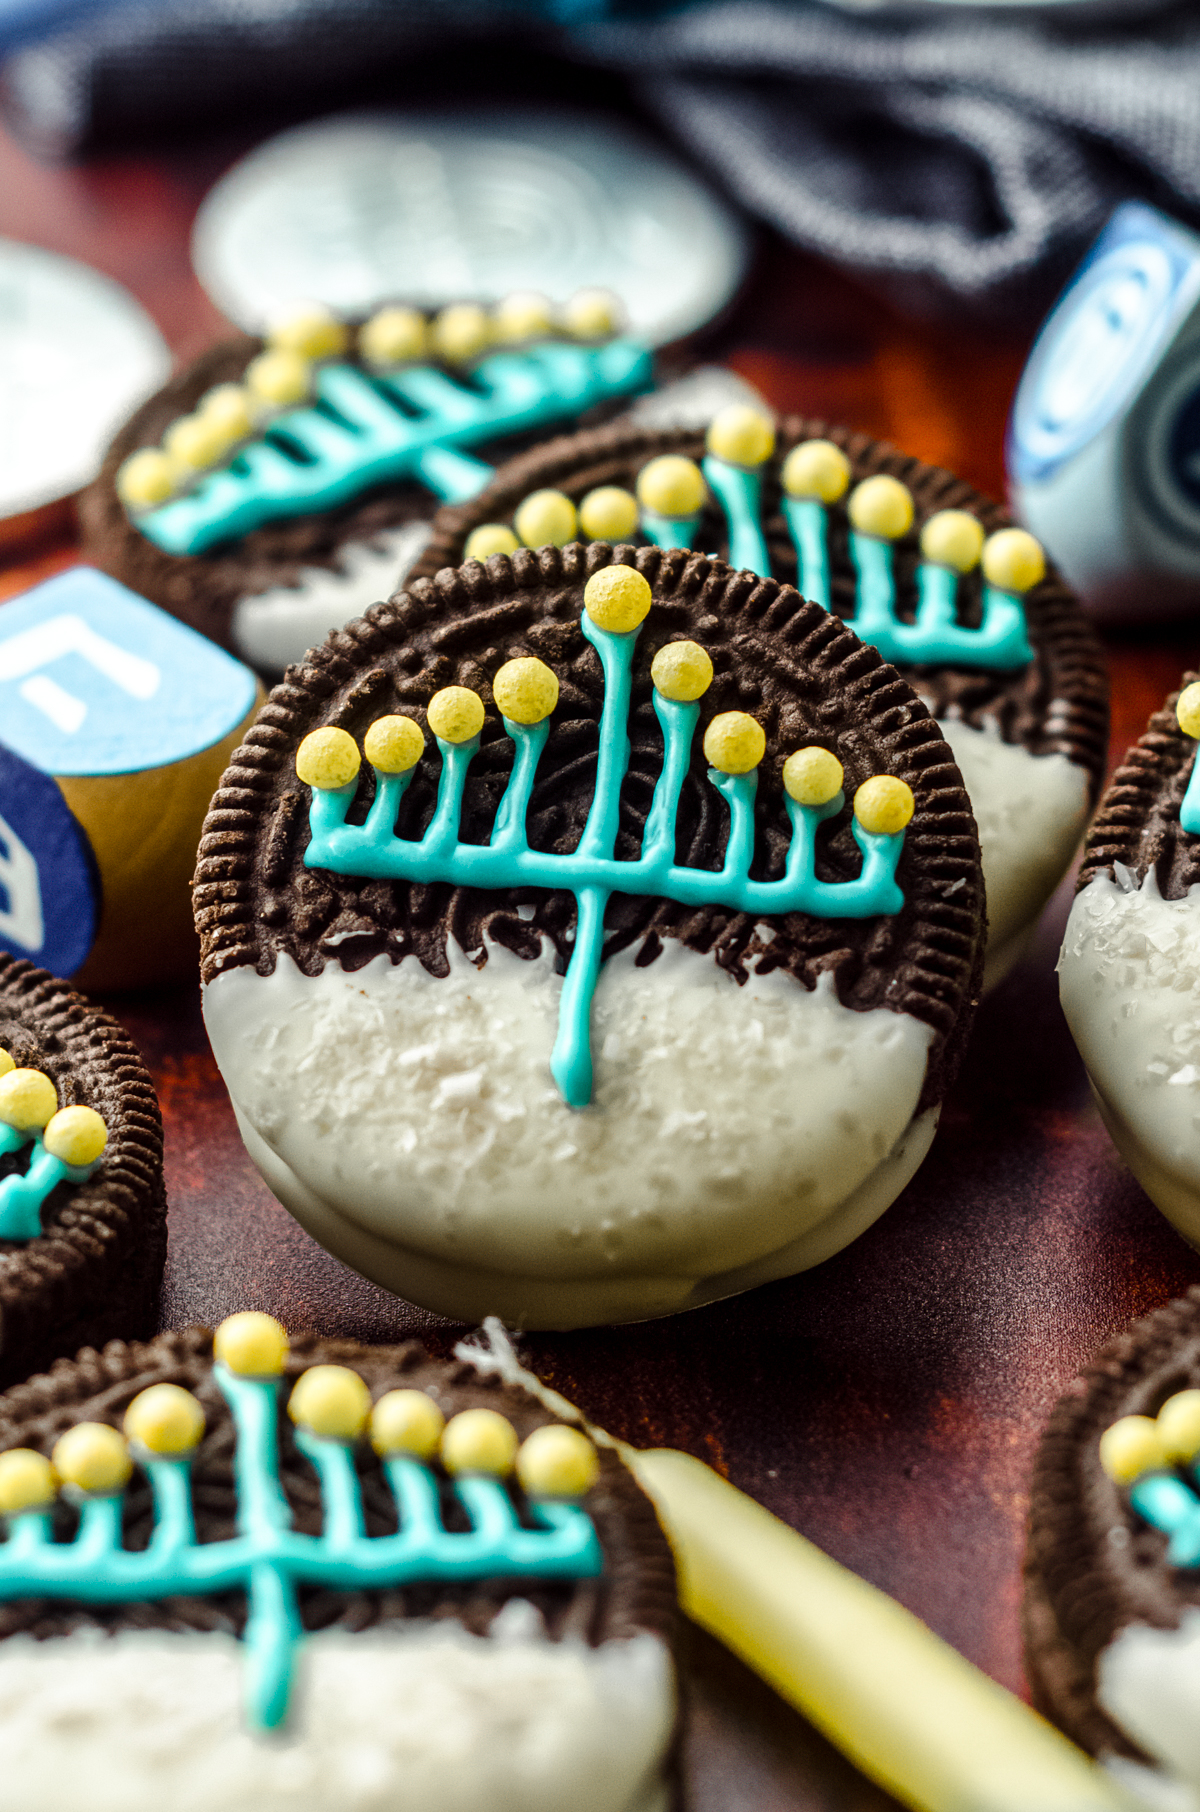
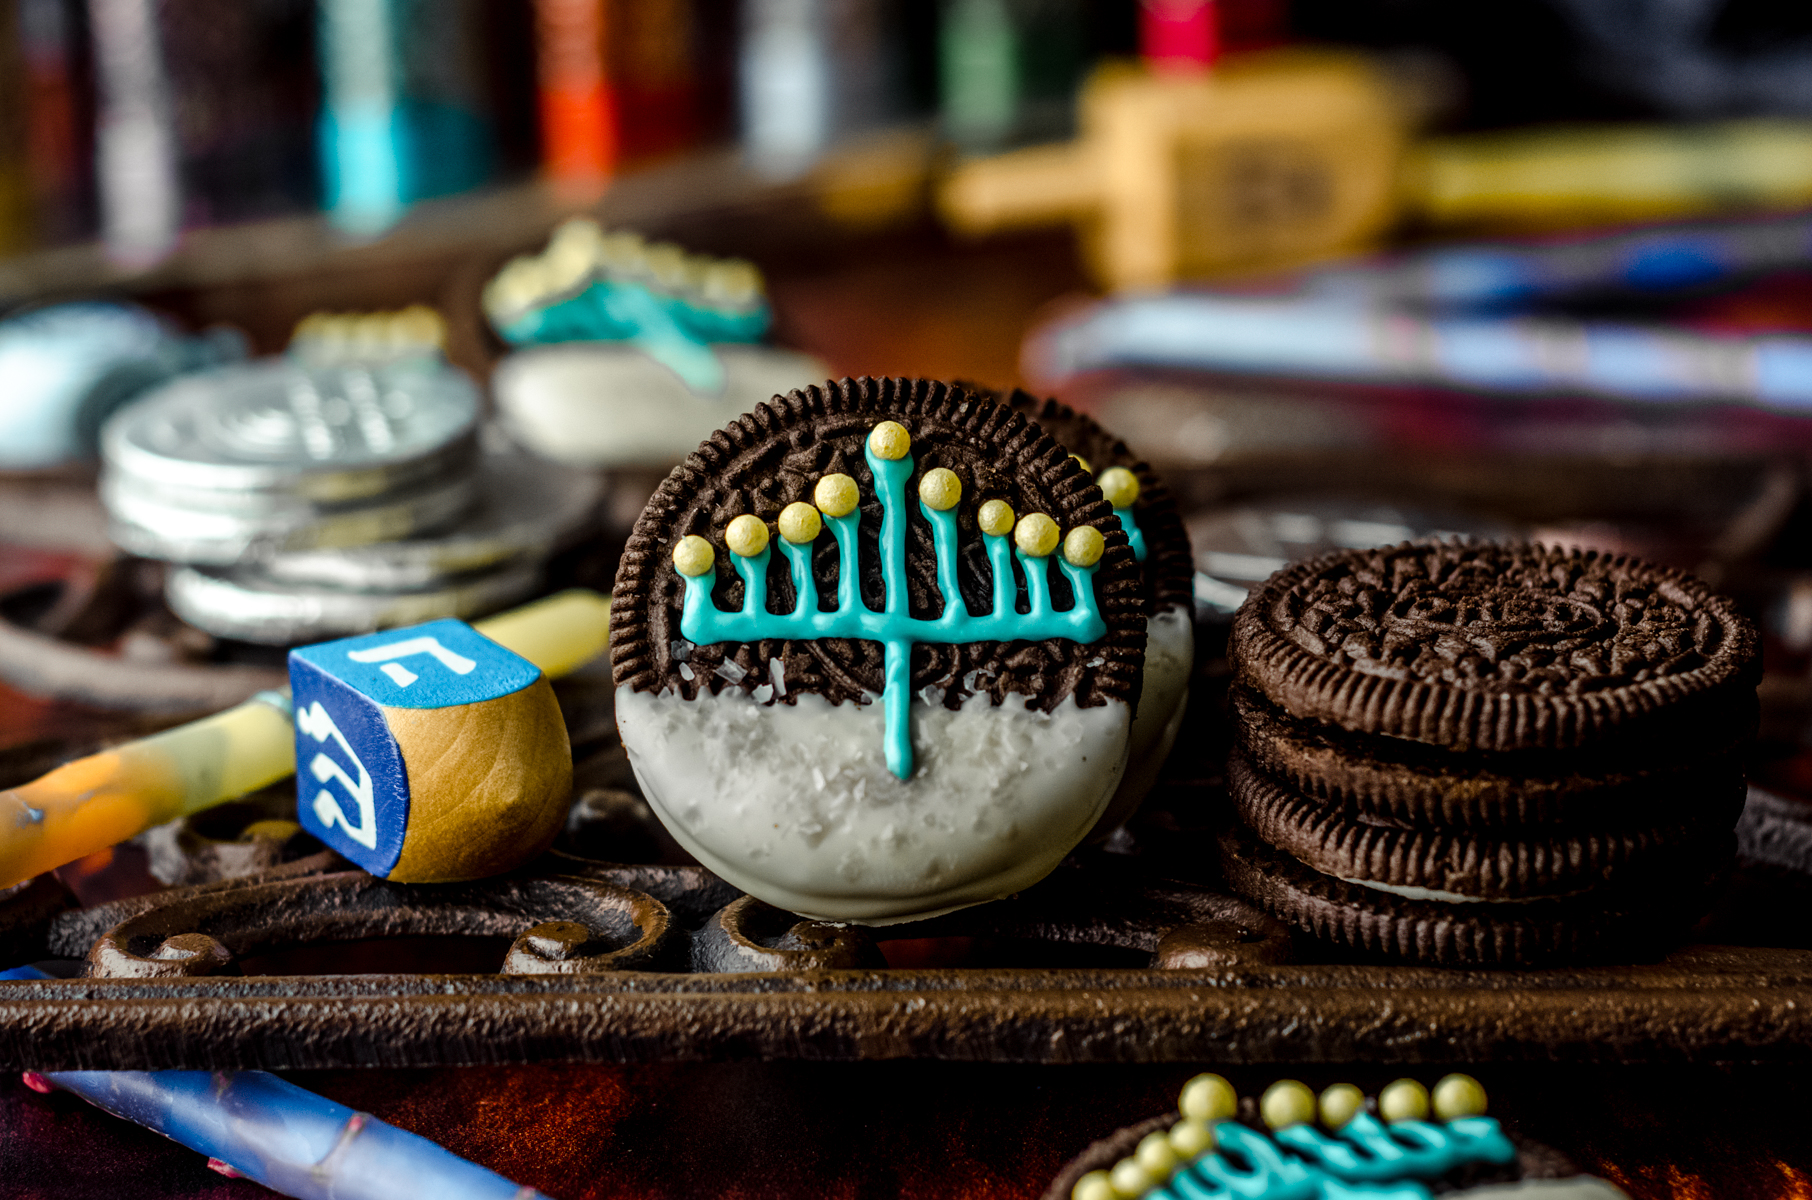
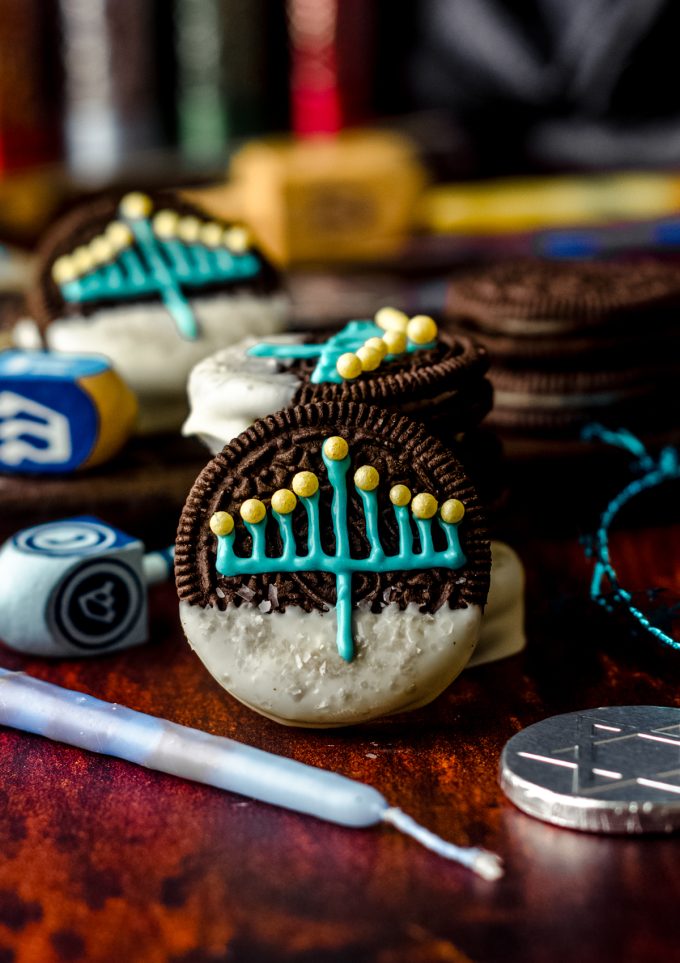
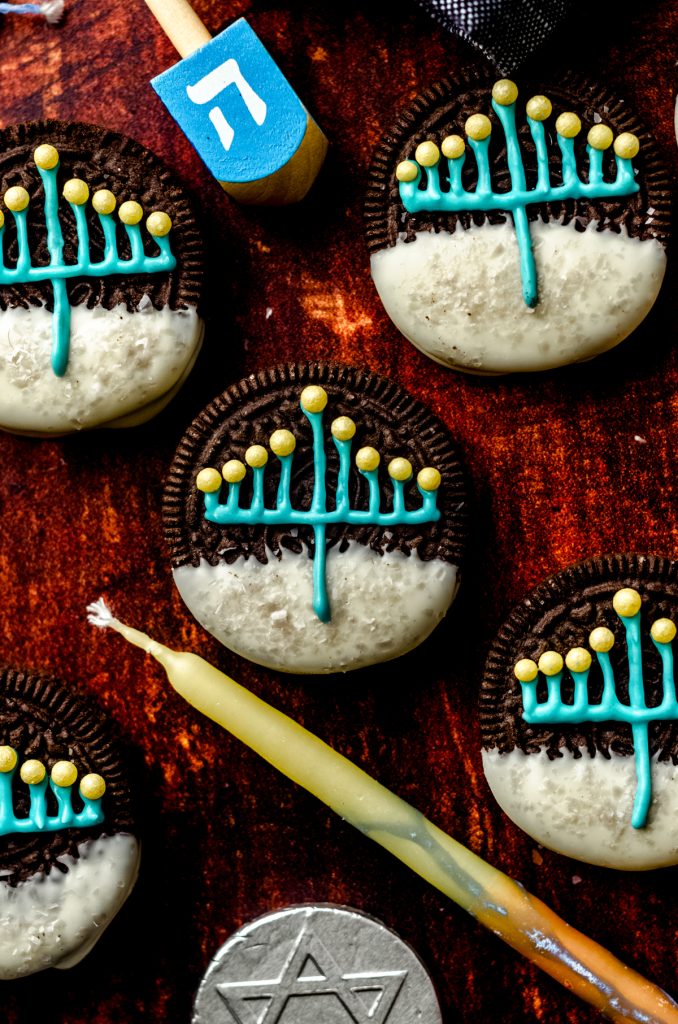
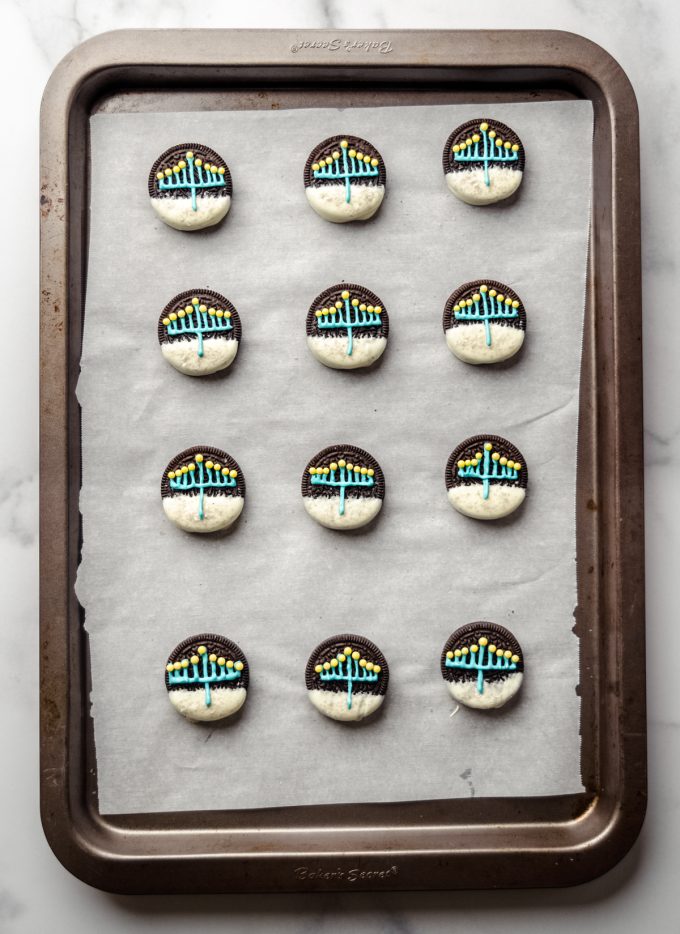
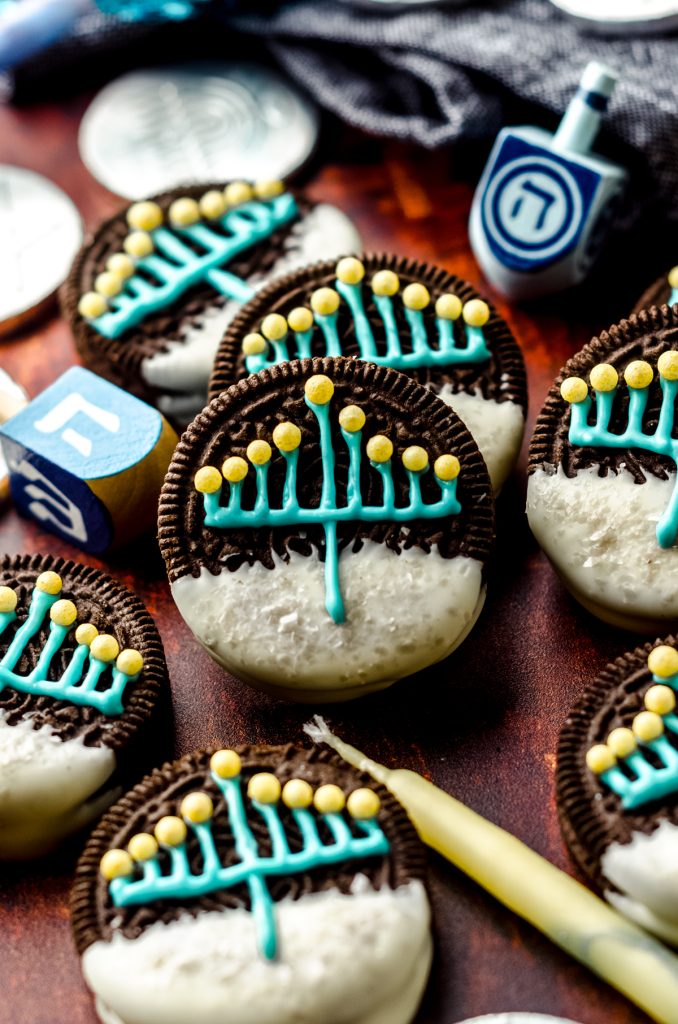
These adorable Oreos are the perfect Hanukkah treat! Store bought Oreo cookies are dipped into melted white chocolate, decorated with a simple menorah, then dotted with colorful beads to finish off the candles.
A SPIN ON A VIRAL FRESH APRIL FLOURS FAVORITE
In 2021, I published some adorable Christmas Oreos, and in 2022, they went absolutely viral on Instagram and Facebook. MILLIONS of folks added those easy Christmas treats to their dessert spreads and cookie tins, so I knew I had to make a variation for my Jewish friends!
I will say… A menorah is a little more difficult to make than a Christmas tree, but nevertheless, we forged ahead and I was so happy with the result, I couldn’t help but share it with the world.
Worried? Don’t be. If you have piping capabilities and can follow my tips, you’ll be cranking out Hanukkah men-Oreos– a name I got from the Brown Birds (#IYKYK)– like a pro! Plus, they get prettier the more practice you have, so you’ll just be forced to eat a handful of possibly not-so-pretty Oreos until you get the hang of it (DARN).
YOU WILL LOVE THESE HANUKKAH OREOS
First of all, they start with Oreo cookies. Anything that starts off with Oreos is GOING to be good.
See my no bake Oreo pie, cookies and cream cookies, or mini cookies and cream cupcakes if you need some convincing.
Oh, AND! You can use any Oreos you like– classic Oreos, holiday Oreos, DoubleStuf Oreos, peppermint Oreos, or any other holiday Oreo flavors or Stuf levels– whatever you prefer. We don’t discriminate against Oreos in this house (though standard/classic are my favs through and through).
THEN we dip those Oreos in melted white chocolate.
AND THEN, we pipe on a simple menorah design using blue candy melts and create little “flames” with candy beads (more on this in a bit).
HANUKKAH OREOS INGREDIENTS
You only need a few ingredients for these festive treats. There are some important notes in the recipe card, so be sure you visit all of your options when deciding what ingredients to commit to before starting.
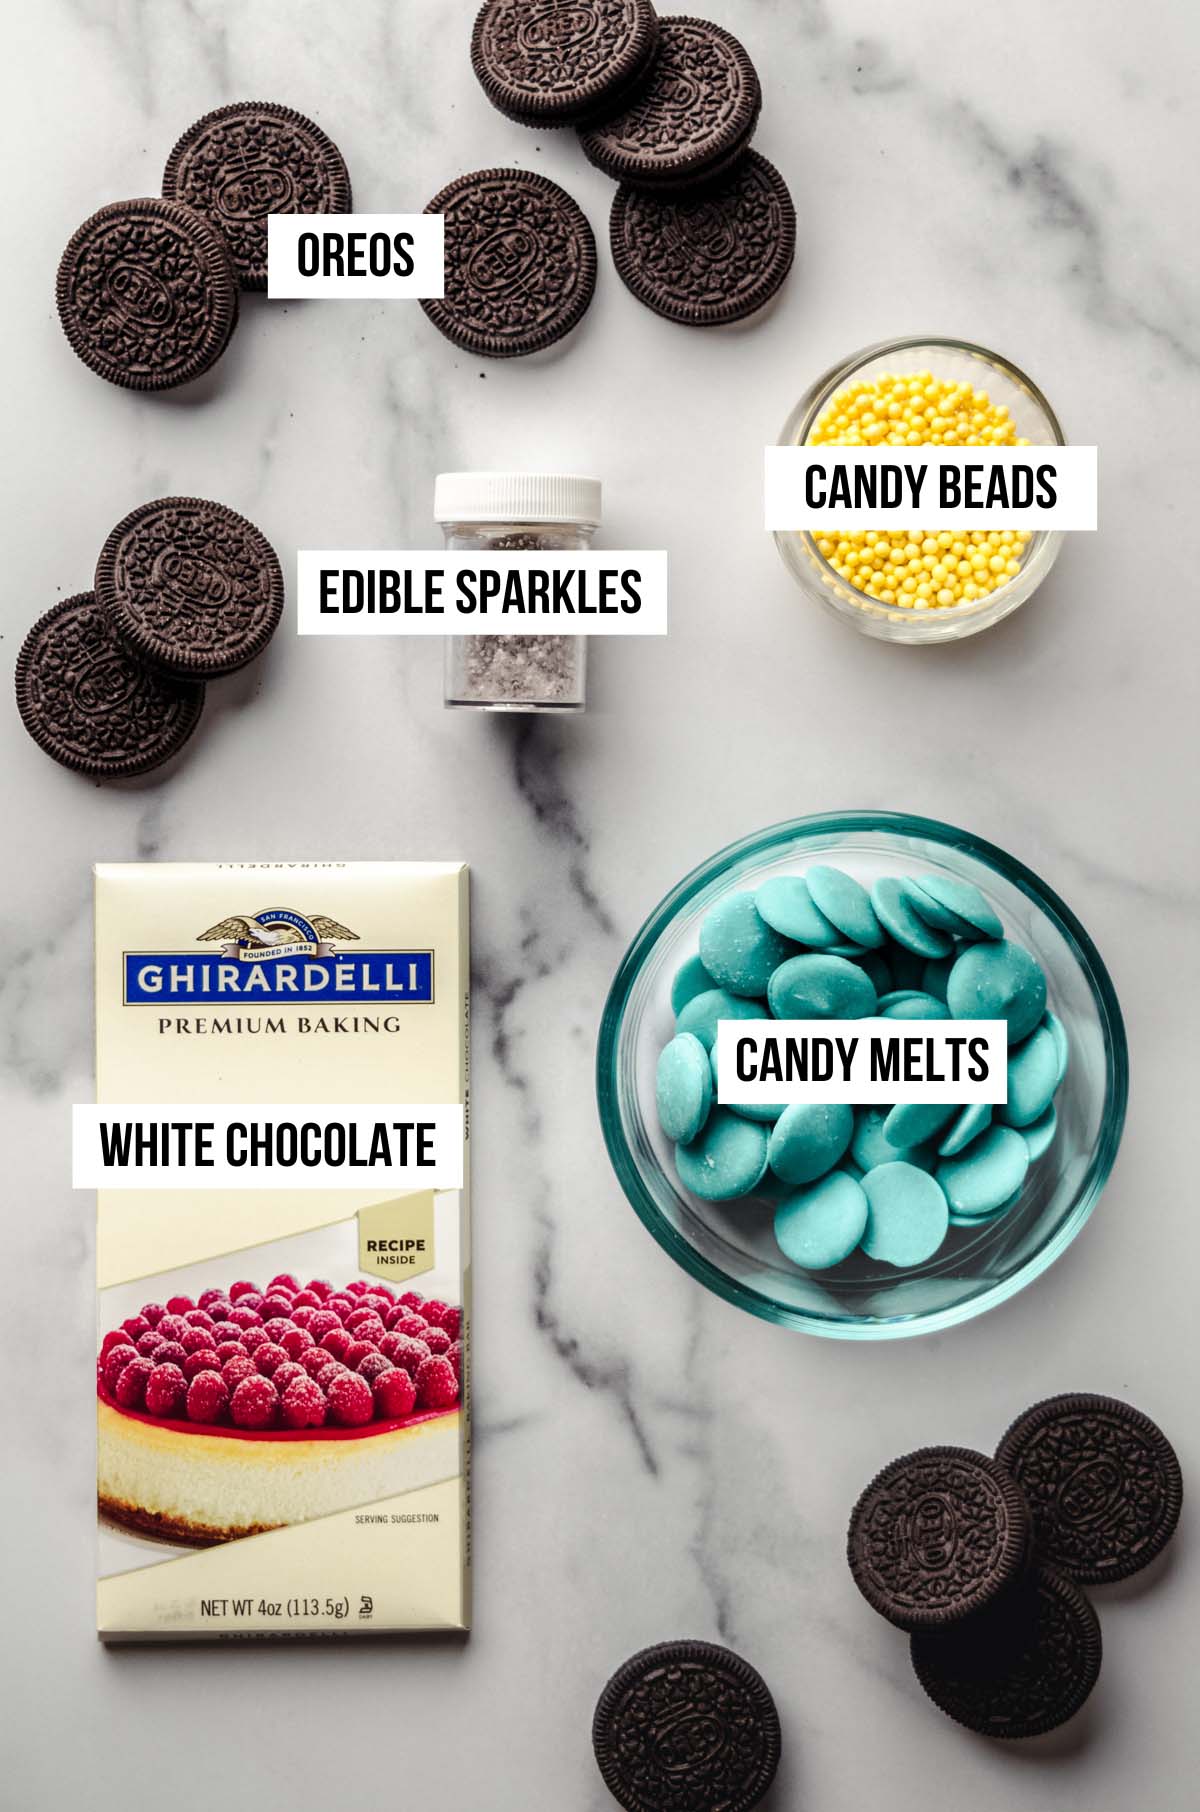
For these Hanukkah Oreos, you will need:
• Oreos
• white chocolate or white candy melts
• edible glitter or cake sparkles
• blue candy melts OR blue food coloring
• yellow candy beads
THE PERFECT HANUKKAH TREAT
My very favorite thing about these Oreos is that they are so easy to make. With absolutely zero oven time and a relatively hands off process, they are just about the easiest thing that will come out of your kitchen this holiday season.
The ease of preparation makes these simple and adorable dipped Oreo cookies the perfect treat throughout the Hanukkah season. And guess what? They ship and store well, lasting up to 2 weeks at room temperature.
They can probably last longer than that, but in all honesty… Ours didn’t stick around near as long enough to find out!
HOW TO MAKE HANUKKAH OREOS
These adorable little Hanukkah treats are a simple and tasty food gift idea as well as the perfect holiday treat for your family to enjoy. Either way, you’re going to love how simple it is to make them.
Even if you don’t consider yourself a skilled baker or cookie decorator, you can have success with these! It’s as simple as dipping Oreos in candy melts or melted white chocolate, and decorating with a basic menorah.
Truly, it’s that easy. And I’ll walk you through it!
SETTING UP A DIPPING STATION
To keep this recipe easy and to save time on clean up, start out by setting up a dipping station. This doesn’t have to be fancy at all, it just has to work for you!
I like to place a baking sheet lined with parchment on the counter, and set the bowl with the melted chocolate or candy melts directly next to it.
This way, minimal drips end up on the counter as I transfer the dipped Oreo cookies to the lined baking sheet.
PREPARING THE CHOCOLATE
You have two options here: you can use white chocolate or white candy melts. I prefer the taste of white chocolate, but the candy melts are a little less finicky when it comes to melting. Do whatever works for you or whatever you have available to you.
Whether you use white chocolate or candy melts, the process is essentially the same.
Place your white chocolate or candy melts in a shallow microwave safe bowl and then heat in small increments until it is smooth. Make sure to stir often, as this is crucial when it comes to melting chocolate to keep it completely smooth.
Alternatively, you can use a double boiler to melt the chocolate or candy melts gently. Be sure to stir often to prevent burning and encourage the wafers or chips to melt evenly.
If you used a double boiler, add your melted candy wafers or chocolate to a small heatproof bowl and place it next to your prepared baking sheet to create your dipping station.
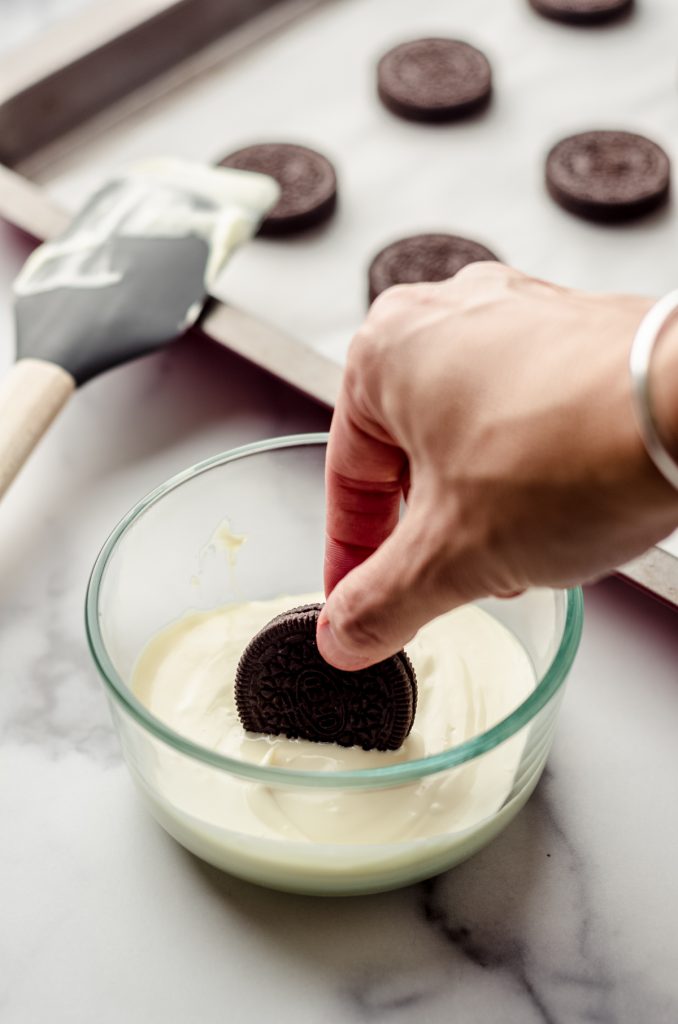
DIPPING THE OREO COOKIES
Working with one Oreo at a time, dip the bottom half of the cookie into the melted white chocolate. Place the dipped Oreo on the parchment lined baking sheet and then sprinkle with some sparkly edible cake sparkles or glitter.
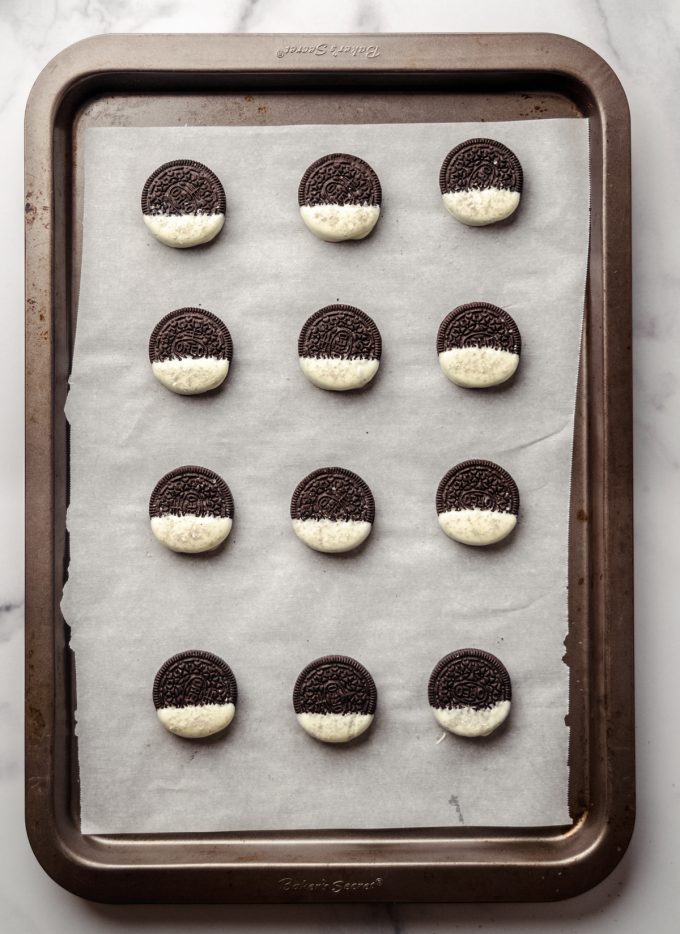
Repeat this process with the remaining Oreos, and then allow the coating to harden completely, which should only take about 15 minutes.
SUCCESS TIP
Be sure to let your cookies harden at room temperature. Adding them to the fridge or freezer in an attempt to speed up the hardening process will result in cracking, blemishes, and sweating of the chocolate. Don’t do it!
MELTING THE BLUE CANDY MELTS
Once the chocolate on your Oreos is completely set, prepare your blue candy melts by using the same process you used for melting the white chocolate or white candy melts.
USE WHITE CHOCOLATE FOR EVERYTHING
If you’d like to streamline the process even more, melt your white chocolate or white candy melts, dip all of the Oreos you plan to decorate, and then tint the remaining mixture blue to pipe the menorahs.
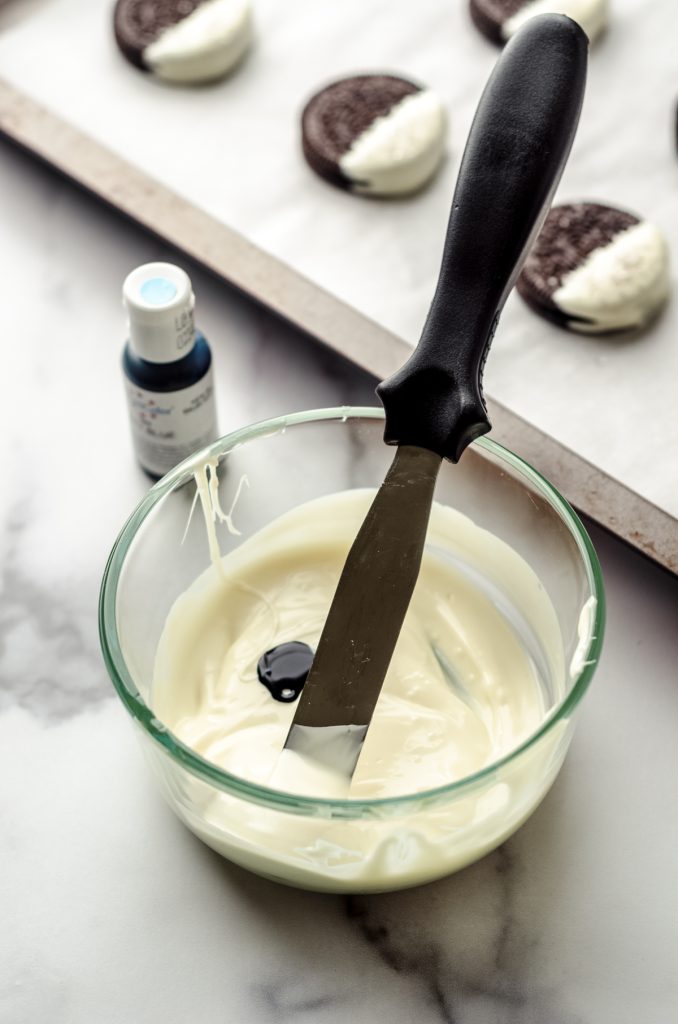
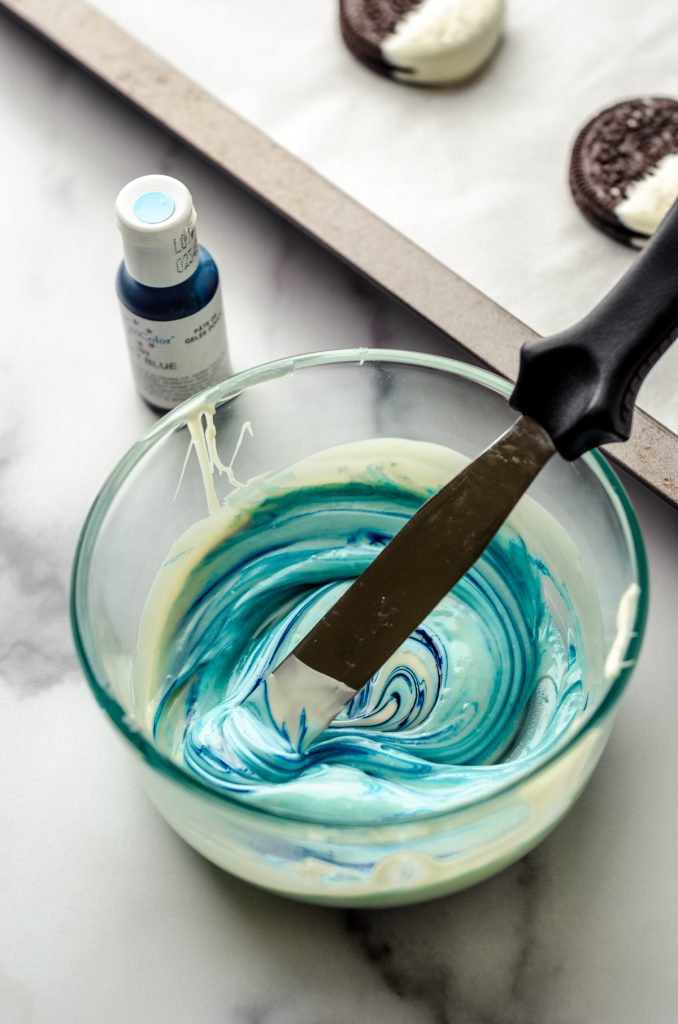
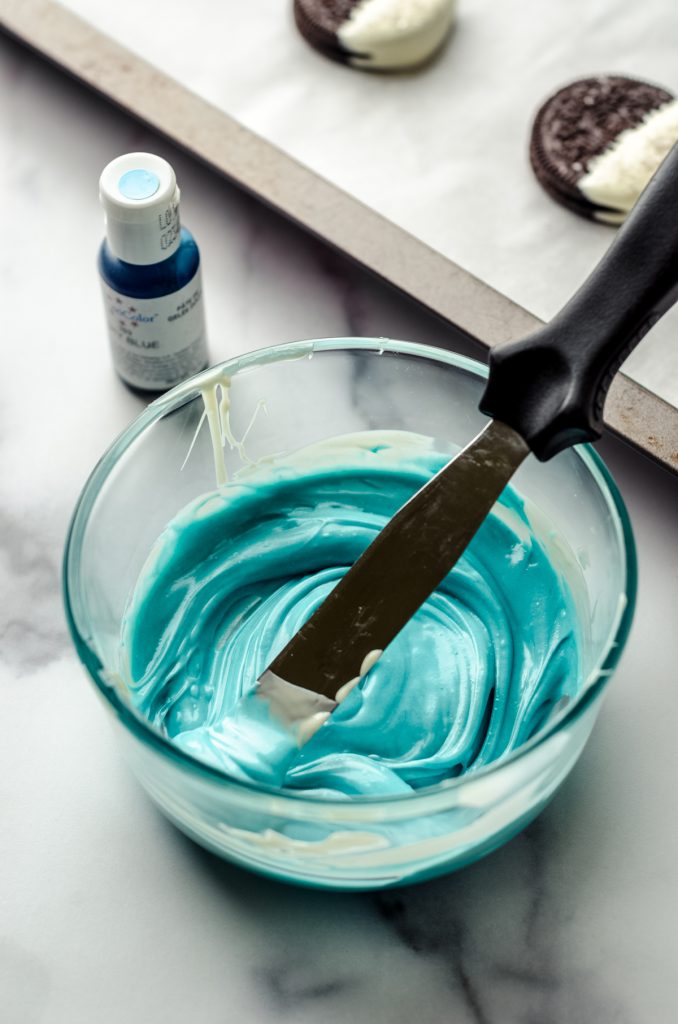
This method cuts down on ingredients as well as the need to melt something all over again (although you will likely need to reheat the mixture to get it smooth enough to pipe, but you won’t have to start from the beginning with solid pieces).
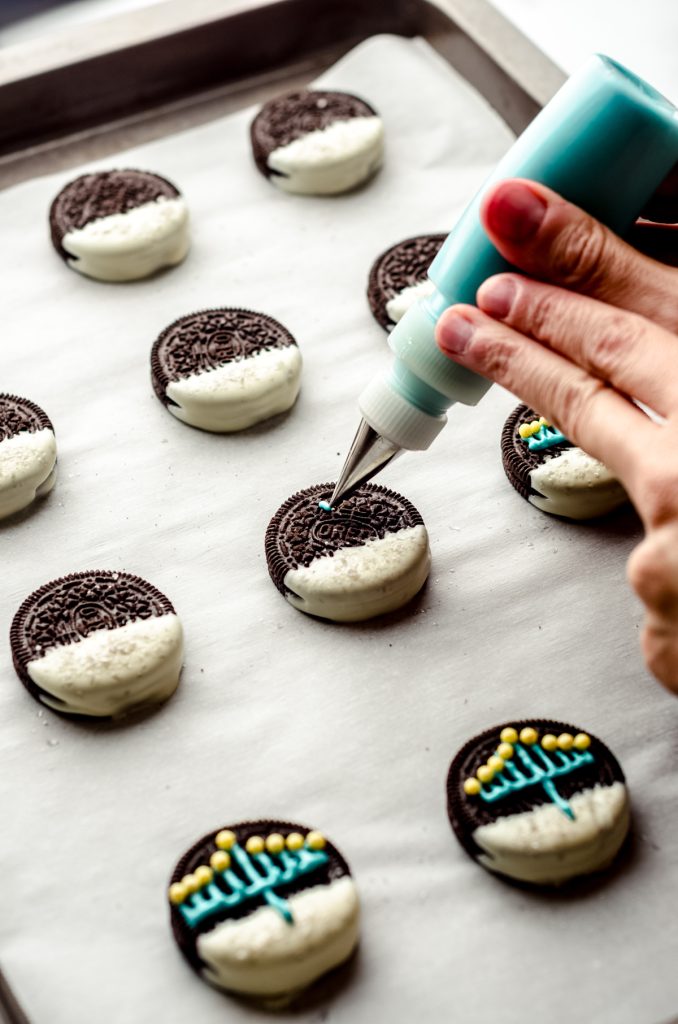
DECORATING THE DIPPED OREOS
Even if you’re a beginner when it comes to cookie decorating, I assure you that you can have great results with these simple and festive Hanukkah Oreo cookies.
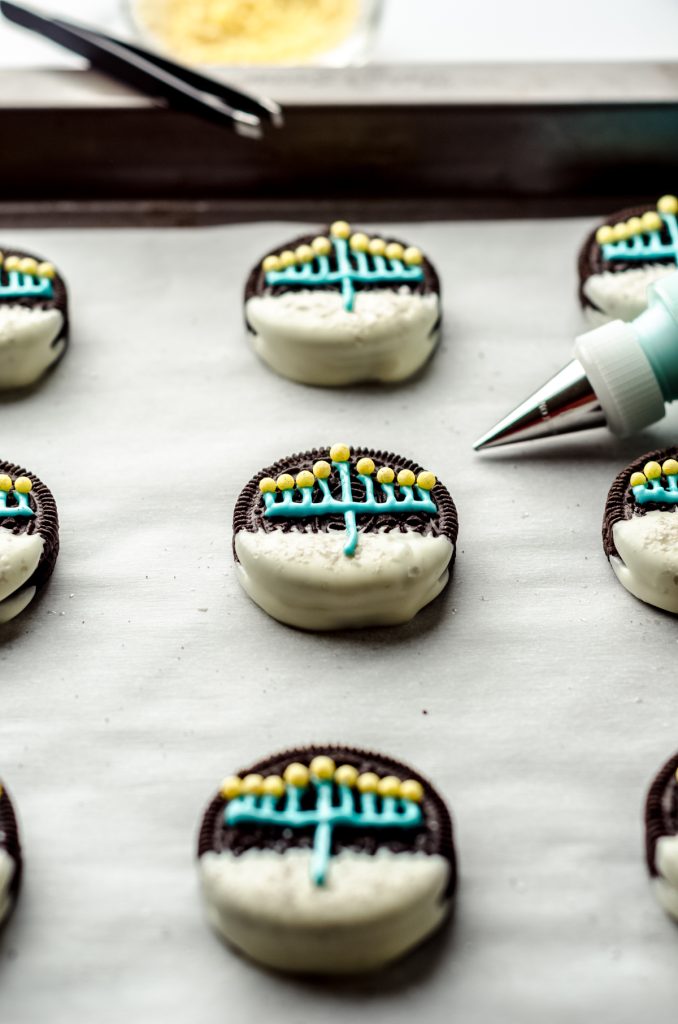
With a quick and simple piped menorah, the hardest part is lining up the “candles” to be sure they’re even on each side.
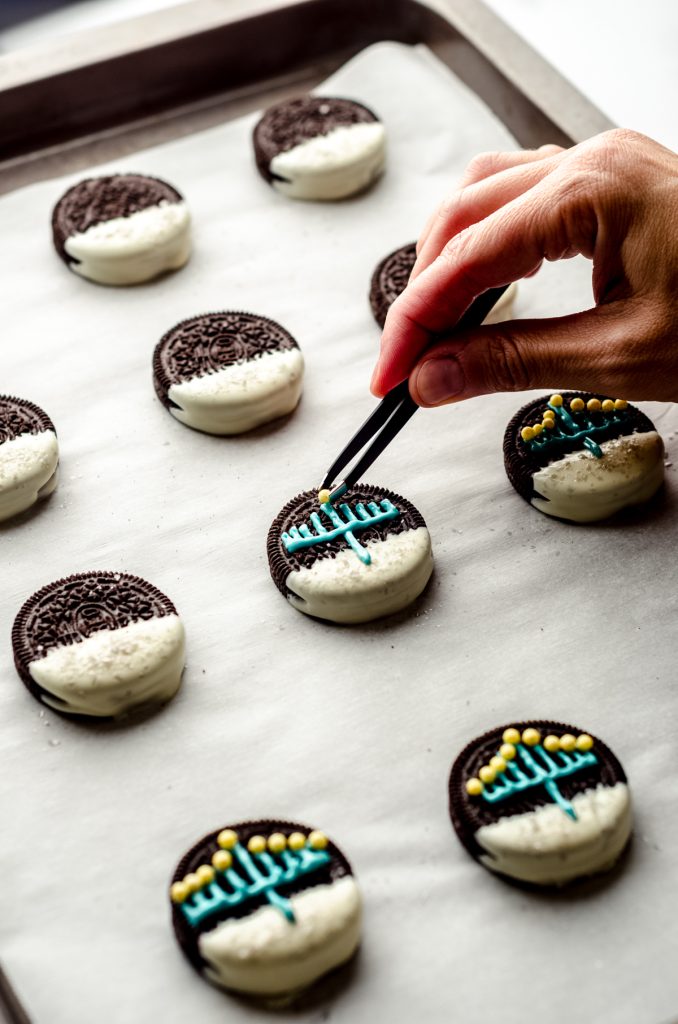
ADDING THE PIPED MENORAH
Add the melted blue candies/tinted white chocolate to a piping bag fitted with a size 2 piping tip. I found a size 1 to be too small and a size 3 to be too big. Size 2 was just right!
For an ultra easy way of decorating these Hanukkah Oreos, I suggest using a small cookie decorating bottle with a size 2 tip. This is my personal favorite way to decorate, since the bottle is small and easily controlled.
SUCCESS TIPS
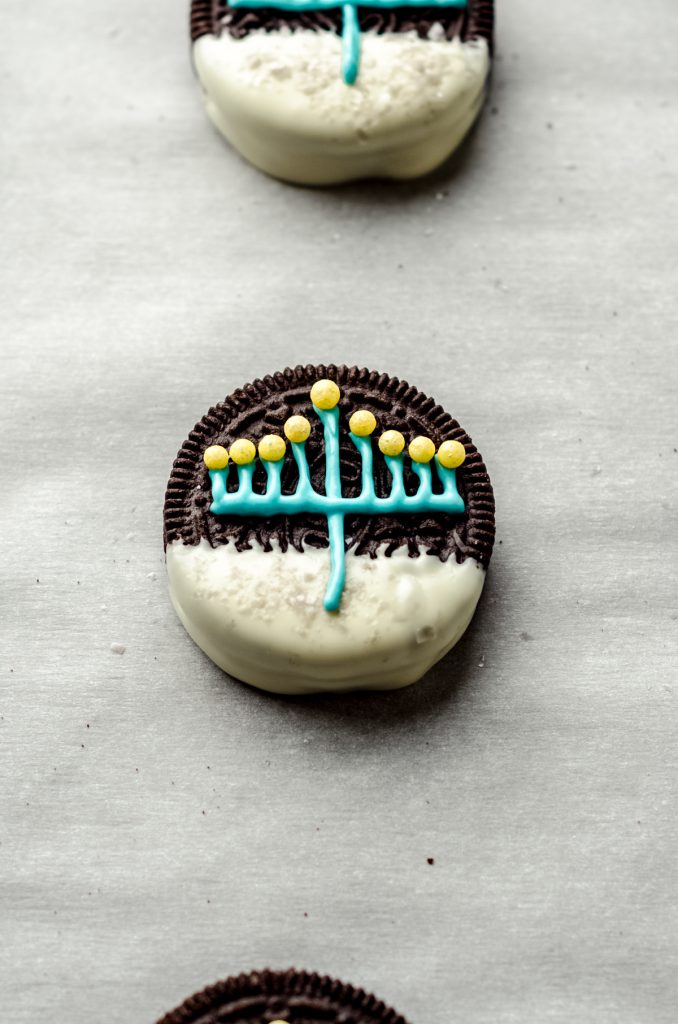
Start by creating the vertical center line of the menorah.
Then, move to the perpendicular base, putting it just below center. You’ll now have something resembling a cross/T shape.
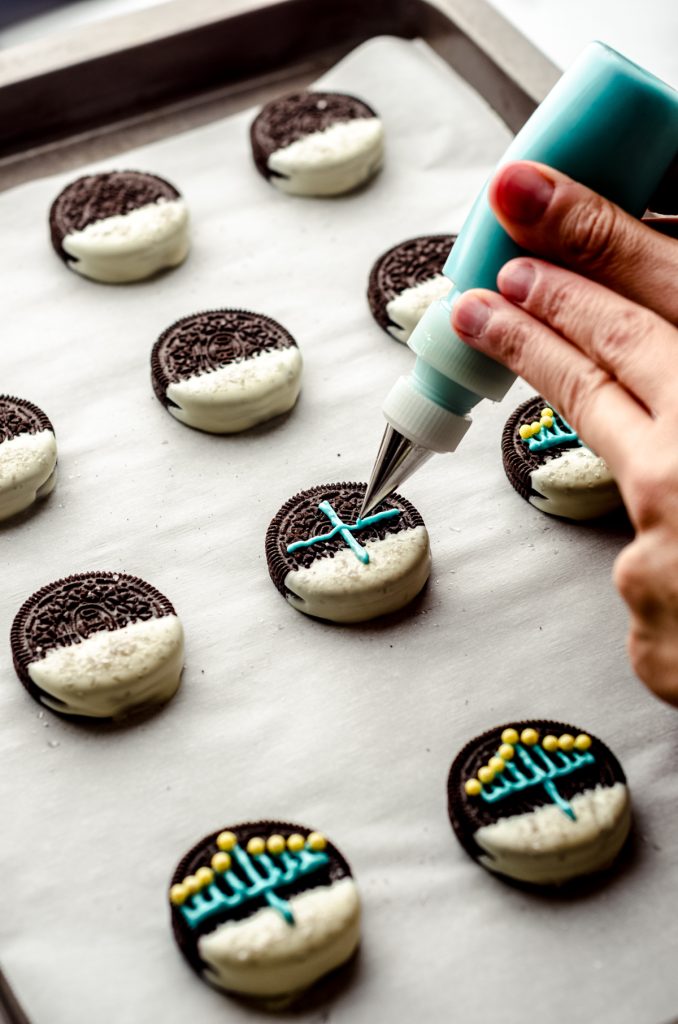
You now have the shamash (or the helper candle) so you will need to add 8 additional vertical lines to represent the candles.
From here, I found it easiest to pipe the outermost candle and work my way in, spacing them out as best as possible.
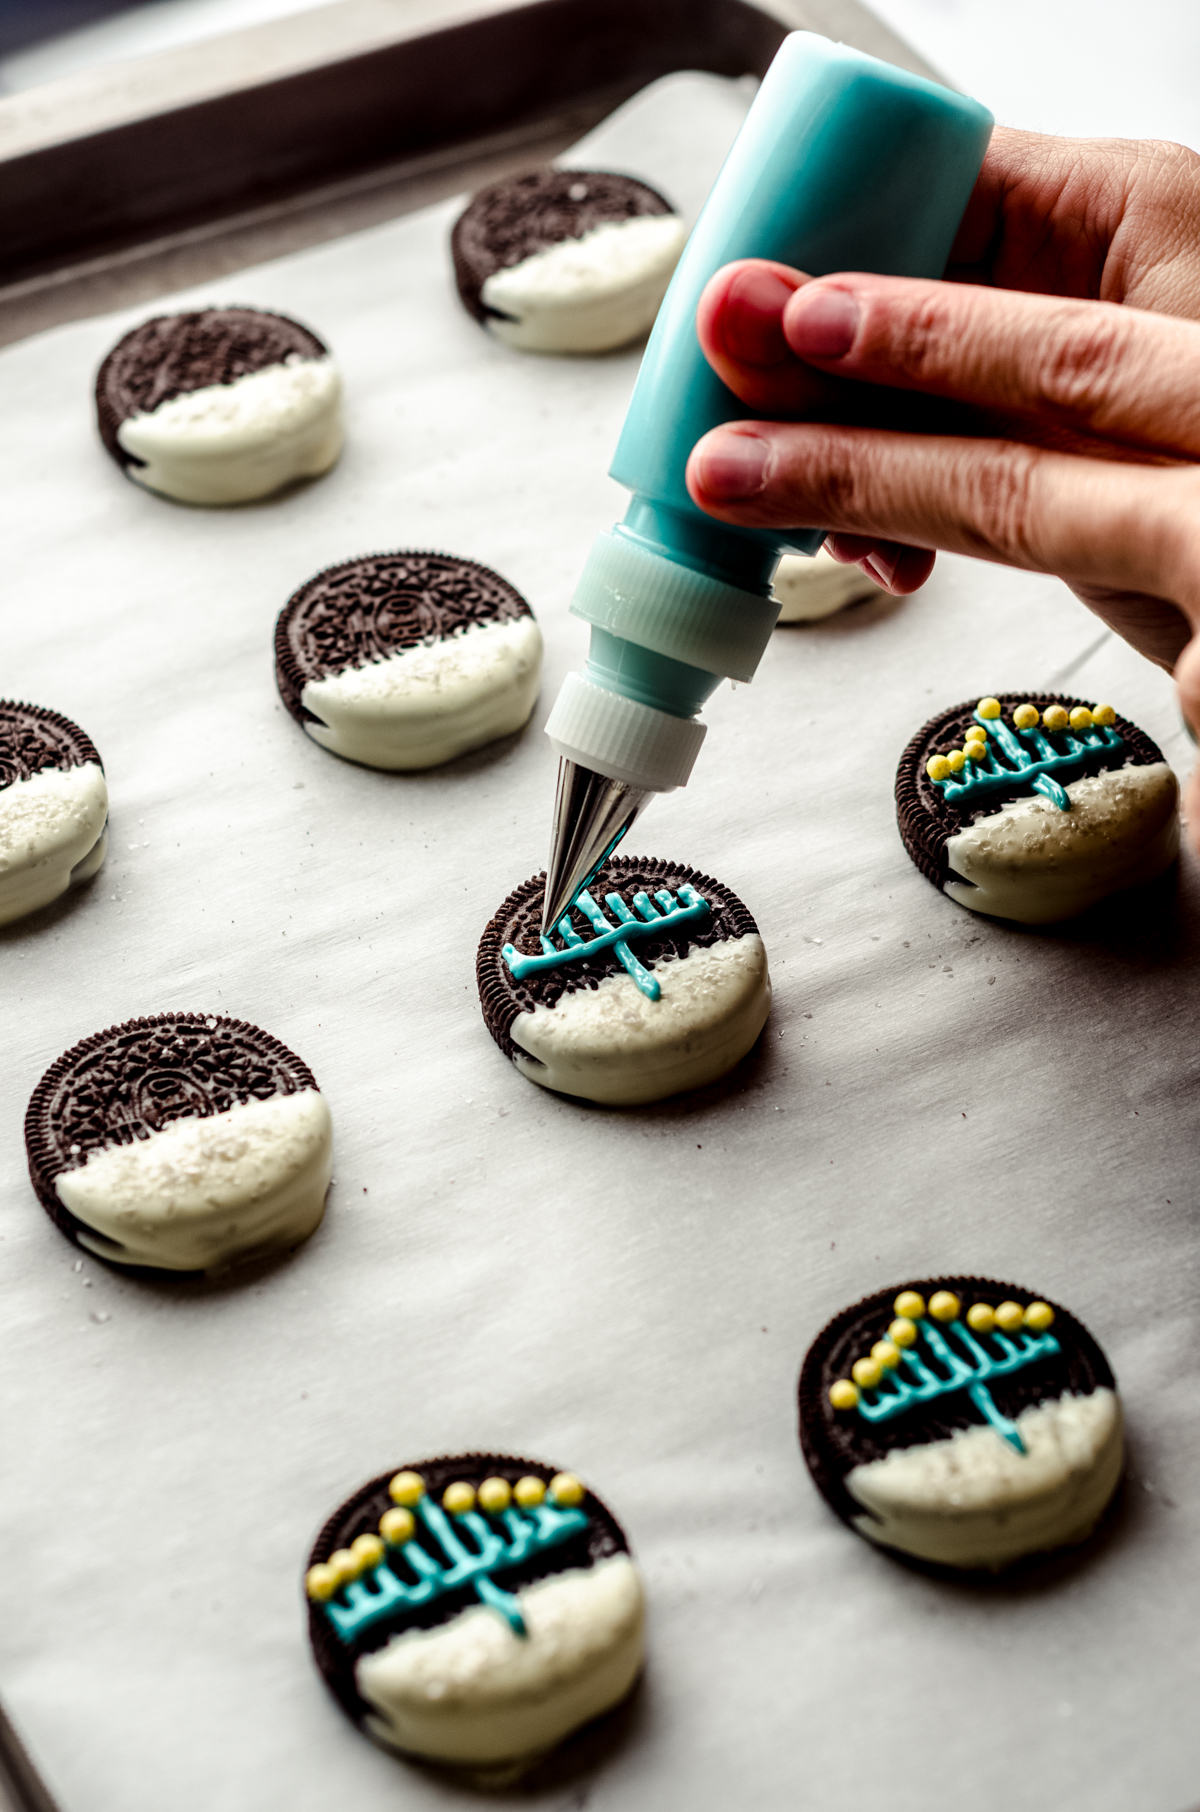
Remember when I said you’d get the hang of it after a few Oreos? Yeah, this is where you’ll find the best order for you. And remember, it doesn’t have to be perfect.
ADD OPTIONAL “FLAMES”
I had fun adding yellow candy beads to make “flames,” but you could also use yellow jimmies if you wanted to! This is totally optional, and you can even just add the flame to some of the candles to represent different days of Hanukkah.
I found the best way to get that candy bead onto the candles was with clean/sanitized tweezers. You can also use your fingers or small tongs.
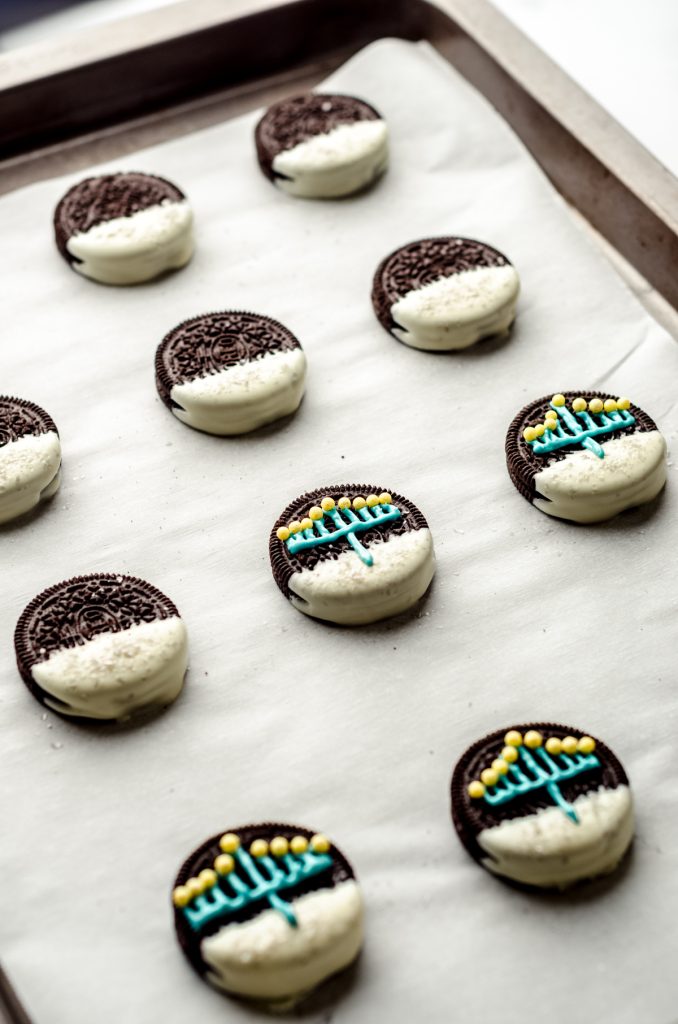
However you choose to finish off your design, be sure to allow your Oreos to harden completely before digging in and/or packing them up for gifts.
STORING YOUR HANUKKAH OREOS
Once your dipped and decorated Hanukkah Oreos are completely set, transfer them to an airtight container and store them at room temperature for up to 2 weeks.
PACKAGING IDEAS FOR GIFTING
Whether you’re making Hanukkah Oreos for loved ones, or just to enjoy in your own home, a little festive packaging can go a long way.
You can add your dipped and decorated cookies to a mason jar tied with ribbon, a classic cookie tin (reusable or recyclable), or a simple treat bag with a plastic window. Don’t forget an adorable printable tag (free download)!
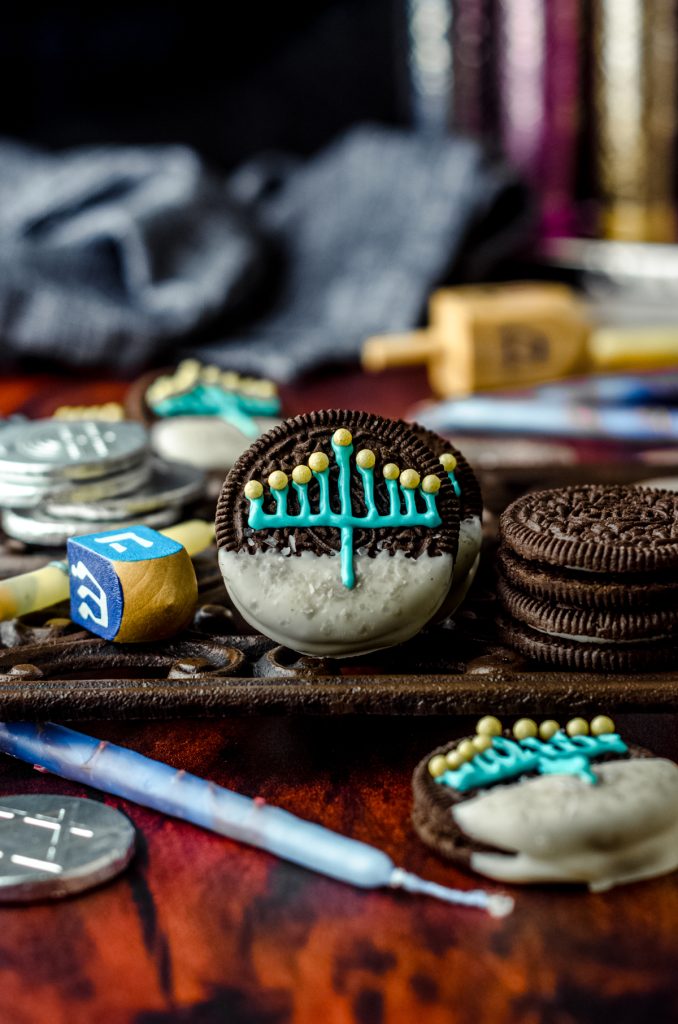
Get creative, and store and gift these delicious cookies any way you like!
MORE NO BAKE HOLIDAY TREATS FROM FRESH APRIL FLOURS

Hanukkah Oreos
Ingredients
- 4 ounces white chocolate or white candy melts
- 12 Oreos1
- edible glitter/sparkles2 optional
- 2 ounces blue candy melts3
- yellow or gold beads or stars4 optional
Instructions
- Line a large baking sheet with parchment paper or a silicone baking mat. Set aside.
- Melt the white chocolate or white candy melts in the microwave in a small, shallow microwave safe cup or bowl, or in a double boiler, until smooth. If you used a double boiler, add the melted white chocolate to a small, shallow cup or small bowl. Set aside.4 ounces white chocolate or white candy melts
- Working with one Oreo at a time, dip the bottom half of one Oreo into the white chocolate, then lay on the prepared baking sheet. Sprinkle the edible cake sparkles onto the white chocolate then allow to harden (about 15 minutes).12 Oreos1
- When the white chocolate is set, melt the blue candy melts2 in the microwave in a small microwave safe bowl, or in a double boiler, until smooth.2 ounces blue candy melts3
- Add the melted blue candies to a piping bag with just a very tiny bit of the corner snipped off, a piping bag fitted with a size 2 piping tip, or my favorite option, a small cookie decorating bottle fitted with a size 2 piping tip.
- Start by making one line down the center of the Oreo, then a perpendicular line through the middle to make the outline of the menorah (see photos in the post above for more detailed visuals). Add 8 additional lines along the midline to make the "candles" of the menorah, then add decorations4. I only do menorahs on one Oreo at a time because the lines start to set quickly, so I want to make sure the decorations will stick. Allow cookies to set completely before serving or packaging5 to gift. Store leftovers at room temperature up to 2 weeks. Oreos freeze well, up to 2 months, but Oreos will lose a bit of their crunch. Wrap tightly, then thaw at room temperature in a single layer.yellow or gold beads or stars4
Notes
- Oreos: you can use any kind of Oreos here (Christmas, traditional, DoubleStuf).
- Edible glitter/sparkles: this is optional, but makes a nice winter touch. You can find some in the cake decorating aisle of any craft store or on Amazon.
- Blue candy melts: you could also use white chocolate or white candy melts and tint it blue. I actually used 6 ounces of white chocolate and just tinted the white chocolate blue after I was done dipping. I prefer gel coloring for tinting white chocolate– AmeriColor is my favorite!
- Beads/stars: this is totally personal preference and based upon whether or not you can find said decoration.
- Packaging: you can add your dipped and decorated cookies to a mason jar tied with ribbon, a classic cookie tin (reusable or recyclable), or a simple treat bag with a plastic window.
Nutrition Disclosure
All nutritional values are approximate and provided to the reader as a courtesy. Changing ingredients and/or quantities will alter the estimated nutritional calculations.
This is such a cute idea, perfect for our Chrismukkah celebrations!
Awesome, Jules! Enjoy!
These are adorable. I made them for my neighbor and she loved them! My menorahs weren’t perfect, but they did get better as I went along.
They are not super easy, but practice does make perfect 🙂
Lynn, these cookies were so fun to make with my grown kids! Oreos are always yummy but the design is what makes them stand apart. Thank you!
You are so welcome!
I love how easy these are! Half of my family is Jewish and I am always looking for new and delicious treats to make them. I whipped up a batch of these and I was the hit the first night of Channukah!
Thanks, Jennifer! I’m so glad you made my treat to share with your family 🙂
I love these, I have been wanting to make something for our dear Jewish neighbors and just finished these today! They turned out so pretty! Thank you!
Thank you for giving them a try 🙂
Thanks for giving them a try, Minnie!
I brought these to a Hannukah dinner, and they were a big hit! Thank you for such a fun treat!
Thank you for sharing!
What a great idea! So simple and easy!
Thank you!