
Banana Pudding Cheesecake Recipe
As an Amazon Associate, I earn from qualifying purchases. Read the full disclosure here.
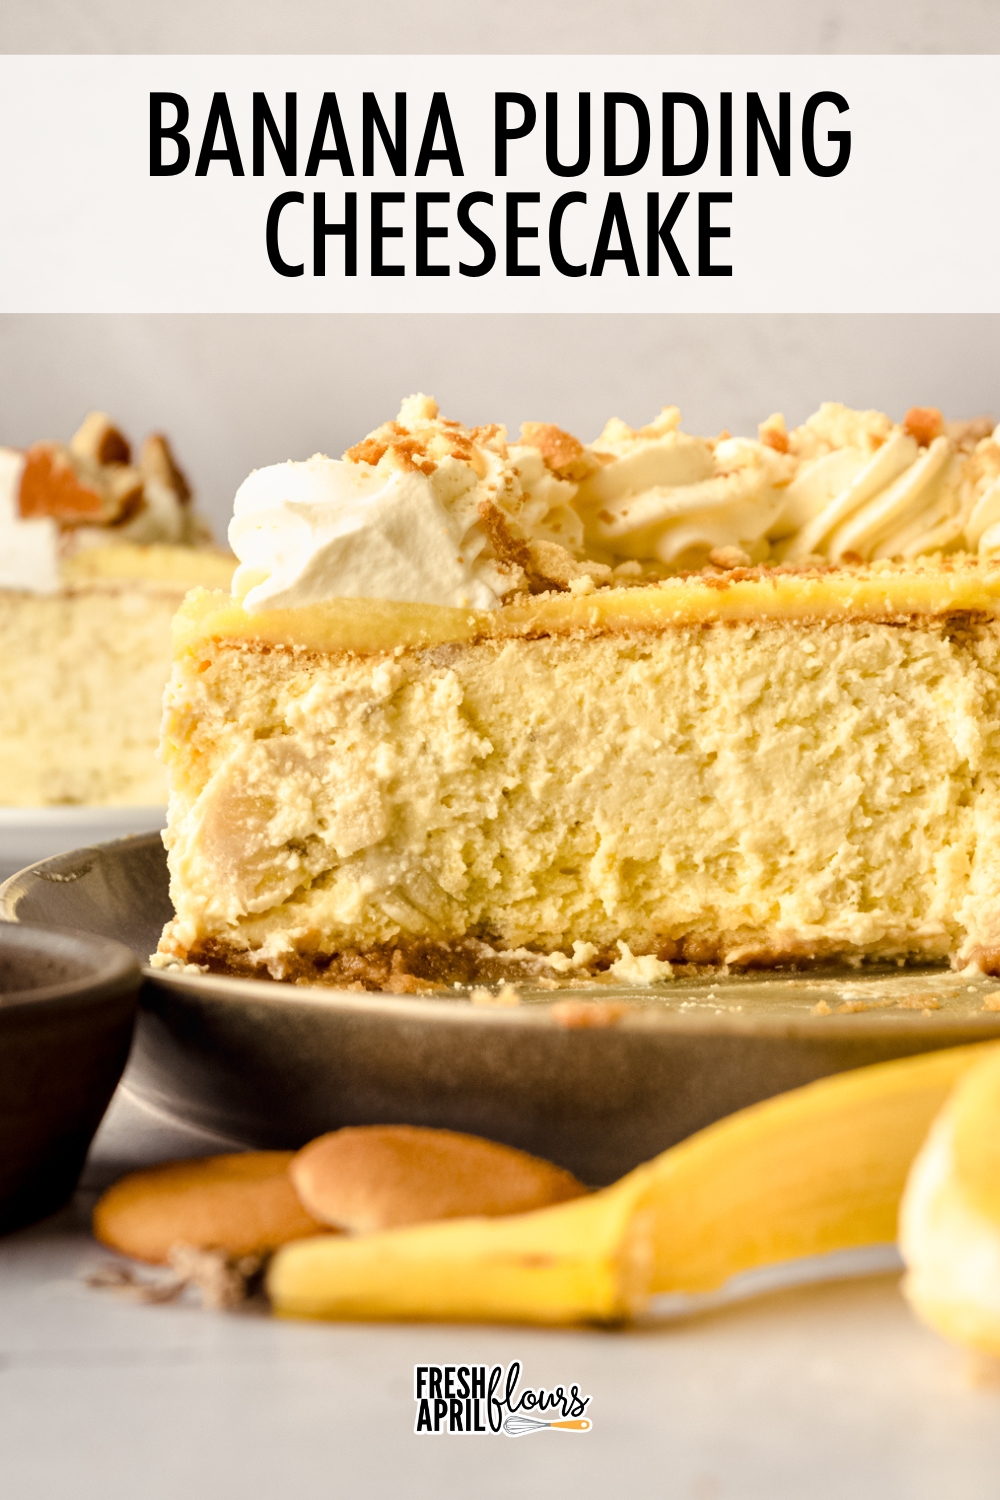
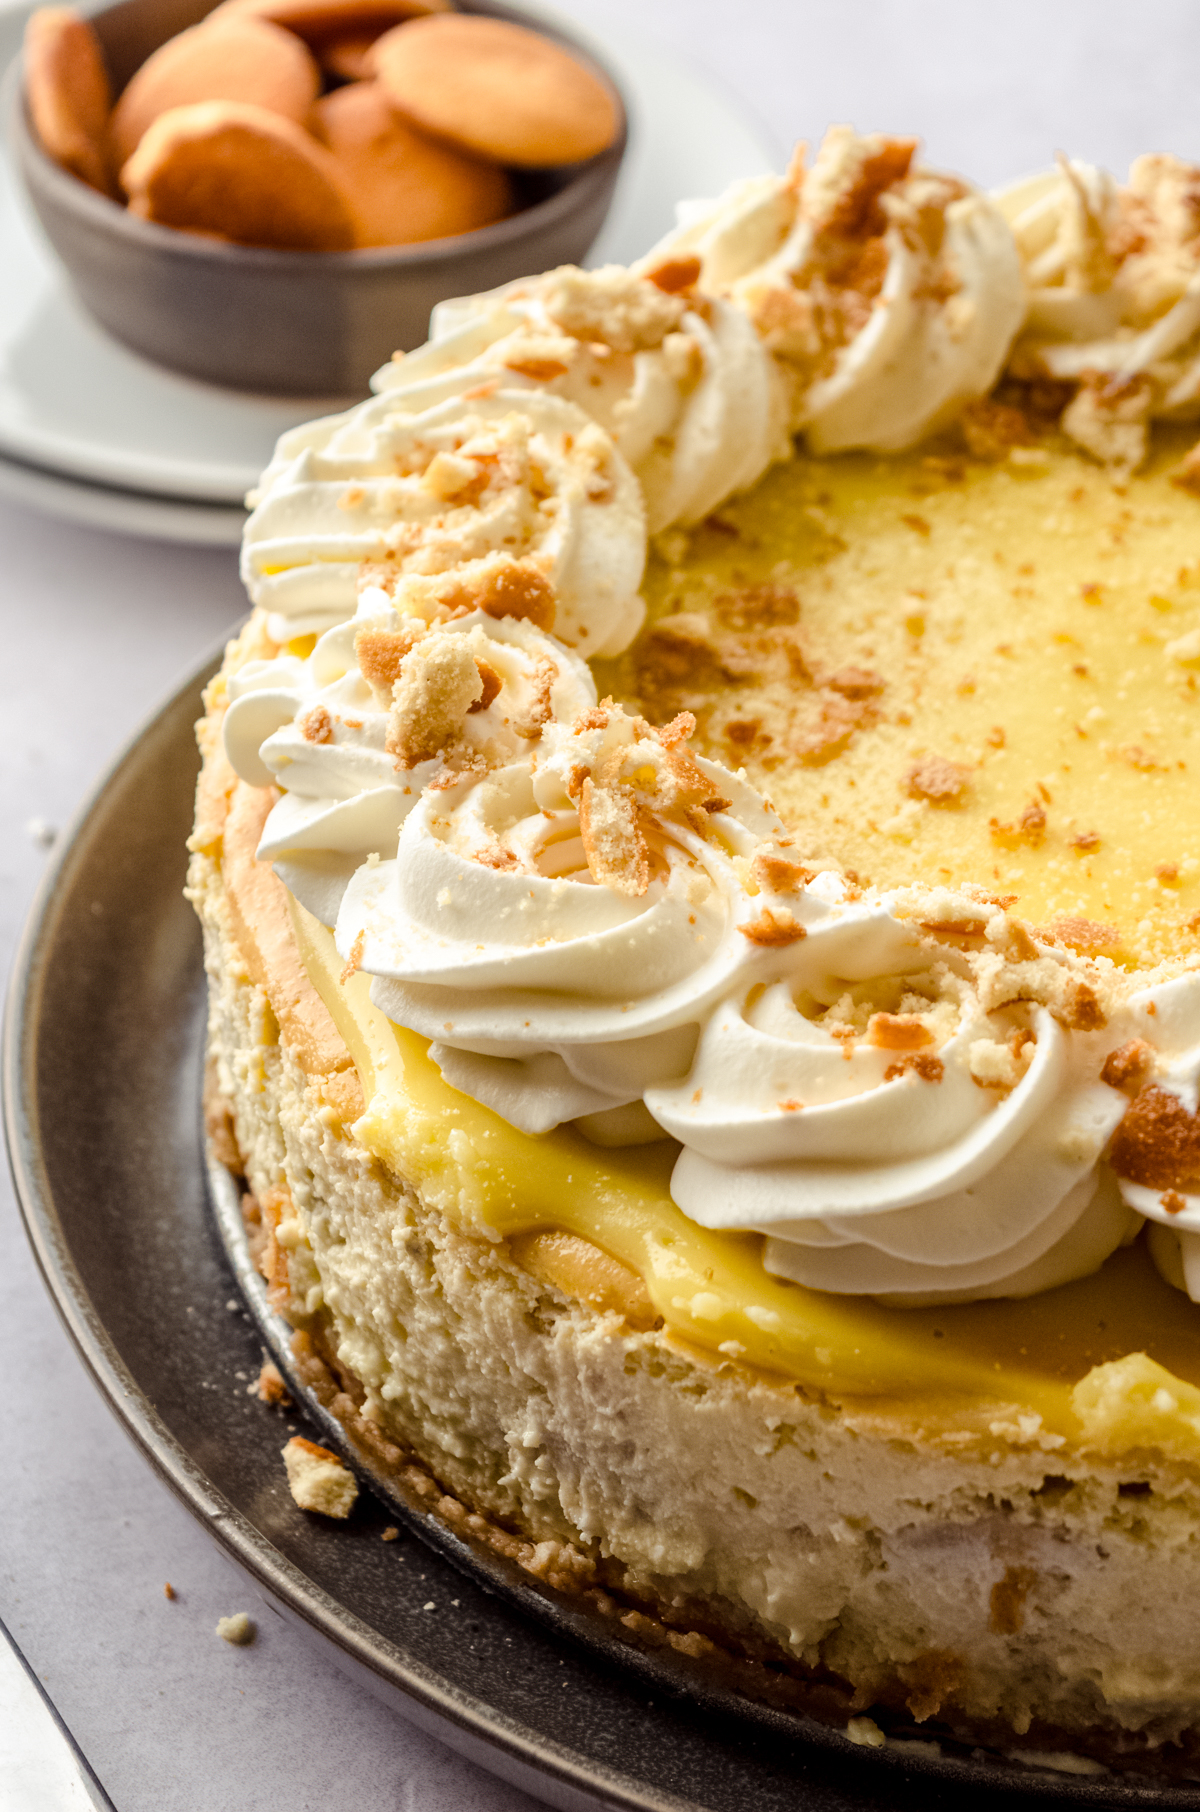
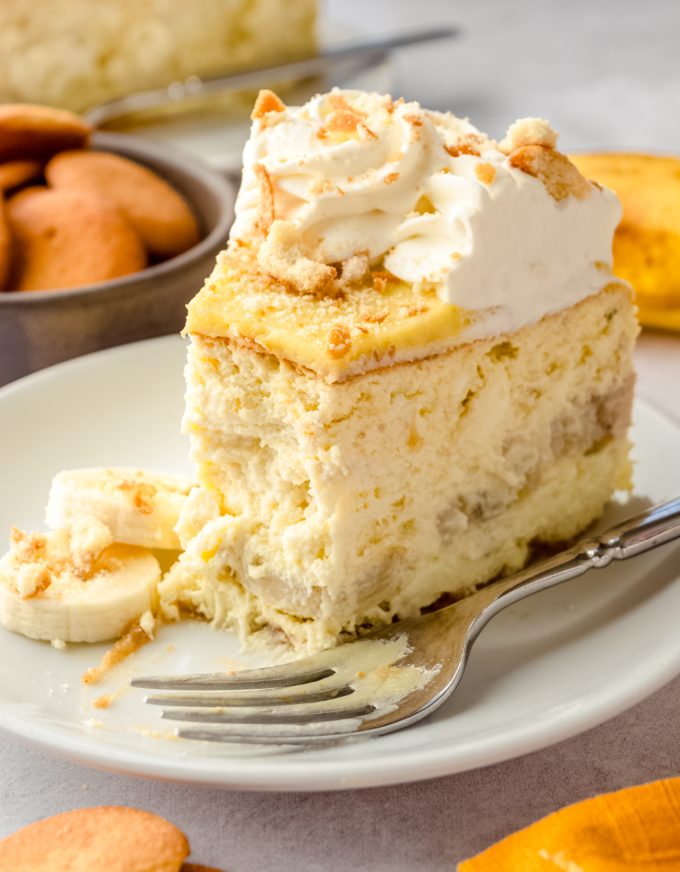
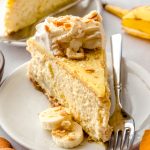
This decadent and creamy cheesecake is flavored with roasted bananas and topped with vanilla pudding, whipped cream, and crushed Nilla wafers. Use my no-foil method to make the easiest cheesecake water bath.
THIS CHEESECAKE IS LOADED WITH FLAVOR
When I tell you that my regular cheesecake taste testers went, for lack of a better term, bananas over this cheesecake, I’m not kidding. I have a pretty “usual” crew of people who get to taste everything that comes out of my kitchen, and this creamy banana pudding cheesecake got more positive feedback and desire for more slices than most things usually do.
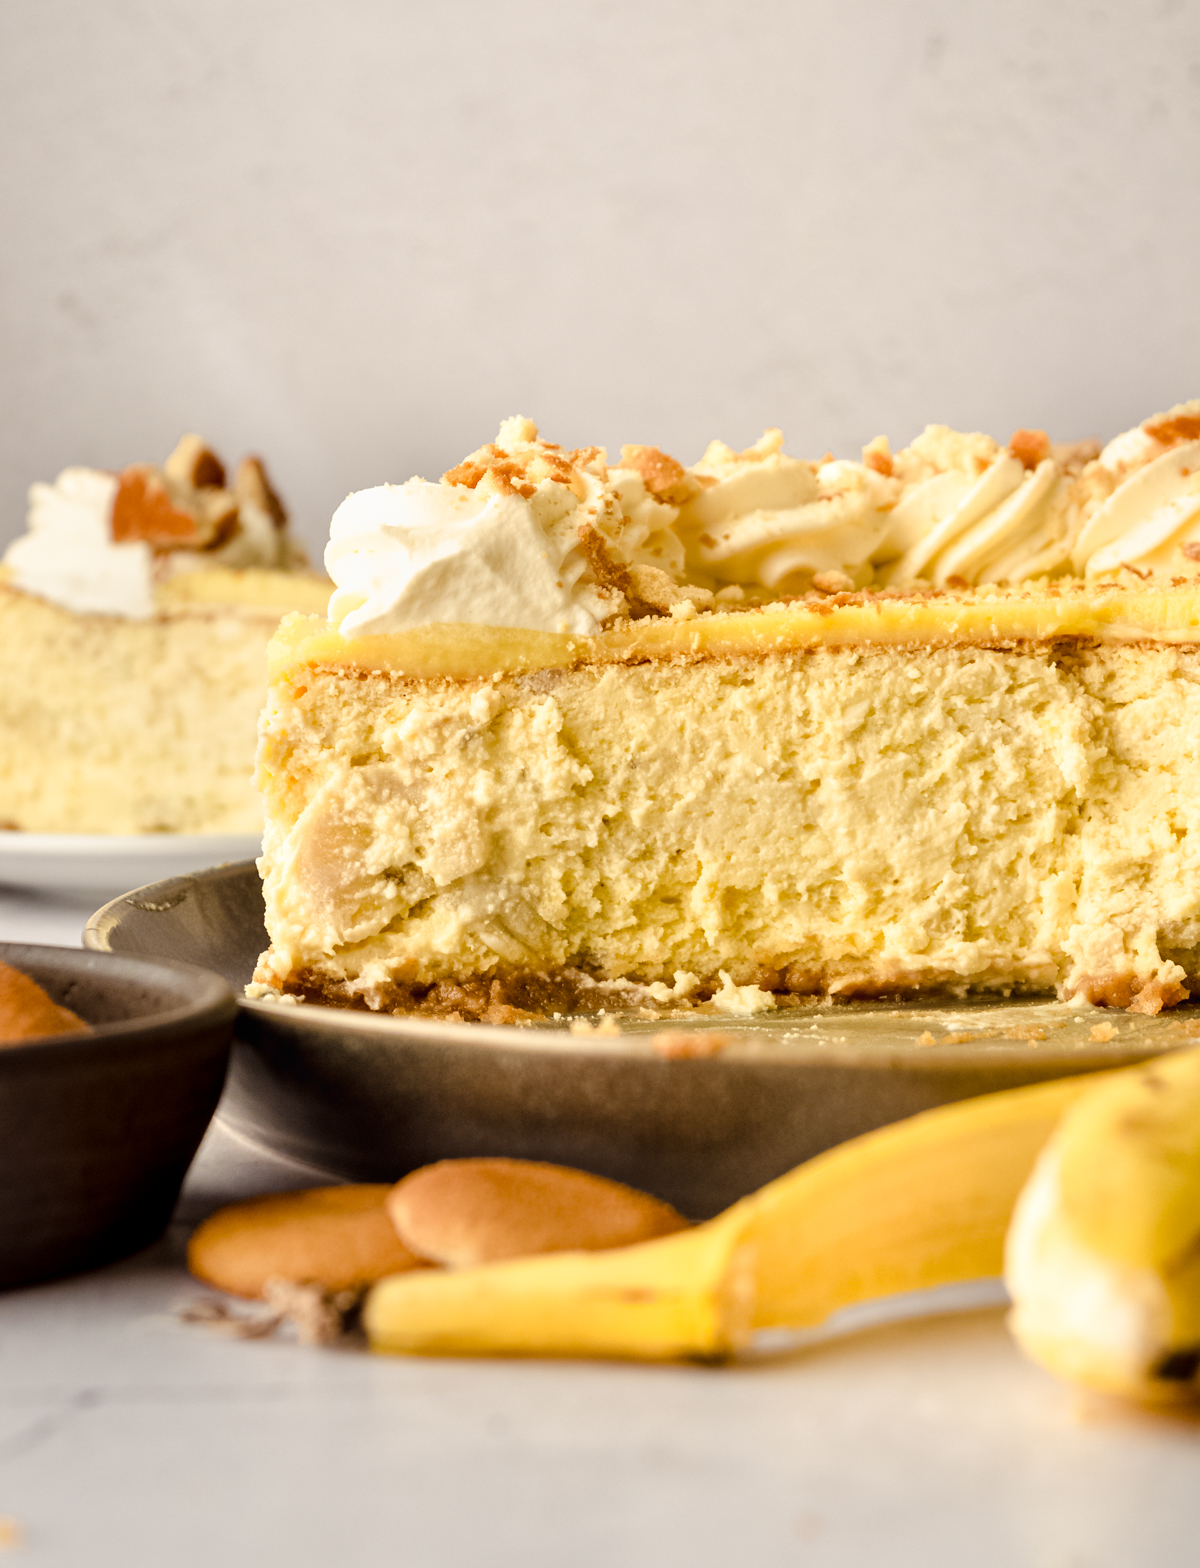
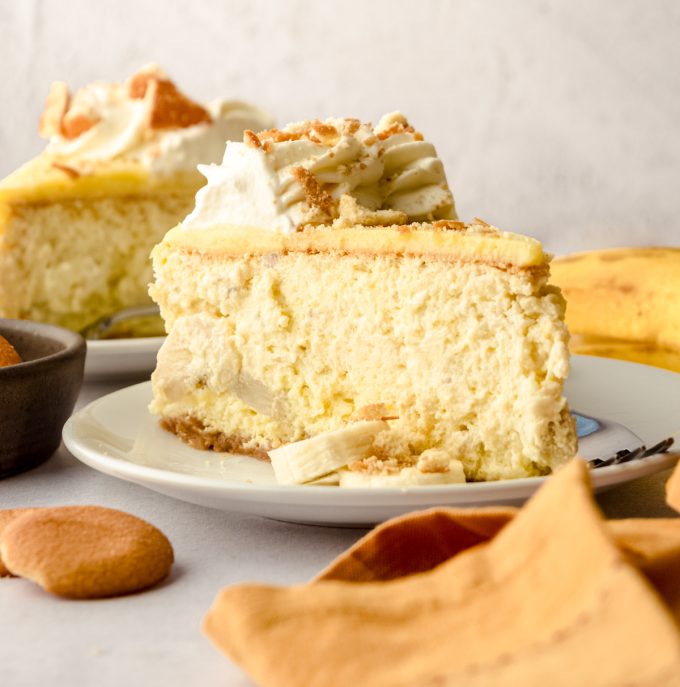
Banana pudding cheesecake is a delicious twist on a dessert classic (check out my banana pudding recipe!), featuring layers of creamy banana-infused cheesecake, with a layer of fresh banana slices, all baked in a Nilla Wafer crust.
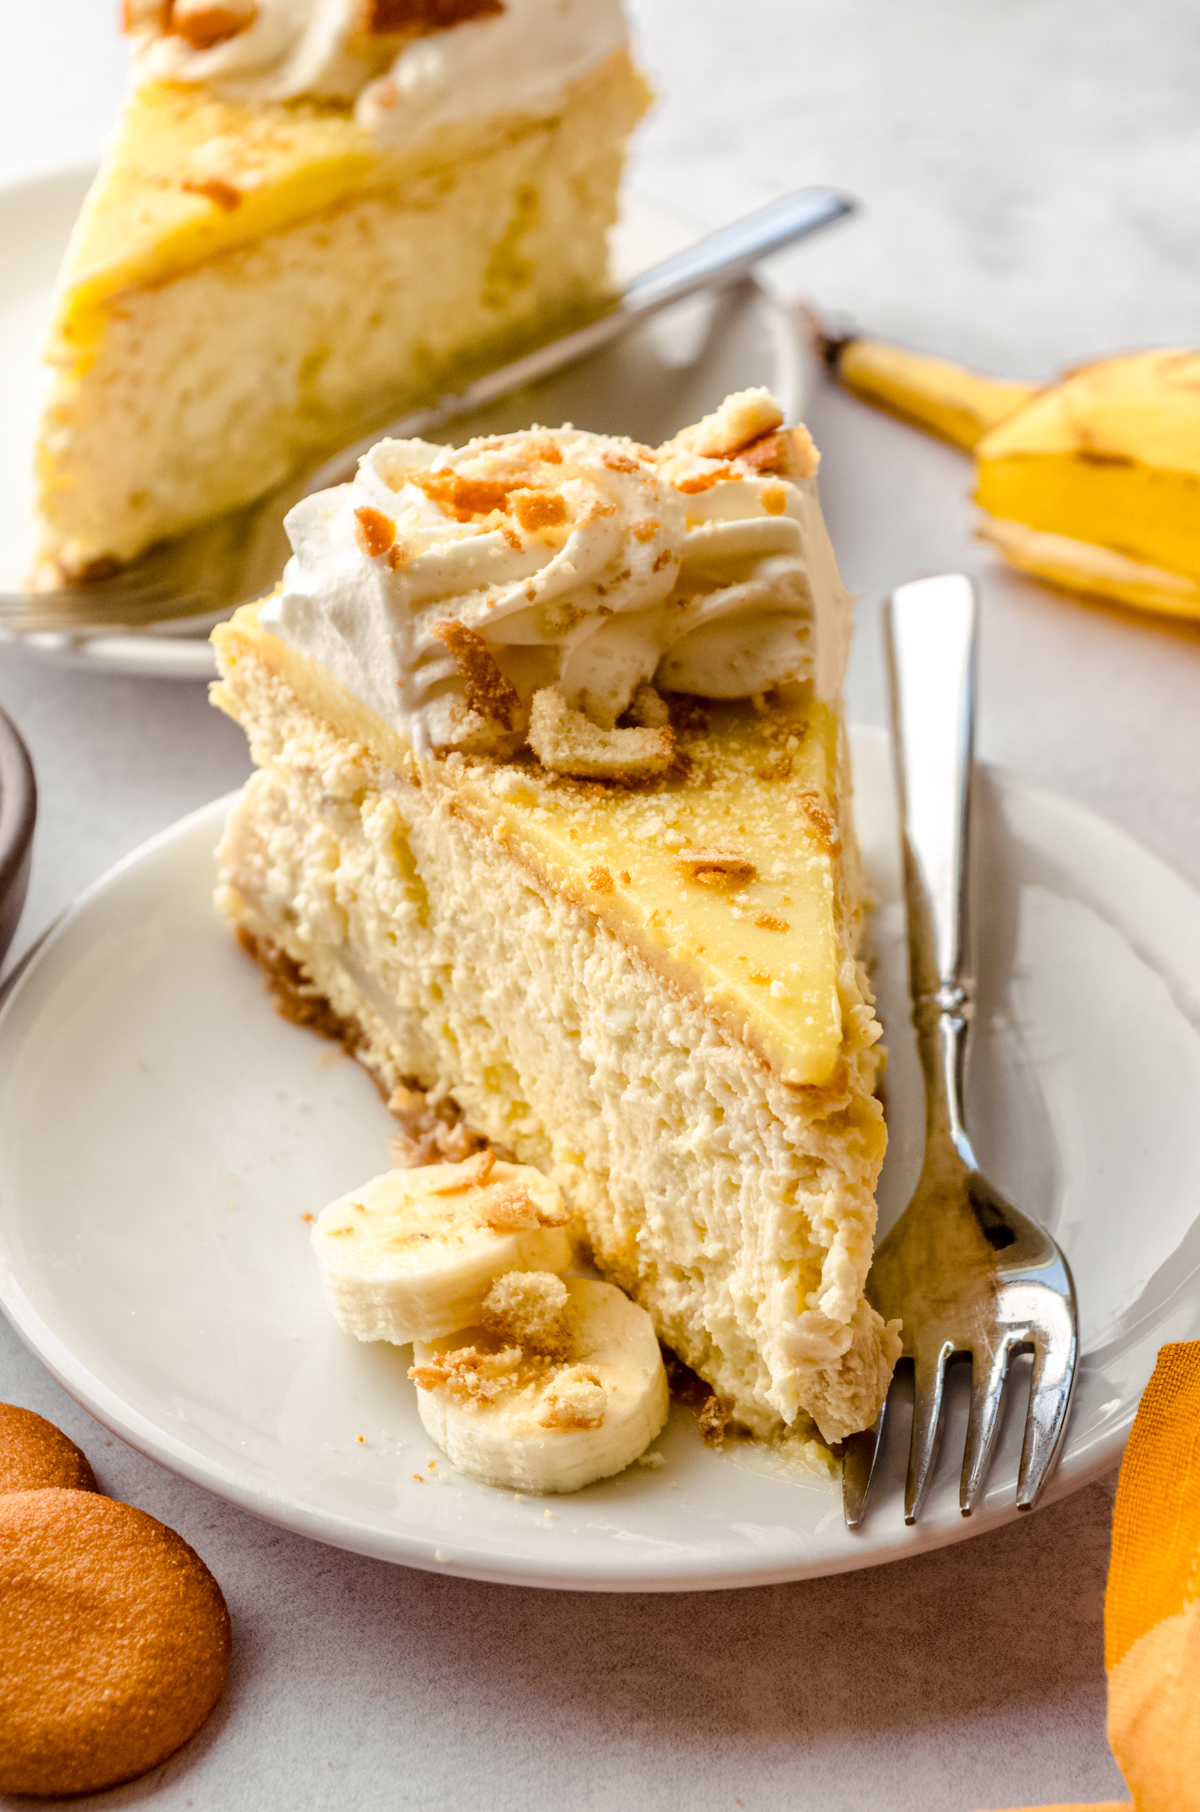
The entire cheesecake is topped off with vanilla pudding, fresh whipped cream, and more crushed Nilla Wafers. Each component has been thoughtfully tested to bring you the ultimate banana pudding cheesecake that I can promise will impress the heck out of all of your tasters!
Banana Cheesecake Recipe Ingredients
ROASTED BANANA FILLING
While I considered adding banana extract to the creamy filling of this dessert, I wanted real authentic banana flavor. In order to maintain strong banana flavor naturally, I decided to roast the bananas which brings out a really intense flavor you just can’t get with an extract.
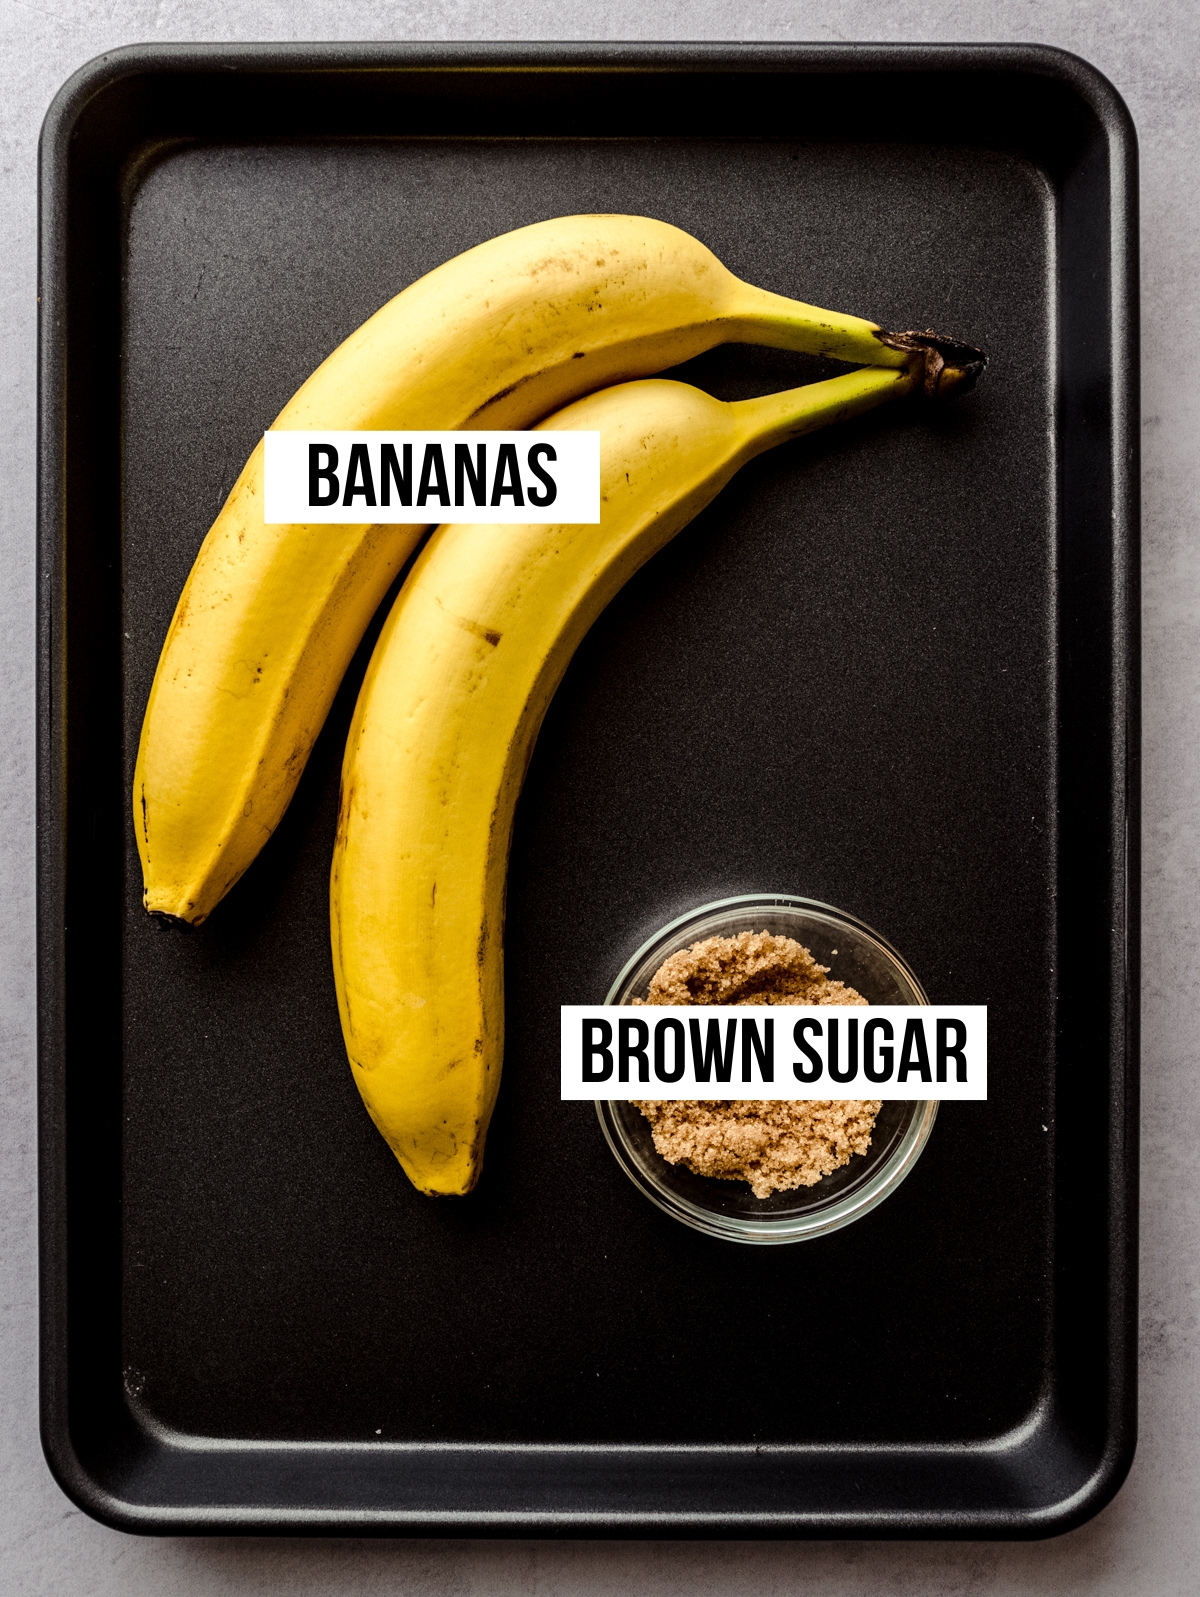
For the roasted bananas, you will need:
• bananas
• light brown sugar
NILLA WAFER CRUST
I swapped out the graham cracker crust from my classic cheesecake recipe for one made with Nilla Wafers to stay true to the format of traditional banana pudding.
For the Nilla Wafer crust, you will need:
• Nilla Wafer crumbs
• granulated sugar
• unsalted butter
CREAMY CHEESECAKE FILLING
Aside from the addition of the roasted bananas, this is the exact recipe you’ll find in my classic cheesecake recipe. It’s creamy, it’s fluffy, and it’s the perfect base for this banana pudding version. Be sure you’re using full fat blocked cream cheese and full fat sour cream in the cheesecake for the best results and creamiest texture.
For the cheesecake filling, you will need:
• full fat block cream cheese
• granulated sugar
• full fat sour cream
• vanilla extract
• large eggs
• bananas
IMPORTANT INGREDIENT NOTE
ALL INGREDIENTS AT ROOM TEMPERATURE: I cannot stress enough how important it is that you have room temperature ingredients. This will allow your batter to blend together easily, staying nice and smooth, so there is no need to over-mix the batter. I typically let my ingredients sit out for at least 1 hour but closer to 2 hours to insure they at room temperature with no chill to them. Using cold ingredients WILL yield a lumpy cheesecake.
VANILLA PUDDING LAYER
While you are welcome to make your own vanilla pudding from scratch, I prefer using a mix. Be sure you’re grabbing the instant kind and not the cook kind, unless, again, that’s your preference!
For the vanilla pudding layer, you will need:
• instant vanilla pudding mix
• milk
WHIPPED CREAM TOPPING
If you prefer, you can cut down on a few steps by using store-bought whipped cream, but I personally prefer the taste of homemade whipped cream so much more. It’s worth the extra elbow grease, always! There’s truly nothing like fresh whipped cream, and this is my go-to recipe whenever I need some.
For the whipped cream topping, you will need:
• heavy cream
• granulated sugar
• vanilla extract
HOW TO MAKE THE BEST BANANA CHEESECAKE RECIPE
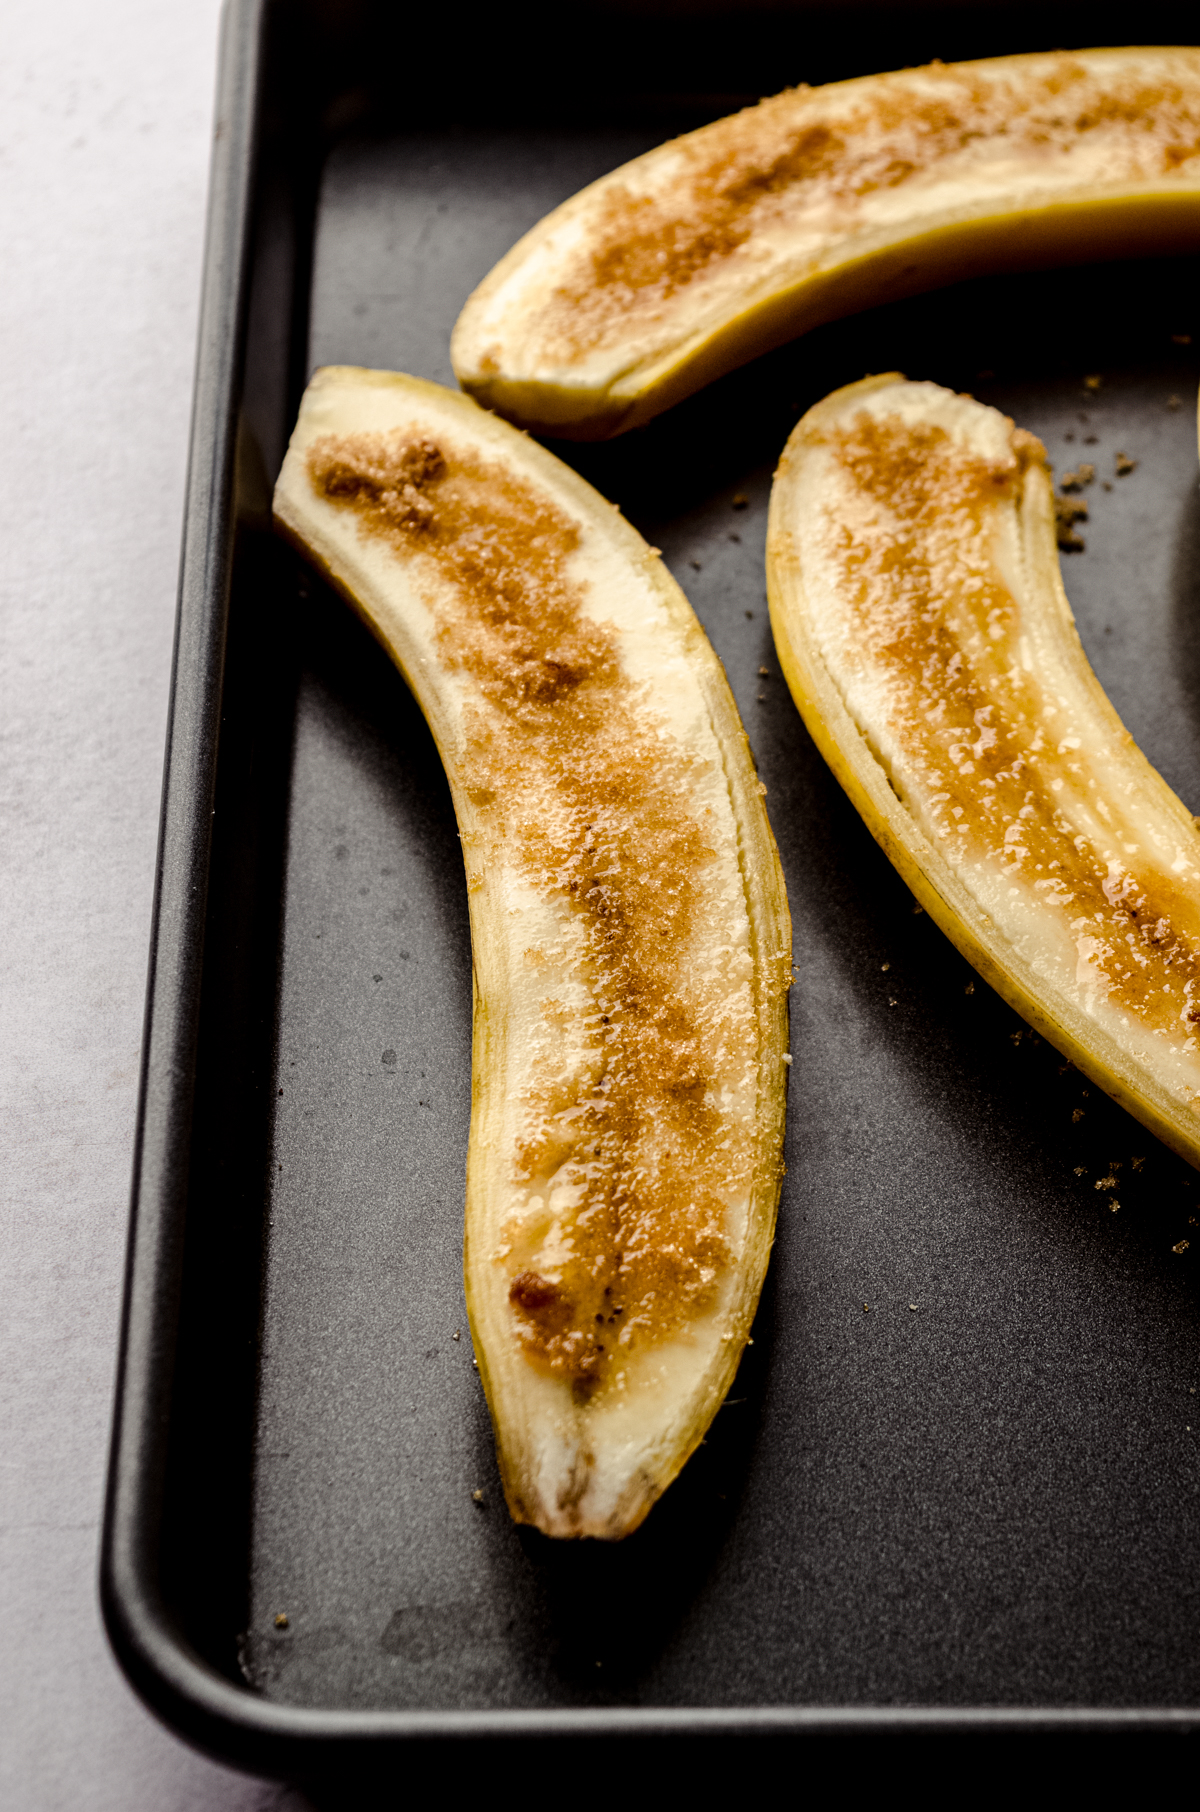
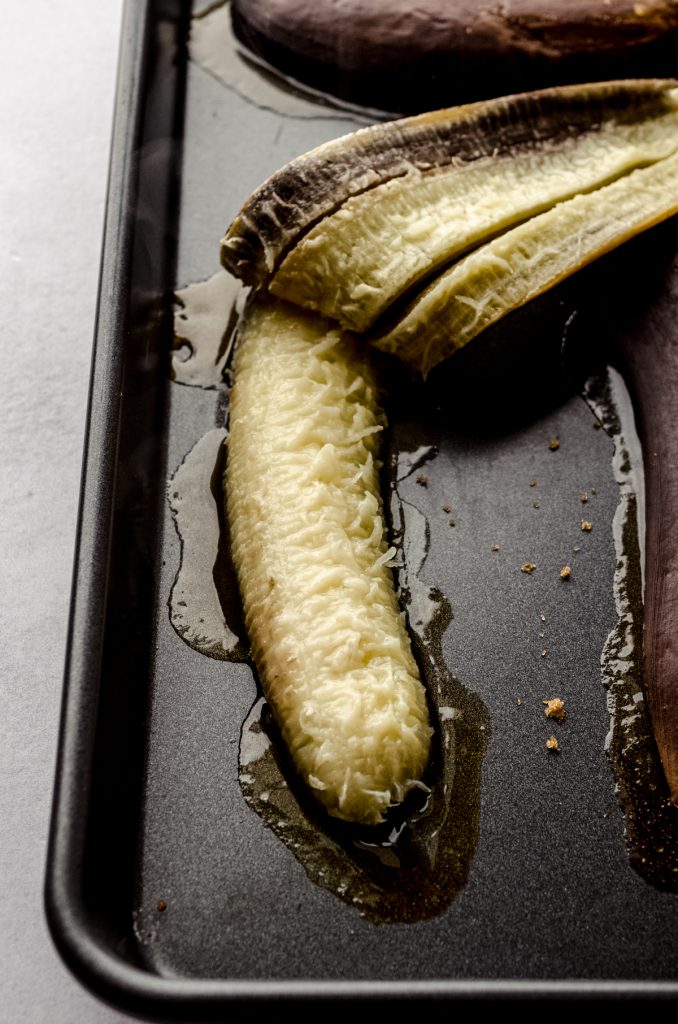
ROAST THE BANANAS
STEP #1
Prepare a small baking sheet or baking dish. You can line it with parchment paper or a silicone mat to reduce mess if you like. Set this pan aside.
STEP #2
Situate each banana so that the curved part is on a surface or cutting board and the ends are facing up. Slice each banana in half long ways, then lay the sliced bananas on the pan, exposed banana side up.
STEP #3
Sprinkle the bananas with the brown sugar and then turn each of them over so that the skins now face up and the exposed banana is on the prepared pan.
STEP #4
Roast the bananas for 10 minutes or until the skins are completely black and leaking juices from the sides. You may only need 6-8 minute for riper bananas.
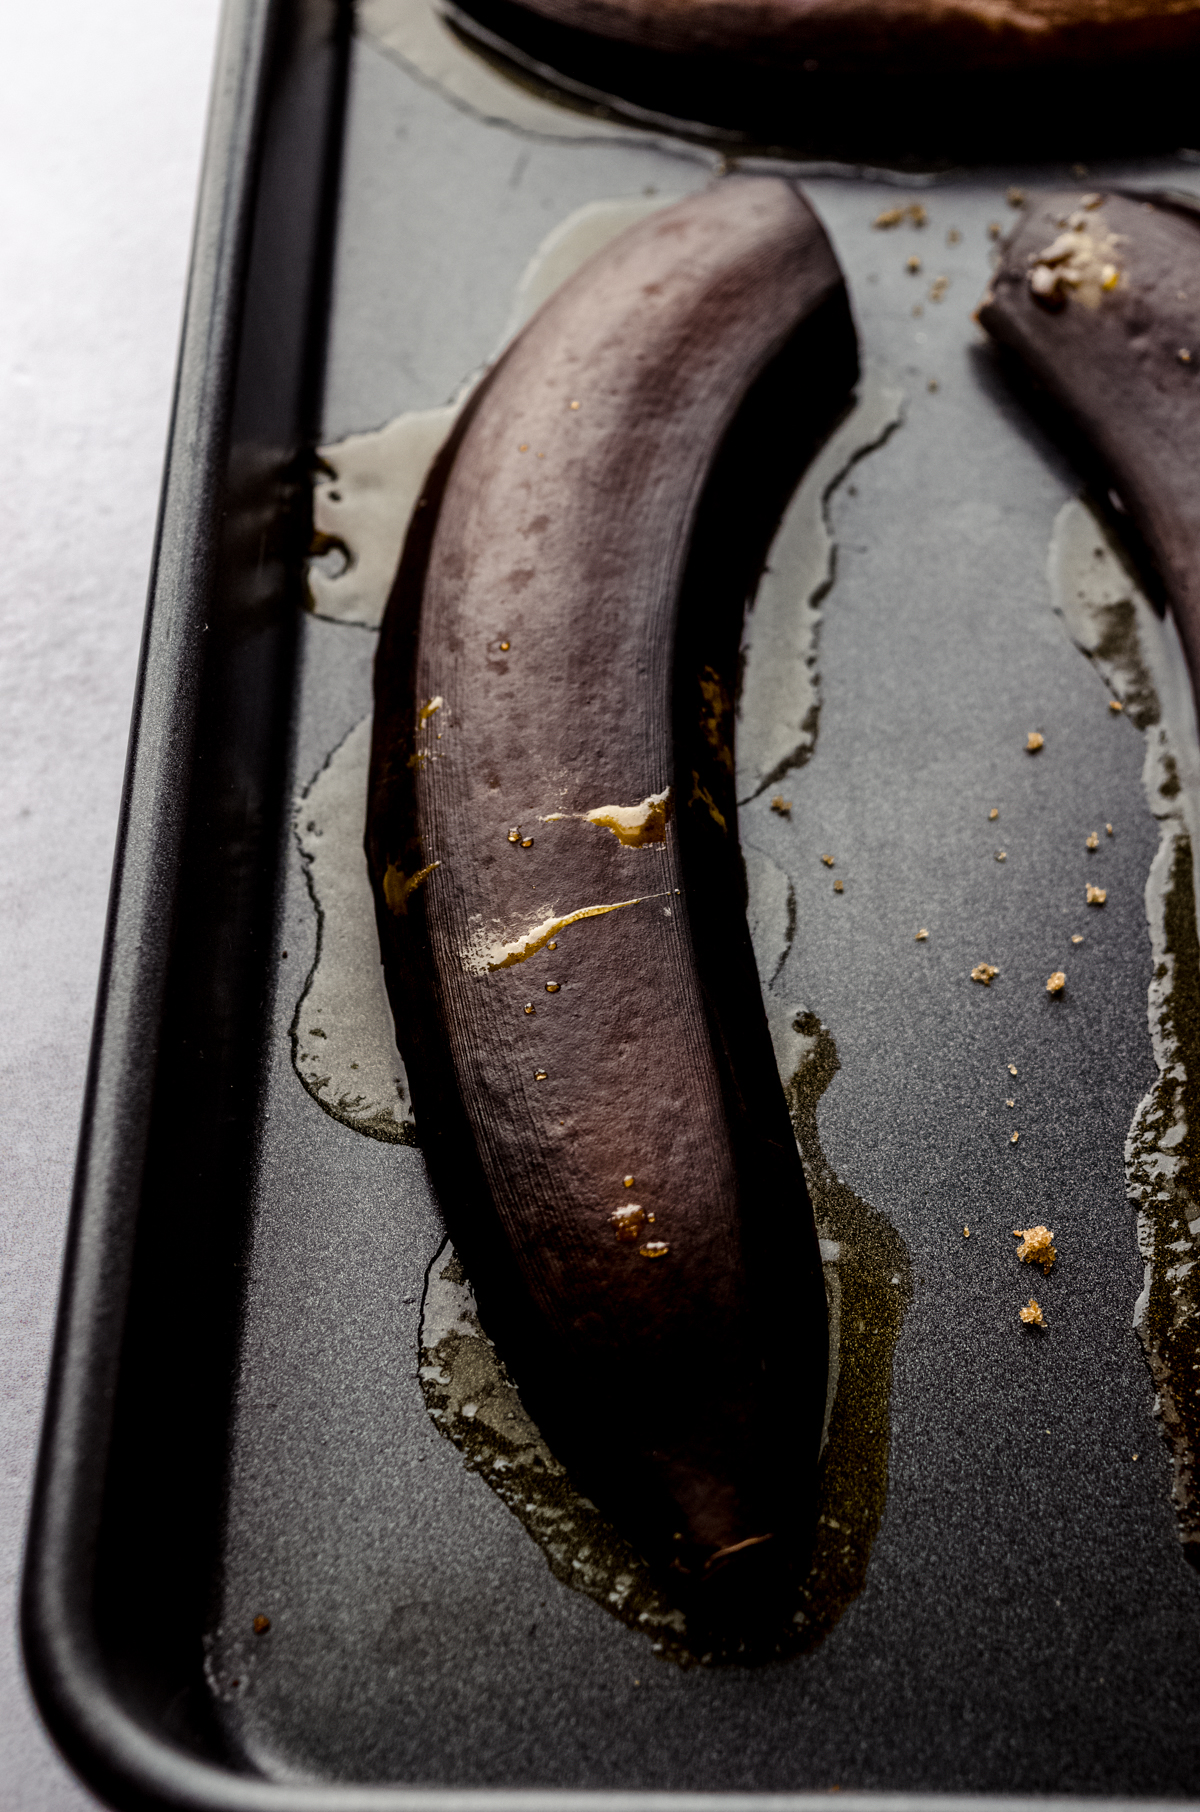
STEP #5
Remove the bananas from the oven, carefully remove the skins, and place the roasted bananas and all of the juices and caramelized sugar into a small bowl.
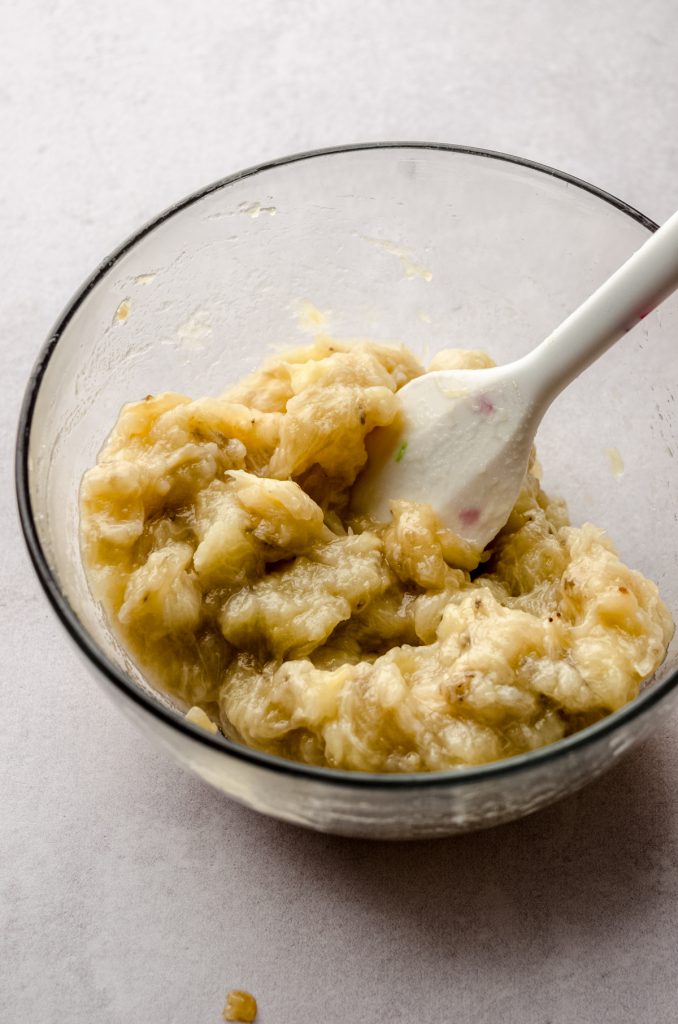
STEP #6
Mash the bananas in the bowl using a fork and set them aside to cool while you make the rest of the cheesecake.
MAKE THE CRUST
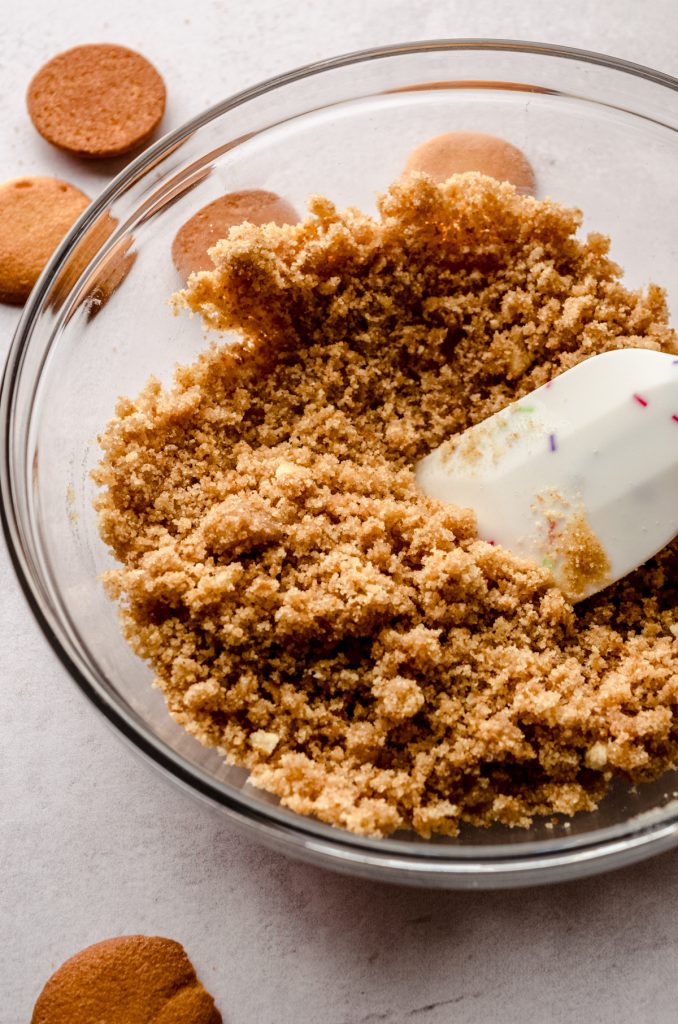
STEP #7
Using a food processor, crush the Nilla Wafers until they become a fine crumb. Pour the cookie crumbs into a large bowl, add the sugar, and stir to combine. Drizzle the melted butter over the mixture and stir until everything is evenly saturated with butter.
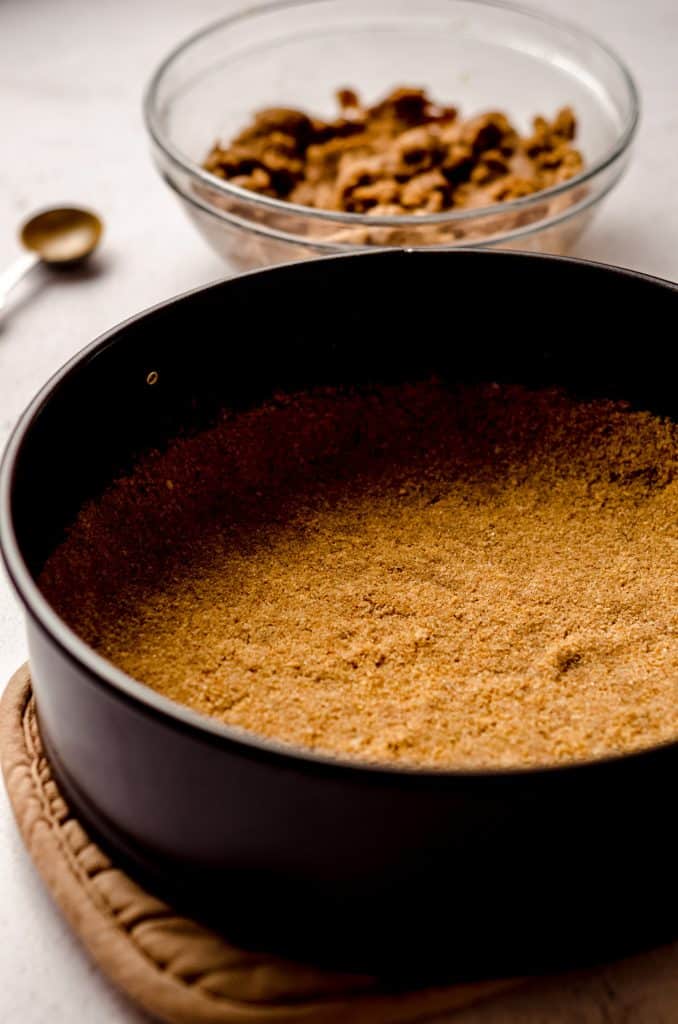
STEP #8
Press the Nilla Wafer crumb mixture into the bottom of the prepared springform pan, then bake the crust for 10 minutes. Allow the baked crust to cool while you prepare the filling.
MAKE THE CHEESECAKE FILLING
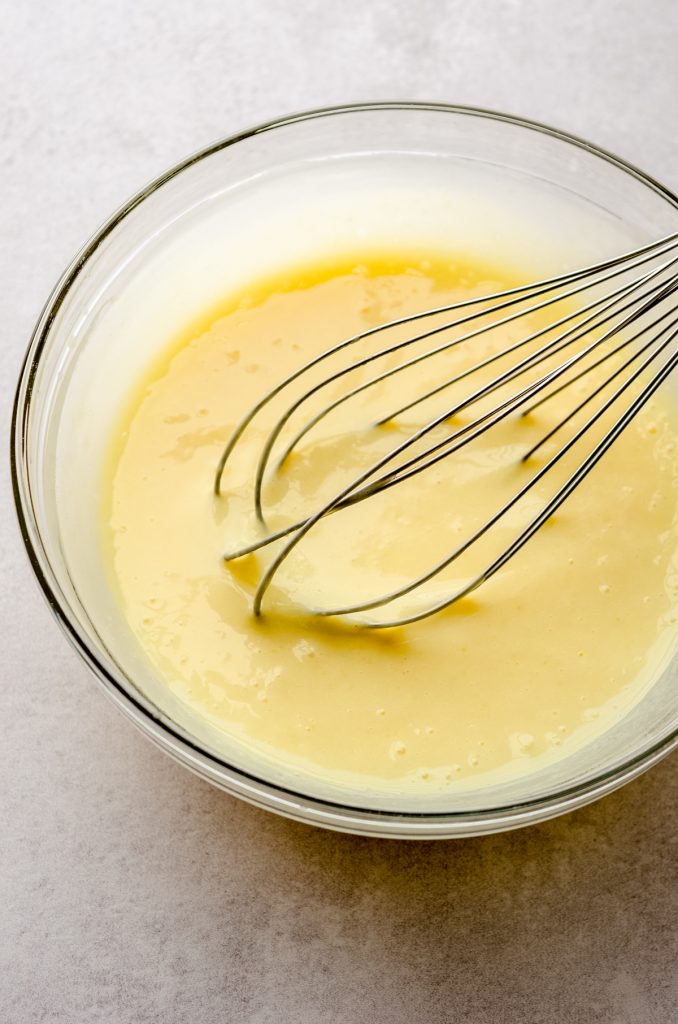
STEP #9
Start by beating the cream cheese on medium high speed until smooth, about 2 minutes. Add the granulated sugar then beat again until combined, about another 2 minutes.
STEP #10
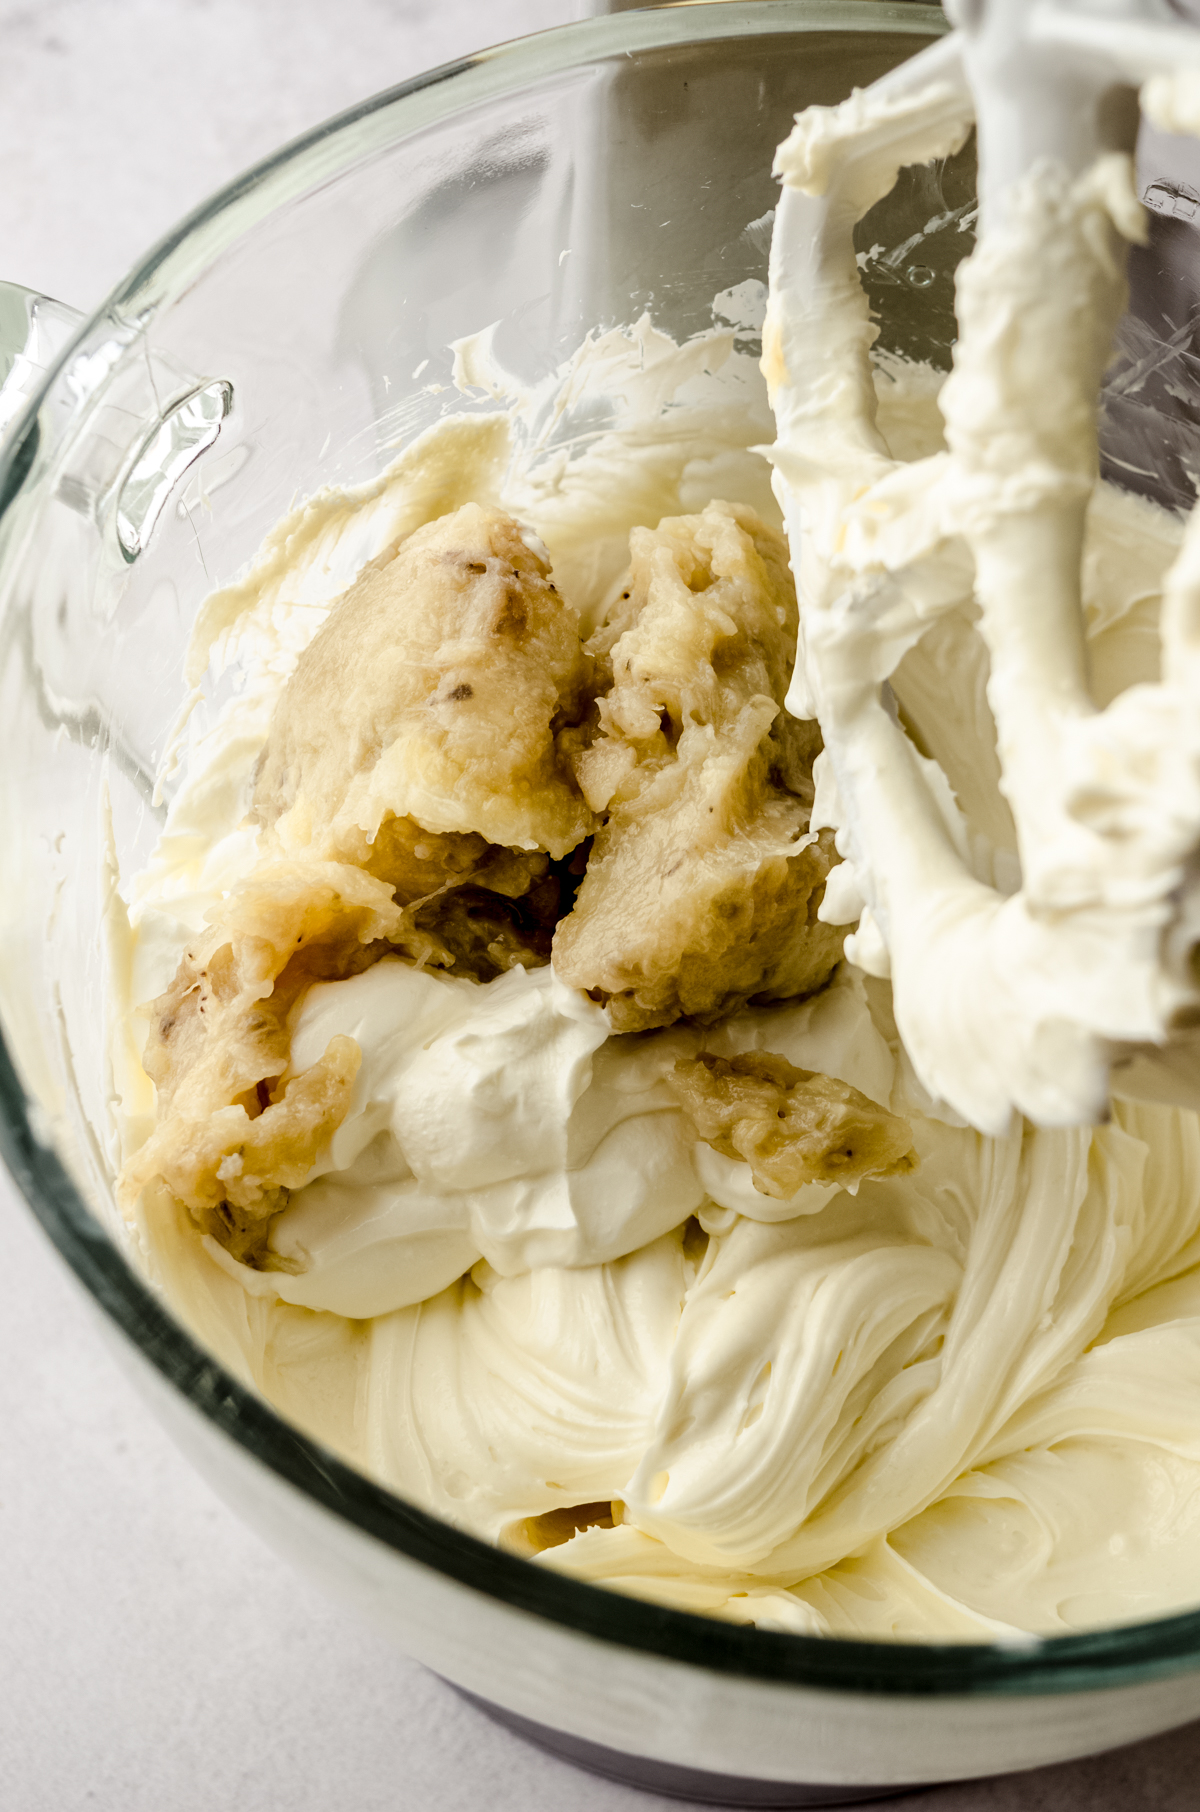
Next, reduce the mixer speed to low, then add the sour cream, roasted bananas, and vanilla and mix until completely combined.
STEP #11
Add the eggs one at a time, mixing on low after the addition of each egg and adding the next just after the previous egg starts to incorporate, and continue mixing until there are no more yellow yolk streaks.
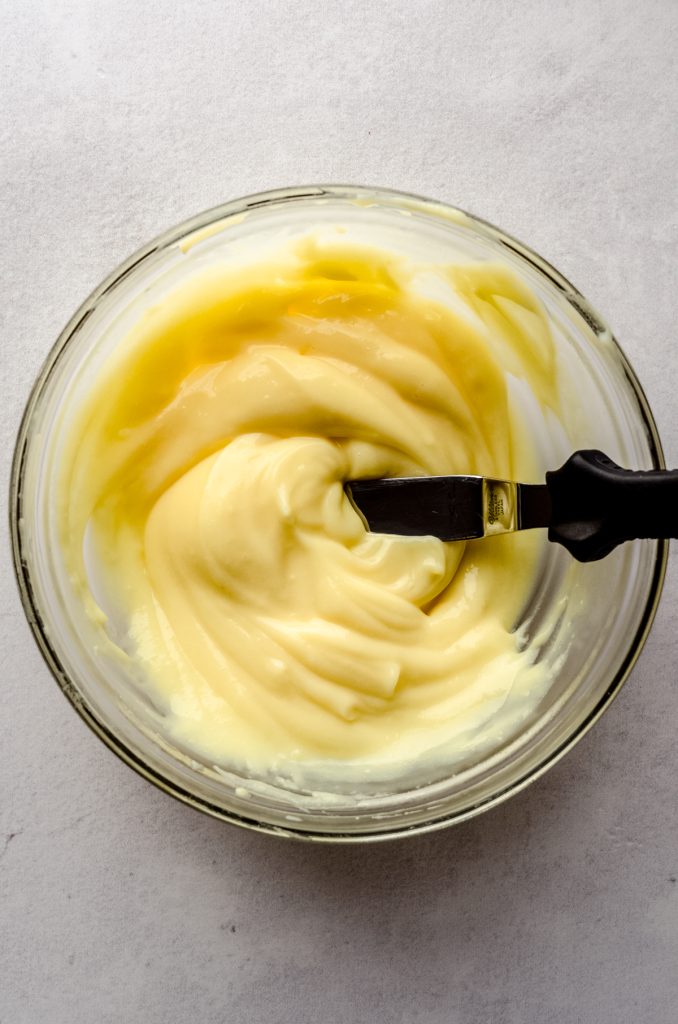
STEP #12
Use a large spatula to carefully fold the batter together, scraping the bottom of the bowl and the sides to gather any extra batter that may not be fully incorporated.
STEP #13
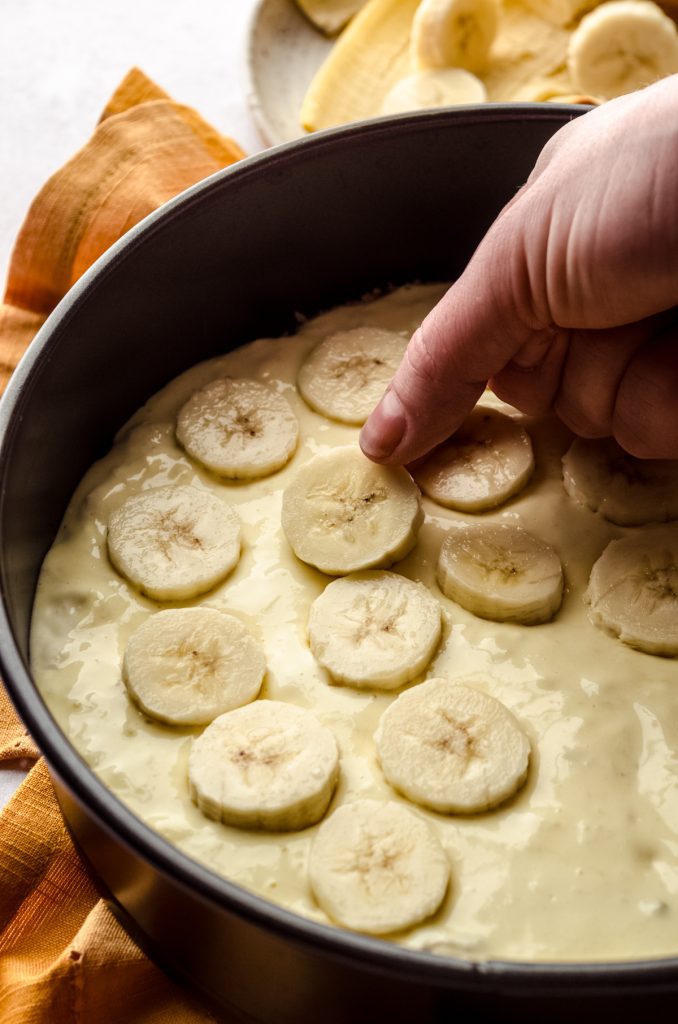
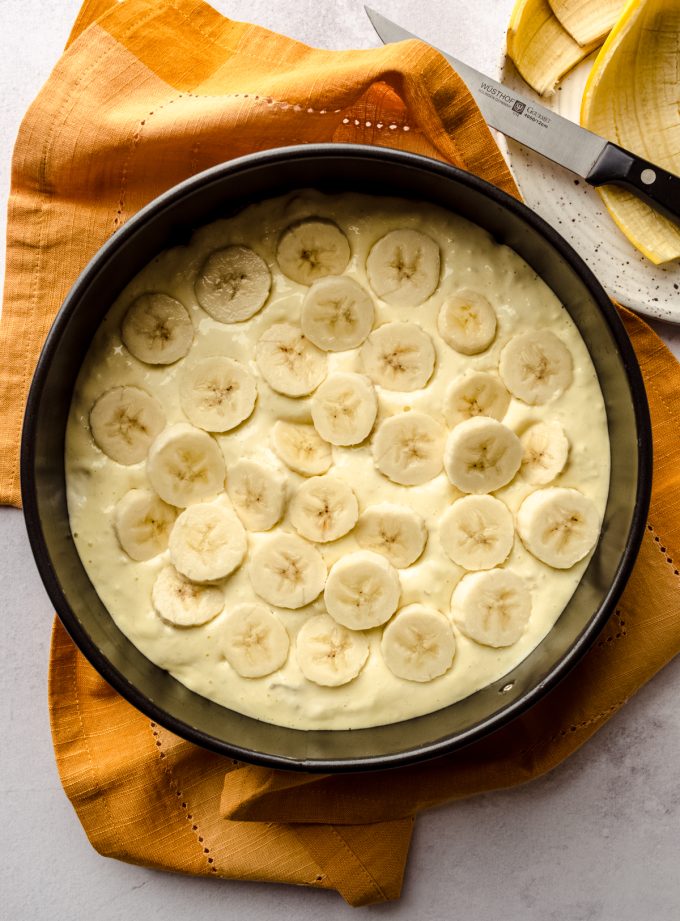
Pour about ⅓ of the batter into the prepared pan. Slice the remaining 1 or 2 bananas into about ½” thick discs and layer on top of the cheesecake batter (I say 1 or 2 depending on how much banana payer you prefer and the radius of your bananas).
STEP #14
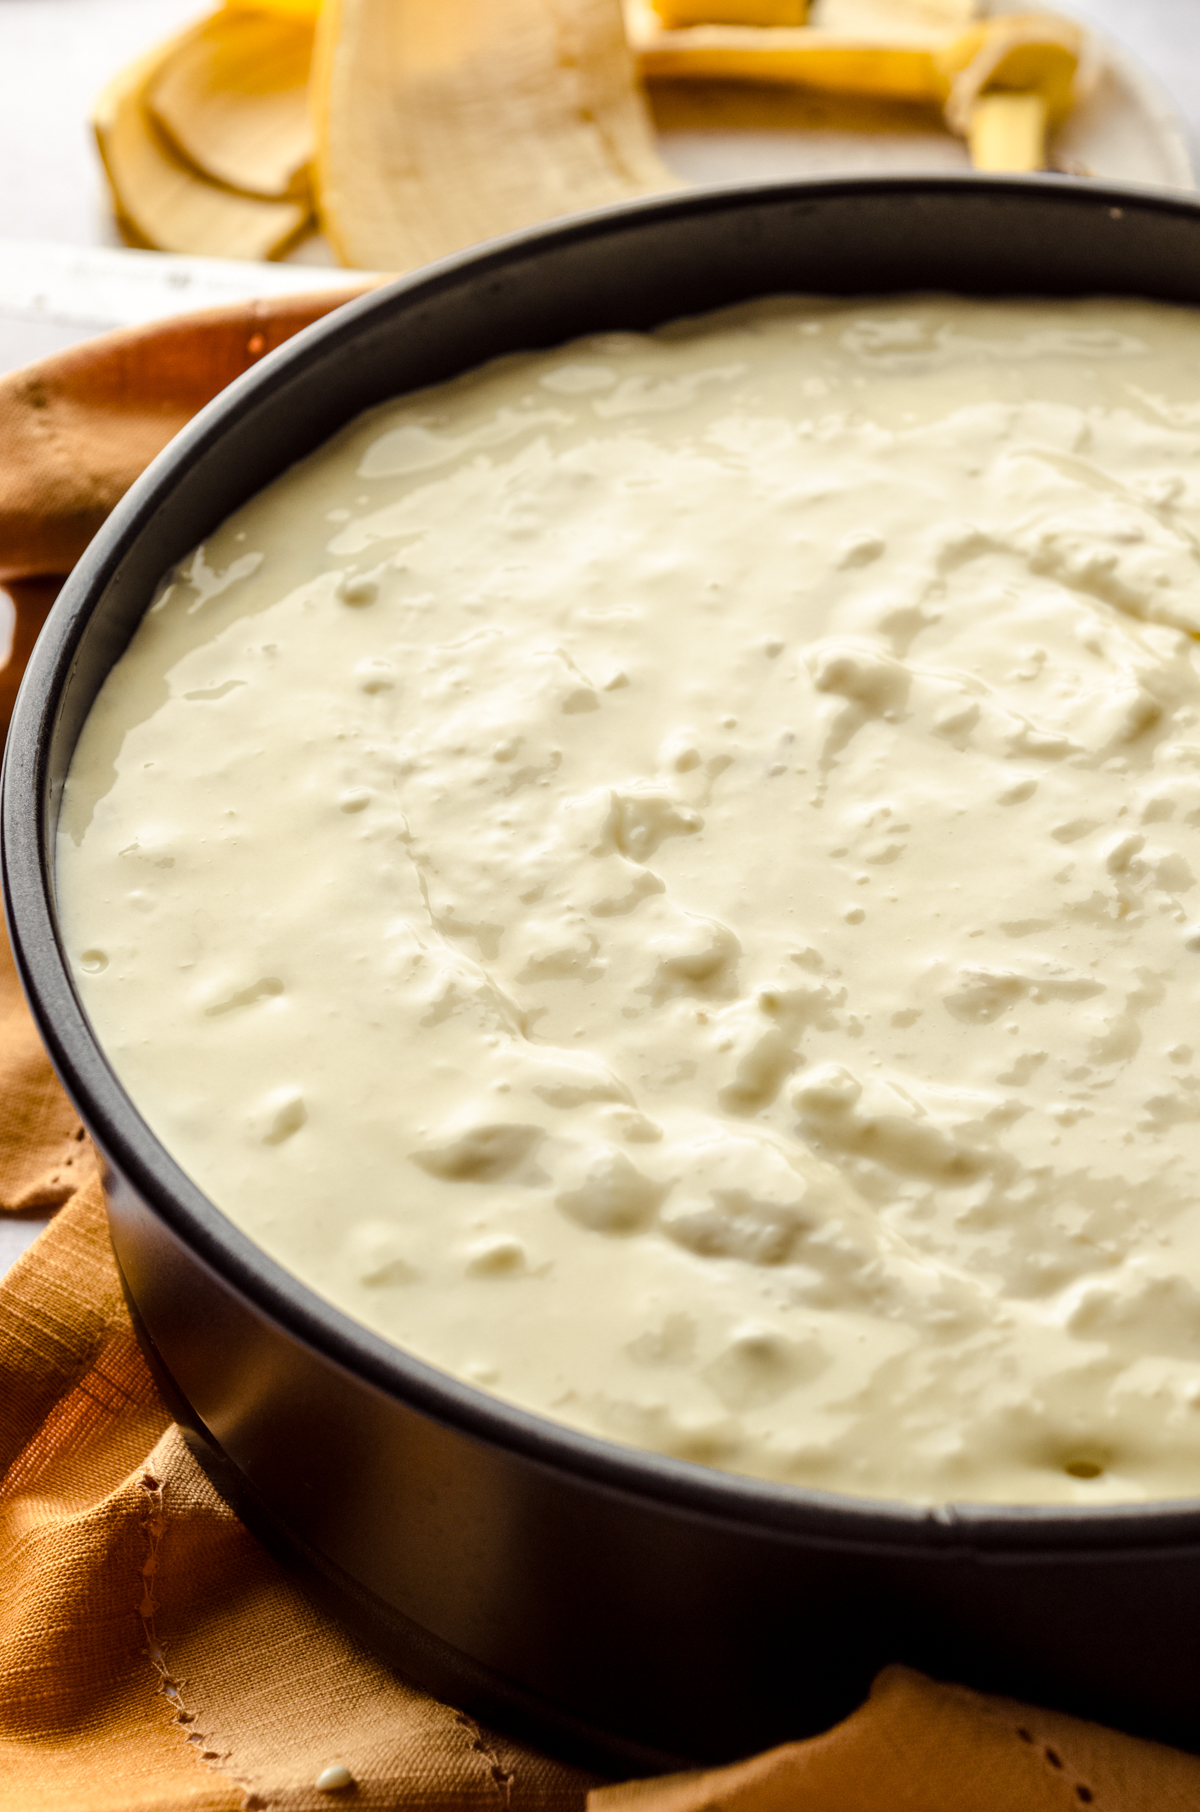
Pour the remaining ⅔ of the cheesecake batter on top of the sliced bananas, then create a water bath, according to the notes below.
PREPARE THE CHEESECAKE WATER BATH (WITHOUT FOIL)
I like to keep this process incredibly simple by eliminating the need for foil. I have seen folks place a pan of water under the cheesecake in the oven, but I prefer immersing the cheesecake into the water (well, sort of).
I actually have an entire post dedicated to how to make a cheesecake water bath (without foil), if you’d like to read about why it’s so important and what it does for cheesecake baking.
Create a water bath by placing the 9″ springform pan in a slightly larger round pan (I like to use a 10″ cake pan) and then place that pan into an even larger round pan (I like to use a 12″ cake pan) or roasting pan.
Fill the outer pan with hot water halfway up the sides of the middle pan, then carefully transfer the whole thing to the oven. You can also assemble the pans in the oven, but work quickly so as not to let too much hot air out of the oven.
STEP #15
Bake the cheesecake in this manner for 1 hour 20 minutes to 1 hour 45 minutes. The middle of the cheesecake (a center approximately 2″ wide) should jiggle just a little bit. See notes in the recipe for details about how to check for proper doneness.
STEP #16
Turn the oven off and allow the cheesecake to cool in the oven for 1 hour. After 1 hour remove the springform pan from all of the other pans and allow to cool on a cooling rack for another 2 hours. While the cheesecake cools, make the pudding layer.
PREPARE THE PUDDING LAYER
STEP #17
Pour the pudding mix into a small bowl, then add the cold milk. If you prefer to make the entire package of pudding, be sure you are using 2 cups of milk and only using half of the finished product on top of the cheesecake.
STEP #18
Allow the pudding to set and chill in the refrigerator until you are ready to use it.
CHILL THE CHEESECAKE
STEP #19
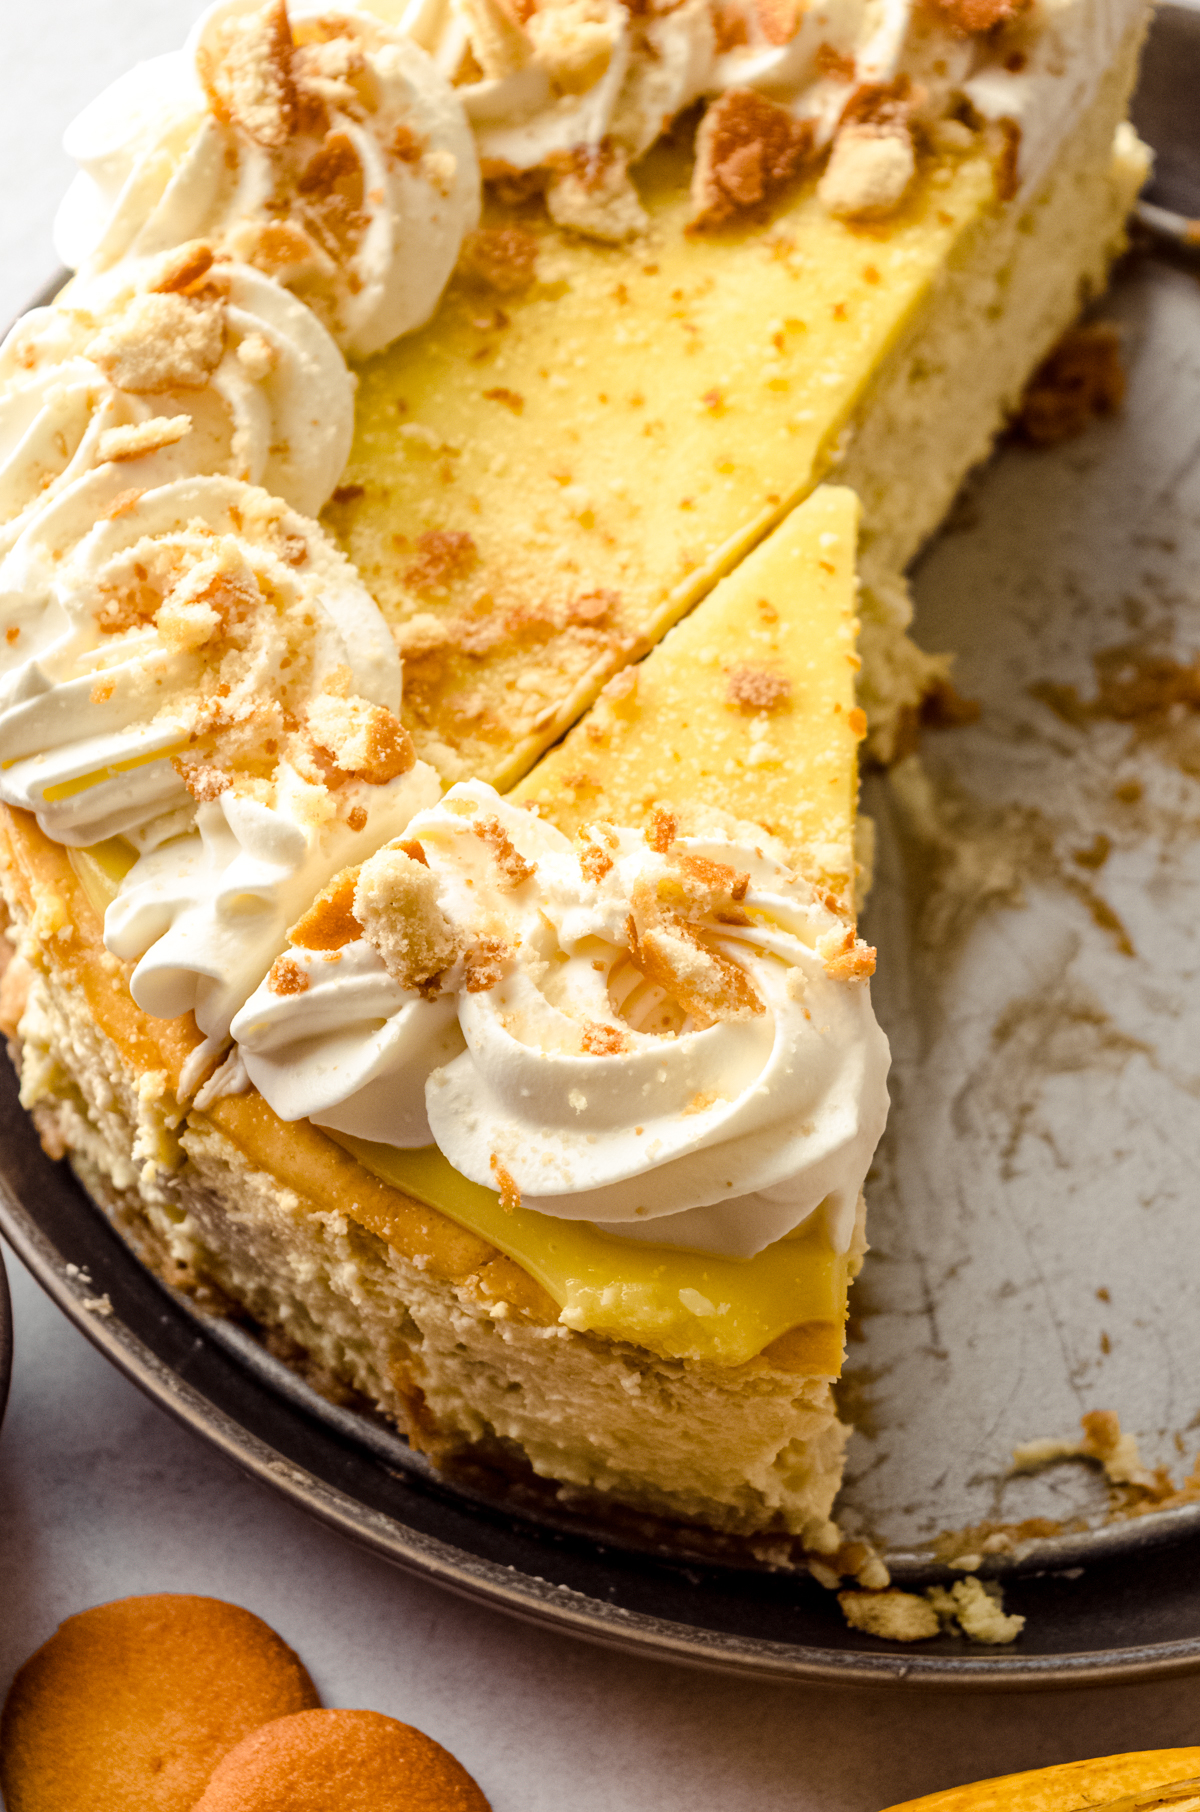
When the cheesecake is completely cool, spread the vanilla pudding onto the top of the cheesecake. Cover or wrap the cheesecake tightly and allow to chill in the refrigerator for at least 6 hours, ideally overnight.

TOP WITH WHIPPED CREAM AND NILLA WAFER CRUMBS
STEP #20
Pour the heavy whipping cream, sugar, and vanilla extract into the bowl of a stand mixer fitted with the whisk attachment.
STEP #21
Turn the mixer to medium speed. The mixture will start to get frothy and bubbly. After about 2-3 minutes, the mixture will start to thicken.
STEP #22
Once the mixture is visibly thick (you will be able to see the trail of the whisk), increase the speed to medium high and beat for an additional 30 seconds to 1 minute. At this point, your whipped cream should start to look “billowy” and the trails from you whisk will be quite distinct.
STEP #23
Continue beating in short bursts of about 5-10 seconds, checking after each, until your whipped cream reaches medium-stiff peaks.
STEP #24
Pipe or spread whipped cream onto the top of the cheesecake, then garnish with additional Nilla Wafer crumbs and/or banana slices, if desired.

Now that you know how to roast bananas, make my banana bread with unripe bananas or roasted banana ice cream!
CHEESECAKE TIPS
Be sure you’ve read through my instructions thoroughly before beginning your cheesecake journey. To summarize the key points, try to remember these 5 success tips for the perfect cheesecake while you’re working through the recipe.
DO NOT OVERMIX THE BATTER: after adding the sour cream, bananas, and vanilla, stick to the “low” setting on your mixer. There is no need to rush this process.
BAKE IN A WATER BATH: at the very minimum, place a large roasting pan with hot water in it on the rack below the one that has your cheesecake on it. For best results, create a no-foil water bath like I outlined in this recipe.
DO NOT OPEN THE OVEN DOOR: I know. It’s very tempting to check in on your cheesecake. Try to resist that temptation and use your oven light to see how it’s progressing. Allowing the hot air to escape can drastically change the temperature inside your oven, resulting in uneven baking of your cheesecake.
COOL IN THE OVEN INITIALLY: allowing the cheesecake to cool alongside the gradually cooling oven will insure a slow and even settling of the cheesecake filling.
COOL AT ROOM TEMPERATURE BEFORE CHILLING: do not go from the possibly-still-slightly-warm oven to the refrigerator. Remember, we want gradual temperature changes for our baked cheesecake.
When I tell you you’re going to adore this cheesecake, I’m not exaggerating. The banana flavor is unmatched and infused in every single bite. Between the creamy whipped cream and buttery Nilla Wafers, all the taste and texture you love in banana pudding is represented in this fun dessert. It’s a top notch winner.
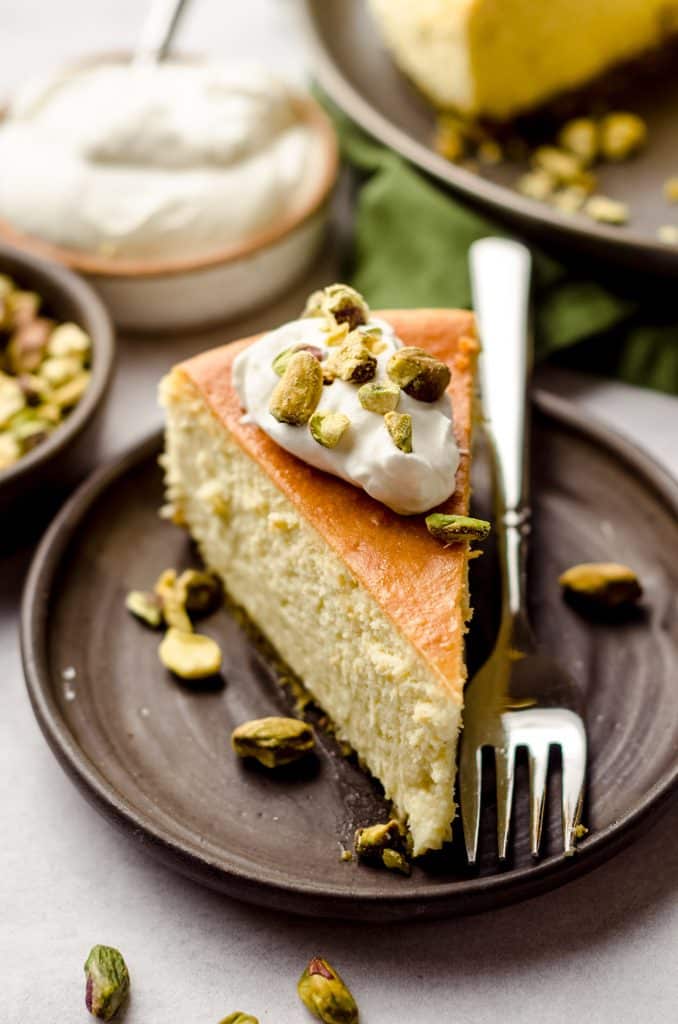
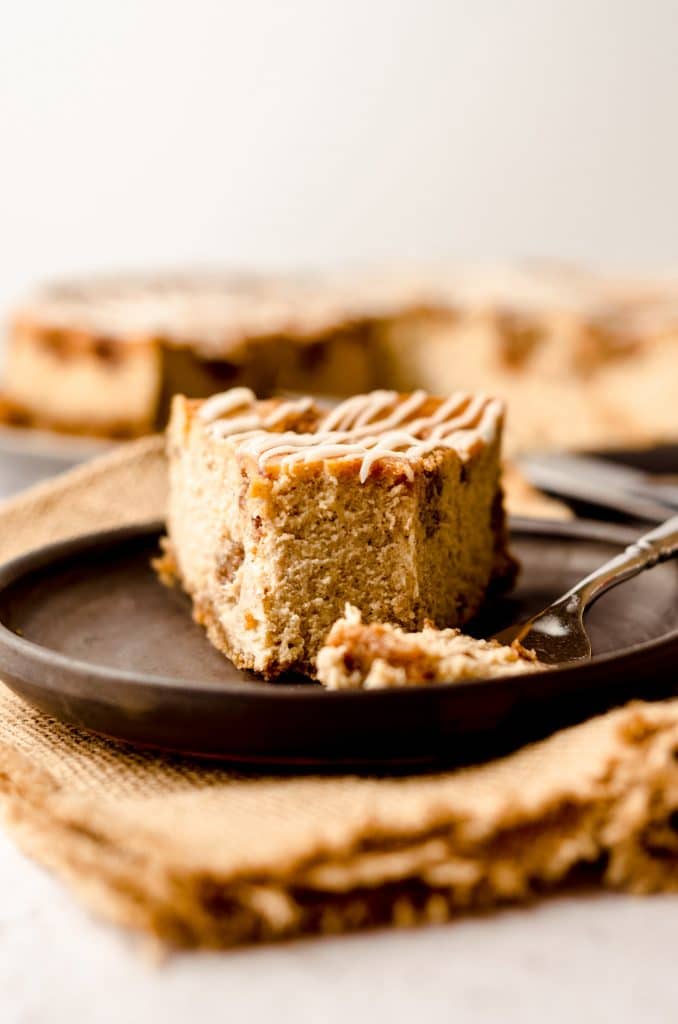
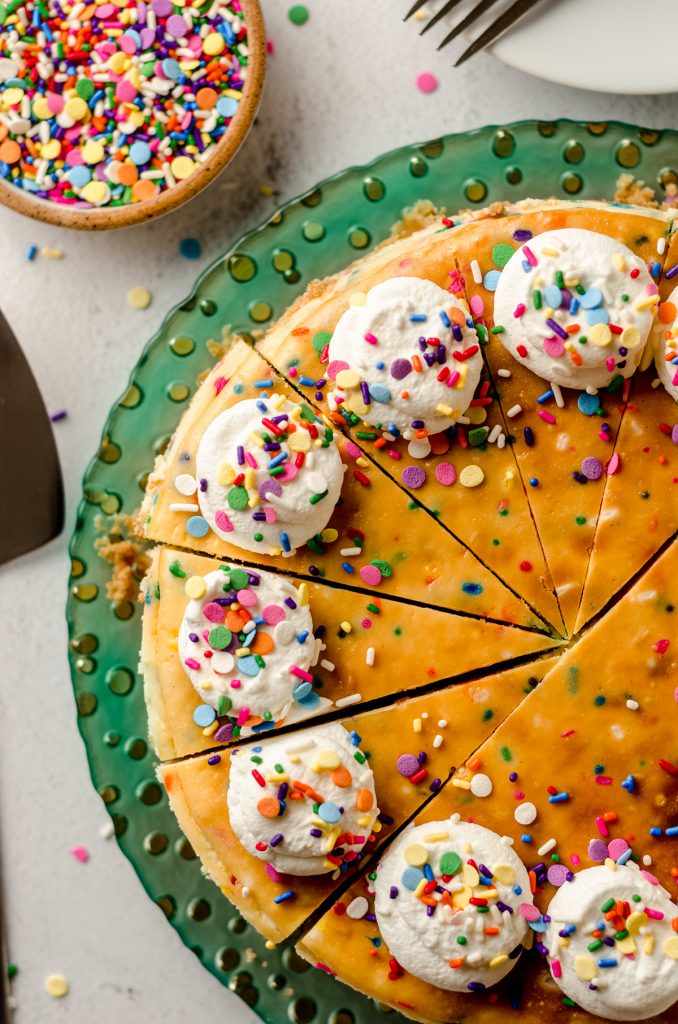
In the mood for more cheesecake recipes? Check out some of my favorite fun cheesecakes: s’mores cheesecake, pistachio cheesecake, cinnamon roll cheesecake, and funfetti cheesecake!

The Best Banana Pudding Cheesecake Recipe
Ingredients
ROASTED BANANAS
- 2 medium bananas
- 1 Tablespoon firmly packed light brown sugar
NILLA WAFER CRUST
- 1 and ½ cups (155g) Nilla Wafer crumbs about 32-34 cookies
- ¼ cup (50g) granulated sugar
- 4 Tablespoons (57g) unsalted butter melted
CHEESECAKE
- 32 ounces (900g) full fat block cream cheese completely softened to room temperature1
- 1 cup (200g) granulated sugar
- 8 ounces (226g) full fat sour cream about 1 scant cup; at room temperature1
- 1 Tablespoon vanilla extract
- 4 large eggs at room temperature1
- 1 to 2 medium bananas
VANILLA PUDDING
- ½ box (1.7oz / 48g) instant vanilla pudding2
- 1 cup (240mL) cold milk any fat content
WHIPPED CREAM TOPPING
- ½ cup (120mL) heavy cream
- ½ Tablespoon granulated sugar
- ½ teaspoon vanilla extract
Instructions
ROASTED BANANAS
- Preheat the oven to 400ºF (204ºC). Prepare a small baking sheet or baking dish. You can line it with parchment paper or a silicone mat to reduce mess if you like. Set aside.
- Situate each banana so that the curved part is on a surface or cutting board and the ends are facing up. Slice each banana in half long ways, then lay the sliced bananas on the pan, exposed banana side up.2 medium bananas
- Sprinkle the bananas with the brown sugar and then turn each of them over so that the skins now face up and the exposed banana is on the prepared pan.1 Tablespoon firmly packed light brown sugar
- Roast the bananas for 10 minutes or until the skins are completely black and leaking juices from the sides. You may only need 6-8 minutes for riper bananas.
- Remove the bananas from the oven, carefully remove the skins, and place the roasted bananas and all of the juices and caramelized sugar into a small bowl.
- Mash the bananas in the bowl using a fork and set them aside to cool while you make the rest of the cheesecake.
NILLA WAFER CRUST
- Reduce the oven temperature to 325ºF (162ºC). Spray a 9" springform pan or my very favorite Fat Daddio's cheesecake pan with nonstick spray. Set aside.
- In a food processor, crush the Nilla Wafers until they become a fine crumb. Pour the cookie crumbs into a large bowl, add the sugar and stir to combine. Drizzle the melted butter over the mixture and stir until everything is evenly saturated with butter.1 and ½ cups (155g) Nilla Wafer crumbs, ¼ cup (50g) granulated sugar, 4 Tablespoons (57g) unsalted butter
- Press the Nilla wafer crumb mixture into the bottom of the prepared springform pan, then bake the crust for 10 minutes. Remove from the oven and allow to cool while you prepare the filling.
CHEESECAKE
- In a large bowl with a handheld mixer or the bowl of a stand mixer fitted with the paddle attachment, beat the cream cheese on medium high speed until smooth, about 2 minutes. Add the granulated sugar then beat again until combined, about another 2 minutes.32 ounces (900g) full fat block cream cheese, 1 cup (200g) granulated sugar
- Reduce the mixer speed to low3, then add the sour cream, roasted bananas, and vanilla and mix until completely combined.8 ounces (226g) full fat sour cream, 1 Tablespoon vanilla extract
- Add the eggs one at a time, mixing on low after the addition of each egg and adding the next just after the previous egg starts to incorporate, and continue mixing until there are no more yellow yolk streaks.4 large eggs
- Use a large spatula to carefully fold the batter together, scraping the bottom of the bowl and the sides to gather any extra batter that may not be fully incorporated. Sometimes I need to use the mixer again, but be sure to keep it on low. Your batter should be smooth and creamy without cheesecake lumps. You will see lumps of banana, and this is ok.
- Pour about ⅓ of the batter into the prepared pan. Slice the remaining 1 or 2 bananas into about ½" thick discs and layer on top of the cheesecake batter (I say 1 or 2 depending on how much banana layer you prefer and the radius of your bananas).1 to 2 medium bananas
- Pour the remaining ⅔ of the cheesecake batter on top of the sliced bananas, then create a water bath4 by placing the 9" springform pan in a slightly larger round pan (I like to use a 10" cake pan) and then place that pan into an even larger round pan (I like to use a 12" cake pan) or roasting pan.
- Fill the outer pan with hot water halfway up the sides of the middle pan, then carefully transfer the whole thing to the oven. You can also assemble the pans in the oven, but work quickly so as not to let too much hot air out of the oven.
- Bake the cheesecake for 1 hour 20 minutes to 1 hour 45 minutes. The middle of the cheesecake (a center approximately 2" wide) should jiggle just a little bit. I use my digital instant-read thermometer to check the internal temperature has reached 145ºF (63ºC). Turn the oven off5 and allow the cheesecake to cool in the oven for 1 hour. After 1 hour, remove the springform pan from all of the other pans and allow to cool on a cooling rack for another 2 hours. While the cheesecake cools, make the pudding layer6.
PUDDING LAYER
- Pour the pudding mix into a small bowl, then add the cold milk. If you prefer to make the entire package of pudding, be sure you're using 2 cups of milk and only using half of the finished pudding to top the cheesecake.½ box (1.7oz / 48g) instant vanilla pudding2, 1 cup (240mL) cold milk
- Allow the pudding to set and chill in the refrigerator until you are ready to use.
- When the cheesecake is completely cool, spread the vanilla pudding onto the top of the cheesecake. Cover or wrap the cheesecake tightly and allow to chill in the refrigerator for at least 6 hours, ideally overnight.
WHIPPED CREAM
- Pour the heavy whipping cream, sugar, and vanilla extract into the bowl of a stand mixer fitted with the whisk attachment.½ cup (120mL) heavy cream, ½ Tablespoon granulated sugar, ½ teaspoon vanilla extract
- Turn the mixer to medium speed. The mixture will start to get frothy and bubbly. After about 2 to 3 minutes, the mixture will start to thicken.
- Once mixture is visibly thick (you will be able to see the trail of the whisk), increase the speed to medium-high and beat for an additional 30 seconds to 1 minute. At this point, your whipped cream should start to look "billowy" and the trails from your whisk will be quite distinct.
- Continue beating in short bursts of about 5-10 seconds, checking after each, until your whipped cream reaches medium-stiff peaks. Set aside.
- Remove the cheesecake from the fridge and use a spatula or butter knife to gently loosen the crust from the side of the pan, then release the outer ring of the springform pan.
- Pipe or spread whipped cream onto the top of the cheesecake, then garnish with additional Nilla Wafer crumbs and/or banana slices, if desired. Store leftovers in the refrigerator up to 5 days. Cheesecake freezes well, up to 3 months. Leave off the whipped cream, thaw in the refrigerator overnight, and top with whipped cream before serving.
Video
Notes
- Room temperature: I cannot stress enough how important it is to have completely room temperature ingredients. This will insure you have the smoothest batter possible. I like to let my ingredients sit out at least 1 hour and sometimes closer to 2 hours before starting my recipe.
- Instant pudding: be sure you’re using instant pudding and not the kind you cook.
- Mixer speed: it’s important not to go above low (or low-medium) speed after you’ve beaten the cream cheese. Incorporating too much air will create bubbles and potential cracks in your finished cheesecake.
- Water bath pans: here is a bundle that includes all the pans I use. Using this method eliminates the need to wrap anything in foil.
- Cool the cheesecake: I like to prop the oven door open with a wooden spoon or spatula.
- Pudding layer: theoretically, you can do this at any time, just be sure you’re adding the pudding layer at the correct time (after the cheesecake has cooled but before you chill it in the fridge).
- Make a smaller cheesecake: you can make this exact cheesecake recipe in a 6″ springform pan or 7.5″ springform pan. Simply halve the recipe (for the crust and the filling). Bake time will be about 60-70 minutes. You can reduce the sizes of the water bath pans to 8″ round and 10″ round sizes or use the same ones I have linked here.
- Make in the Instant Pot: you can make this exact cheesecake in a smaller size with my Instant Pot cheesecake recipe.
Nutrition Disclosure
All nutritional values are approximate and provided to the reader as a courtesy. Changing ingredients and/or quantities will alter the estimated nutritional calculations.
My very first cheesecake attempt and it was a huge success! Trust the process and roast those bananas. The flavor is so intense in every bite. My family loved it!!! The recipe is so easy to follow, and every step is explained so nicely. It’s pretty much foolproof. It’s a must try for sure.
I’m so happy to hear this, Cindy! Thank you so much 🙂
Was too lazy to roast the bananas
This turned out so delicious!! I love love any banana things, but only if they’re the real and not artificial banana flavor, so this was the perfect recipe! I love the nilla wafer crust, and the roasted bananas were the perfect touch. It was my first time ever making a cheesecake, so it took me a bit longer than I thought (Though it’s pretty standard for me to take almost double the projected times to bake lol!) but I’m so glad I made it and will be back for more cheesecake recipes once I buy the right pans to be able to do the water bath the fresh April flours way!
Thank you so much, Andrea! I’m so glad you enjoyed this recipe and conquered your first cheesecake!
My first time too haven’t tasted it in the morning I will taste it but I did not do the caramelized bananas
Let me know how it turns out! I expect a more subtle banana taste– roasting them brings out ALL the flavor!
Hi
Is this a stablized whipp cream topping.
Hi, Jackie– no, it is not.
CAN I OMIT THE BANANA SLICES, IN THE MIDDLE, I LOVE BANANA FLAVOR, BUT HATE ACTUAL BANANAS, IF THAT MAKES SENSE, LOL!!!
Hi, Darryl– yes, you can.
I don’t see an actual baking temp for the cheesecake?
Step #1 under Nilla wafer crust. You’re keeping it at the same temperature from baking the crust.
Do the bananas turn brown in the cheesecake?
Hi, Dee– sort of. Not totally brown so that they are unappetizing, but brown because they’ve been baked. Hope that helps.
Thank you so much for the answer. I am looking forward to trying this recipe.
It wasn’t very good neither was a couple of your other ones. I will not be trying any more of your recipes. Did u go to culinary school? Or did u think that trying things would consider u a baker? You are a Big fat NO for me and others.
This is, quite possibly, the rudest comment I have ever gotten. It’s funny that you mention no specifics on why you didn’t think this was good, nor the other recipes you allegedly tried. I’d love to hear more about your experiences with my recipes, so please, share more. This post was first posted 8 weeks ago and has two 5-star reviews, plus at least a dozen of my personal taste testers who all gave it glowing reviews. Side note, “Suzie Q” is an interesting name for a reviewer whose email suggests their name is Clarence.
Either you are a hate or you are joking. This recipe turned out amazing. Had so much fun making this with my husband.
Thanks so much for your review!
My mouth is already watering just reading the directions…so thorough with the steps…I know I’m going to love it!!!
Enjoy! Can’t wait to hear about it!
My husband is obsessed with all things banana and so I made this for his birthday last week. He said 10/10!! I was nervous because I had only ever made “no bake” cheesecakes before, but the recipe was easy to follow and it came out so well and SO delicious! I can’t wait to try some of your other cheesecake recipes! Thank you!!!
I am so happy to hear so much of this, Maddy! Thank you for sharing and for trusting my process 🙂
Absolutely delectable! I had so many bananas that were harvested from my garden and this was a perfect recipe to use. My family devoured it quickly. Thank you so much for sharing this wonderful recipe!
Thanks so much, Josephine! I’m so glad you enjoyed it 🙂
Loved the flavor. I noticed that my cheesecake had many more dark speckles from the roasted bananas than the photo shown here , but that’s what I expect in a real-banana dessert.
The instructions are thorough and resulted in a crack-free cheesecake!
I sautéed my garnish bananas in a little butter and brown sugar- definitely recommend!
Thanks so much, Judy! I love that you added some special bananas on top– yum!
Haven’t made it yet but I plan on it this week for my daughters birthday. My question before I start, and I did read everything in hopes it would have been addressed, I don’t currently have a spring pan. I left it with said daughter when we moved because she bakes far more often than I do. Can I use a traditional pie pan? Would I just cut the recipe in half? I can’t wait to try this!!
Hey, Marci! No problem– depending on how tall your pie plate is, it may not work well. Do you have a regular 8″ or 9″ round cake pan? The only reason for a springform pan is for easy removal of the cheesecake.
This recipe was fabulous! I used vanilla paste instead of vanilla extract for the pretty speckles. I also made homemade vanilla pudding, and partake brand vanilla wafers to be a little healthier, but this was a big hit to my husband who requested a banana cheesecake for his birthday! The person who left a nasty review must not know how to follow instructions. If you follow the directions you’ll be left with an award winning banana cheesecake!
Thank you so much, Leavi! I’m so glad you enjoyed it.
This was delicious!!! Easy to follow instructions. Love that you added the amounts in the directions area so I didn’t have to scroll back and forth. Highly recommend. Enjoy!!
Hey, Liz– thanks so much! And I’m so glad you enjoy the formatting 🙂
This banana cheesecake was absolutely incredible! Needed something new to try with an abundance of bananas and am so glad I found this recipe! Everyone who tried it wanted more. This is a keeper and will be making again (and again) in the warmer months to come. Thank you!
I’m so glad you made this cheesecake, Tommy! It’s such an underrated recipe on my site! Thank you for making, sharing, and coming back to let me know 🙂
This was incredible, the banana flavor was just right and the vanilla wafer crust was such a nice change up from traditional graham cracker crust! It was also a very easy recipe to follow. I made the cheesecake one day and let it chill overnight, then did my pudding and whip cream the following day. An absolute 100/10!
Thanks so much, Megan! I loved watching your Insta series on this cheesecake 🙂 I’m so glad you found and loved this recipe– it’s such a hidden gem in my recipe collection.
I qas originally going to make banana pudding for the fourth, my son suggested banana pudding cheesecake. I didn’t didn’t know if a recipe like that existed! But, I found yours and I’m so excited to make it today!
YAY!