
Cheesy Vegetable Quiche with Cauliflower Crust
As an Amazon Associate, I earn from qualifying purchases. Read the full disclosure here.
A cheesy quiche loaded with veggies, baked in a low-carb, gluten free, and deliciously seasoned cauliflower crust.
Many years ago, I was dying to try out this cauliflower pizza crust I had seen all over the place.
Being a baker, my brain constantly thinks in recipes– my bookmarks, notes in my phone, and scribbles in the margins of my planner are filled to the brim with recipe titles and ideas (real life Pinterest, over here).
My brain is also constantly thinking in indoor cycling songs and workout playlists, but that’s a completely different problem I have.
While pizza toppings never quite made it onto my cauliflower pizza crust, turning that crust into the bottom layer of a quiche turned out to be one of the best blogging decisions I ever made.
In fact, just 2 months after I originally published this post, Huffington Post picked it up and plopped it into a roundup of recipes using cauliflower in unconventional ways.
Needless to say, this post has gotten so much traffic over the years from that post, so, in turn, it has received some pretty great reviews from folks who have made it.
I thought that six years later was a good time to finally update the post with fresh photos and an updated, clearer set of instructions.
The same great recipe, just easier to understand!
I have written before that I adore savory breakfast.
Give me sausage, egg, and cheese on a biscuit or an everything bagel, you can keep your pastries and French toast (except these sourdough cinnamon rolls can stay… Mmmkay?).
If you aren’t interested in the cauliflower crust, you may certainly bake this in a store bought pie crust, my favorite homemade pie crust, or go with one of my tried and true methods and leave it crustless.
Just skip the part about the crust and head over to the guts and glory, but if I were you, I would give this a try.
It really surprised me, not only that it was fairly easy to make, but that it gave a really good flavor and texture to the quiche overall.
WHAT YOU NEED FOR A GREAT CAULIFLOWER CRUST
All you need for the crust is
• a large head of cauliflower
• some grated Parmesan
• an egg
• and some spices
Good news– you need all of that (minus the cauliflower) for the quiche, so you might as well go all out and try something new.
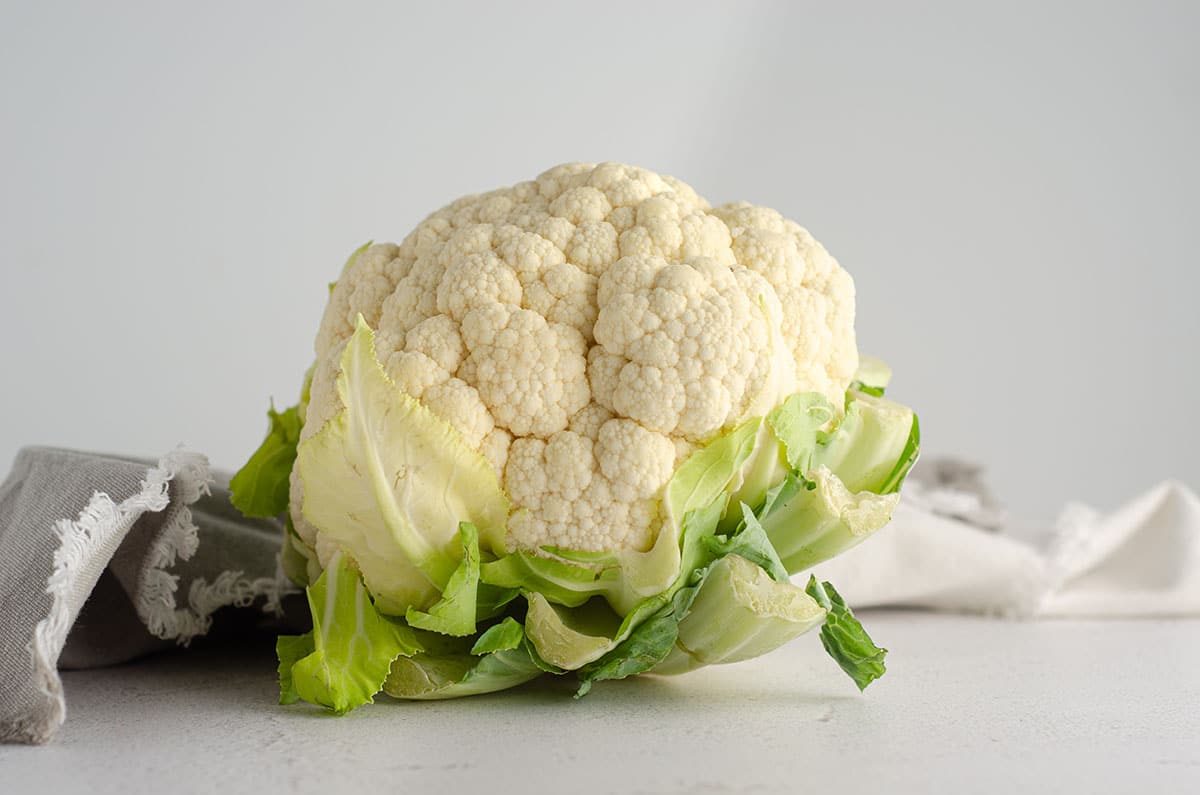
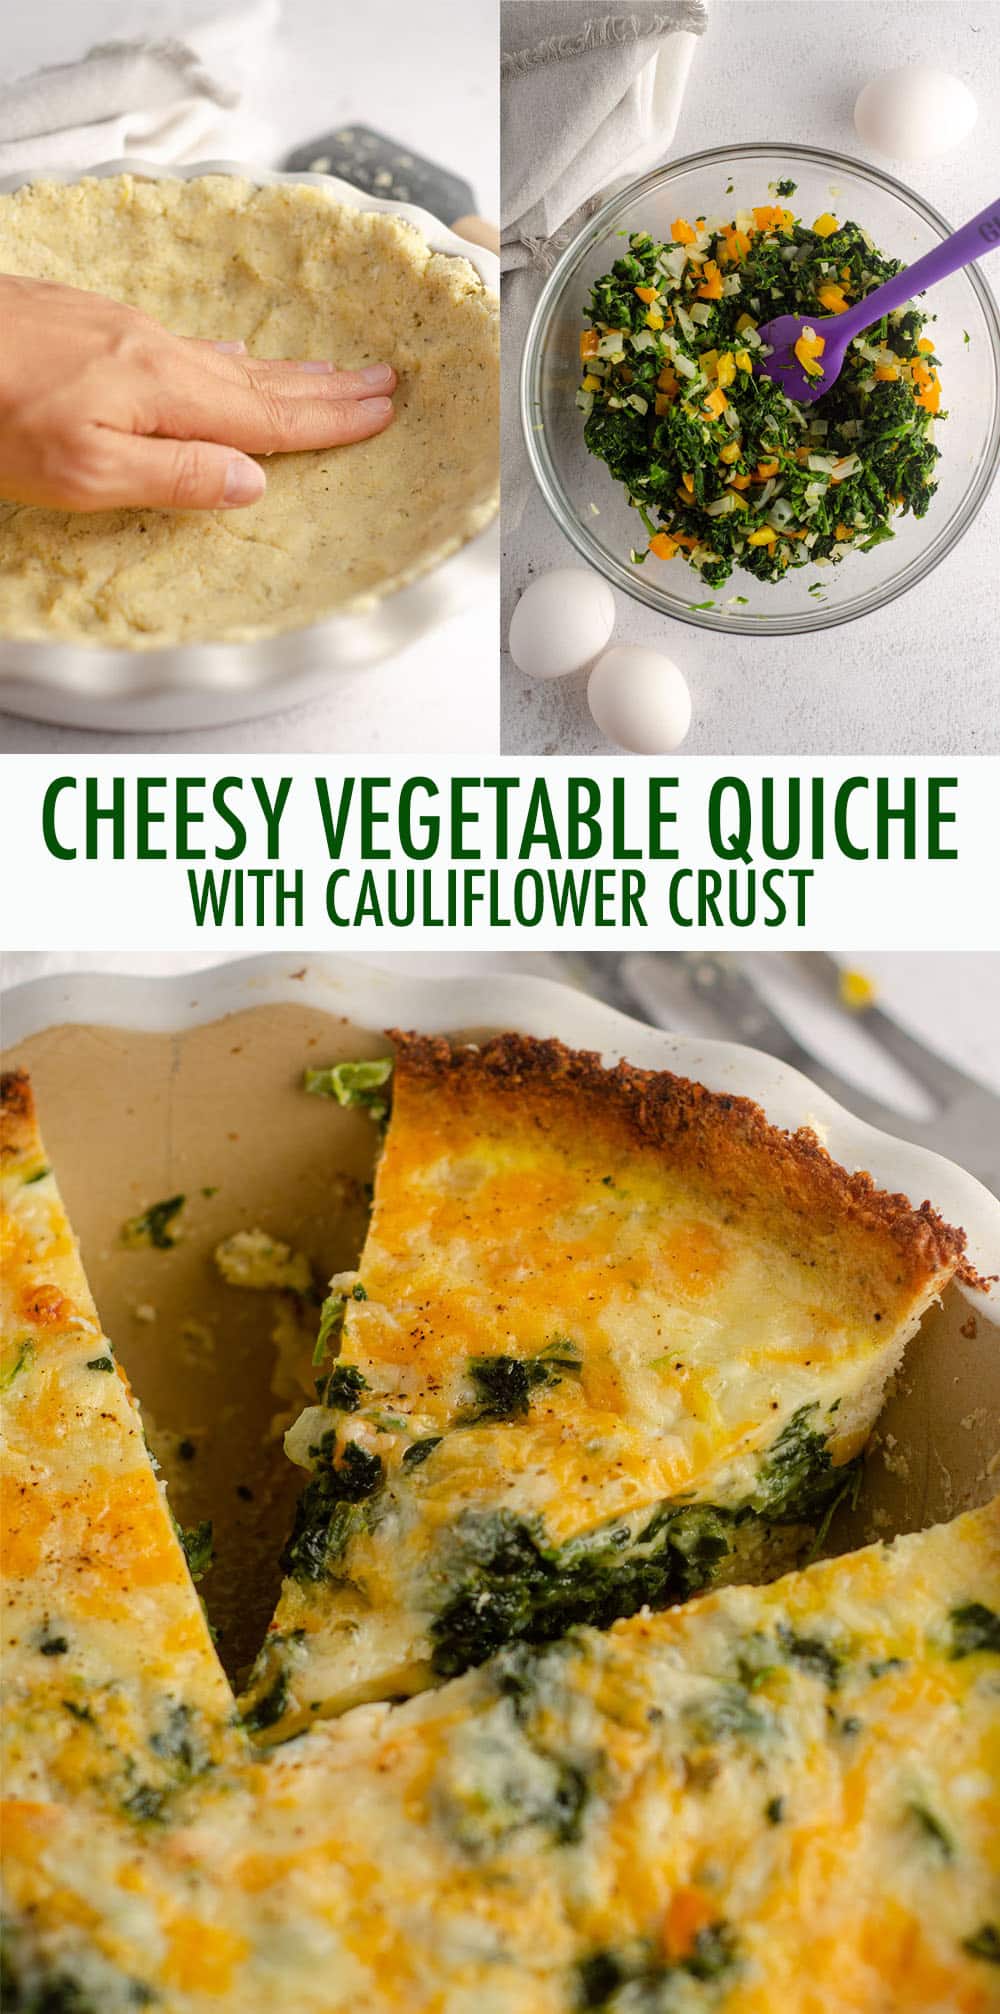
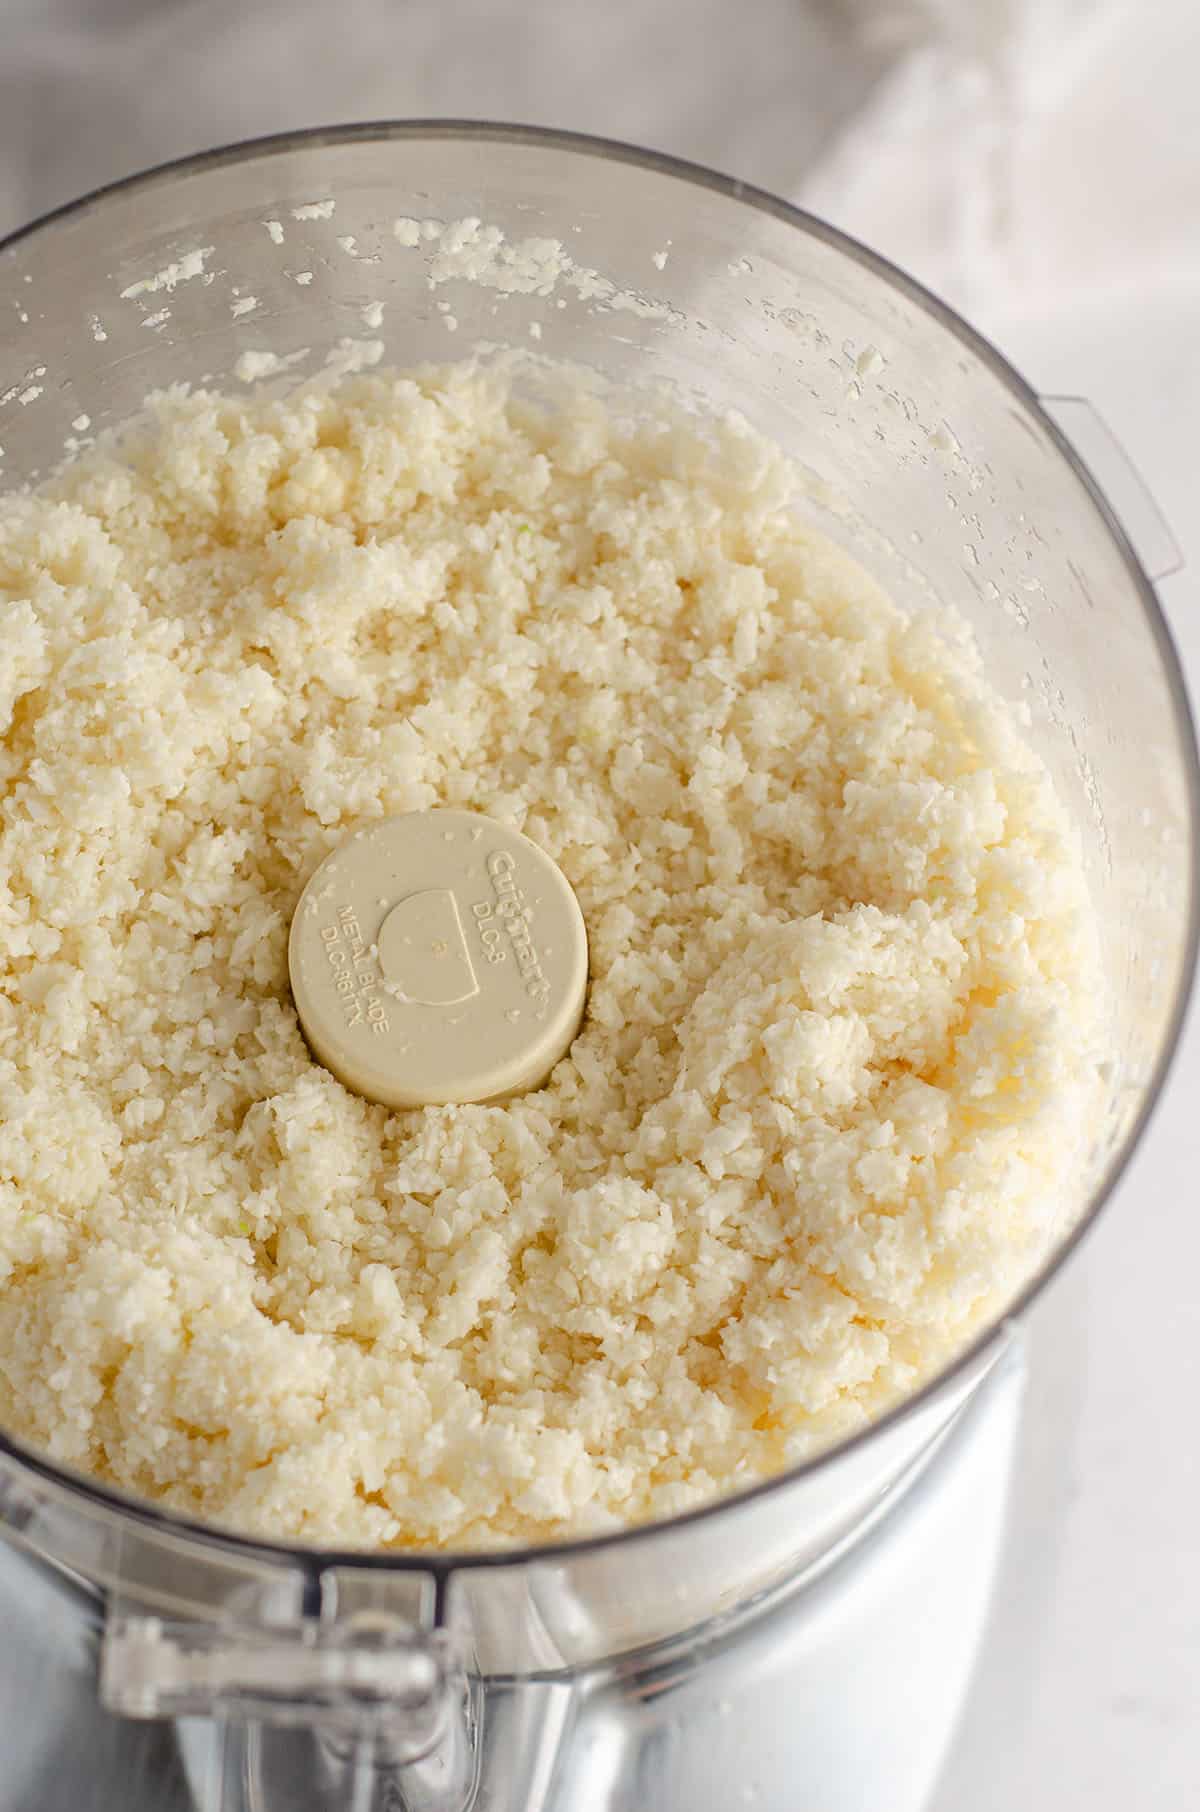
You’re going to cut up your cauliflower, removing all of the stems and working with just the florets, and pulse all of it in your food processor (this is the food processor we own and love) until it resembles cornmeal.
After processing, you should have about 2 cups of “cauli-flour” (I crack myself up).
Throw this mixture into a microwave safe container, and cook it in the microwave for 5 minutes (no need to add water).
After it’s done cooking, try to get over the fact that it smells like you-know-what, and let it cool for at least 10 minutes.
Trust me, you don’t want to leave this part out, because the next step involves squeezing out all of the excess water, and you don’t want hot lava pouring down your hands and arms (not that I know this from experience, I am super patient and always wait the entire 10 minutes before I start squeezing…).
While you’re waiting for the cauliflower to cool, blend your cheese, egg, and spices, and maybe start chopping up the vegetables for the quiche filling.
SQUEEZE OUT ALL THE MOISTURE
Once your cauliflower is cool, ball it up in a strong kitchen towel and squeeze like you’ve never squeezed before. There will be a ton of water in that bad boy… Seriously, a ton.
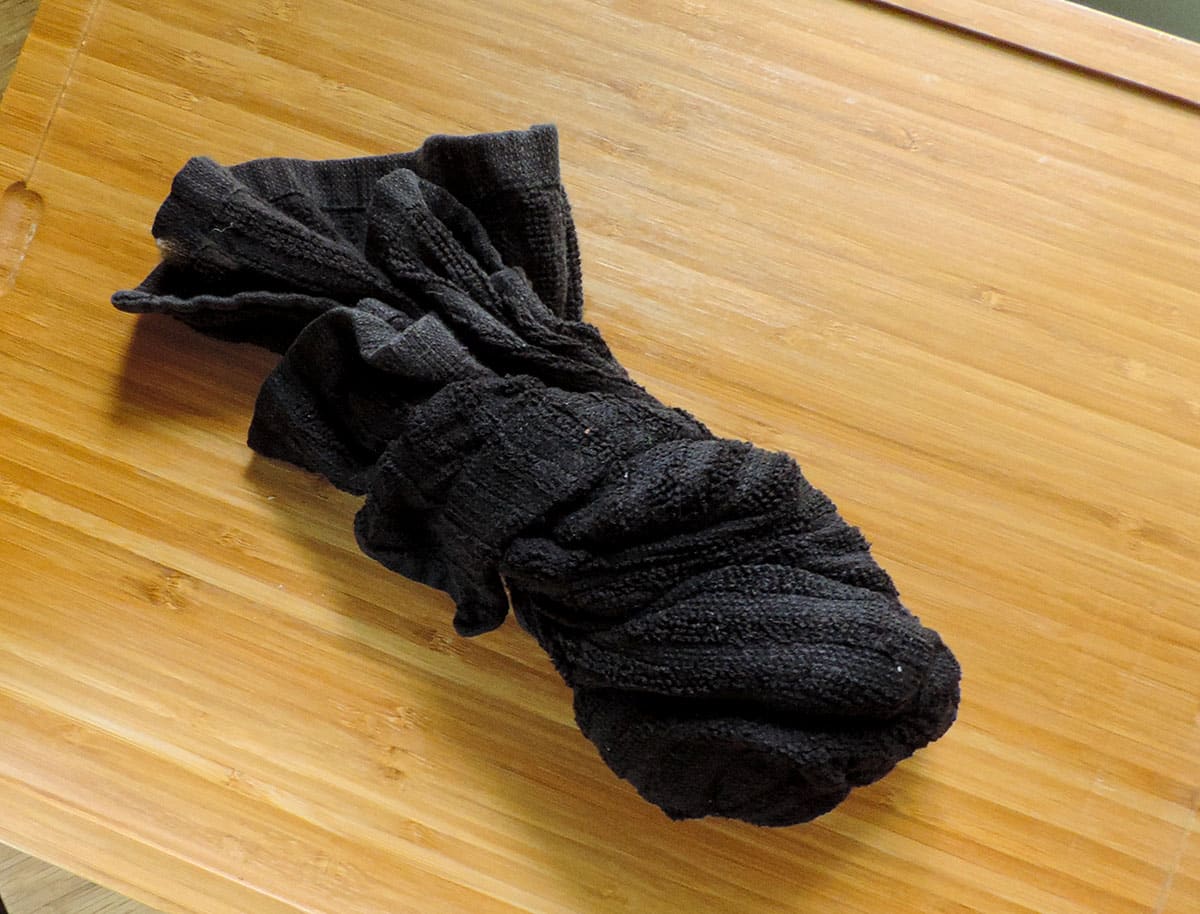
And when you think you’re finally done squeezing, squeeze some more, because you’re not. You want absolutely zero liquid left in your cauliflower crust.
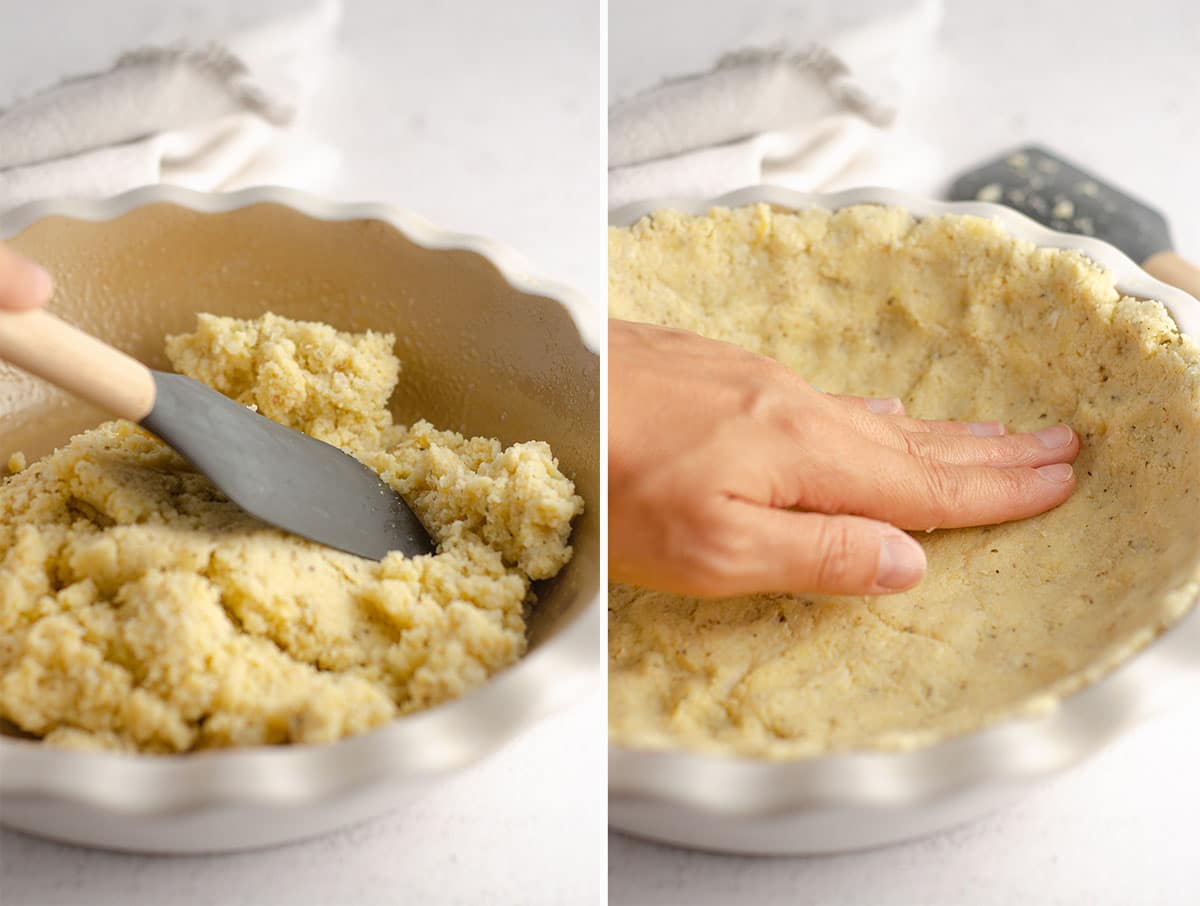
Once it’s all dried up, throw it in with your egg mixture and get your hands in there (or a spatula) to mix it all together. From there, you can sort of flatten it and put it right into your pie dish, spreading it out evenly like you would a pie crust.
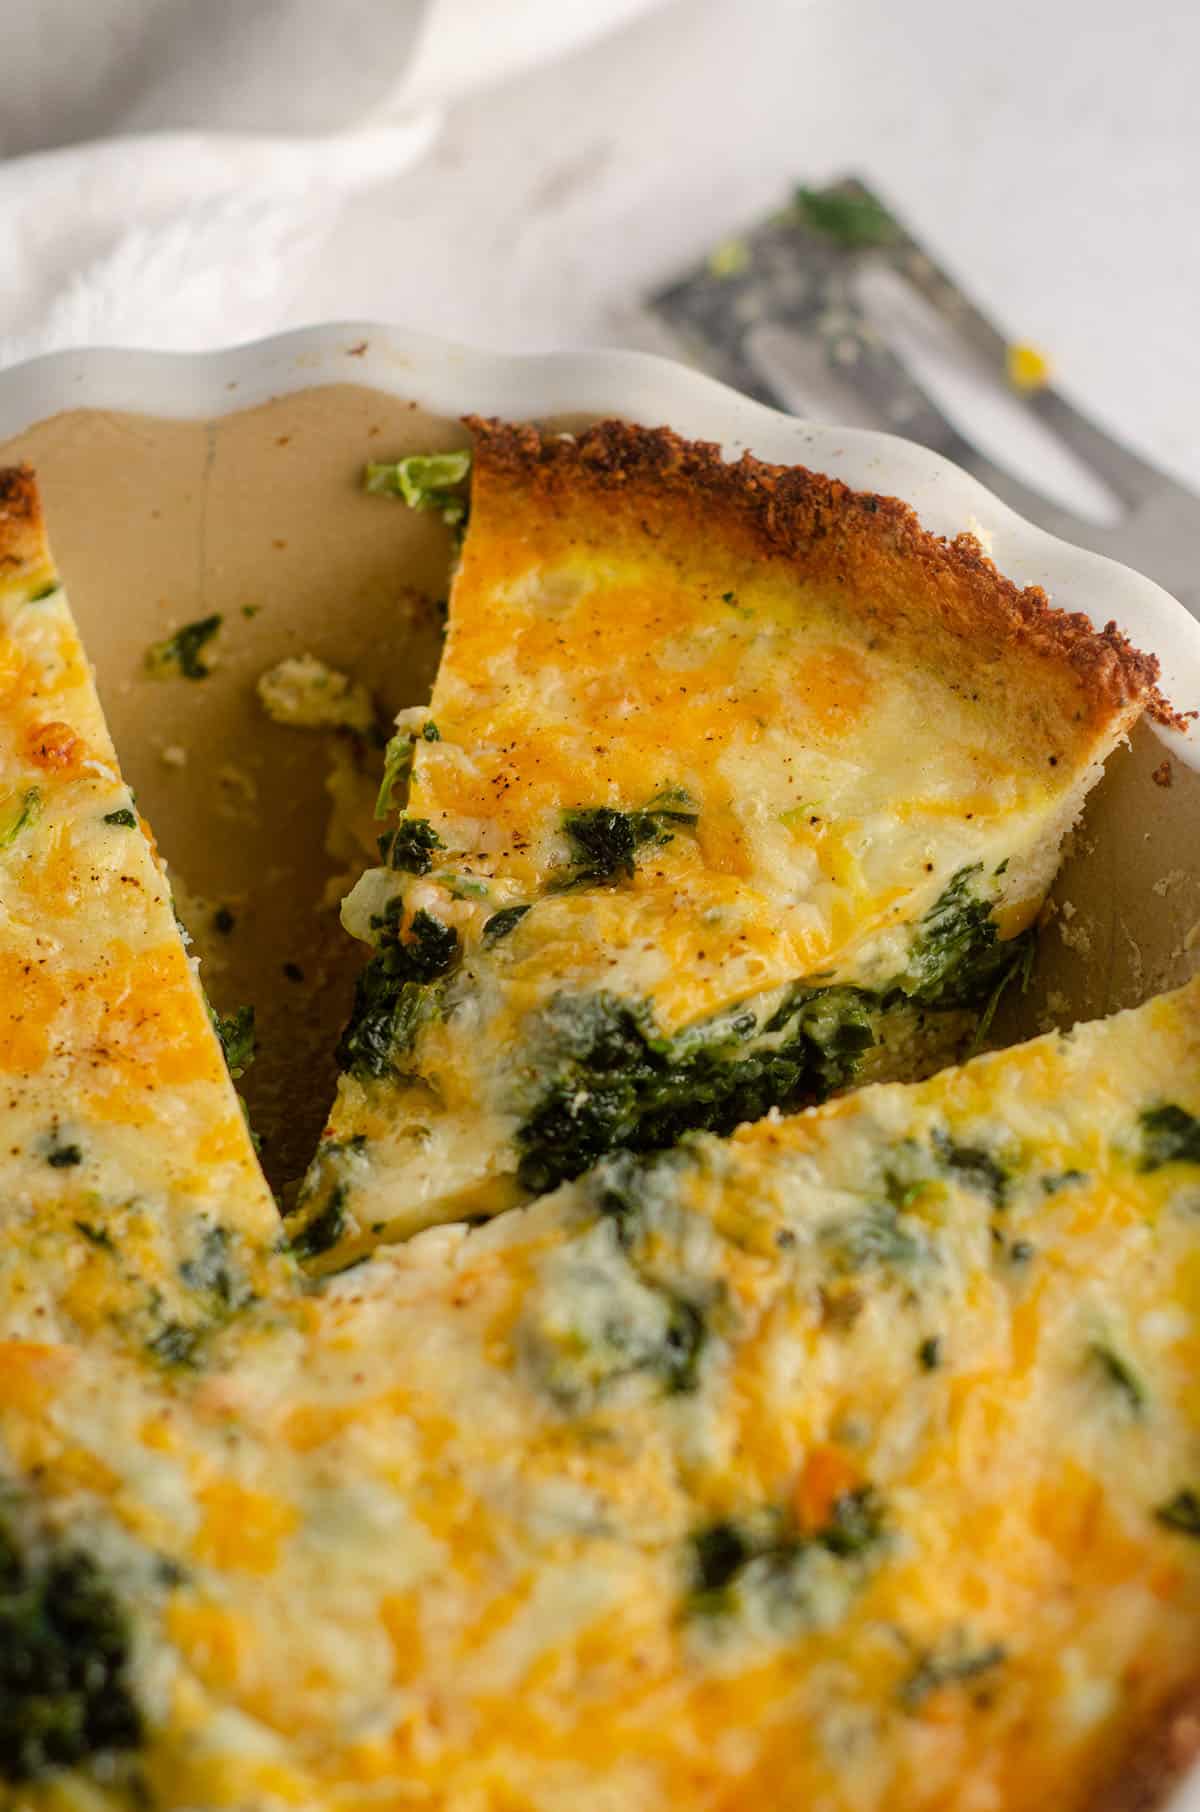
Once it’s all in, bake it for about 15-20 minutes, or until the edges brown and the overall color is browning as well.
While my crust baked, I started to sauté my vegetables (seasoned with a pinch of salt and pepper).
ALL THE VEGGIES!
For this recipe, I used frozen chopped spinach. I went this route because:
1. it’s easier than sweating down a bunch of spinach
2. it’s already chopped and
3. it comes in a 10oz block which was the perfect amount I needed for my quiche.
No measuring!
Just make sure that once your spinach is defrosted, you squeeze out the water just like you did with your cauliflower (again, make sure it’s cool enough for you to do so if you thawed it in the microwave).
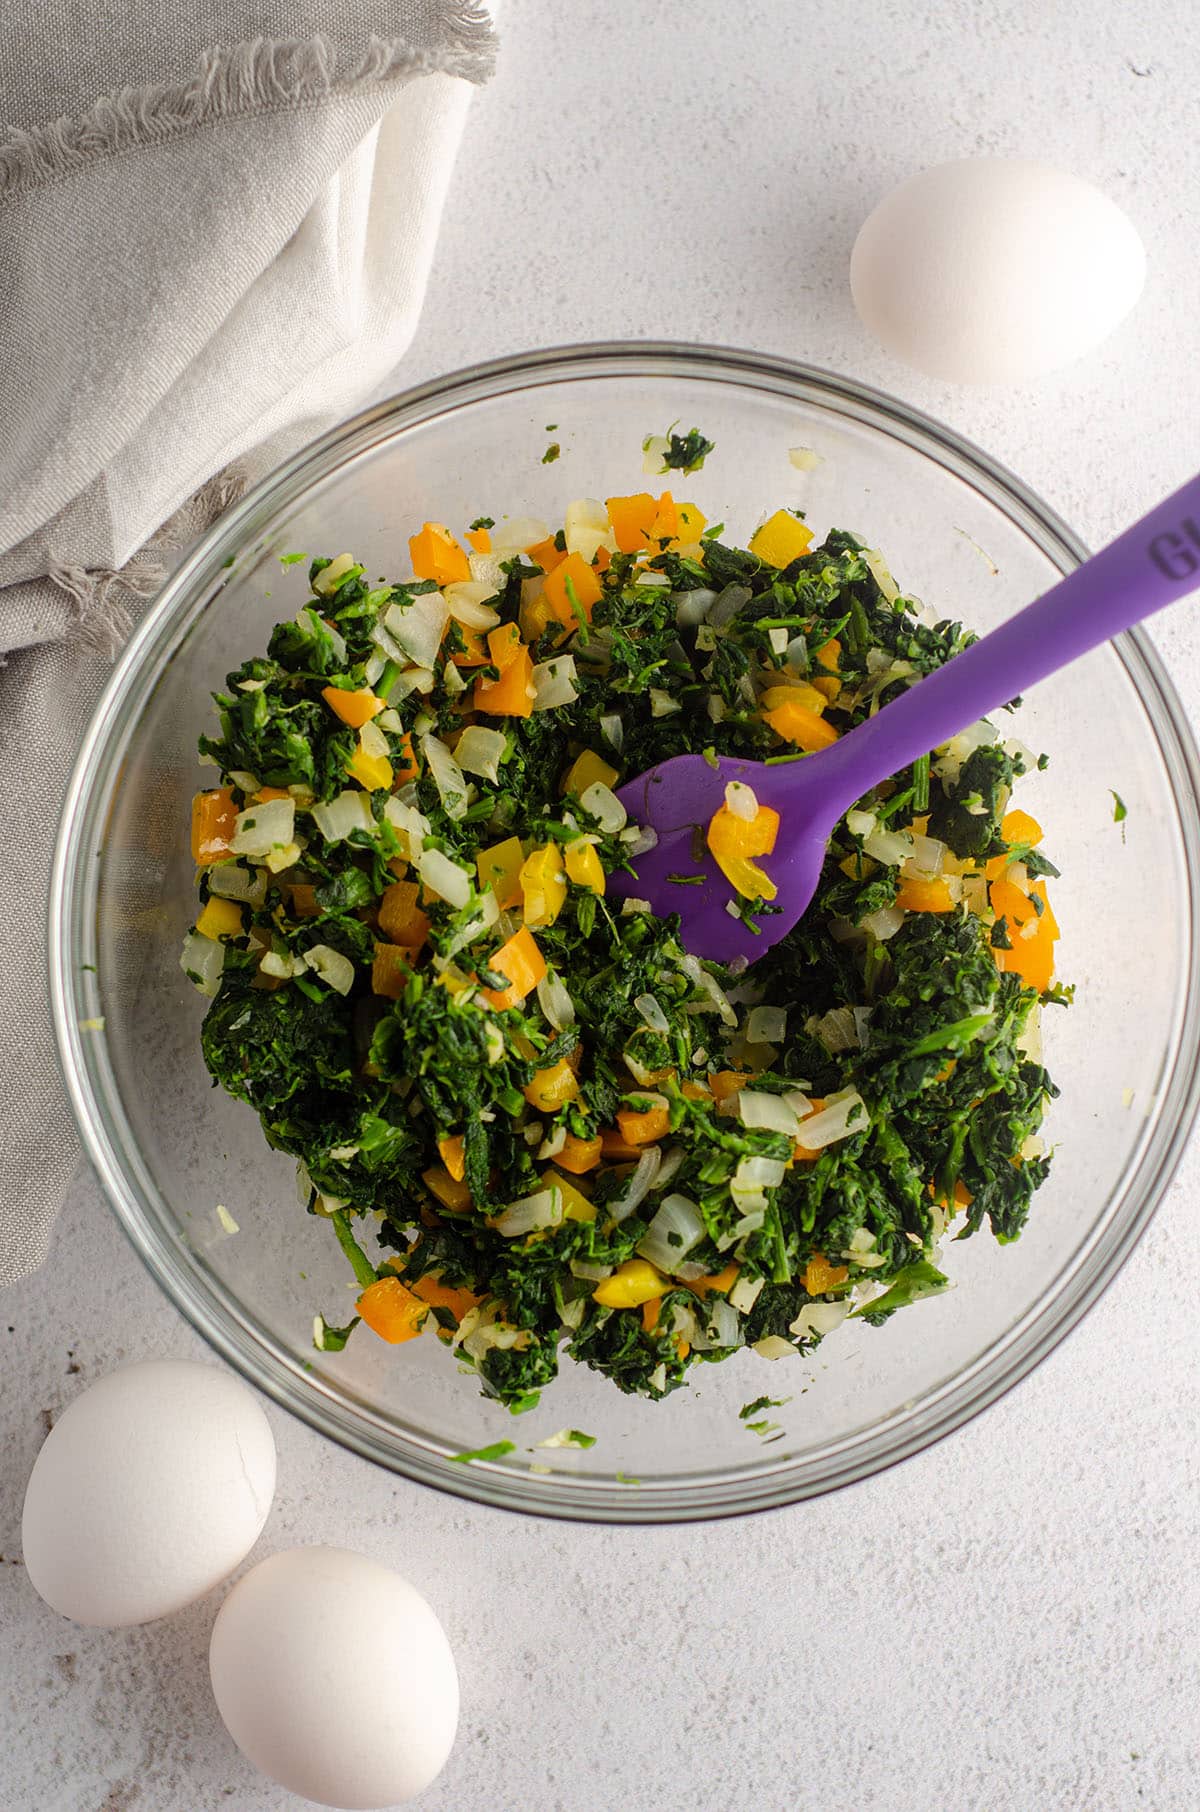
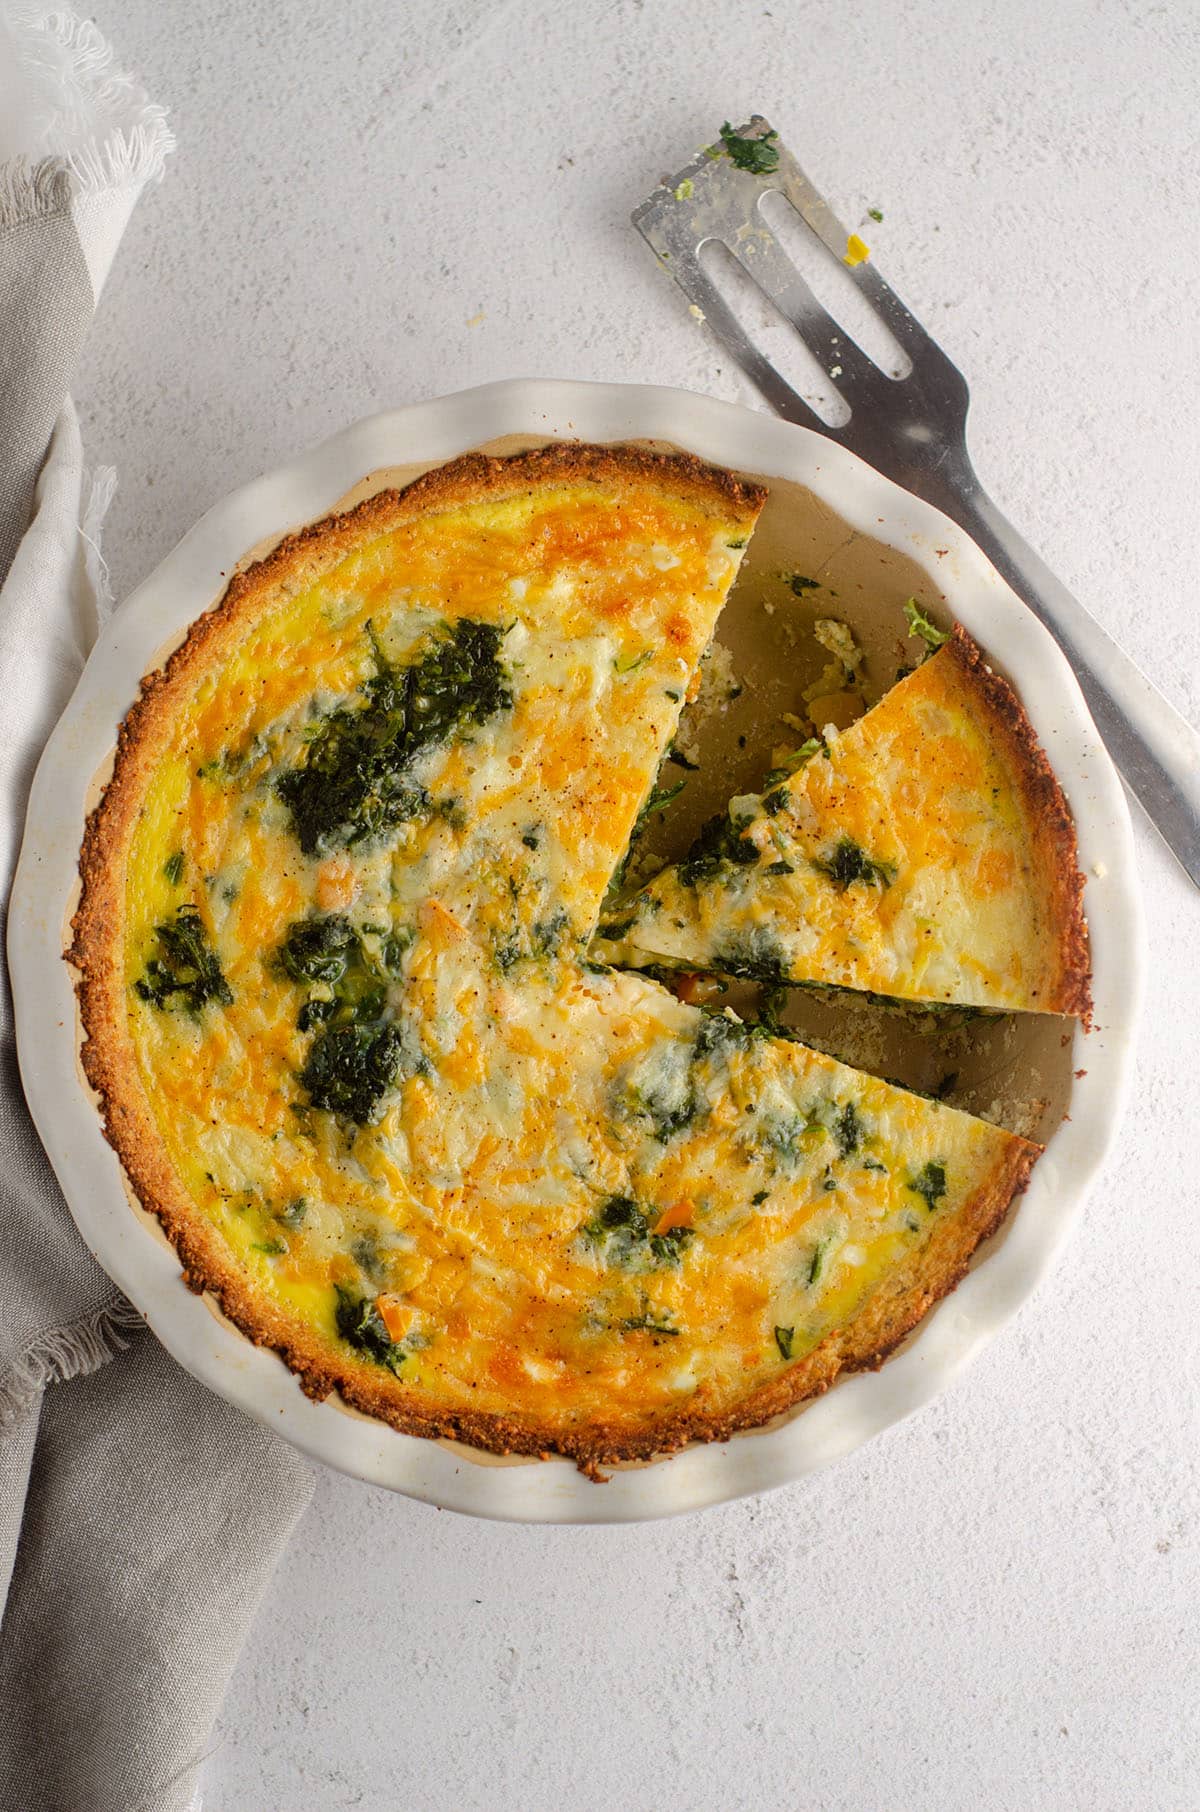
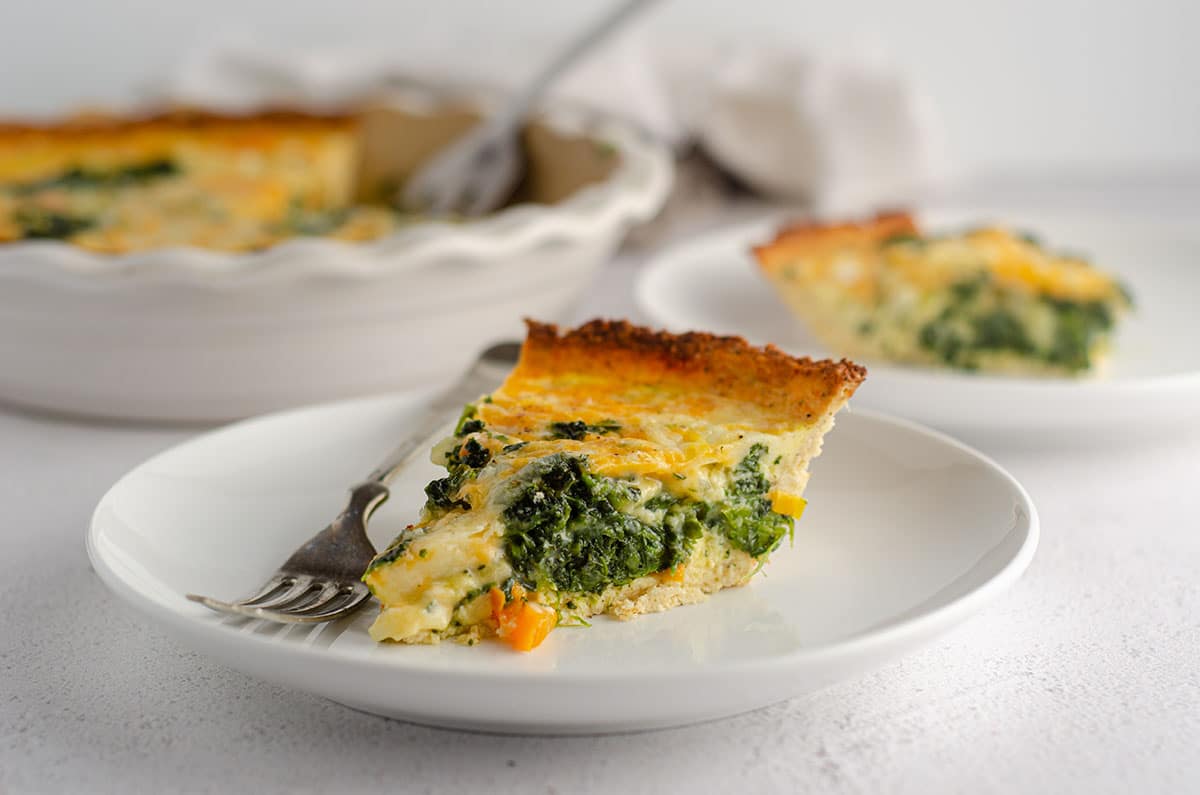
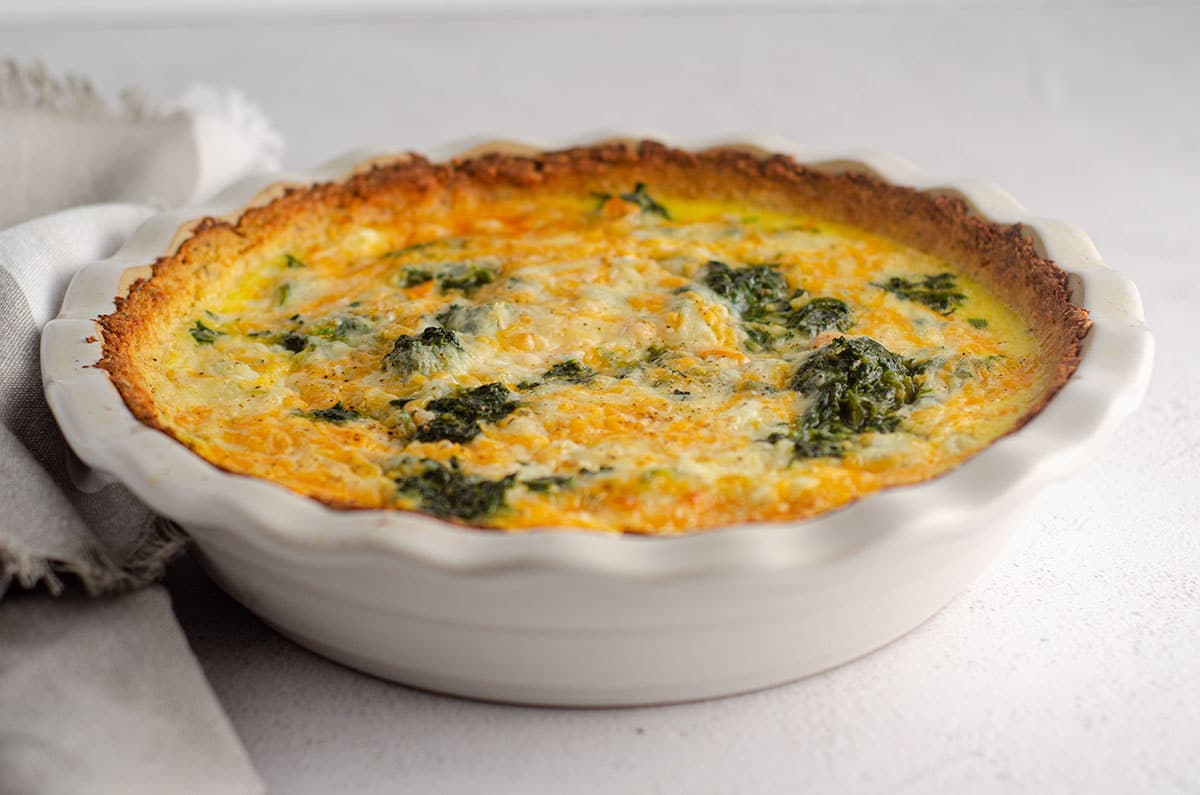
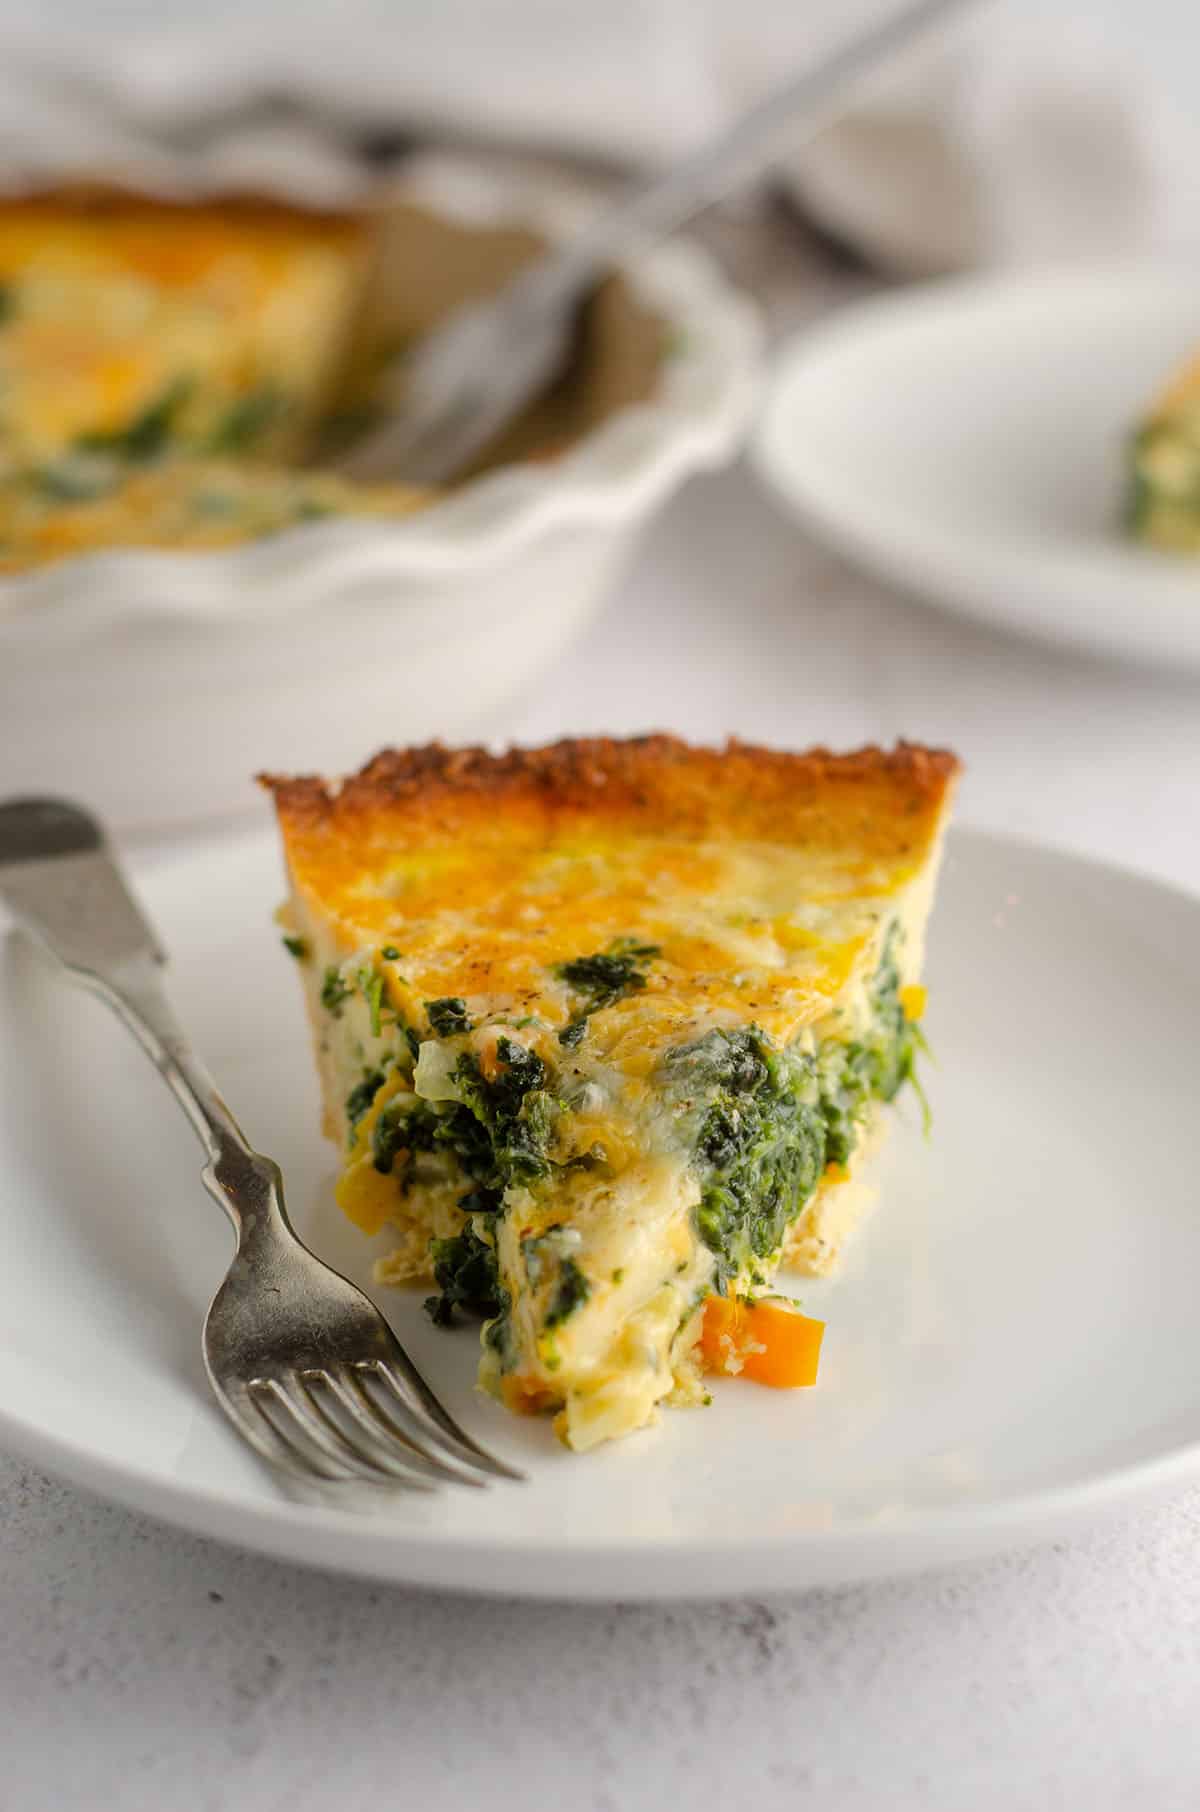
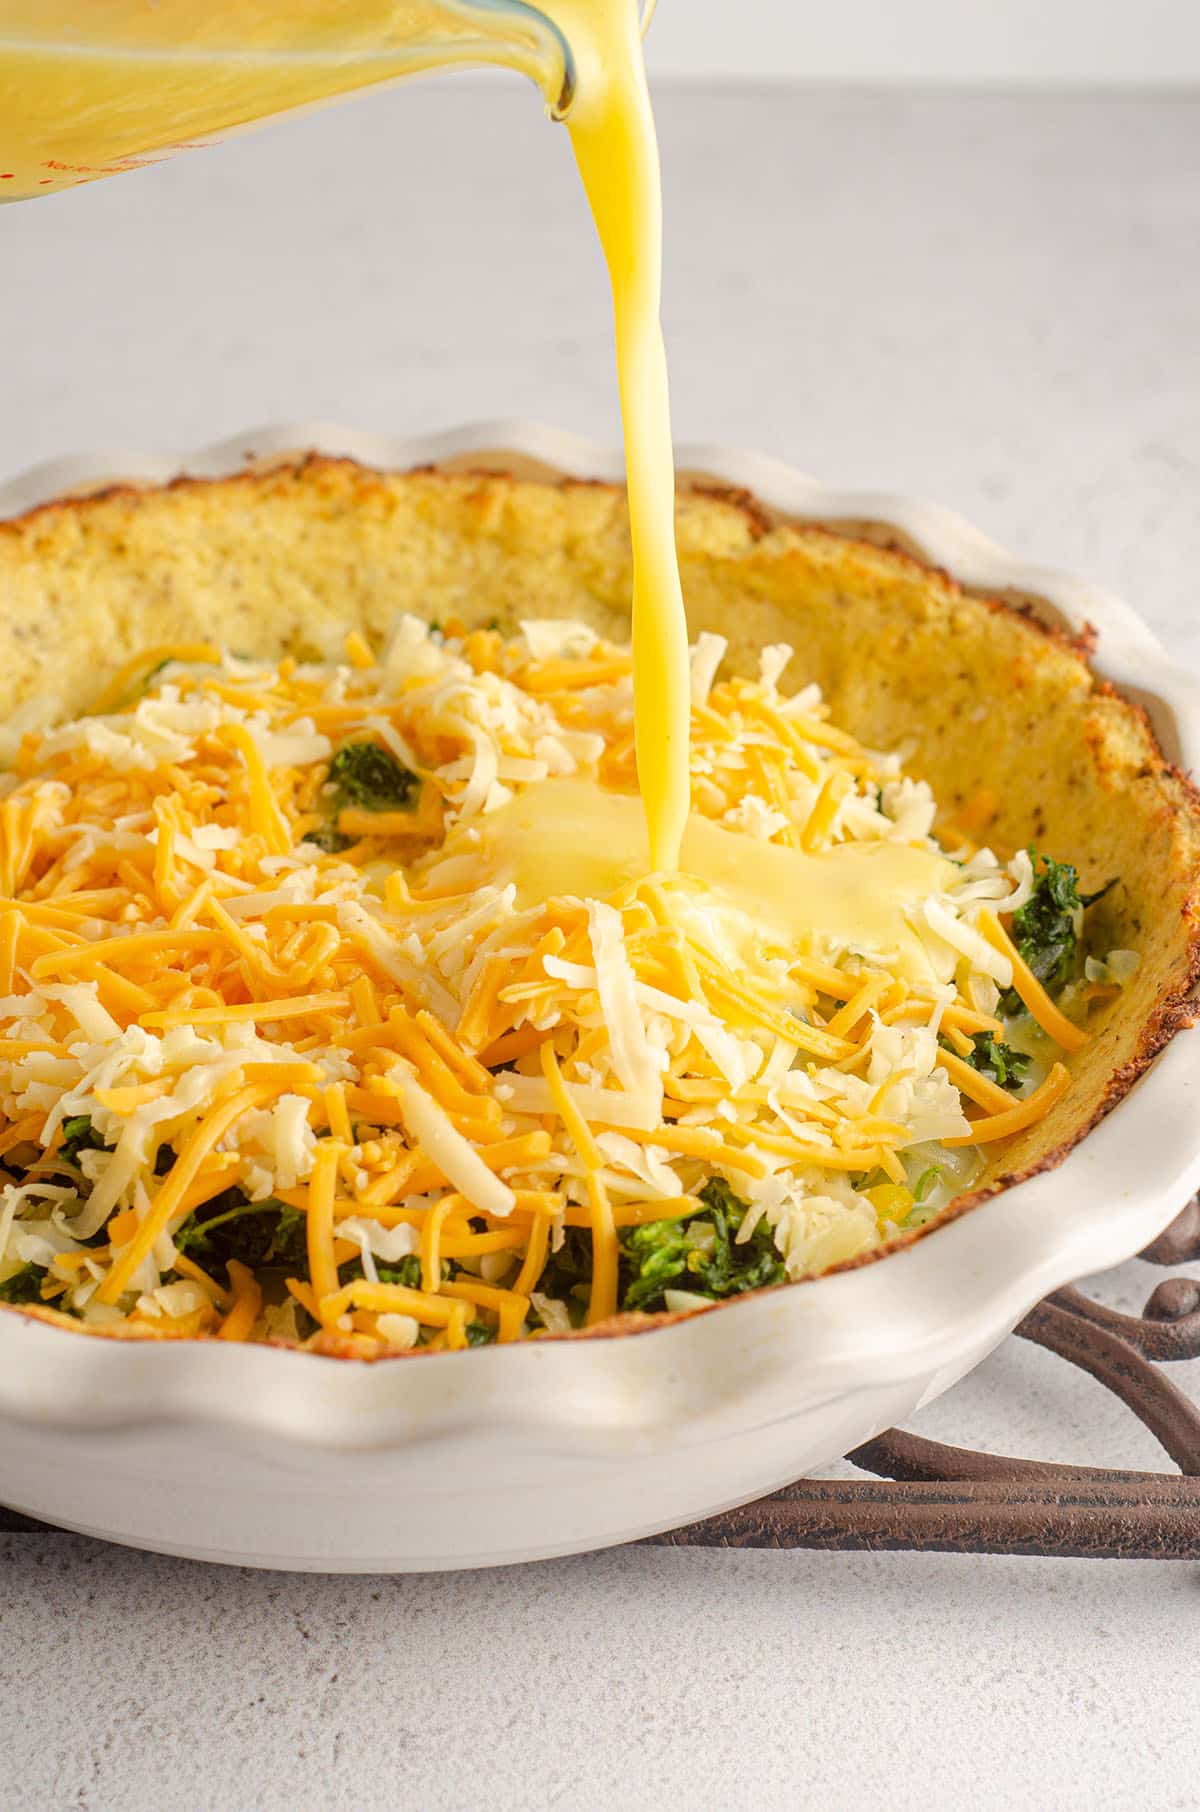
After all of the vegetables are cooked, it’s time to whip up the simple spinach and vegetable mixture, layer it in the bottom of the baked cauliflower pie crust, and sprinkle the cheese right on top of that layer.
For my cheese, I like to shred my own off the block and use a creamy blend of sharp cheddar and Monterey Jack.
The eggs, milk, salt, and pepper get whisked together in a bowl and then evenly poured on top of the cheese mixture.
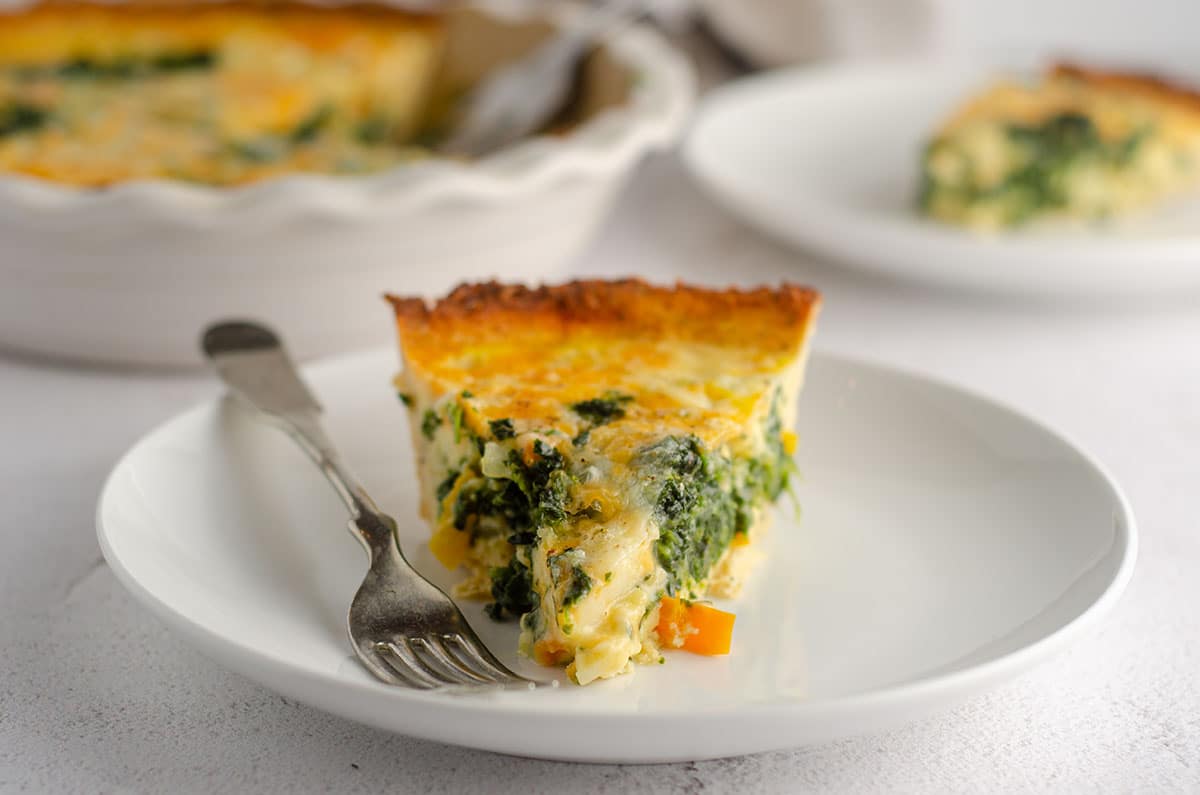
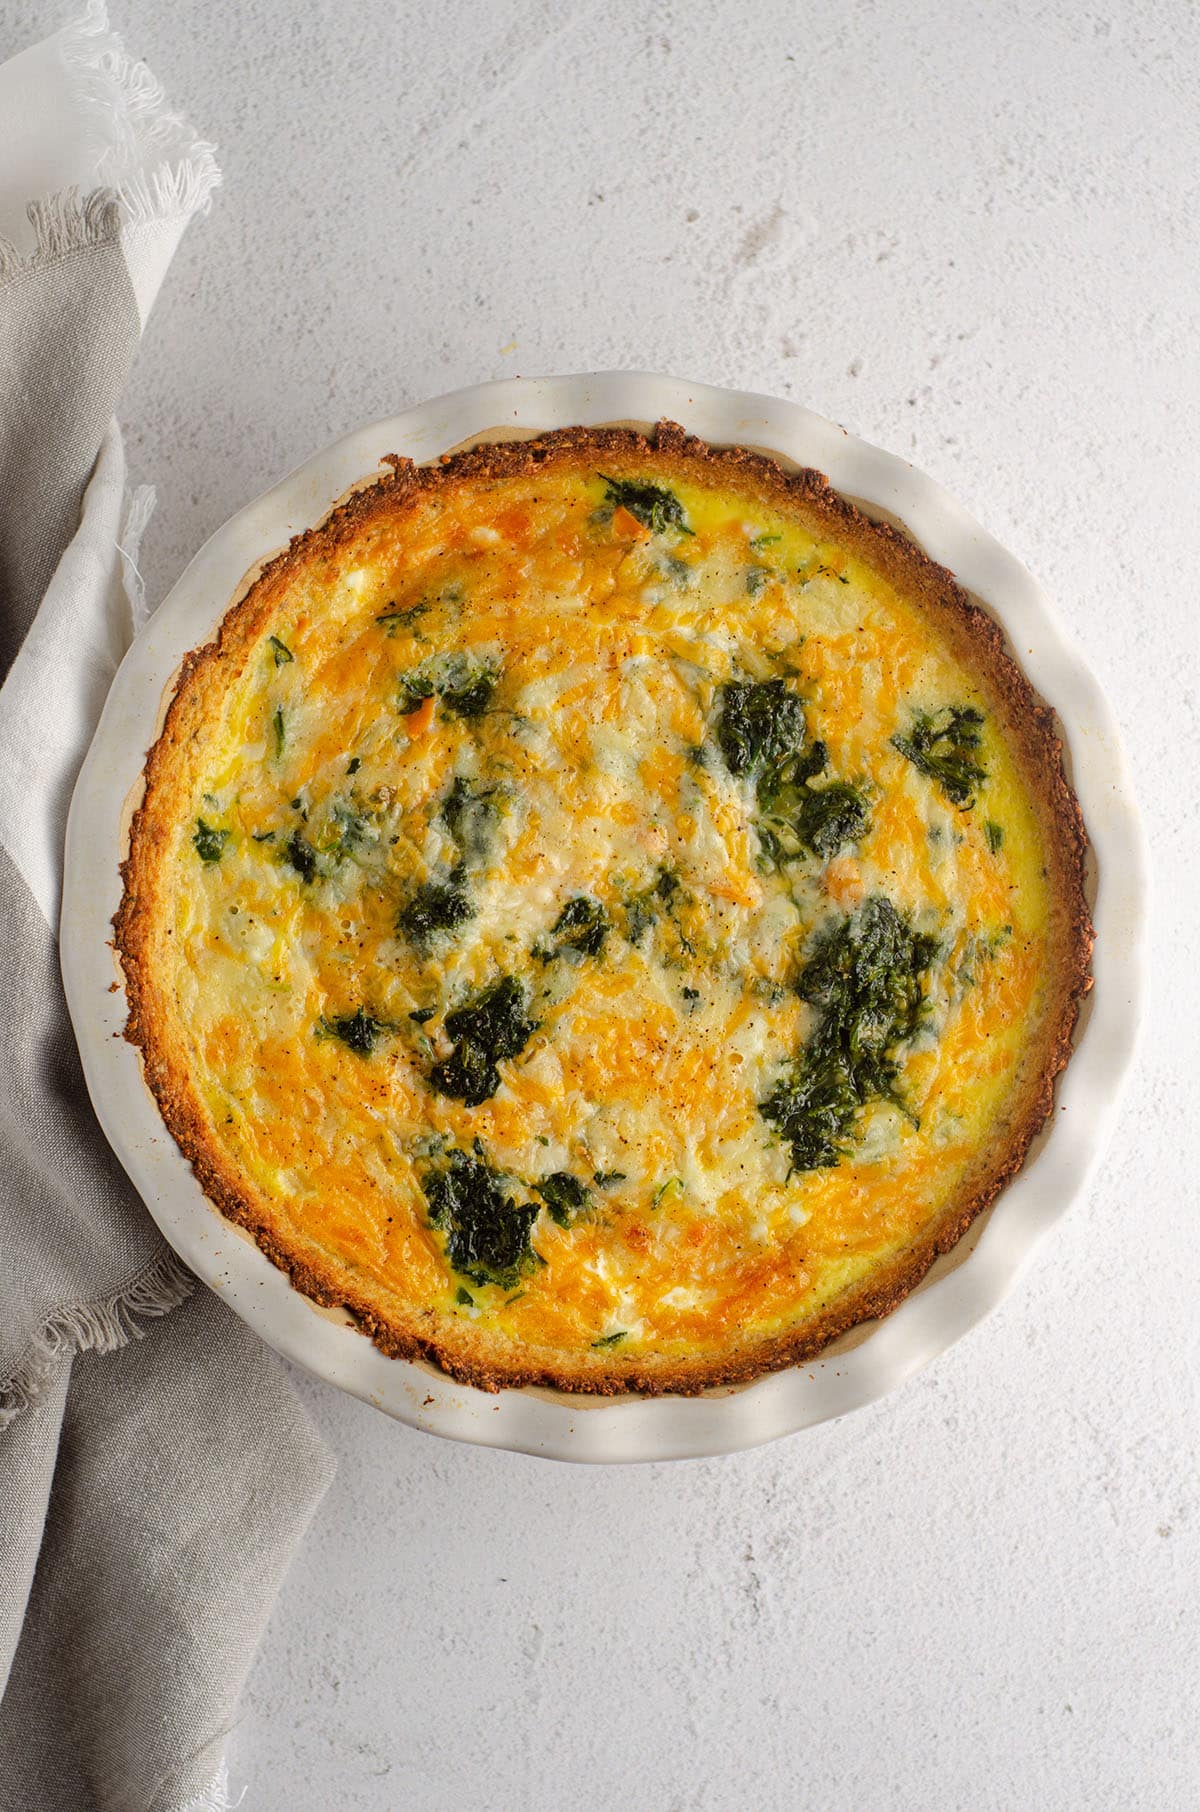
Although we typically dig right in once it’s finished baking, we find the best taste to be after it has settled a bit in the fridge. The flavors marinate together better and, surprisingly, the crust gets crustier.
PERFECT FOR ANY MEAL
This quiche is the perfect breakfast, although if we’re being honest, we have had it for lunch AND dinner. So it never lasts long in our house!
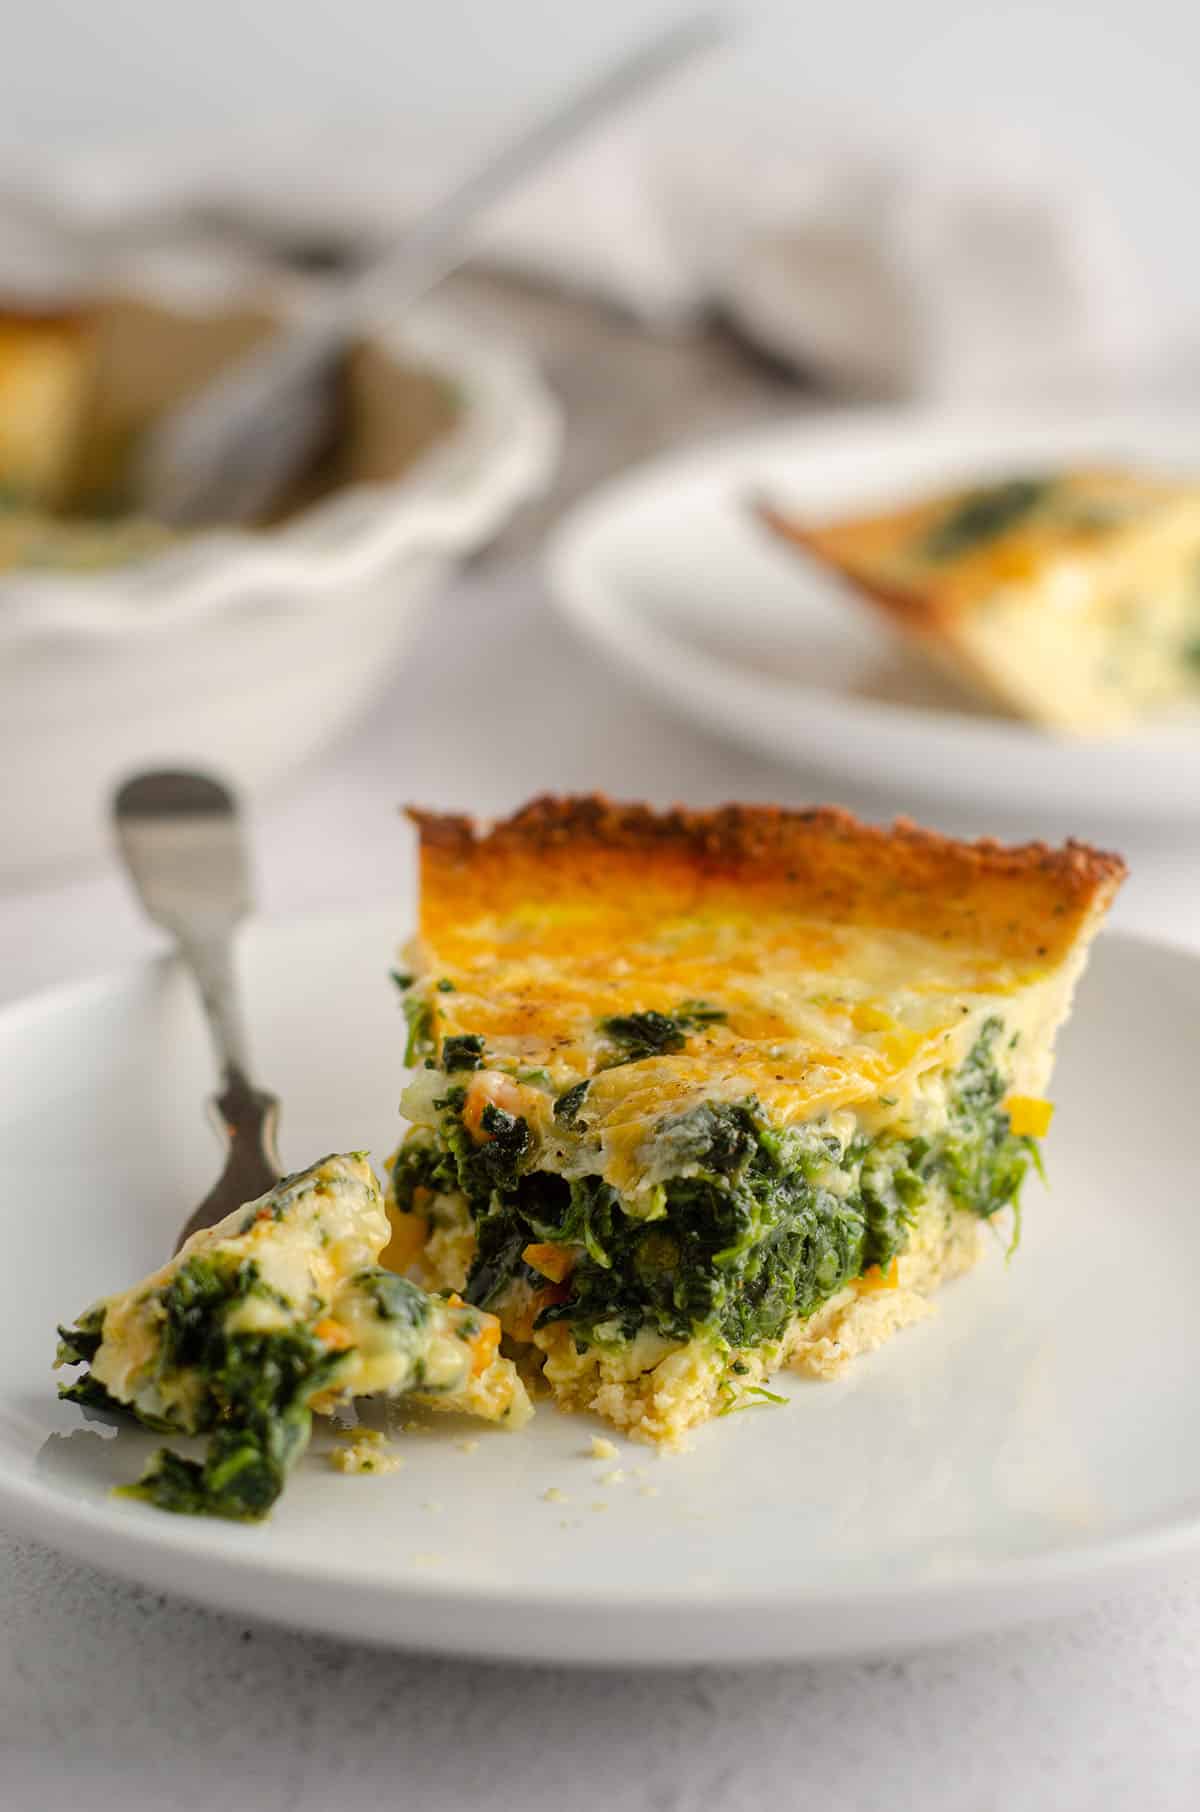
The quiche itself is perfectly cheesy, speckled with sweet vegetables, and blends nicely with the boldly seasoned cauliflower crust (which taste-testers can usually tell is different, but aren’t exactly sure in what way, and still delicious).
Change up your vegetables, play around with your cheeses, but certainly do not be intimidated by this “crust.” It might surprise you and your next breakfast guests!
If you’re interested in any other recipes that would go nicely with this low carb crust for quiche, check out any of the following quiche recipes on my blog:
• crustless mushroom & tarragon quiche
• asparagus quiche
• crustless caprese quiche
BONUS: this is actually a keto cauliflower pie crust, so if you’re looking for one of those, BINGO!
Plus, it’s lasted the test of time here at FAF. And I don’t think it’s going anywhere any time soon!
Want to continue getting your veggie fix? Try my veggie nuggets (perfect for kids) or zesty cucumber salad next.

Cheesy Vegetable Quiche with Cauliflower Crust
Ingredients
CAULIFLOWER CRUST
- 1 medium head of cauliflower
- ½ cup (45g) grated Parmesan cheese
- 1 large egg
- ½ teaspoon dried oregano
- ¼ teaspoon garlic powder
- ¼ teaspoon salt
- ¼ teaspoon black pepper
FILLING
- 1 10-ounce package (283g) frozen chopped spinach thawed and drained
- 1 large bell pepper chopped
- ½ of a yellow onion chopped; about ⅓ cup
- 2 cloves garlic chopped
- 4 large eggs
- 2 large egg whites
- 1 cup (240g) milk any
- ½ teaspoon salt
- ¼ teaspoon black pepper
- 4 ounces (114g) shredded cheese
Instructions
CAULIFLOWER CRUST
- Preheat the oven to 450ºF (232ºC). Spray an 8″ or 9″ pie dish with non-stick spray and set aside.
- Cut cauliflower into pieces, removing as much stem as possible and keeping the florets. Rinse the florets in a colander, place in a food processor, and pulse florets until they resemble corn meal.1 medium head of cauliflower
- Place processed cauliflower in a medium size microwave safe bowl and cook in the microwave on high for 5 minutes. Remove from microwave, set aside, and allow to cool for 10 minutes.
- After cauliflower has cooled, use a strong kitchen towel to wring out all of the moisture. I will sometimes use two different towels separately to get out as much moisture as possible. Transfer dry cauliflower back to bowl.
- In a small bowl, blend together Parmesan cheese, egg, and spices. Add to cooled cauliflower and mix together with a spatula or your hands.½ cup (45g) grated Parmesan cheese, 1 large egg, ½ teaspoon dried oregano, ¼ teaspoon garlic powder, ¼ teaspoon salt, ¼ teaspoon black pepper
- Transfer cauliflower to pie dish, smoothing it out with your hands, making sure to spread it evenly to cover the bottom and the sides of the dish.
- Bake crust for 15-20 minutes until edges are brown and overall crust starts browning. Allow to cool on wire rack while you prepare the filling.
FILLING
- Decrease the oven to 350ºF (177ºC). Blot or squeeze out as much moisture as you can from your thawed spinach. If you heated your spinach to thaw it, make sure it is cool enough to handle. Put dry spinach in a large bowl and set aside.1 10-ounce package (283g) frozen chopped spinach
- Spray a large skillet with non-stick spray and heat over medium-high heat. Add bell pepper, onion, and garlic and season with a pinch of salt and black pepper. Cook mixture for 5-6 minutes, stirring frequently, or until tender. Spoon the cooked vegetables into the bowl with the spinach. Stir to combine and allow to cool.1 large bell pepper, ½ of a yellow onion, 2 cloves garlic
- In a medium size bowl, preferably with a spout, whisk the eggs, egg whites, milk, salt, and pepper until thoroughly combined. Set aside.4 large eggs, 2 large egg whites, 1 cup (240g) milk, ½ teaspoon salt, ¼ teaspoon black pepper
- Spoon spinach and vegetable mixture into cauliflower crust, top with shredded cheese, and pour the egg mixture evenly on top of cheese layer. Place a pie shield or foil around the exposed crust to prevent from burning.4 ounces (114g) shredded cheese
- Bake quiche for 40-42 minutes or until filling is set. Cool for 10 minutes on a wire rack before serving. Cover tightly and store in the refrigerator up to 4 days, or in the freezer up to 2 months. Thaw in refrigerator overnight and bake at 350°F (177ºC) until warmed through, about 25 minutes.
Notes
Nutrition Disclosure
All nutritional values are approximate and provided to the reader as a courtesy. Changing ingredients and/or quantities will alter the estimated nutritional calculations.
Delicious!! Thank you! I’m beyond impressed that you had this recipe before Cauliflower crust was a thing, Lynn! Healthy, and so tasty. I’d been making Frittatas for years so only wish I’d found this before! Thanks for all the tips and helpful info too. I used Coconut Milk instead and turned out delicious!
Thanks so much, Laura! This is on my list to redo, rephotograph, and republish with updated info for later this summer. It’s one of my most popular posts– can’t believe I got in while cauliflower crust was still on the rise, hahaha.
Taste is a 5, but this is super labor, tool and time intensive, IMO. Lots of bowls, a frying pan, strainer, towel…I feel like my kitchen was full of utensils and equipment when I was done. Not to mention itty bitty cauliflower pieces. It had good flavor, but after all that work I think I’d probably try another recipe in the future. Thank you for sharing though and I look forward to trying more of your recipes!
Fair assessment– crustless is way less work! This is for those who want a crust but don’t want to use a traditional pie crust. I’m glad you liked it though!
I don’t have a food processor. What can I do in the step that calls for a food processor? I do have a hand mixer, but not a blender or juicer.
My next suggestion would be a blender, but if you don’t have that either, my best suggestion would be to chop up the cauliflower as tiny as possible and cook a couple more minutes than suggested to soften. Then chop again. You’ll probably be able to get the florets pretty tiny that way, though I can’t guarantee anything. Good luck and keep me posted!
Hey Lynn – this recipe is amazing! I made it for my mum who follows a keto diet, but we all loved it! And the leftovers were just as good as the first round. The only sub I made was whipping cream for the milk as that was all we had in the house (and threw in some bacon because … well … everything is better with bacon right) and it was fantastic! In fact, it reminded me of a cheese and onion tart I used to eat in a little French restaurant in London so … I’ve just made it again replacing all the veg with beautifully softened almost caramelised onions. Can’t wait to try it out.
That sounds amazing, Jeff! Thank you so much for your glowing review!
Hi! Thanks for the recipe, going to try it today! I would like to make many and freeze some. Anything I should know about to do this?
Step 5 gives freezing instructions– let me know if you have any other questions!
Would be a great recipe if you included how many calorie to 1 serving,
Hi, Jan! You are always welcome to put the recipe into a calorie calculator to find out the nutrition information. The majority of the recipes on my site have the nutrition information, but this is something I have to manually enable individually on each recipe. With 600+ recipes on my site, the fact that I’ve only had this capability for a couple of years, and my endless to-do list for creating and perfecting content so that it’s as informative as possible for my readers PLUS creating new content weekly and spending time with my family, it’s not something that will be 100% done any time soon. It’s a work in progress. I removed your 3-star rating since you do not appear to have made the recipe and, in my opinion, even if you absolutely loved the taste of it, I don’t think “not having nutrition information” is a reason to remove stars on a rating. Anyway, thanks for stopping by. I’ll update the information right away, on this Sunday morning at 7am 🙂
The recipe sounds really good, I wanna make it but I don’t have a microwave. Do you think I can steam the cauliflower first and then blend it? Or what would you suggest?)
Thanks in advance🙏🏻
Hi, Mila– yes! Any way you can soften the cauliflower is fine. Enjoy!
Question: would it be ok to sautee or bake the riced cauliflower (on lower heat)to get more of the water out via evaporation? Still squeeze after cooling but not so much work?
Hi, Elaine– that would be fine, too!