
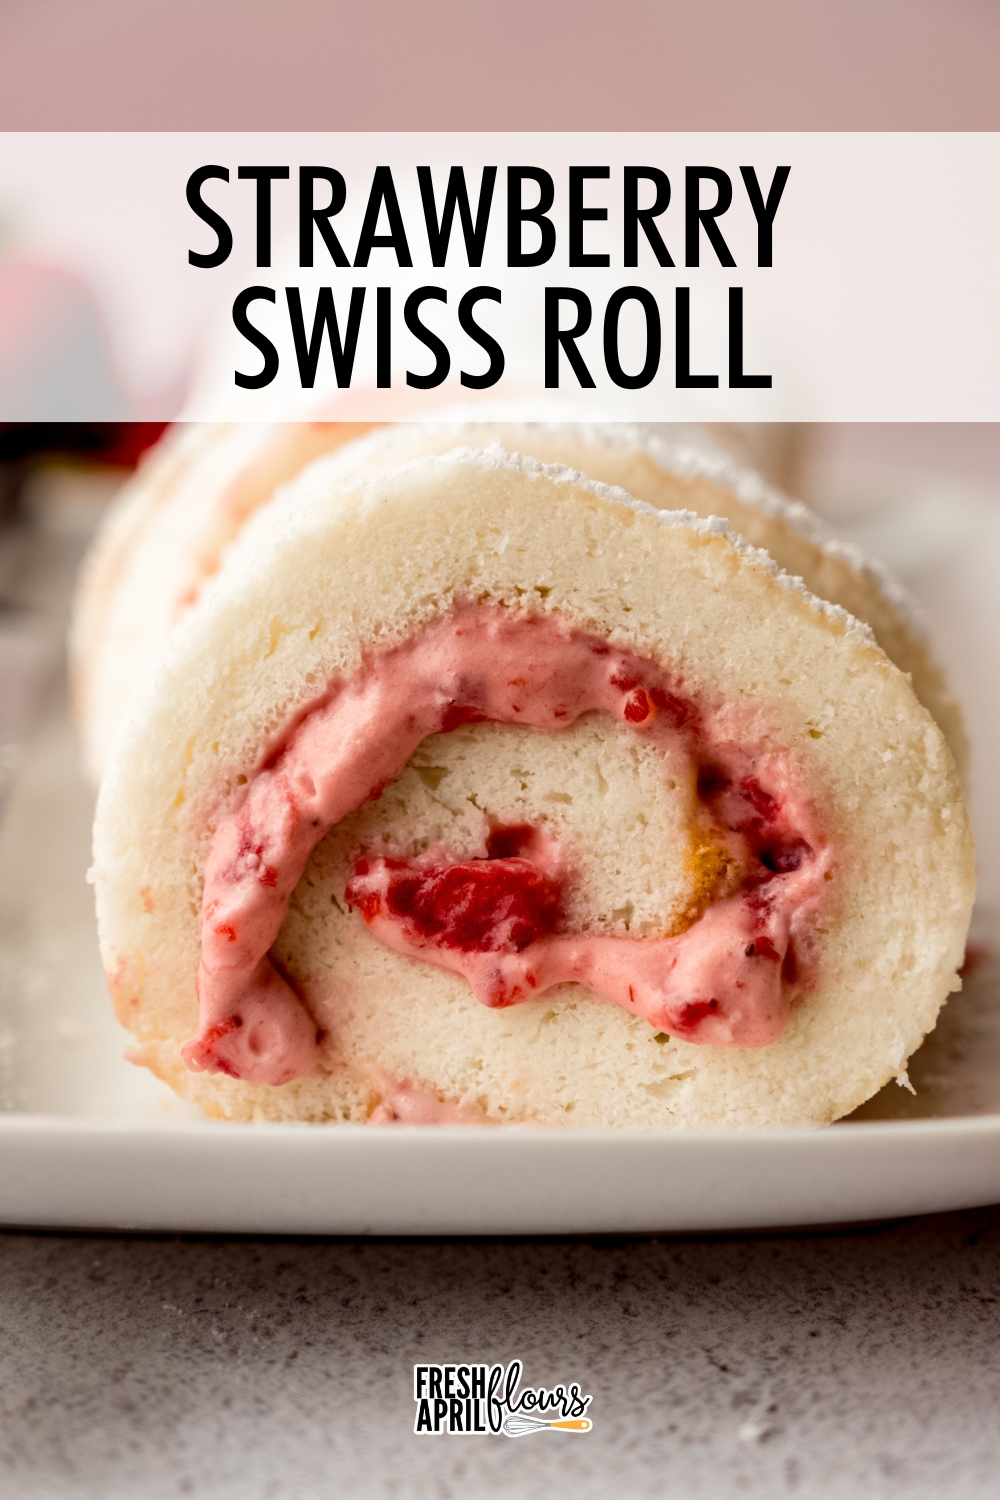
Strawberry Swiss Roll
As an Amazon Associate, I earn from qualifying purchases. Read the full disclosure here.
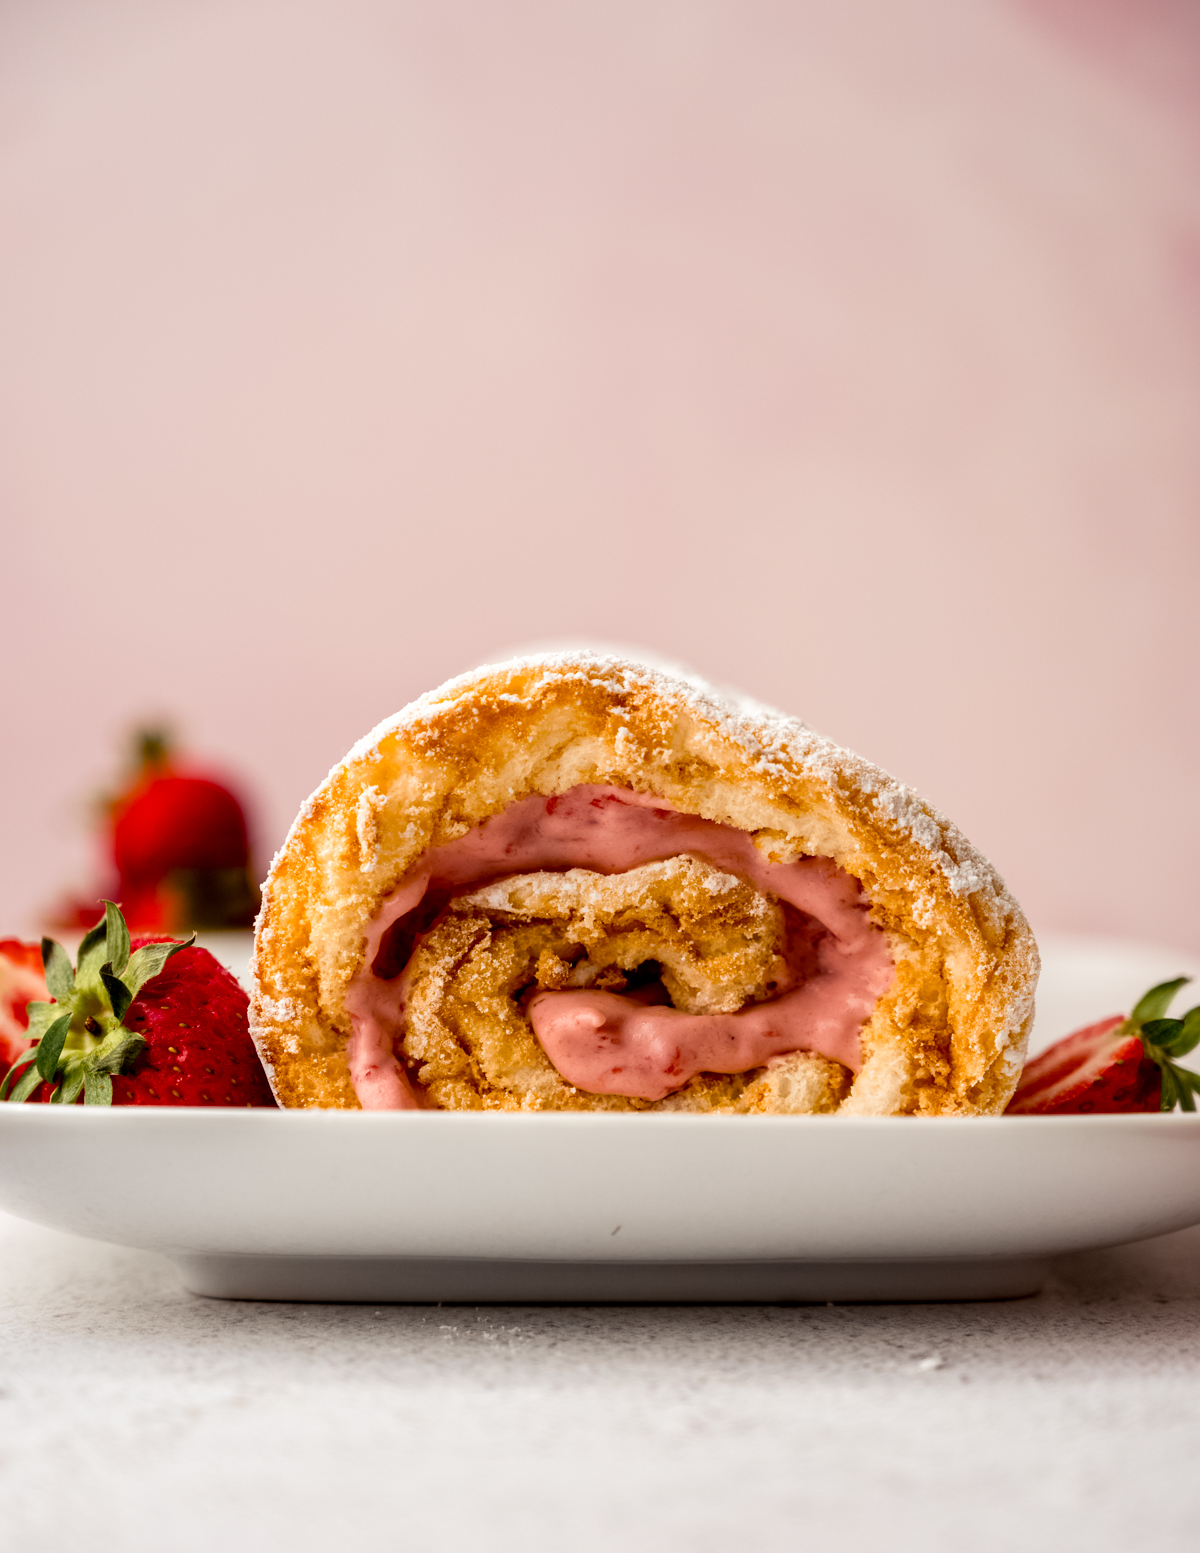
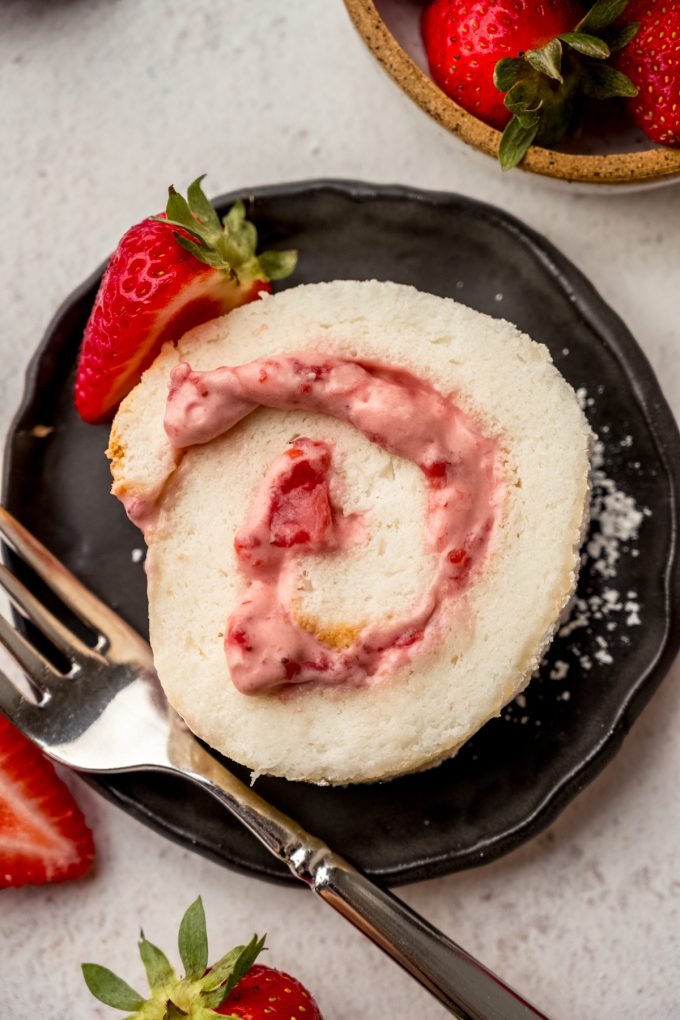
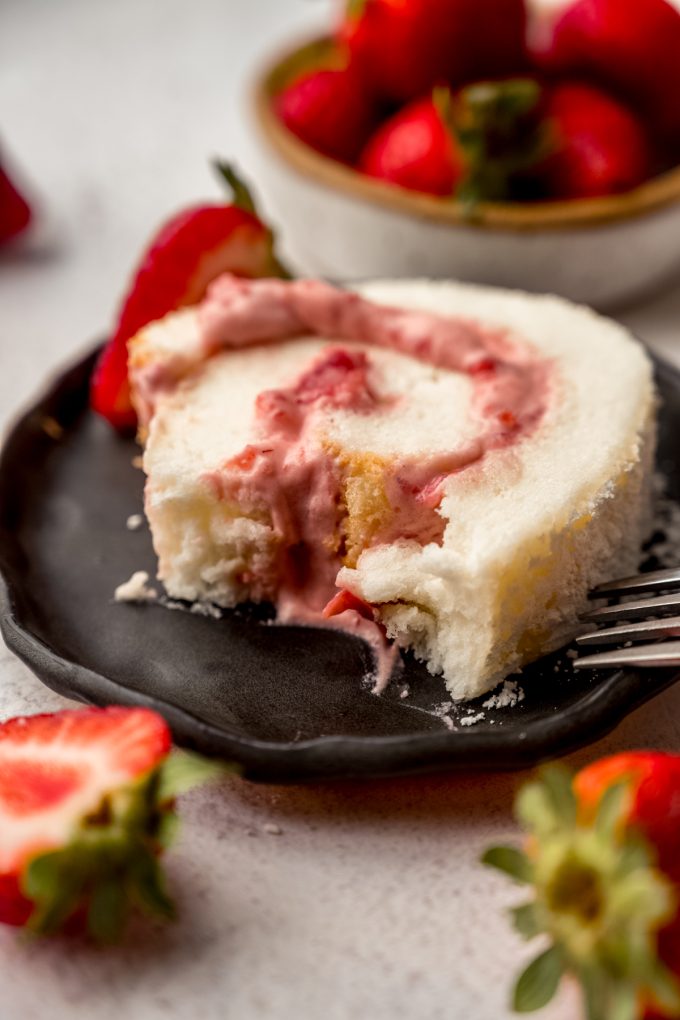
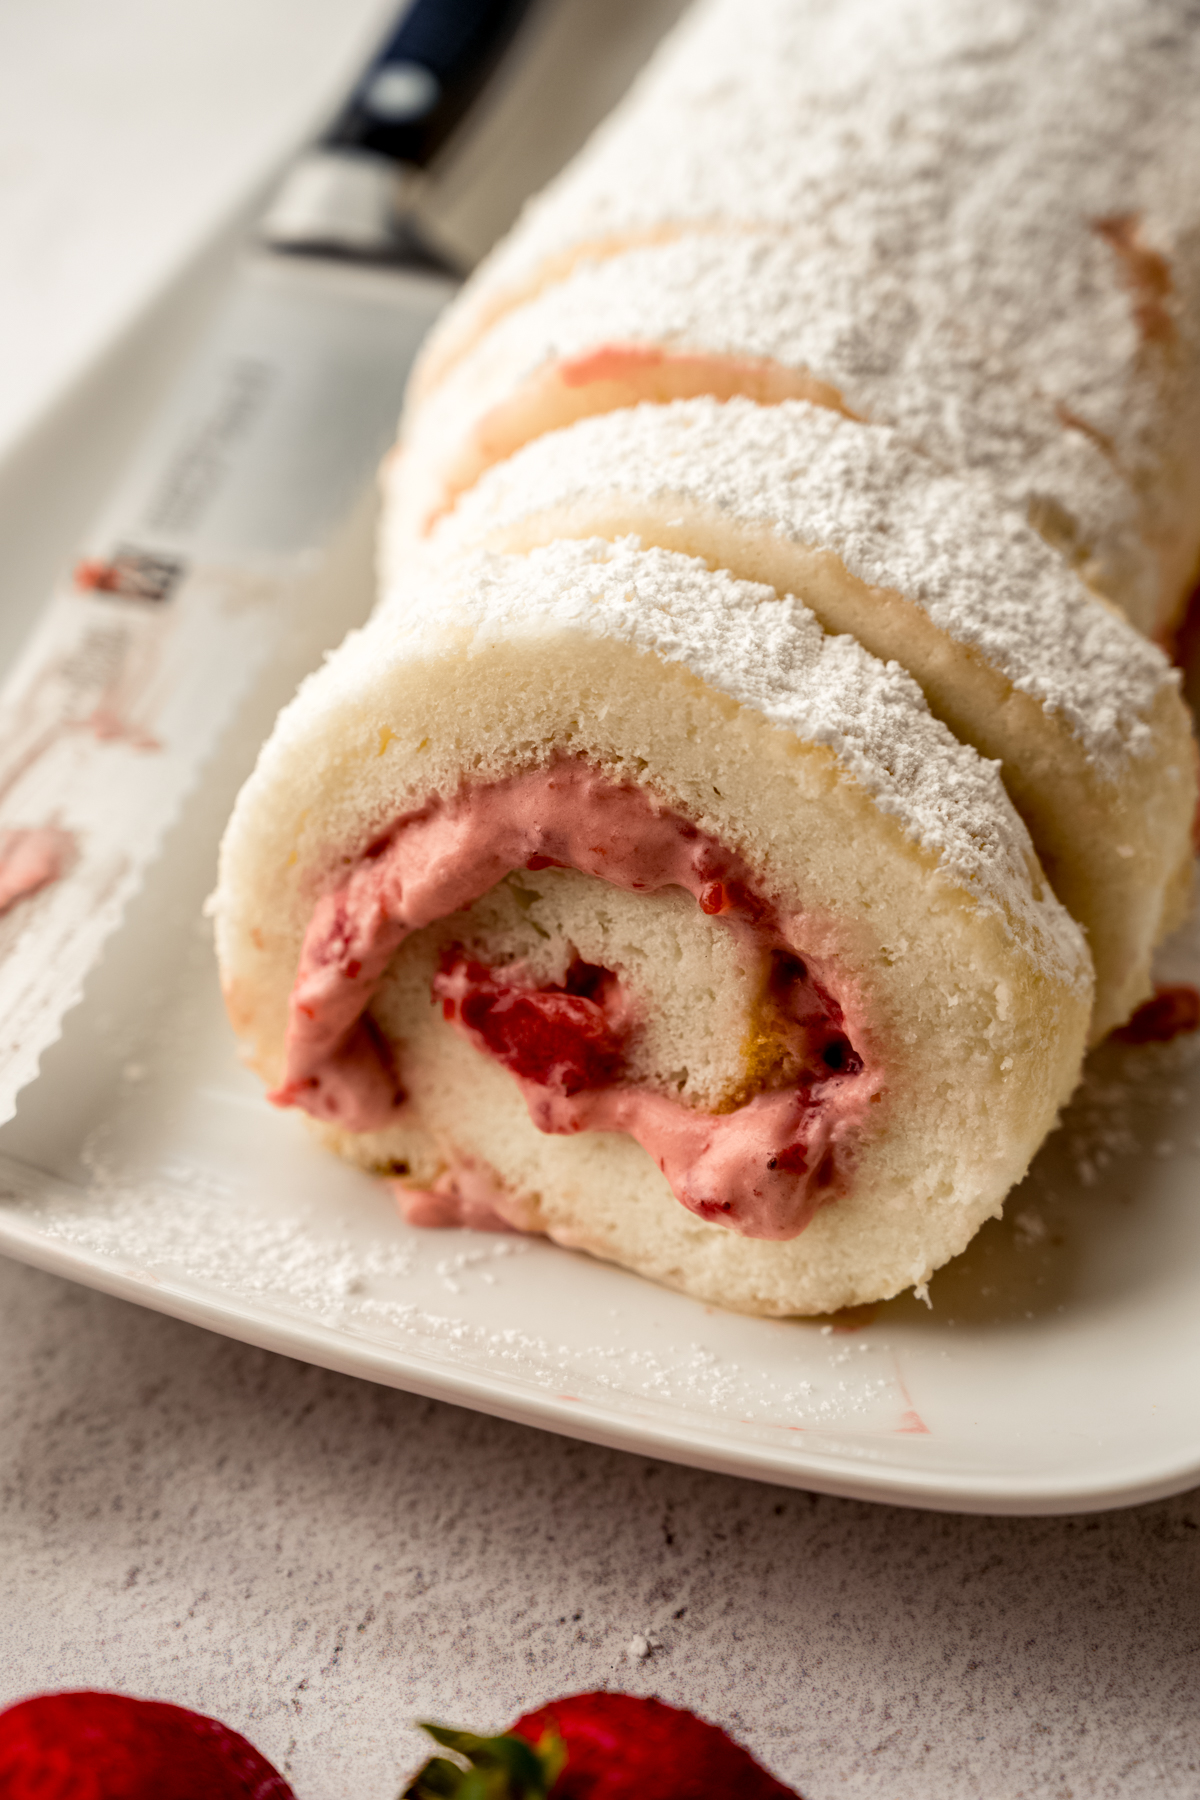
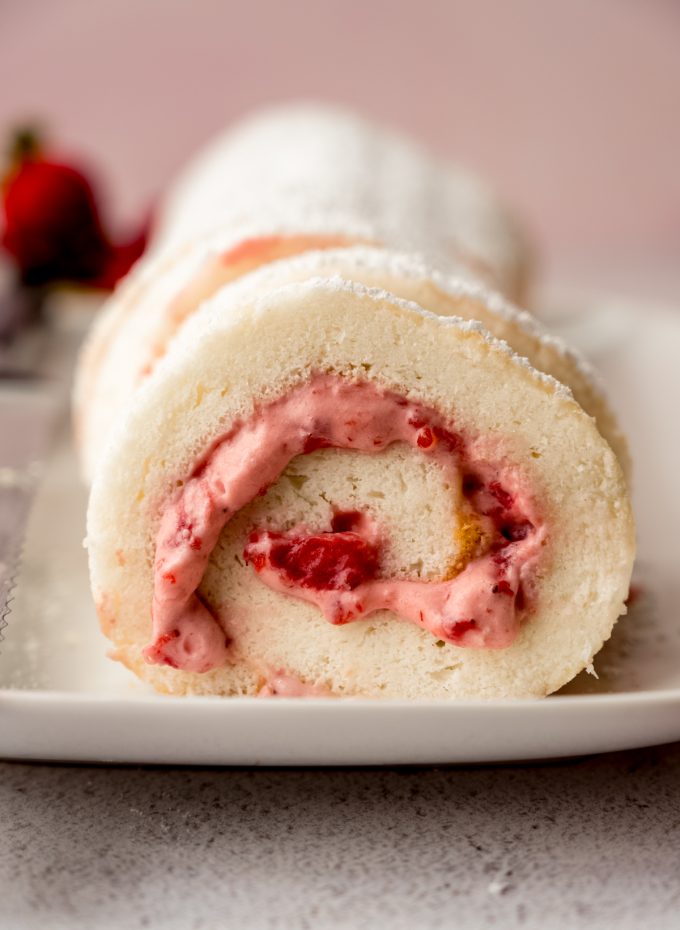
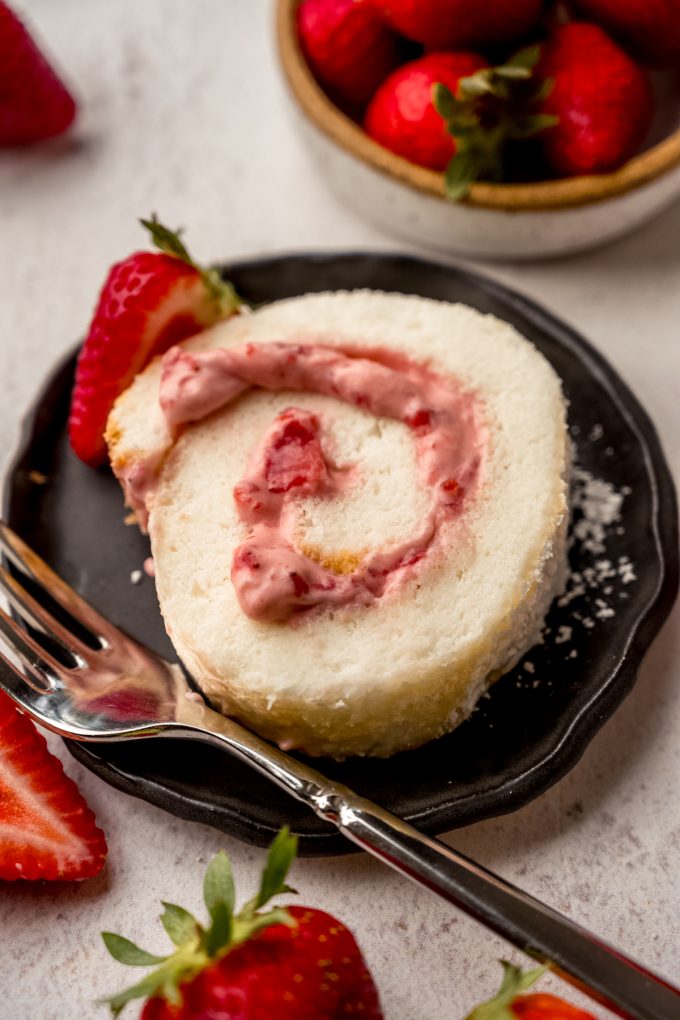
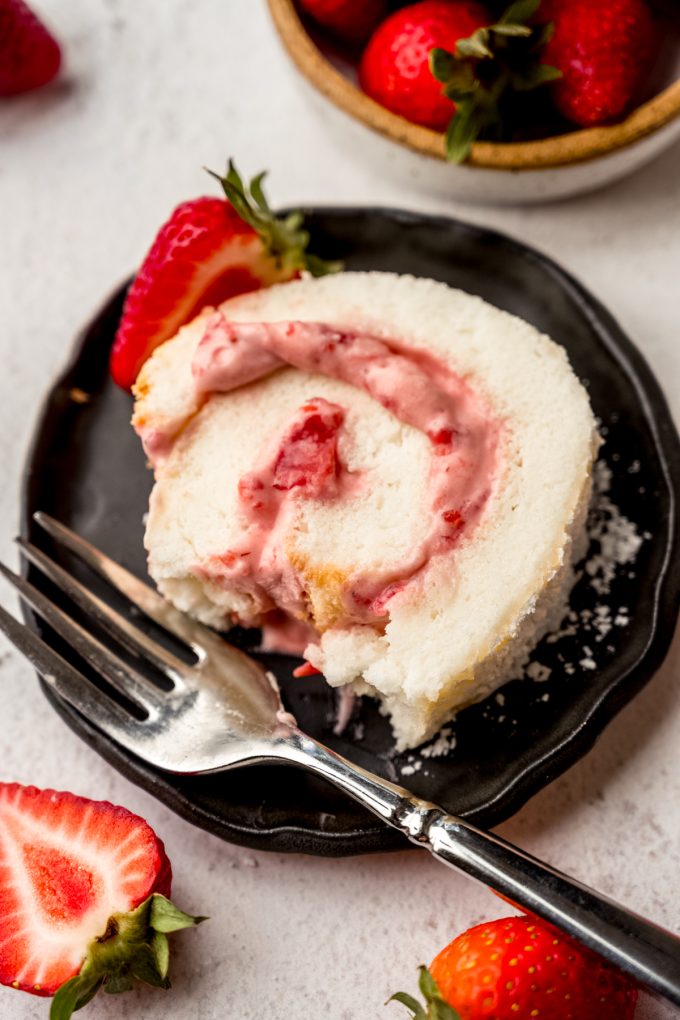
This jelly roll cake, otherwise known as a Swiss roll cake, is made from light and spongy angel food cake that’s filled with a homemade strawberry sauce and fresh whipped cream filling, revealing a charming swirled pattern once you slice it. Keep things easy by using a box mix or try your hand at making the angel food cake component from scratch, too!
This recipe is brought to you in partnership with Bushel and Berry®.
A CAKE THAT’S DRESSED TO IMPRESS
She’s a beaut, isn’t she? *insert heart eye emoji*
She looks complicated, doesn’t she? *insert spiral eye emoji*
Would you believe me if I told you that you (yes, you!) can absolutely do this? *insert surprise face emoji*
Listen, I’ve been there. A Swiss cake roll? You mean, I’m baking a cake and then rolling it up? Nope. I’m outta here. Where’s my strawberry layer cake?
But believe it or not, when I decided to rip the bandage off and just see what this whole jelly roll cake business was about, it wasn’t as hard as I’d expected it to be. And lucky for you, I had my fair share of testing and repeating the results so that you succeed on your first try, guaranteed.
You might be really happy to know that although I will always encourage a from-scratch bake around here, especially when it comes to cakes, there is a time and a place for a boxed cake mix, and this is one of those times. Just like cake batter dip, red velvet biscotti, red velvet pancakes, strawberry poke cake, Butterfinger poke cake… All times when the recipe is meant to be quick and painless.
Now, don’t get me wrong, if you want to make the angel food cake component from scratch, be my guest! It’s just a lot of work for a cake that needs more than the traditional trimming/stacking/frosting that layer cakes and even less of those things than sheet cakes do.
The real scratch components that matter lie in the filling: a strawberry sauce made from cooked strawberries that gets folded into fresh whipped cream. Believe me, there is no substitute for fresh of either of these parts of this strawberry Swiss roll cake recipe. We’ll get to why in a bit!
HERE’S WHAT YOU’LL NEED
Aside from ingredients, you’ll need some specific equipment, too. Don’t worry, you likely have most of the equipment already, but if not, the pan you’ll need is inexpensive, and you’ll definitely find additional uses for it (mine is one of my frequent flyers).
INGREDIENTS
ANGEL FOOD CAKE MIX: like I said, you’ll need a box of angel food cake mix. Jelly roll cakes are meant to be light, fluffy, and spongy so they can adapt to the necessary shaping. If you’re feeling jazzy, you can make it yourself using my angel food cake recipe. In addition to your cake mix, you’ll need the ingredients it calls for on the box, which is typically just water.
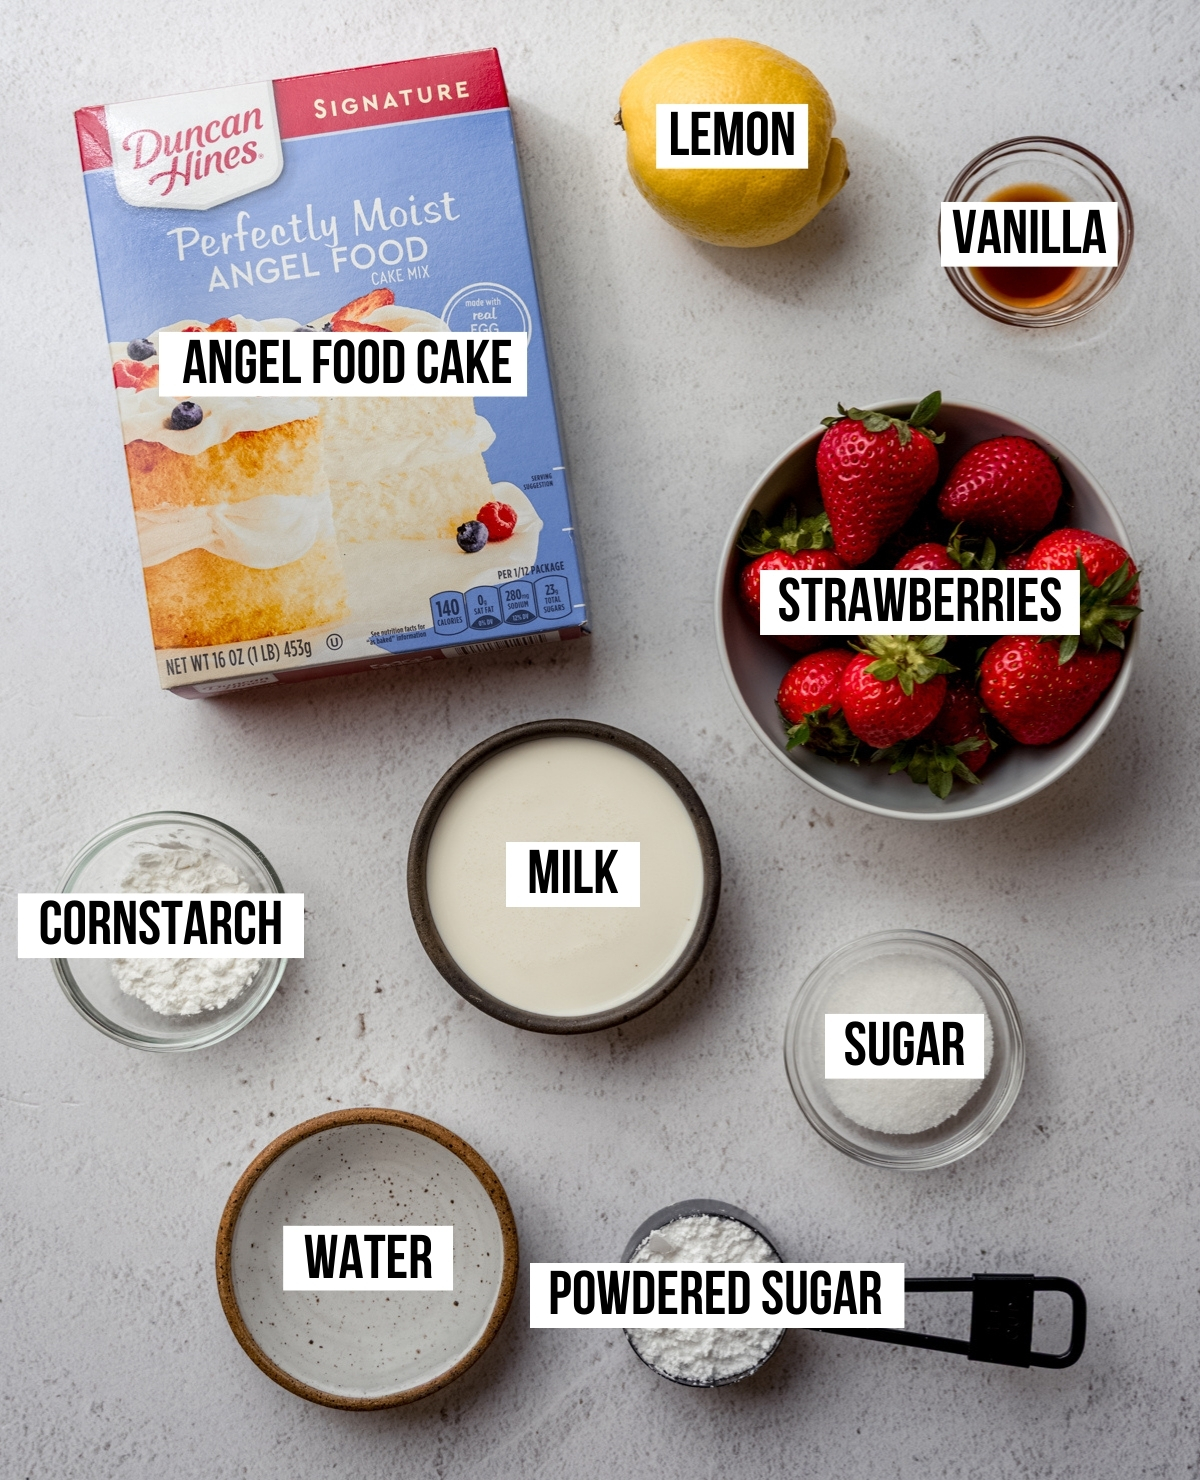
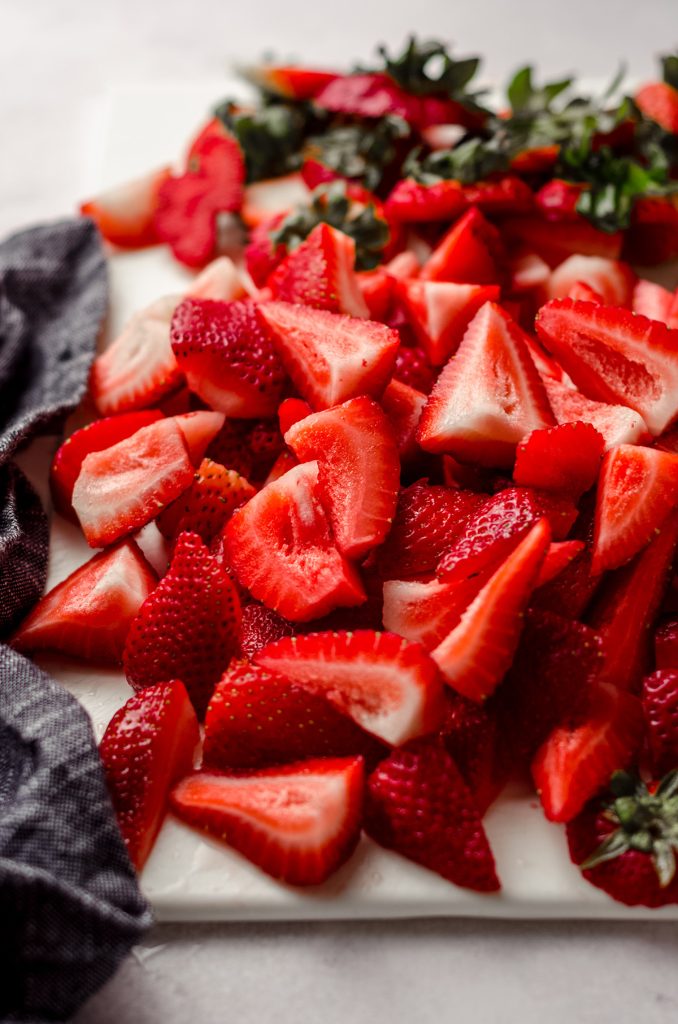
FRESH STRAWBERRIES: there is no substitute for fresh strawberries in this cake recipe, but you can use thawed, previously frozen strawberries. Thanks to Bushel and Berry®, I had fresh strawberries available to me when I made this recipe. I particularly like this strawberry plant, Scarlet Belle™, because it produces juicy strawberries all season! It works well planted in patio pots, hanging baskets, or garden beds.
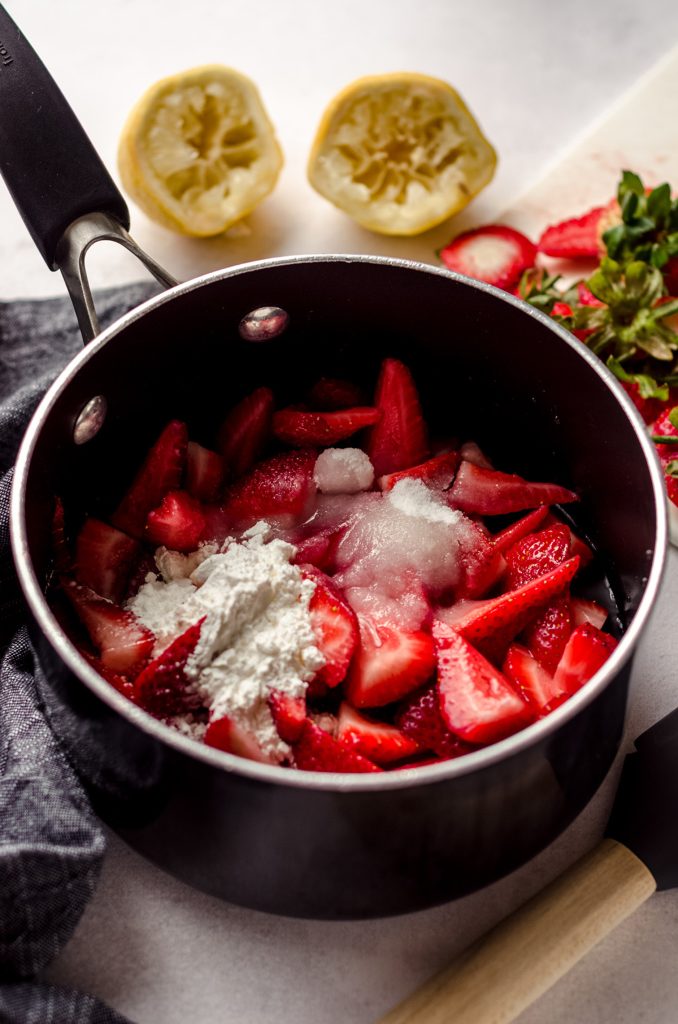
GRANULATED SUGAR: the strawberries bring some natural sweetness with them, but sweetening them a bit more with sugar helps get them ready to pair with a cake. It also helps macerate the fruit, encouraging it to break down.
FRESH LEMON JUICE: another ingredient to help break down the fruit! Do not use bottled lemon juice for this recipe.
CORNSTARCH: this will help thicken the sauce. If you have a corn allergy, you can use flour instead.
HEAVY WHIPPING CREAM: you’ll turn this into homemade whipped cream. This is also the same as heavy cream. Do not use milk, half-and-half, or cream for this recipe.
POWDERED SUGAR: you’ll use this in two places– a portion of it will help keep the cake from sticking to the towel you’ll use to roll it up, and you’ll also use some to sweeten the whipped cream just a touch.
VANILLA EXTRACT: more flavor enhancers and to give the whipped cream some vanilla notes.
EQUIPMENT
JELLY ROLL PAN: while I can normally suggest an alternative or substitute for a pan you might not have, there’s no other size that works for a jelly roll cake. In fact, they make a pan just for this purpose– a 10″ x 15″ jelly roll pan! A standard size baking sheet would yield a cake that’s much too thin, and a 9″ x 13″ would be too thick to roll up.
WHAT ELSE WILL I USE A JELLY ROLL PAN FOR?
I know, I hate buying a piece of equipment just to use it once! We use ours often for small batches of cookies (like this small batch chocolate chip cookie recipe or just baking off a few dough balls of my standard batch chocolate chip cookies that I keep frozen at all times), focaccia (the high rim contains the liquid), roasted veggies, and toasted nuts.
PARCHMENT PAPER: you do not want grease or oil touching this cake, as that could interfere with the crumb of the cake. Remember how we’re keeping this cake light and spongy? No eggs or oil or butter in angel food cake. The only thing separating your cake from the pan should be parchment (and it will pull off nicely, I promise).
LINT-FREE TOWEL: be sure you’re using a towel that is either linen or flat-weave cotton. You don’t want a cake with lint in it! Don’t have one of those? You can use a pillow case or the non-pocket portion of an apron in a pinch.
MAILING TUBE (OPTIONAL): while I don’t personally use a mailing tube with my Swiss cake roll, I’ve seen folks use mailing tubes (or other sturdy tubes) that are about 3-4″ in diameter. The purpose is so the cake log doesn’t wind up with a flatter side, but this is mostly just for aesthetics. It all tastes the same in the end!
STEP-BY-STEP: HOW TO MAKE A STRAWBERRY SWISS ROLL
I know it looks complicated, but let’s simplify this process. There’s a cake, and there’s a filling, and then there’s the part where they come together. It’s just like making a layer cake or cupcakes (cake + frosting) but a little more elbow grease when it comes to the “together” part.
Not to worry, I have lots of pictures and a video to help you.
STEP #1: MAKE THE CAKE BATTER
Unless you’re going for a scratch angel food cake, this part is as simple as mixing up the batter from the box. It’s highly likely your box will tell you to beat the batter until it’s fluffy/foamy. This is where we get the lift, since there’s no leavener in angel food cake. The air bubbles will help the cake rise and also keep it light and fluffy, exactly what we want for a Swiss roll.
STEP #2: BAKE THE CAKE
Here’s your warning: you might look into your oven and think you’re headed for a mess of batter in the bottom of it. Fear not! You aren’t. The nature of the angel food cake means it has a mega grip on the sides of the jelly roll pan, so it will “crawl” up the sides and have enough structure to continue to puff up on itself without overflowing.
When the cake is done baking, it should be starting to brown on the top and sides and if you tap the top, it should bounce back. Baking will take about 22ish minutes.
STEP #3: PREPARE YOUR TOWEL WHILE THE CAKE COOLS BRIEFLY
“Briefly” is the key here. You don’t want the cake to cool down all the way, as it will be shapable when it’s hot.
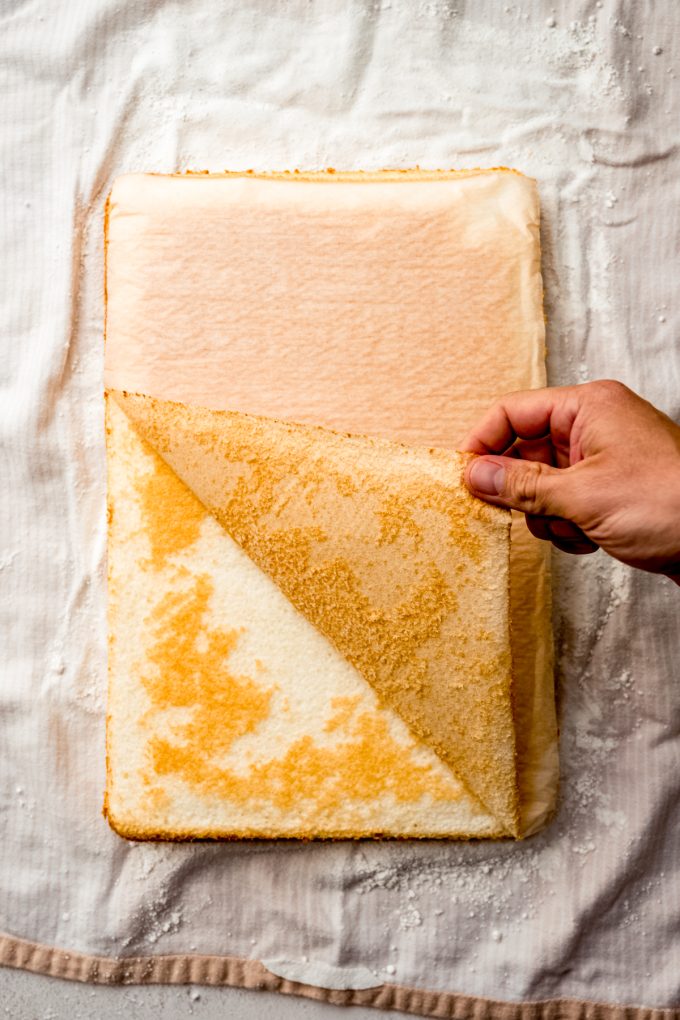
When the cake comes out of the oven, use a butter knife to loosen the cake from the sides. It will be sticky but it should move freely. Once you’ve separated it from the sides, set it aside briefly so you can prepare your towel.
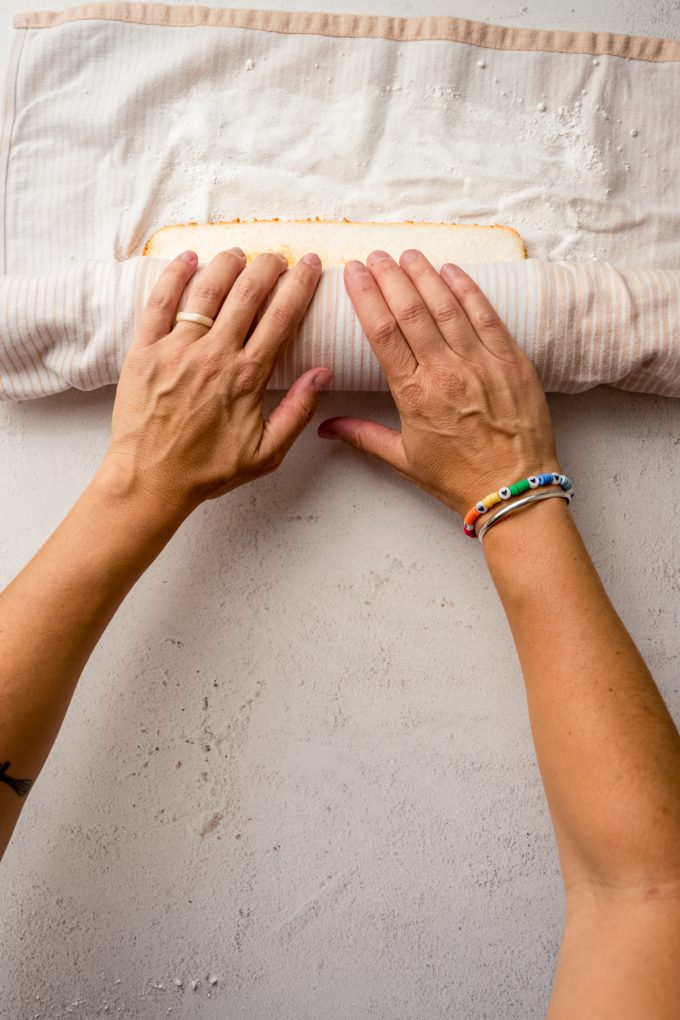
That’s right, we’re rolling the cake up in a towel. But to prevent it from sticking, you’ll want to dust the towel evenly with powdered sugar.
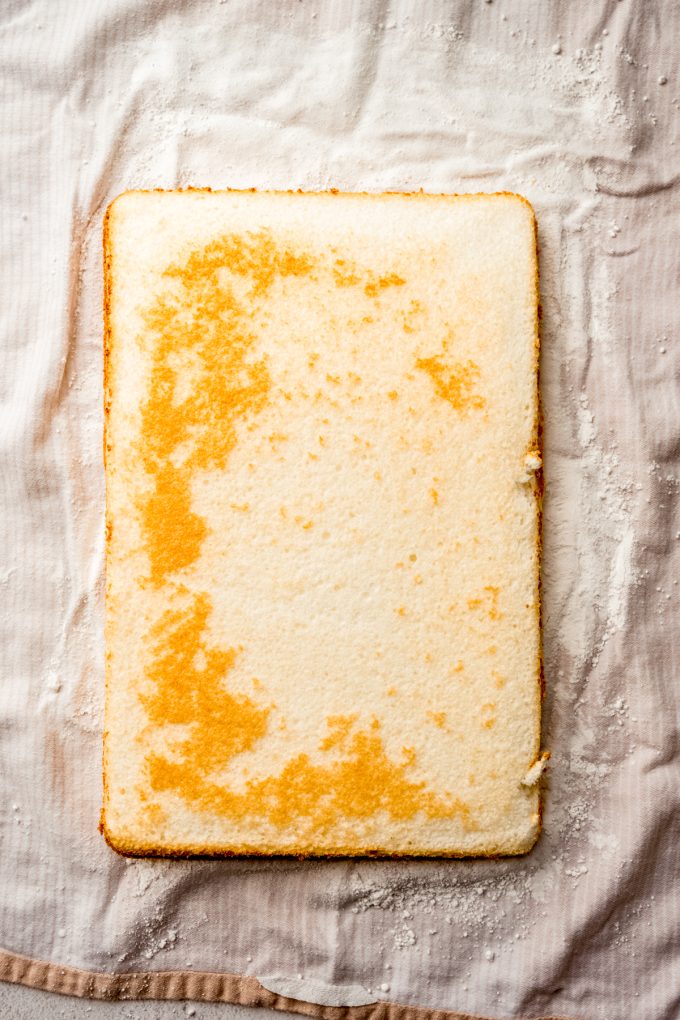
Once dusted, the towel is ready for your cake. Use oven mitts to carefully but quickly flip the cake out onto the towel. The quicker you are, the better the chance of your cake staying together without cracking, but certainly don’t do this from several feet in the air. That’s what I mean by “carefully but quickly.”
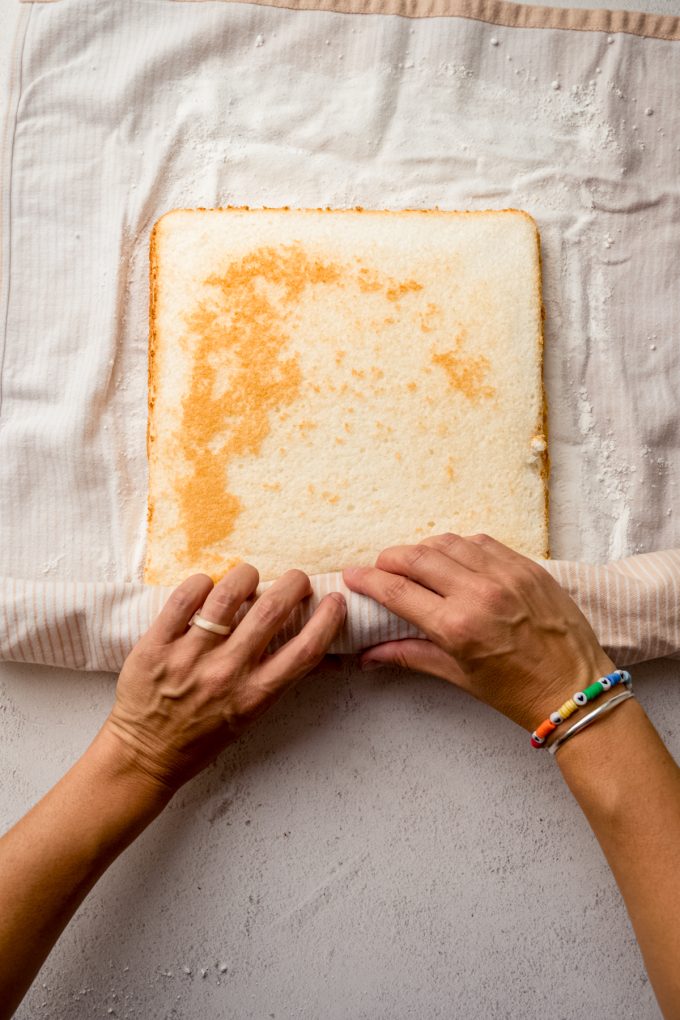
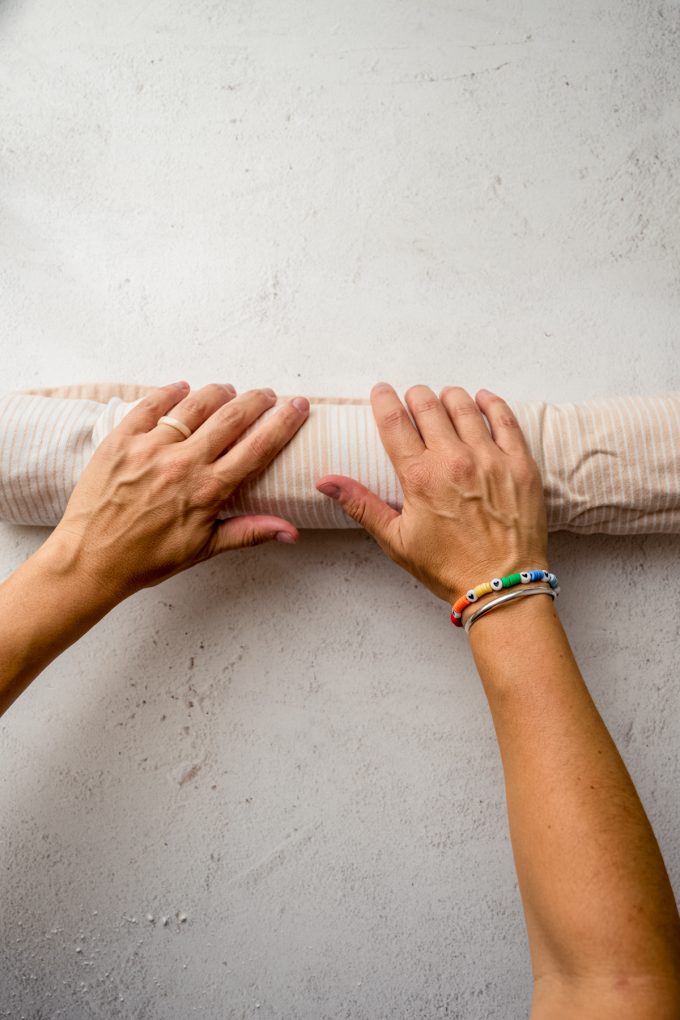
STEP #4: ROLL THE CAKE INTO A LOG
Roll the cake up into a light log, starting with one of the short sides. The cake will roll up into the towel, and the cake roll will cool just like this for about 2 hours. Taking care that it’s completely room temperature is critical to it unrolling nicely without cracking. Try to resist the urge to speed up the cooling process in the refrigerator.
WHAT IF I WANT TO MAKE THIS AHEAD OF TIME?
While the cake should be fine at room temperature, if it’s particularly warm in your kitchen, you may want to store the rolled up cake in the refrigerator. If this is the case, you’ll need to make sure it’s back to room temperature before unrolling it and proceeding with the recipe.
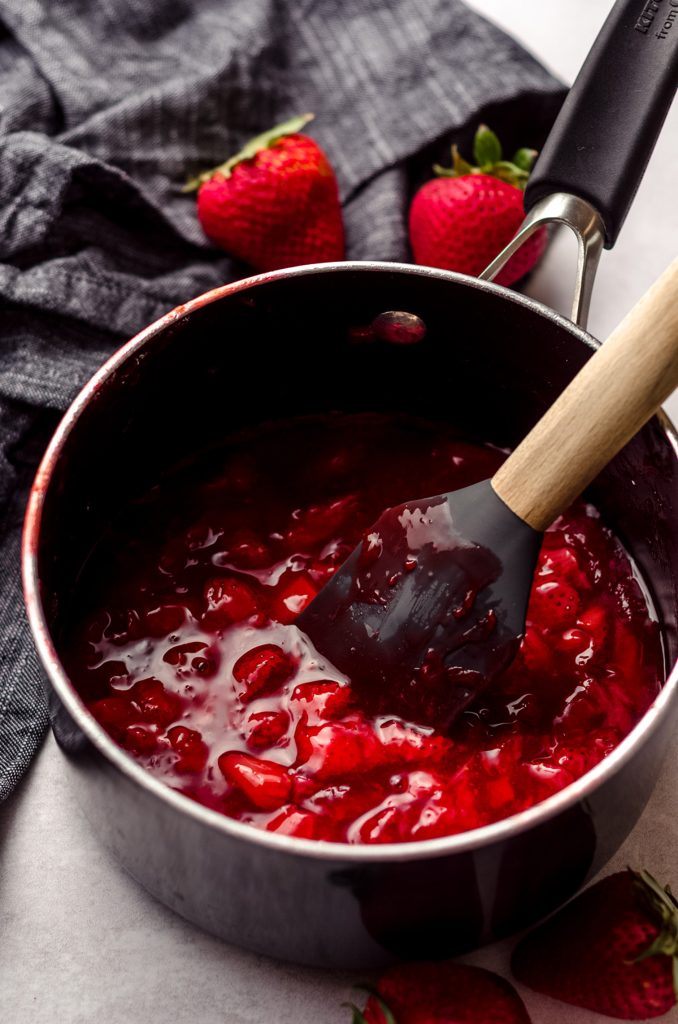
STEP #5: MAKE THE STRAWBERRY COMPONENT
While the cake cools, you can make the cooked strawberry mixture, since this will also need to be completely cool before it mixes with the whipped cream.
You can make this part of the cake up to 3 days in advance and store it in the fridge! It will be just fine to use in the next step at room temperature, but if it’s cold, that’s fine, too.
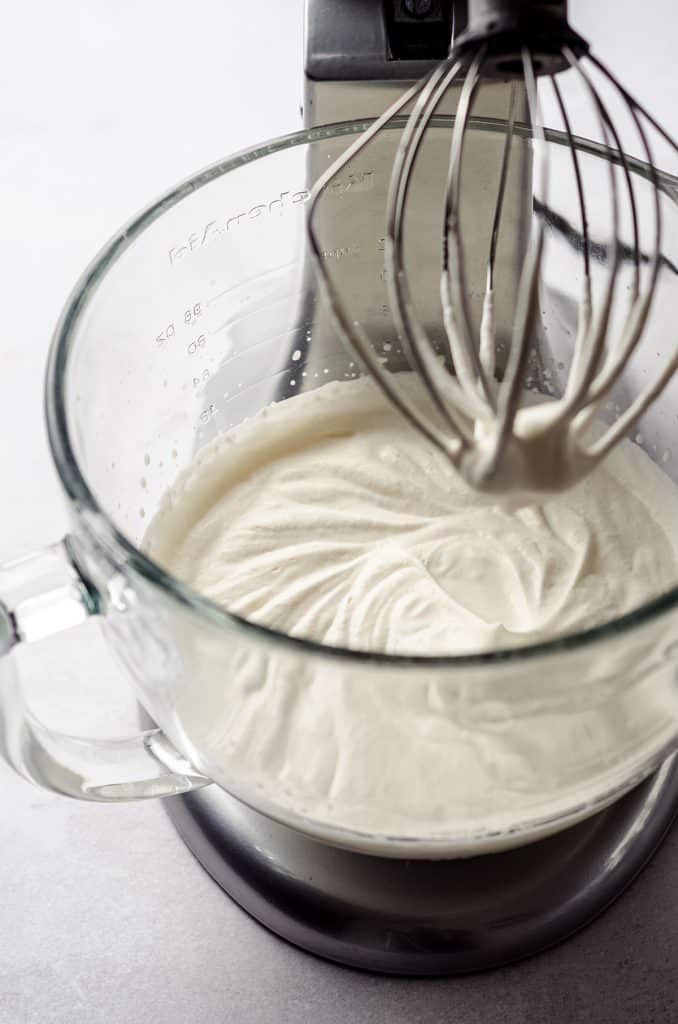
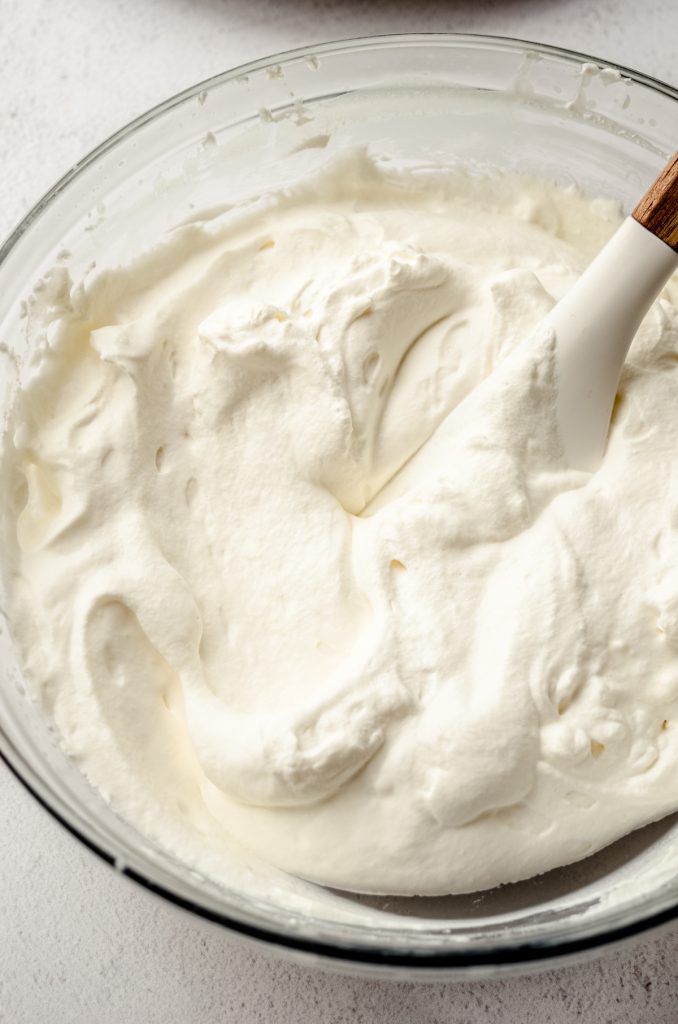
STEP #6: MAKE THE WHIPPED CREAM
This is another component you can refrigerate and store for up to 1 day in advance. Cold whipped cream will be the most stable, so making it and then using it right away is more ideal than letting it sit at room temperature. Pop it in the fridge, covered, if you need to wait on using it.
STEP #7: PUT IT ALL TOGETHER
Arguably, the hardest part is over! Now it’s just a matter of putting everything together.
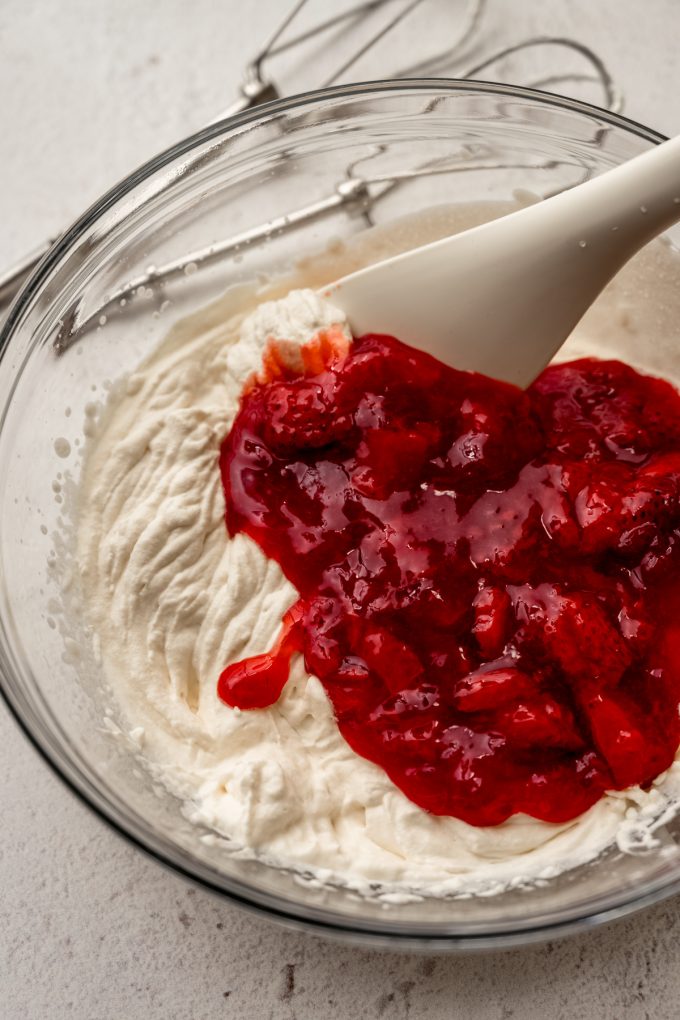
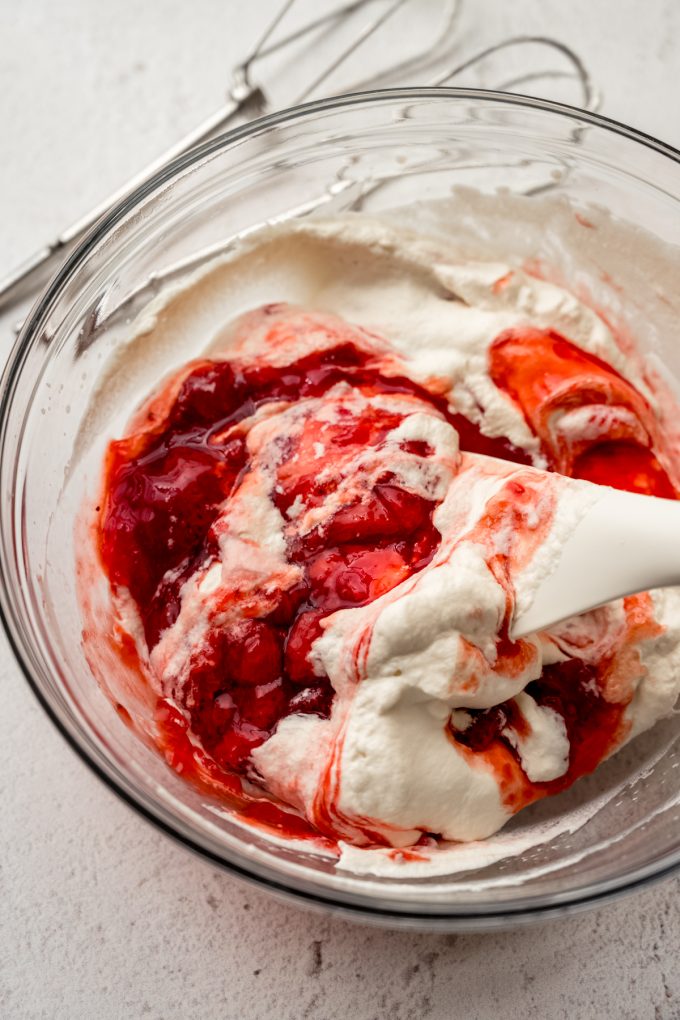
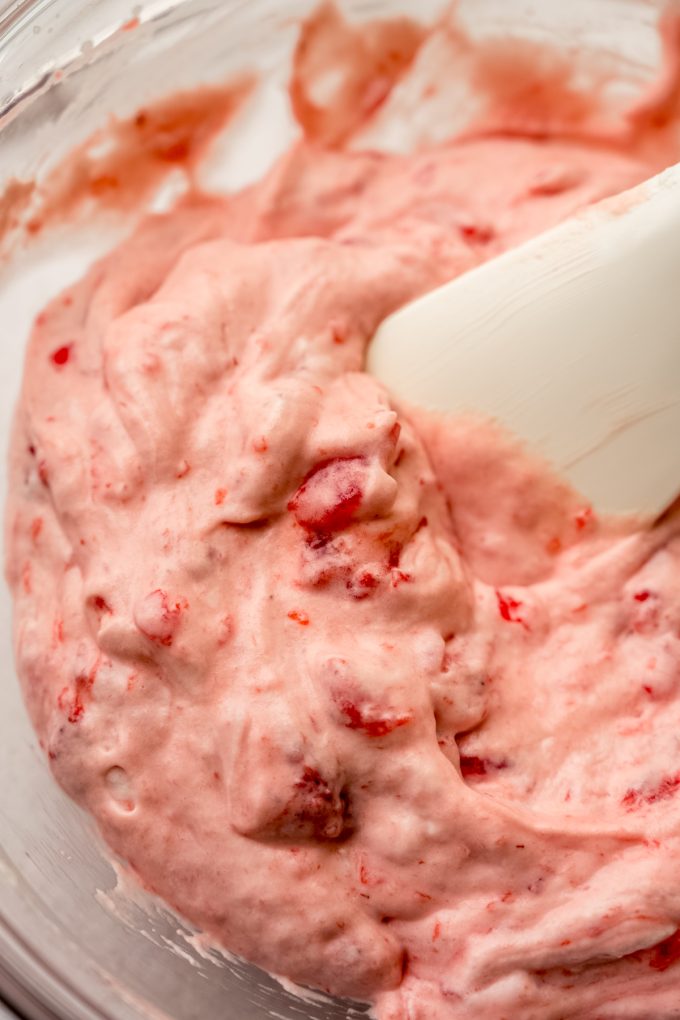
Combine the strawberries + whipped cream: gently fold the cooled strawberry mixture into the whipped cream. Be sure you don’t deflate the whipped cream! Look for all the red streaks to disappear. The mixture should be cohesive, pink, and studded with soft chunks of strawberries when it’s properly mixed.
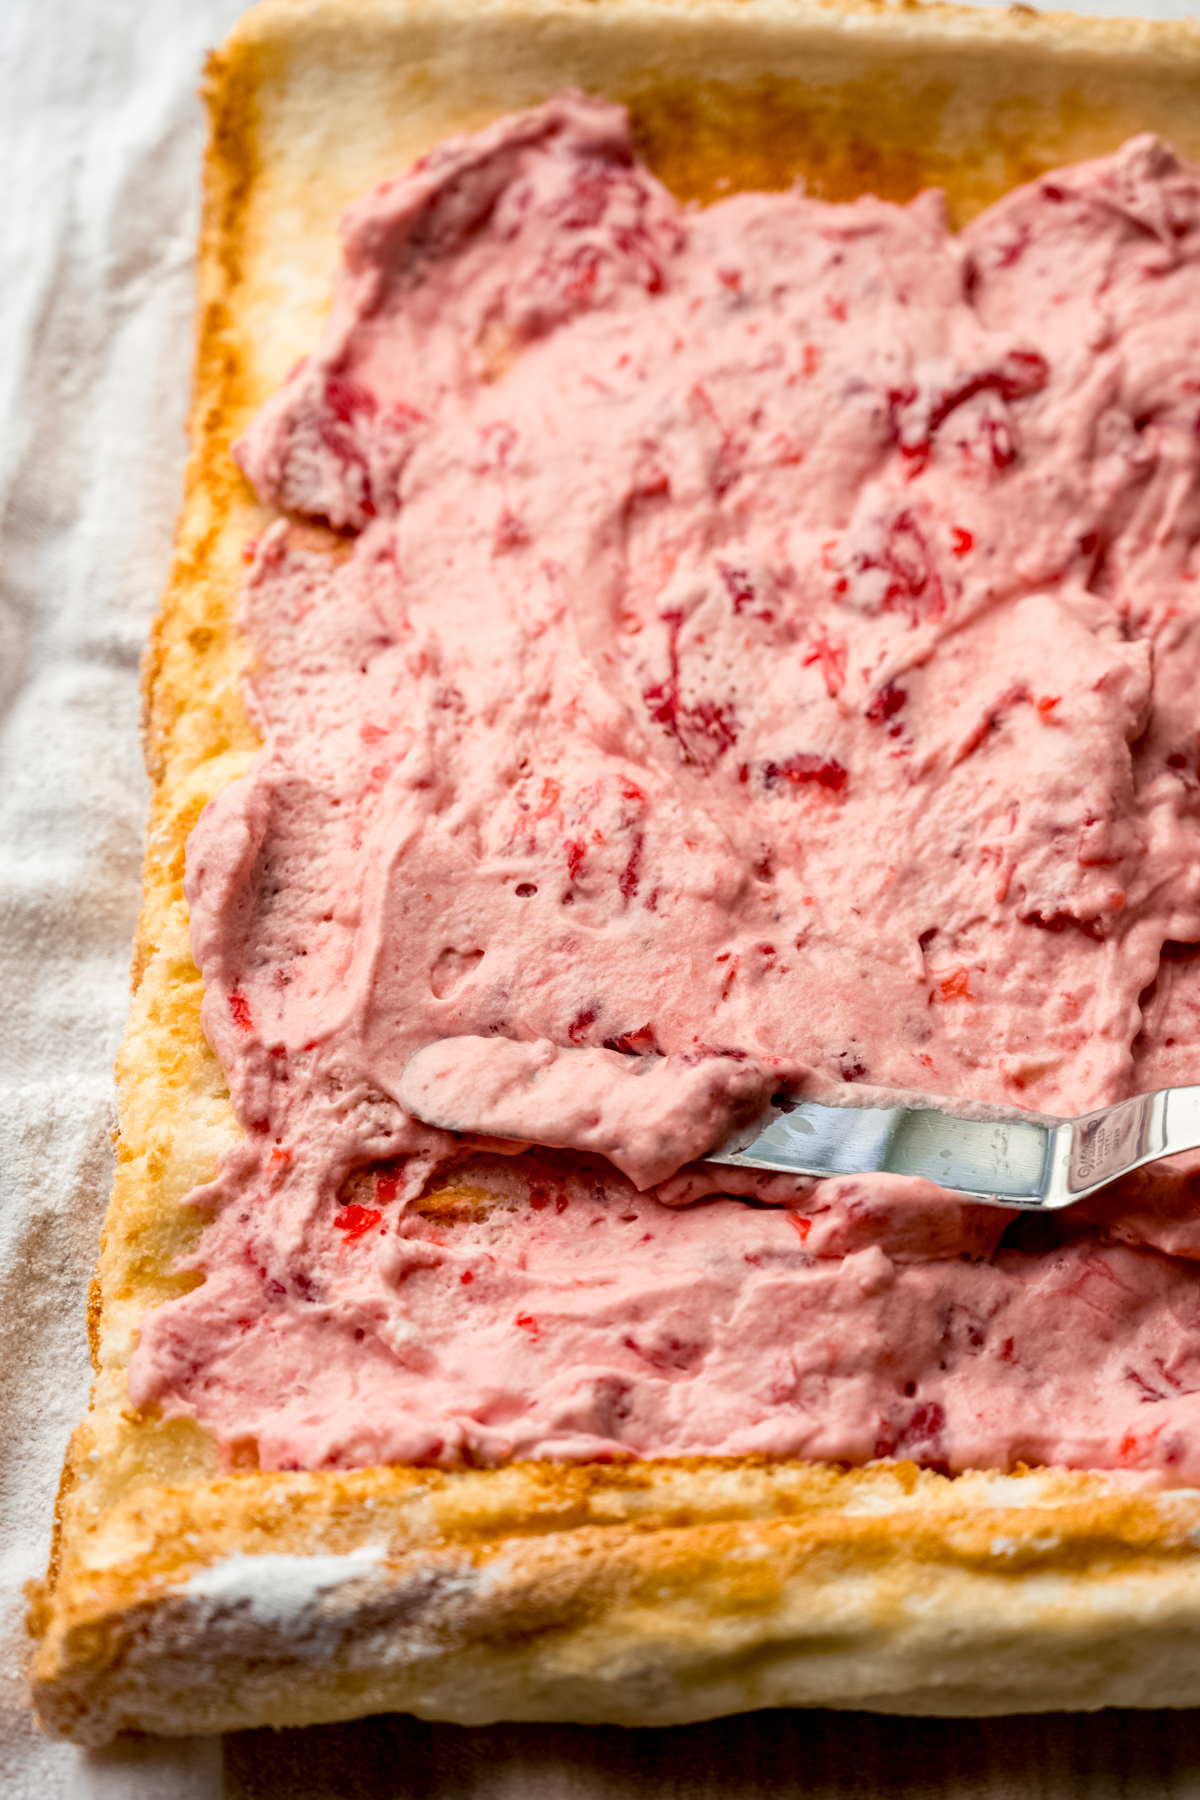
Unroll the cake log: carefully unroll the cake, taking care not to let it crack (just work slowly). If the end closest to you is super curled under, you can carefully pull it apart to get filling under the lip. Spread all of the filling out evenly, taking care to leave about 1″ of border at the far short end.
Roll the cake back up: roll the cake up just like you did before, but without the towel this time. The filling might start to squish out, but that’s ok! You can clean it up if it becomes a problem once the whole log is rolled.
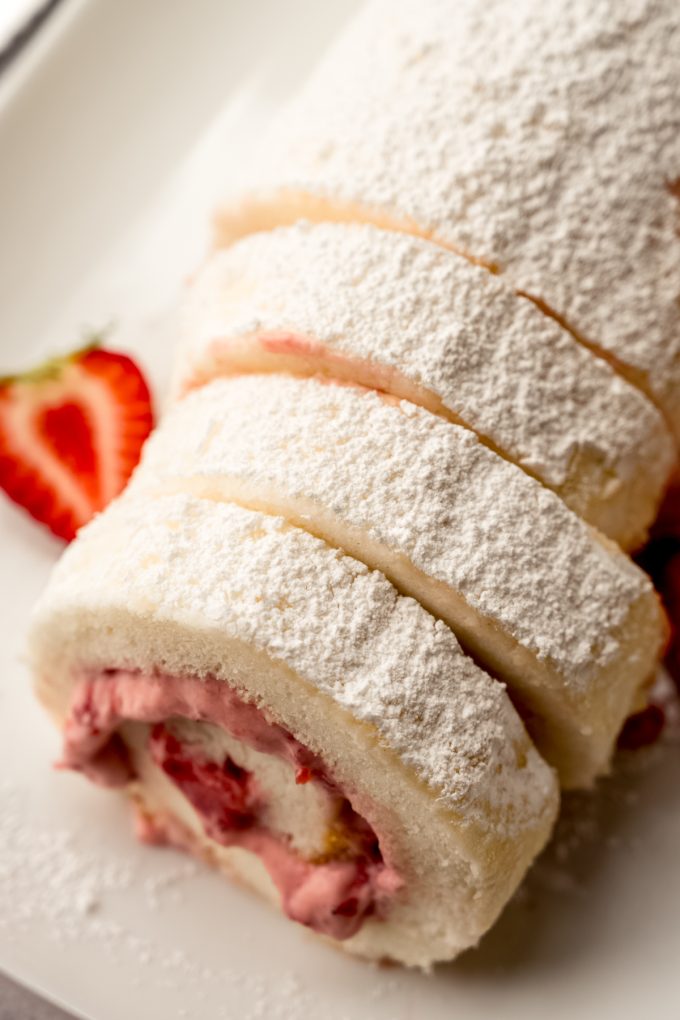
Chill the log: you only need to chill this cake roll for about 20-30 minutes so it can firm up a bit. Then, you can dust it with powdered sugar, top it with chopped strawberries or strawberry slices, or really whatever your strawberry-loving heart desires. It’s also perfectly delicious just as is.
STORAGE
This cake is best served on day 1, but can be kept in the refrigerator covered tightly for up to 3 days. Anything longer than that and the cake starts to absorb a lot of moisture. There is, of course, nothing wrong with this, but the sponge cake will start to get squishy.
While you can freeze this cake, thawing the whipped cream filling can be problematic from a texture standpoint, so freeze and thaw at your own risk.

Strawberry Swiss Cake Roll Recipe
Ingredients
CAKE
- 1 box angel food cake mix1 or make it from scratch (see note #1)
- ⅓ cup (40g) powdered sugar
FILLING
- ½ pound (227g) fresh or frozen strawberries hulled and sliced into halves or quarters; about 1 and ¼ cups once sliced
- ¼ cup (60mL) water
- 2 Tablespoons (25g) granulated sugar
- 1 Tablespoon (15mL) fresh lemon juice2
- 1 Tablespoon (8g) cornstarch
- ¾ cup (90mL) heavy whipping cream
- 1 Tablespoon (8g) powdered sugar
- 1 teaspoon vanilla extract
Instructions
CAKE
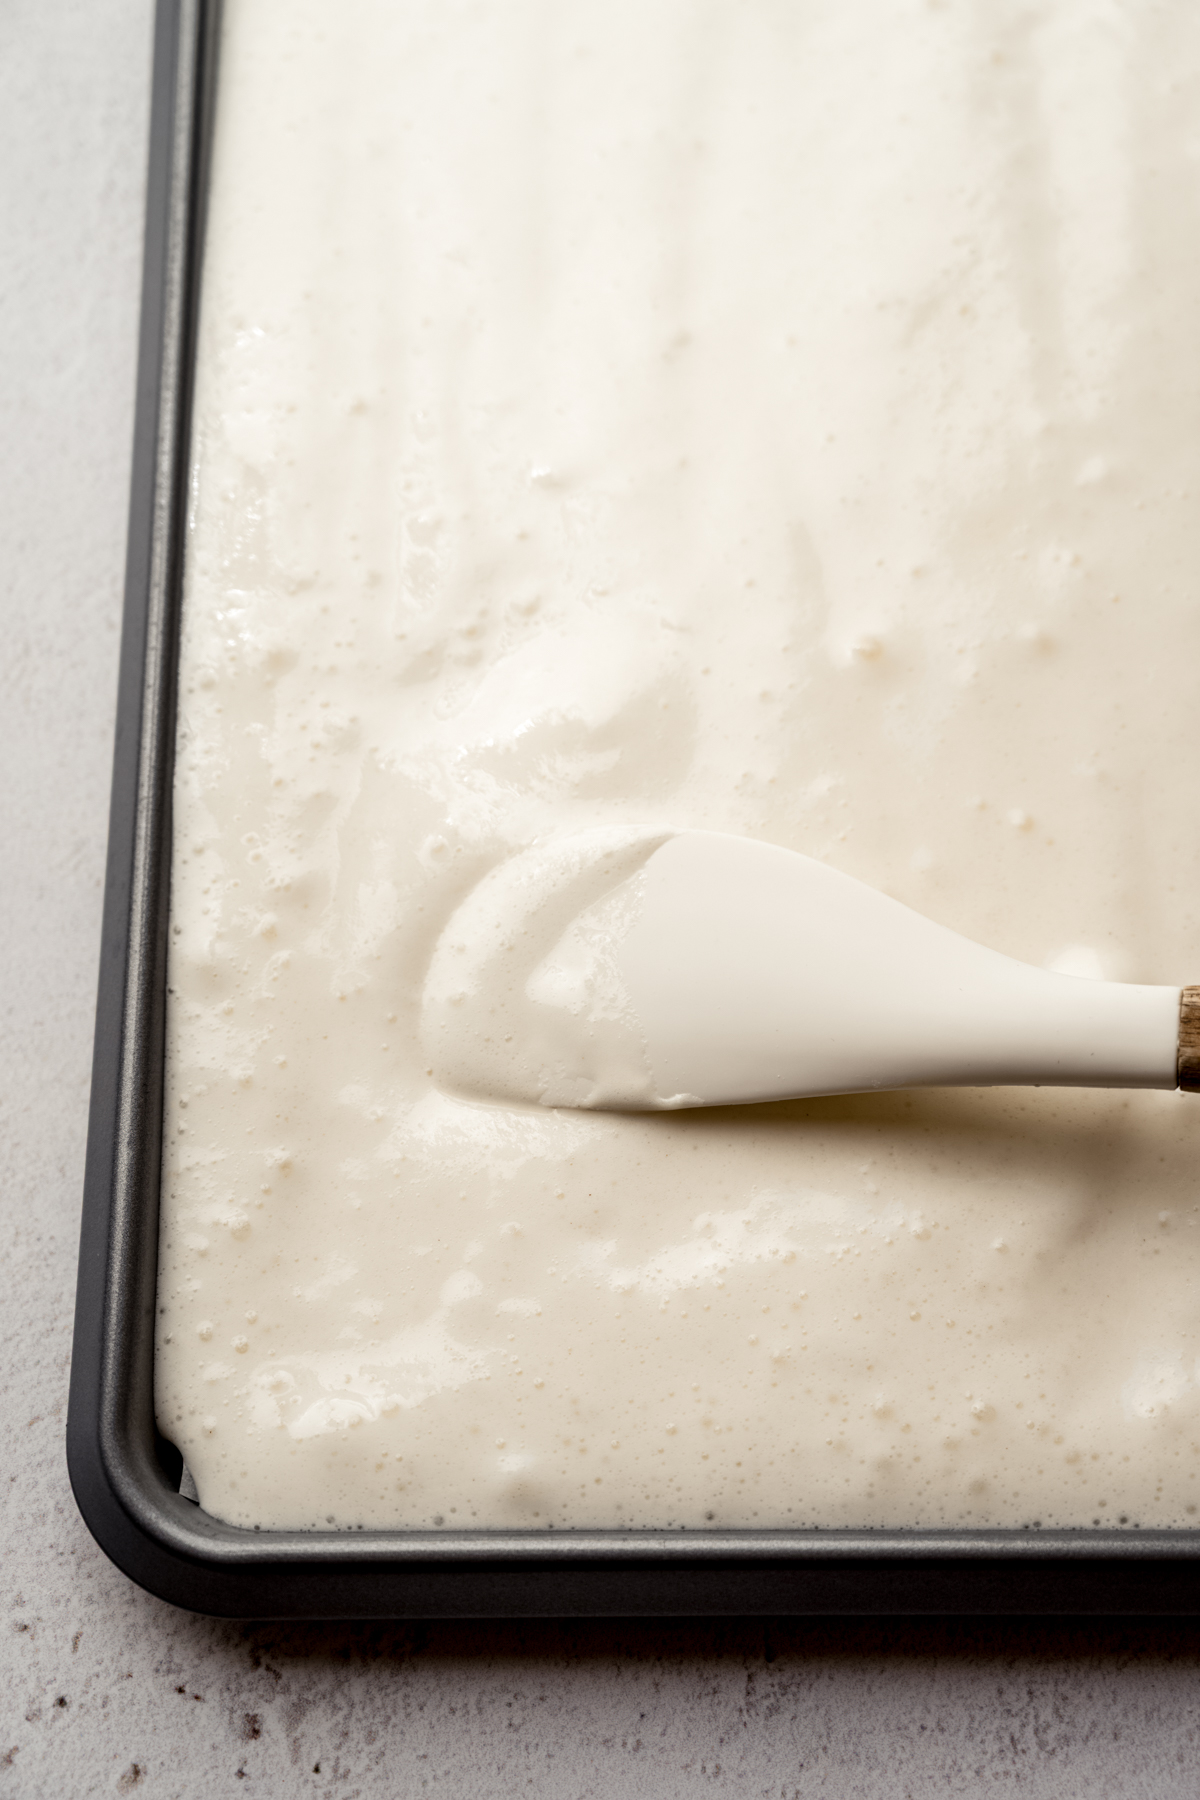
- Preheat the oven to 350°F (177ºC). Line the bottom of a 10" x 15" jelly roll pan or rimmed baking sheet (of the same dimensions) with parchment paper. Be sure the parchment can lay flat. Do not grease the pan.
- Prepare the cake mix according to the package directions (or make it from scratch– see note #1), then pour the batter evenly into the prepared pan.1 box angel food cake mix1
- Bake the cake for 22-24 minutes or until the top is lightly golden brown. The cake will rise significantly and be very puffed up at this point, but it will deflate as you work with it.
- Use a butter knife to loosen the cake from the edges of the pan. It will be slightly sticky but should come away from the sides of the pan easily. Set aside briefly while you prepare the next step.
- Spread out a clean, lint-free kitchen towel onto your work surface and sprinkle it evenly with the powdered sugar.⅓ cup (40g) powdered sugar
- Carefully but quickly (so it doesn't break!) flip the warm cake out onto the towel and peel off the parchment paper.
- Starting with one of the short ends, roll the cake up into a tight log with the towel inside (see photos in the post above for visuals). Let the cake cool completely at room temperature3 rolled up in the log for about 2 hours.
FILLING
- Make the strawberry sauce: combine the strawberries, water, sugar, lemon juice, and cornstarch in a small saucepan.½ pound (227g) fresh or frozen strawberries, ¼ cup (60mL) water, 2 Tablespoons (25g) granulated sugar, 1 Tablespoon (15mL) fresh lemon juice2, 1 Tablespoon (8g) cornstarch
- Heat over medium heat, bring to a low boil, then reduce heat and simmer for 10-12 minutes until liquid thickens.
- Allow the strawberry mixture to cool completely before combining it with the whipped cream portion of the filling you'll make next.
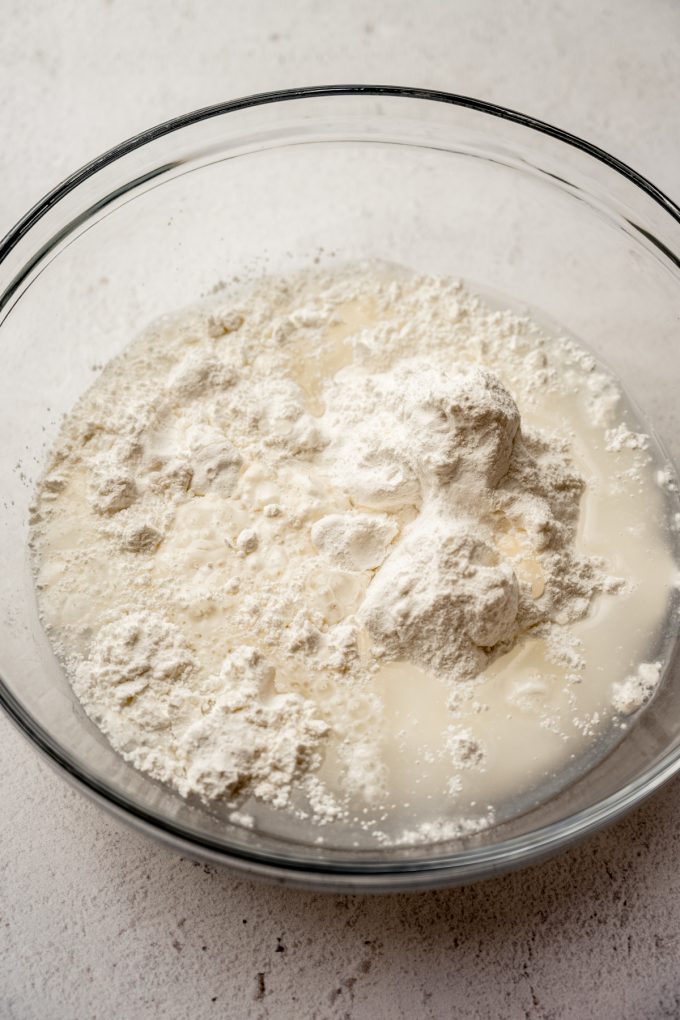
- Make the whipped cream: pour the heavy whipping cream, sugar, and vanilla extract into the bowl of a stand mixer fitted with the whisk attachment.¾ cup (90mL) heavy whipping cream, 1 Tablespoon (8g) powdered sugar, 1 teaspoon vanilla extract
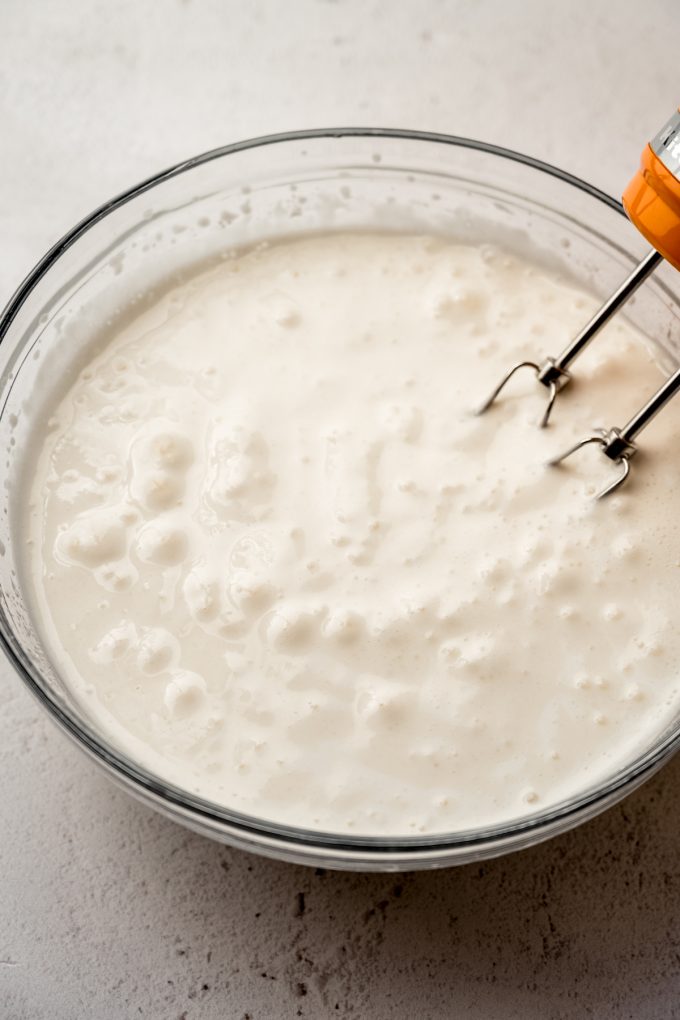
- Turn the mixer to medium speed. The mixture will start to get frothy and bubbly. After about 2 to 3 minutes, the mixture will start to thicken.
- Once mixture is visibly thick (you will be able to see the trail of the whisk), increase the speed to medium-high and beat for an additional 30 seconds to 1 minute. Stop when you have stiff peaks, which means when you pull the beater out of the mixture, the point should stand up.
- Cover and chill the strawberry mixture and the whipped cream in the refrigerator until your cake is ready to use.
ASSEMBLE THE CAKE
- When you are ready to unroll the cooled cake, prepare the filling. Fold the strawberries into the whipped cream until they are completely incorporated. Set aside.
- Slowly and carefully unroll the cooled cake, keeping it on the towel while you work. If it starts to crack, don't panic! Just work slowly.
- Once the cake is completely unrolled, spread the cake with the filling. If the end closest to you is curled up, you can carefully tuck filling under the edge and let it curl back up instead of forcing it open. Spread the filling evenly onto the cake, taking care to leave about 1 inch of border at the far short end.
- Once you have used up all the filling, carefully roll the cake back up, this time without the towel, and place it on a serving plate. Don't worry if some of the filling spills out.
- Chill the cake for about 30 minutes before serving. You can dust the roll with powdered sugar, if desired, or serve as is. Roll is best served on day 1, but leftovers can be kept in the refrigerator covered tightly for up to 3 days. While you can freeze this cake, thawing the whipped cream filling can be problematic from a texture standpoint, so freeze and thaw at your own risk.
Video
Notes
- Angel food cake mix: you will also need the ingredients to complete the recipe on the box (it’s usually just water). You can also make your angel food cake from scratch if you prefer.
- Fresh lemon juice: do not use bottled lemon juice for this recipe.
- Cooling the cake: if you are hoping to make this ahead and need to store the cake, you can safely keep it in the refrigerator for up to 2 days. You must make sure the cake is back at room temperature before moving into the next step.
Nutrition Disclosure
All nutritional values are approximate and provided to the reader as a courtesy. Changing ingredients and/or quantities will alter the estimated nutritional calculations.