
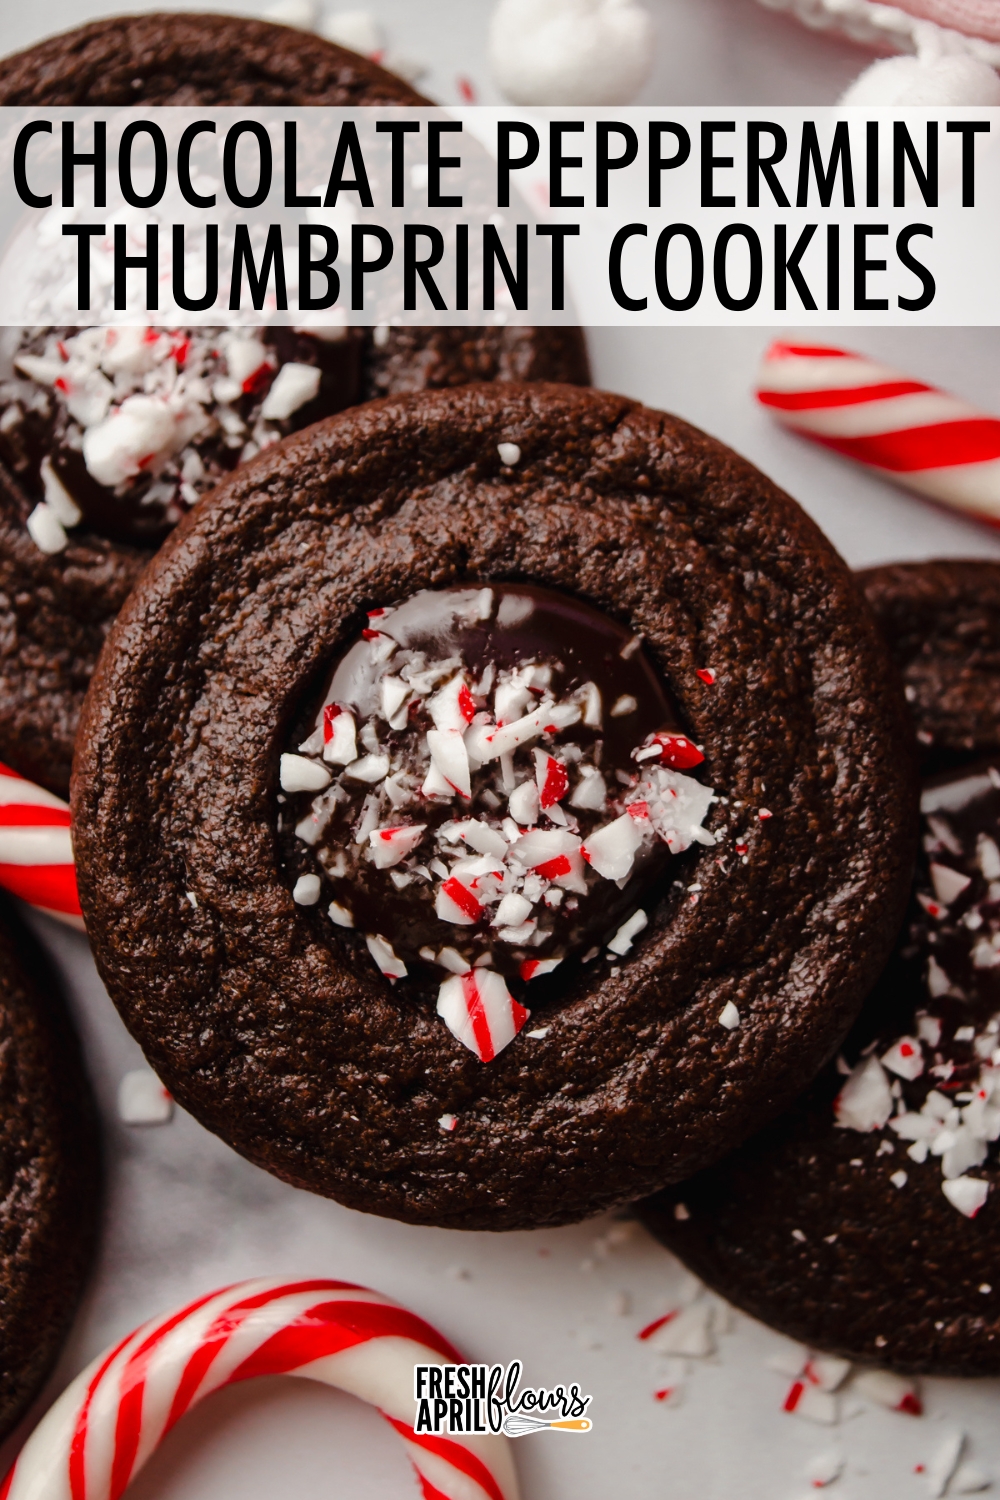
Chocolate Peppermint Thumbprint Cookies
As an Amazon Associate, I earn from qualifying purchases. Read the full disclosure here.
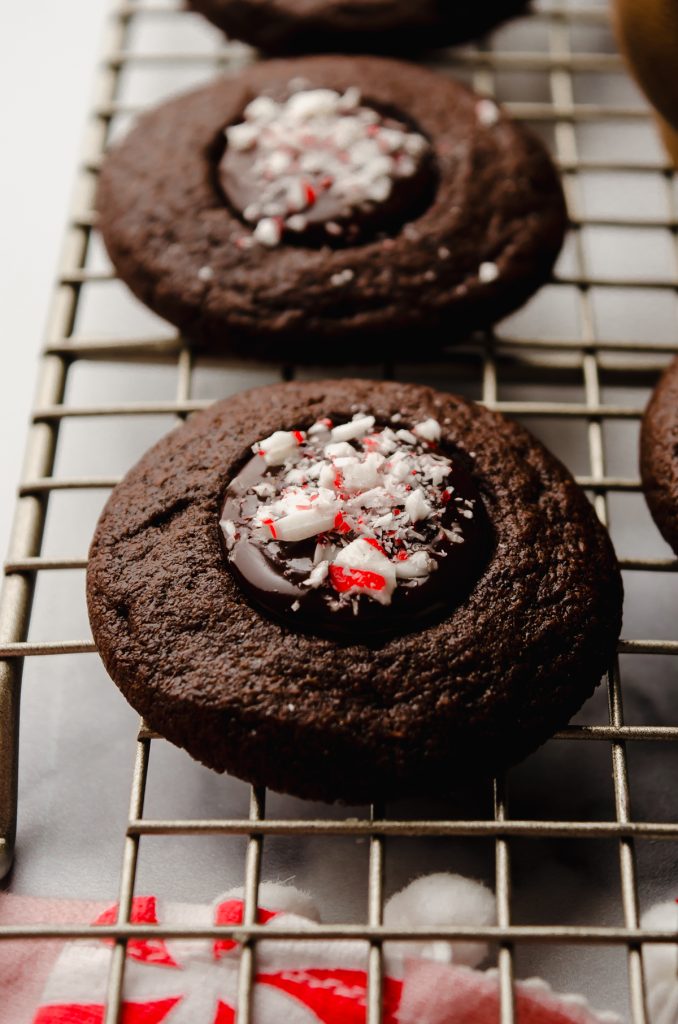
These chocolate peppermint thumbprints feature a thick and rich chocolate cookie filled with chocolate peppermint ganache and crushed candy canes for a festive looking and tasting cookie.

BOUND TO BE A NEW FAVORITE CHOCOLATE PEPPERMINT COOKIE
When it comes to peppermint chocolate, there’s no shortage of cookie choices around these parts. In fact, peppermint bark cookies and chocolate peppermint blossoms are two staples in our house every December. Right alongside a mug of peppermint mocha coffee. I can hardly resist a good candy cane + chocolate situation!
These peppermint chocolate thumbprint cookies are no different. They’re modeled after my popular chocolate caramel thumbprints, and we’re swapping gooey caramel and a chocolate drizzle for creamy chocolate ganache and crushed peppermint candies. The combination is irresistible, the texture is unbeatable, and these cookies are sure to be a hit with one bite.
WHAT YOU’LL NEED
ALL-PURPOSE FLOUR: you’ll need less than 1 cup of flour, and in order for this recipe to work perfectly, you’re going to need to measure the flour accurately. Use a kitchen scale for the most accurate measurement, or at the very least, use spoon-and-level method.

DUTCH PROCESSED COCOA POWDER: I chose Dutch processed here for its robust yet smooth chocolate flavor. You can use regular cocoa powder in a pinch, but my preference is for Dutch processed. Here are more chocolate cookies that use it!
BAKING POWDER: this will help the cookies spread and puff just a touch. We don’t want them to lose their shape too much.
SALT & VANILLA EXTRACT: for flavor! Don’t leave them out.
UNSALTED BUTTER: be sure your butter is at room temperature and no warmer.
GRANULATED & BROWN SUGAR: we’re using both sugars for moisture and sweetness.
EGG YOLK: omitting the egg white keeps these cookies thick and rich.
SEMI-SWEET CHOCOLATE: you can use a bar of chopped chocolate or chips, just be sure they’re high quality if you’re choosing the latter.
PEPPERMINT EXTRACT: just a touch to bring the minty flavor! Use a careful hand, we don’t want toothpaste cookies.
HEAVY CREAM: this is the heart and soul of ganache. This is the same as heavy whipping cream.
CANDY CANES: you can also use crushed peppermint candies here or buy pre-crushed candy canes/candy cane bits.
OVERVIEW: HOW TO MAKE CHOCOLATE PEPPERMINT THUMBPRINTS
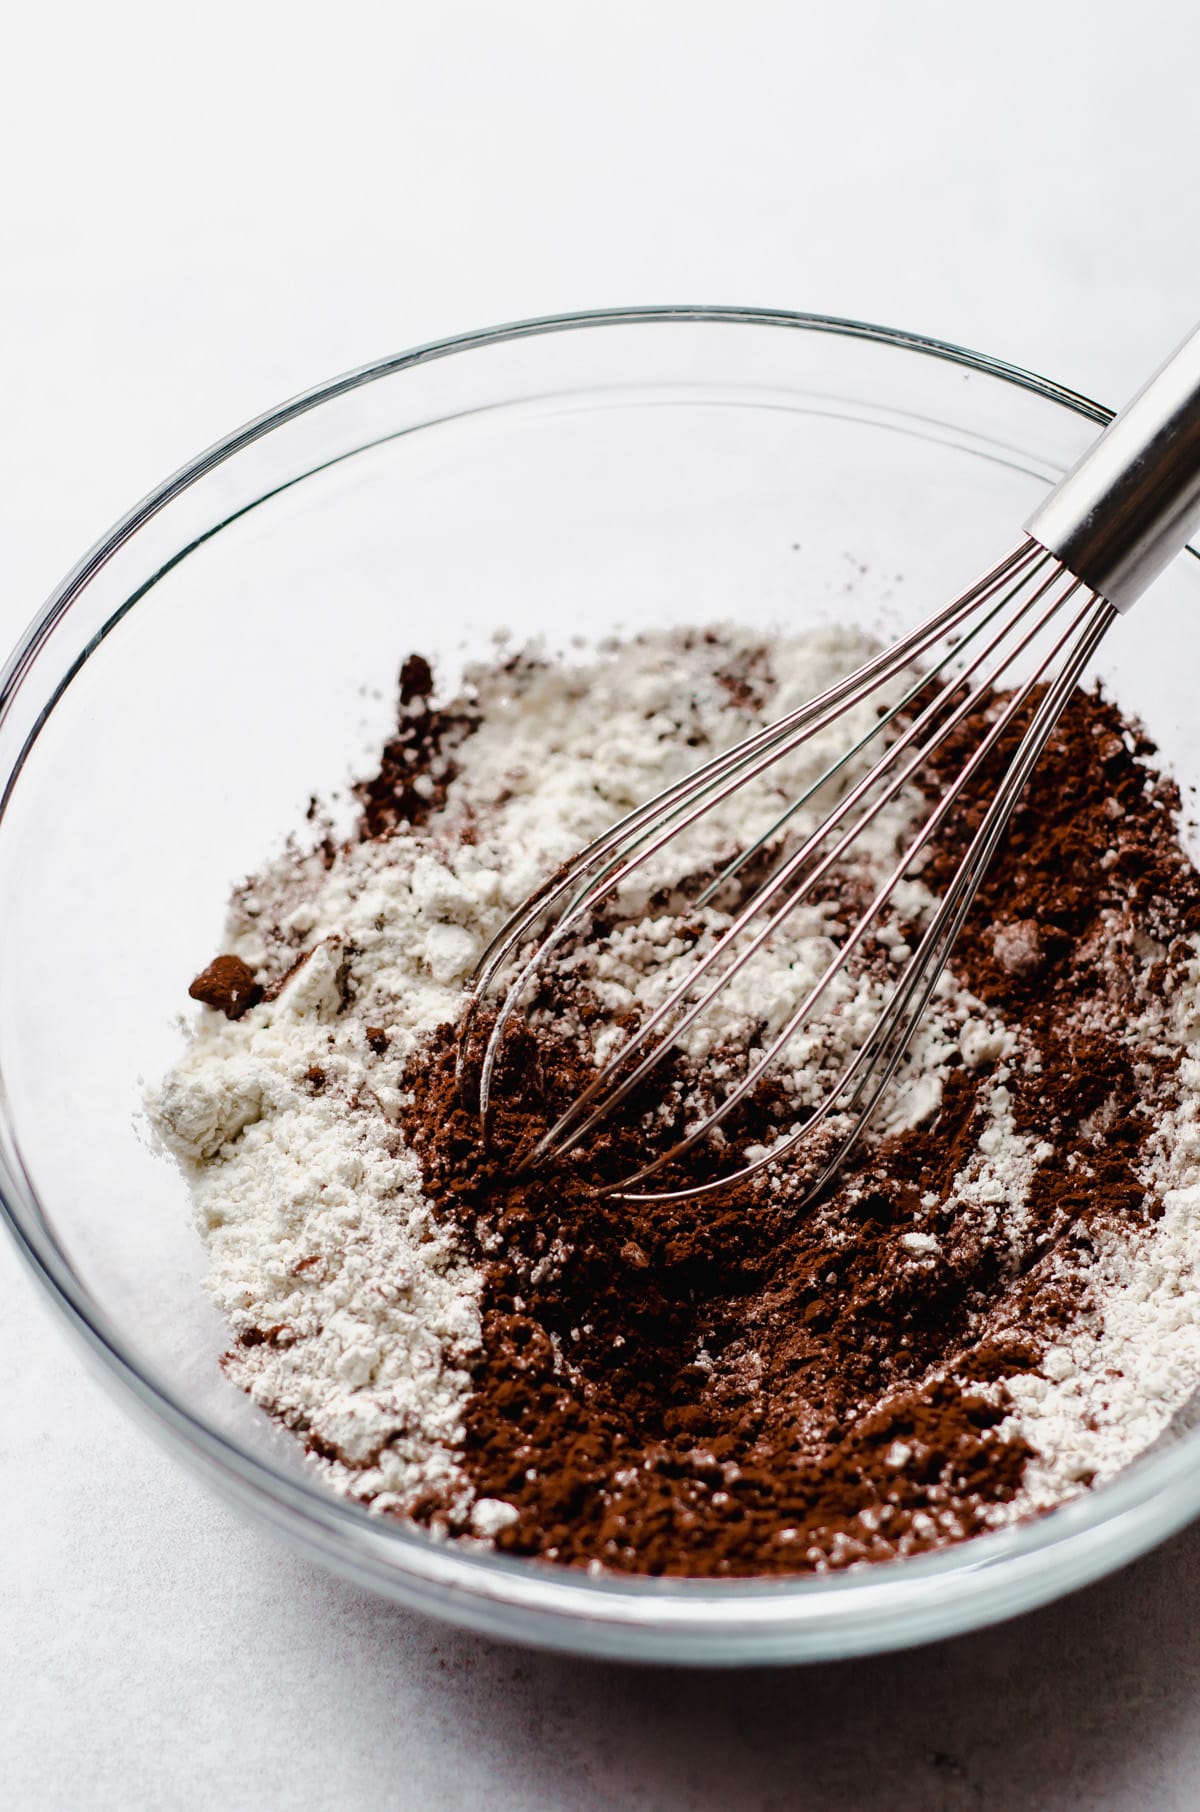
STEP #1: start by whisking together the flour, cocoa powder, salt, and baking powder, then set this mixture aside.
STEP #2: next, cream together the butter and both sugars on medium high speed until light and fluffy, about 2-3 minutes. Add the egg yolk and the vanilla then beat again until completely combined. Scrape down the sides of the bowl as necessary.
STEP #3: reduce the mixer speed to low, then slowly add the dry ingredients, mixing until just combined.
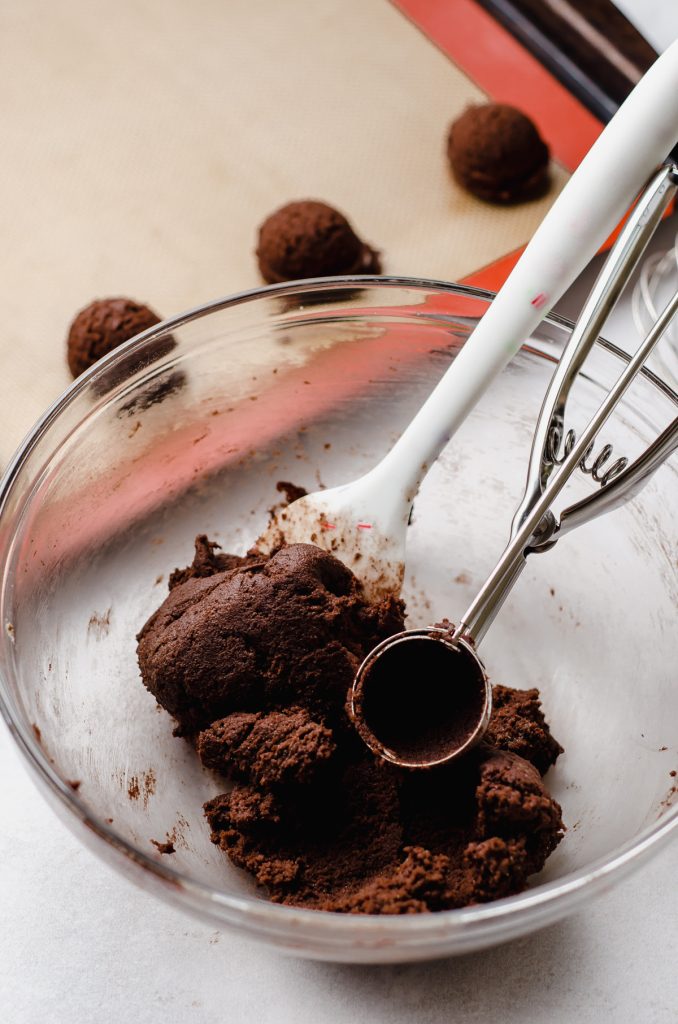
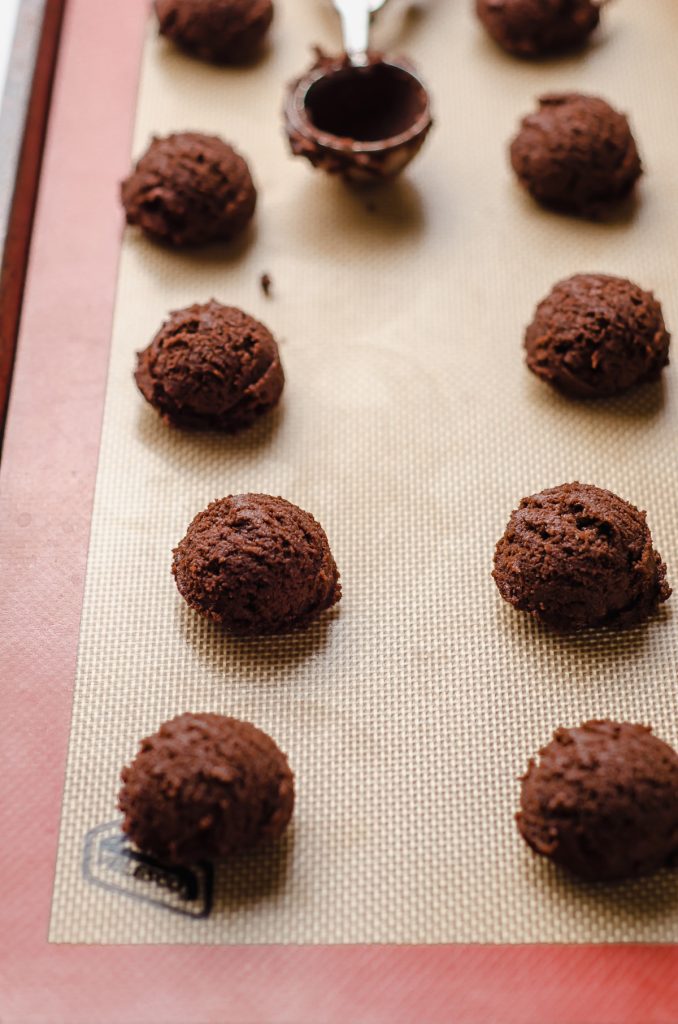
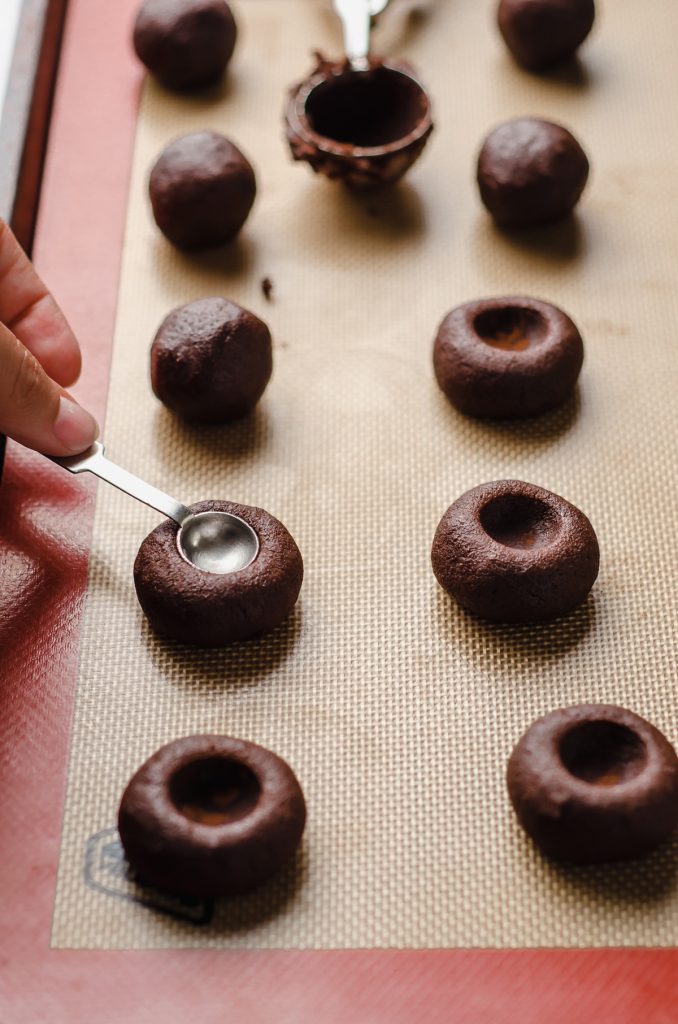
STEP #4: use a cookie scoop to drop mounds of cookie dough onto the prepared baking sheet until you have used up all of the dough. Then, roll the rough balls of dough into smooth balls with your hands and place back onto the prepared sheet.
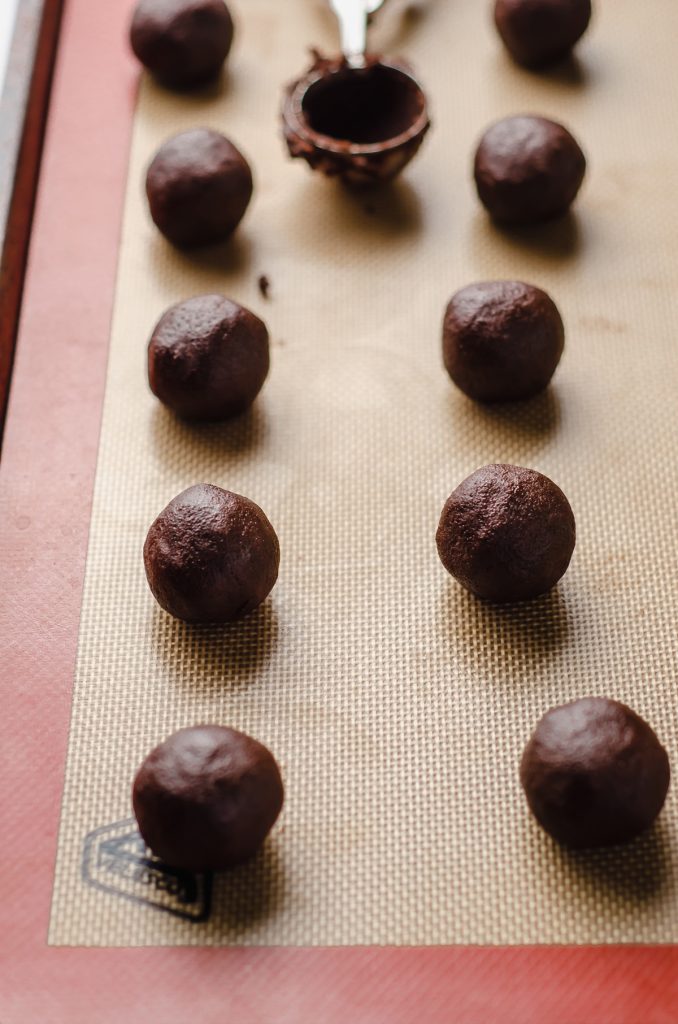
STEP #5: use a ¼ teaspoon measure to gently press down on the tops of the dough balls to create an indent. If the spoon is sticking to the dough, dip it into some cocoa powder. Once all of the cookie dough balls have been indented, chill in the refrigerator.

SUCCESS TIP
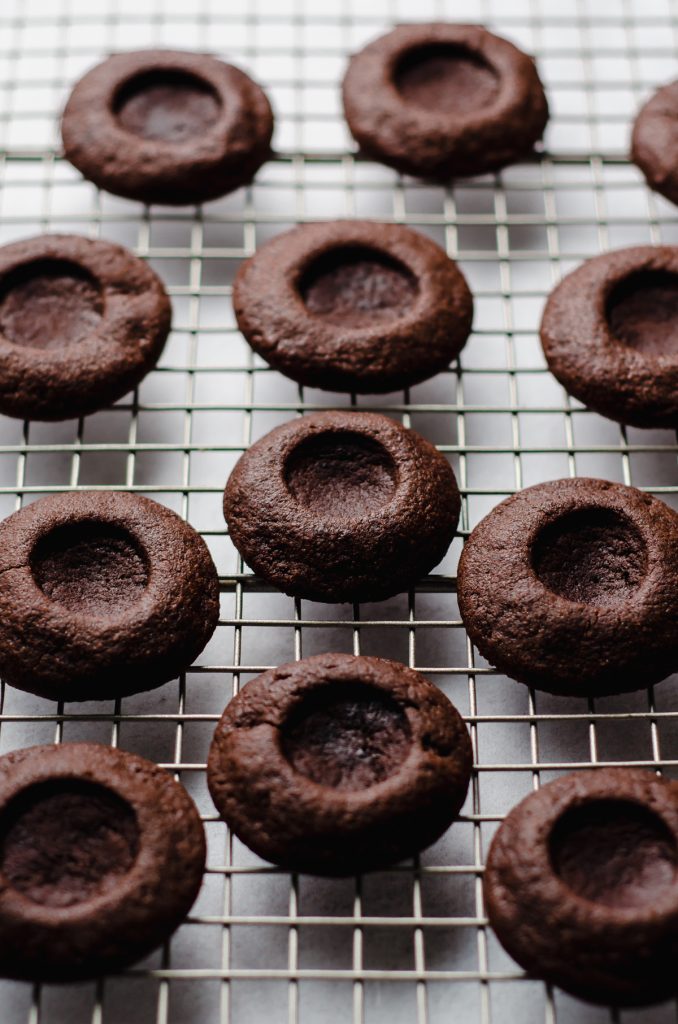
Chilling the dough after shaping is crucial to their success. Shaping them after chilling is very difficult, so if you’re looking to make these chocolate peppermint cookies ahead of time, freeze cookie dough balls after shaping. Chilling them shaped will encourage the cookies to maintain their shape. You will lose a bit of the sharpness of the indent, but we’ll reshape them a bit after baking.
STEP #6: when the cookies are thoroughly chilled, bake until the edges are set, then press down gently again with the ¼ teaspoon measure to re-shape the wells while the cookies are still hot. Allow the cookies to cool completely before filling with ganache.
STEP #7: make the ganache (detailed instructions in the next section and recipe card below).
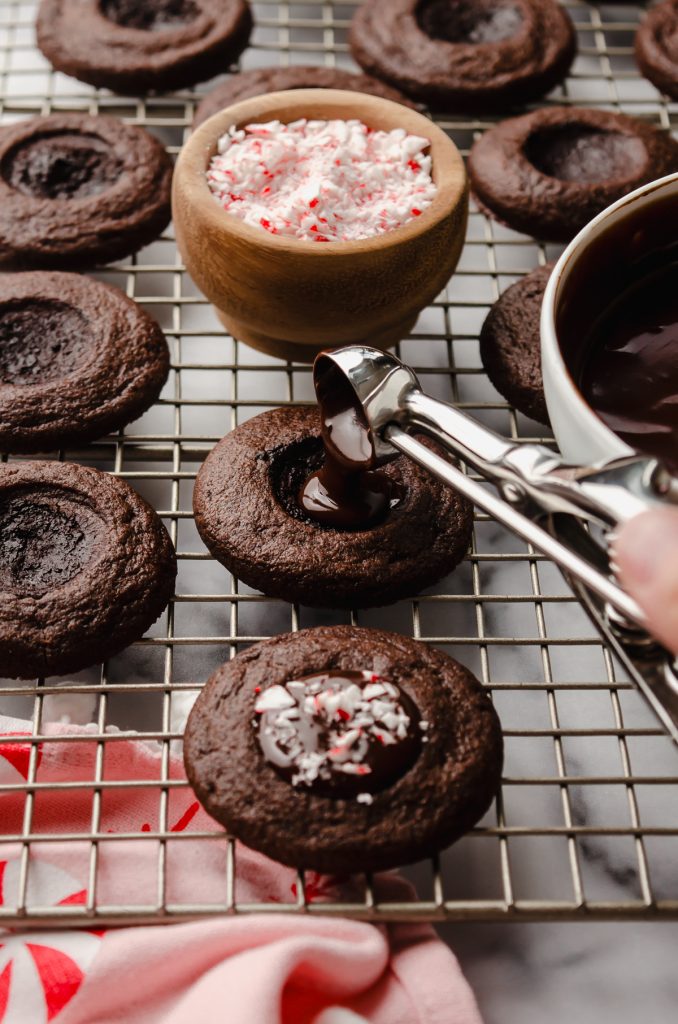
STEP #8: spoon about 1 teaspoon of ganache into the wells of the cookies, then sprinkle with crushed candy canes then allow to set before serving.
HOW TO MAKE PEPPERMINT CHOCOLATE GANACHE
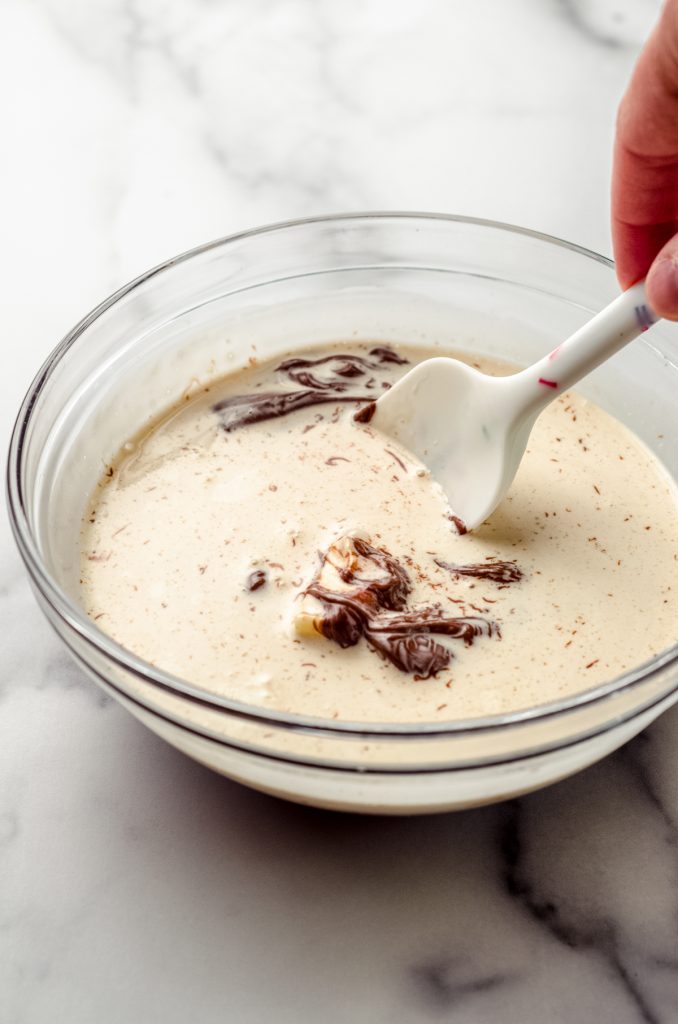
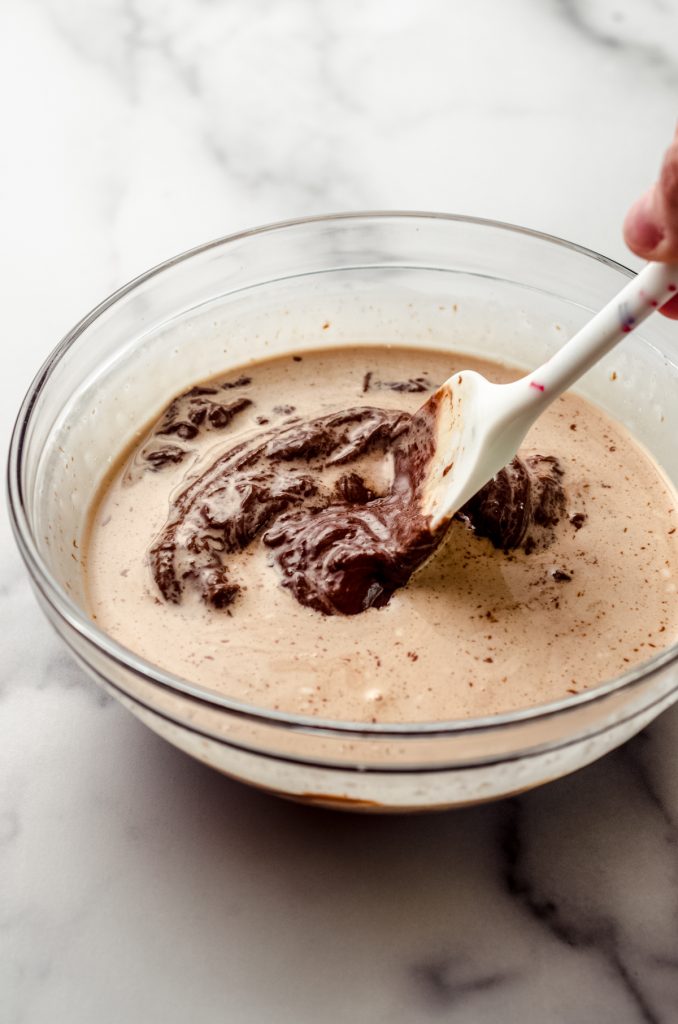
STEP #1: place the chocolate and peppermint extract into a medium size bowl.
STEP #2: in a small saucepan over medium heat or in the microwave, heat the heavy cream to steam. Remove from heat and immediately pour over the bowl of chocolate and extract.
STEP #3: allow the mixture to sit for a few minutes, then carefully stir mixture until all of the chocolate is melted. Allow to cool at least 10 minutes before using.
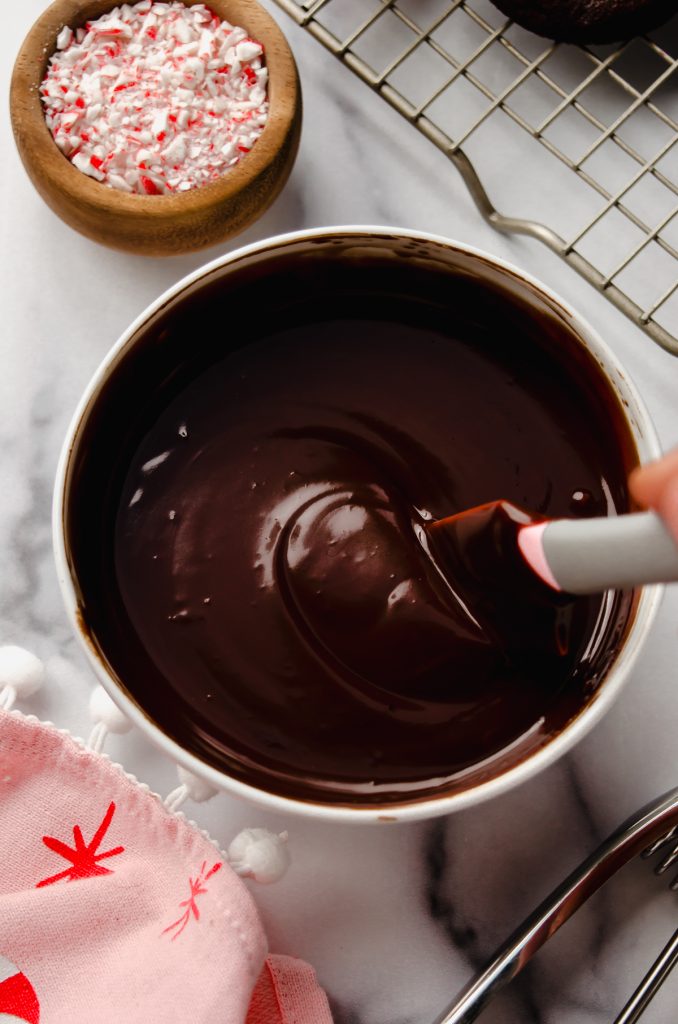
IMPORTANT NOTE
These cookies will stick together if stacked thanks to not only the ganache but also the candy canes. Place them in a single row, and separate with wax or parchment paper to avoid sticking together. Candy canes will start to dissolve in the ganache as the cookies sit, so will lose their color and texture the longer the cookies sit. Still totally safe to eat! They’re just not as vibrant as they are on day 1 and 2.

MORE CHOCOLATE PEPPERMINT RECIPES

Chocolate Peppermint Thumbprint Cookie Recipe
Ingredients
CHOCOLATE COOKIES
- ¾ cup (90g) all-purpose flour be sure to measure properly
- ¼ cup (24g) Dutch processed cocoa powder
- ¼ teaspoon salt
- ¼ teaspoon baking powder
- 6 Tablespoons (85g) unsalted butter softened to room temperature
- ¾ cup (150g) firmly packed light brown sugar
- 2 Tablespoons (25g) granulated sugar
- 1 egg yolk at room temperature
- 1 teaspoon vanilla extract
GANACHE FILLING
- 2 ounces (57g) quality semi-sweet chocolate coarsely chopped
- ⅛ teaspoon peppermint extract
- 2 Tablespoons (60mL) heavy cream
- 1 to 2 candy canes1 crushed
Instructions
CHOCOLATE COOKIES
- Line two large baking sheets with parchment paper or silicone baking mats and set aside.
- Whisk together the flour, Dutch processed cocoa powder, salt, and baking powder in a medium size bowl. Set aside.¾ cup (90g) all-purpose flour, ¼ cup (24g) Dutch processed cocoa powder, ¼ teaspoon salt, ¼ teaspoon baking powder
- In the bowl of a stand mixer fitted with the paddle attachment or a medium size bowl with a handheld electric mixer, cream together the butter and both sugars on medium high speed until light and fluffy, about 2-3 minutes. Add the egg yolk and the vanilla then beat again until completely combined. Scrape down the sides of the bowl as necessary.6 Tablespoons (85g) unsalted butter, ¾ cup (150g) firmly packed light brown sugar, 2 Tablespoons (25g) granulated sugar, 1 egg yolk, 1 teaspoon vanilla extract
- Turn the mixer speed to low, then slowly add the dry ingredients, mixing until just combined.
- Using a cookie scoop (I use this #50 cookie scoop for all of my standard size cookies), drop mounds of cookie dough onto the prepared baking sheet until you have used up all of the dough. Then, roll the rough balls of dough into smooth balls with your hands and place back onto the prepared sheet.
- Using a ¼ teaspoon measure, gently press down on the tops of the dough balls to create an indent. If the spoon is sticking to the dough, dip it into some cocoa powder. Once all of the cookie dough balls have been indented, chill in the refrigerator for at least 1 hour and up to 3 days. If you are chilling them for longer than 1 hour, cover them so the dough doesn't dry out. You can also chill them on a large plate or platter if you don't have enough room in the refrigerator for 2 large baking sheets. You can then transfer them from the plate or platter to the prepared baking sheets.
- When you are ready to bake the cookies, preheat the oven to 350ºF (177ºC). Bake the cookies no more than 8 to a baking sheet for 9 to 11 minutes (10 minutes worked best for me and my oven) until the edges are set.
- Remove the cookies from the oven, then press down gently again with the ¼ teaspoon measure to re-shape the wells while the cookies are still hot. The well will be larger than the ¼ teaspoon measure, so you will have to go around the edge of the well with the measuring spoon. You could also opt for a larger measuring spoon if that feels easier (I sometimes use a 1 teaspoon as it fits a but better). Allow the cookies to cool for at least 5 minutes on the baking sheet before transferring to a cooling rack to cool completely before filling with chocolate.
GANACHE FILLING
- Place the chocolate and peppermint extract into a medium size bowl. Set aside.2 ounces (57g) quality semi-sweet chocolate, ⅛ teaspoon peppermint extract
- In a small saucepan over medium heat or in the microwave, heat the heavy cream to steam. Remove from heat and immediately pour over the bowl of chocolate and extract.2 Tablespoons (60mL) heavy cream
- Allow the mixture to sit for a few minutes, then carefully stir mixture until all of the chocolate is melted. Allow to cool at least 10 minutes before using.
- Spoon about 1 teaspoon of ganache into the wells of the cookies, then sprinkle with crushed candy canes. Ganache will thicken inside the cookies as it sets but will still be creamy when you bite into the cookies. Allow cookies to set for at least 1 hour before enjoying.1 to 2 candy canes1
- Cookies stay fresh covered at room temperature for up to 3 days2 or in the refrigerator for up to 1 week. Do not stack cookies, but store in an airtight container at room temperature. If you need to stack them, place a piece of wax or parchment paper between layers. Un-filled cookies freeze well, up to 3 months. Do not freeze filled cookies. Allow to thaw at room temperature then fill.
Notes
- Candy canes: you can also use peppermint candies like Starlight mints instead. You can use pre-crushed peppermint candies, too.
- Storage notes: candy canes will start to dissolve in the ganache as the cookies sit, so will lose their color and texture the longer the cookies sit. Still totally safe to eat! They’re just not as vibrant as they are on day 1 and 2.
Nutrition Disclosure
All nutritional values are approximate and provided to the reader as a courtesy. Changing ingredients and/or quantities will alter the estimated nutritional calculations.