
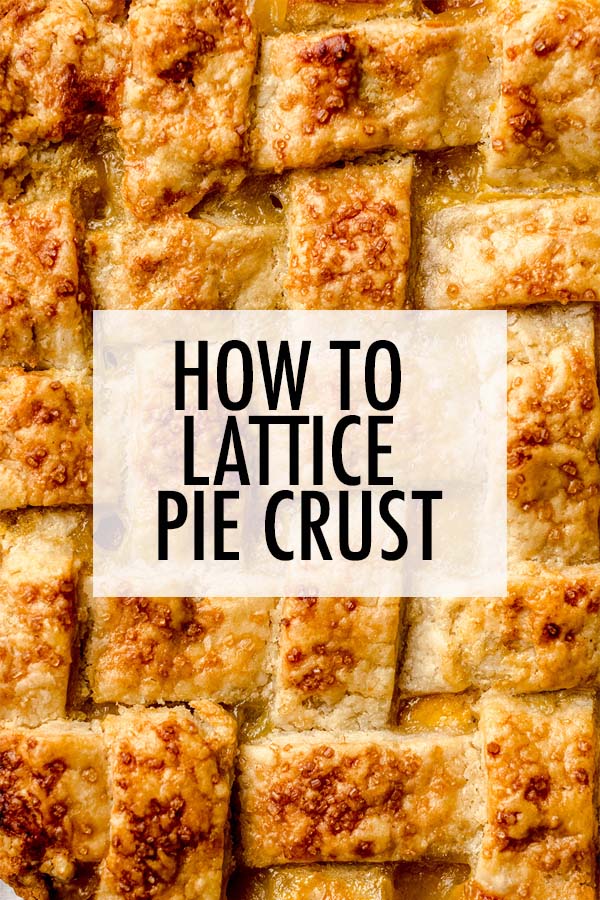
How To Make A Lattice Pie Crust
As an Amazon Associate, I earn from qualifying purchases. Read the full disclosure here.
Learn how to make a beautiful and impressive lattice top pie crust with this simple method. Pictures and labeled diagrams included to help you get the perfect lattice crust every time!
In 2022, I spent the year filling my monthly baking series with pies. Pies had always given me trouble, despite having a solid, reliable, highly-tested homemade pie crust recipe, and as I got more comfortable with pies and different ways to crust a pie, I finally felt ready to tackle a lattice top.
Spoiler alert: it was much easier than I had expected it to be, and I found that I could even “practice” using ribbon before putting it on an actual pie. Once I got to my beloved peach pie, I was ready with all of the tips, tricks, and tools to make a simple lattice top turn out beautifully.
USE MY FAVORITE HOMEMADE PIE CRUST RECIPE
While you can certainly use your favorite homemade pie crust or even store-bought pie dough to get your pie done, I urge you to use my go-to recipe whenever you make pie from scratch.
My recipe is made with both butter and shortening, ratios of both that provide the perfect balance between buttery flavor and super flaky layers.
I’ve used this pie crust recipe for many years and for dozens and dozens of pies (and cookies!) and it never fails me. Ever.
How to Make a Lattice Pie Crust
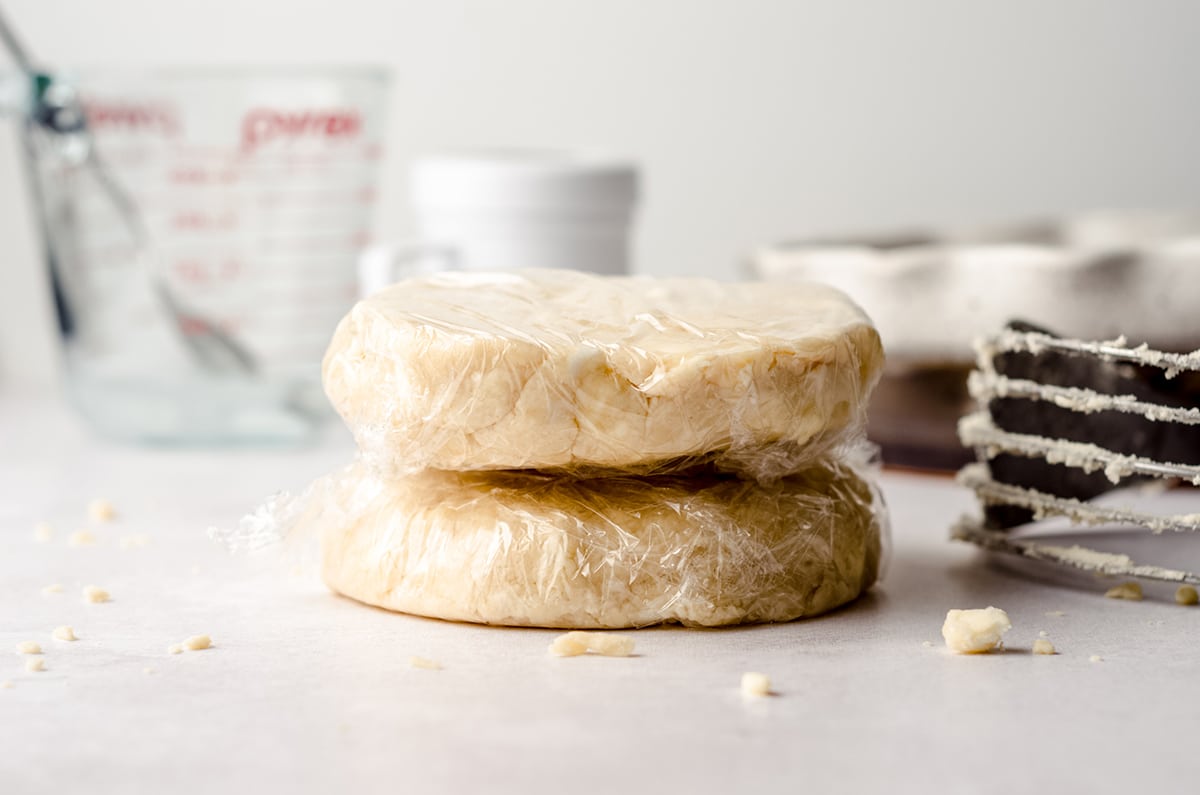
USE A DOUBLE CRUST RECIPE
In order to lattice a pie, you’re going to need two crusts. Lucky for you, my homemade pie crust recipe is a double crust recipe. Most pie crust recipes are, but if you’re not using mine, check to be sure that the recipe you’re using is.
You want to make sure your pie crust is nice and chilly, so prepare your crust well ahead of time.
I like to make a double pie crust every time I finish a pie so that I always have pie crust ready to go.
You’ll need the pie crusts to be thawed, but you’ll be working with them cold, so make sure if you have pie crusts in the freezer, they have at least overnight to sit in the fridge to be ready for pie baking.
PREPARE THE BASE PIE CRUST
As I said, you want your pie discs to be nice and cold, so only grab one disc to first line your pie plate.
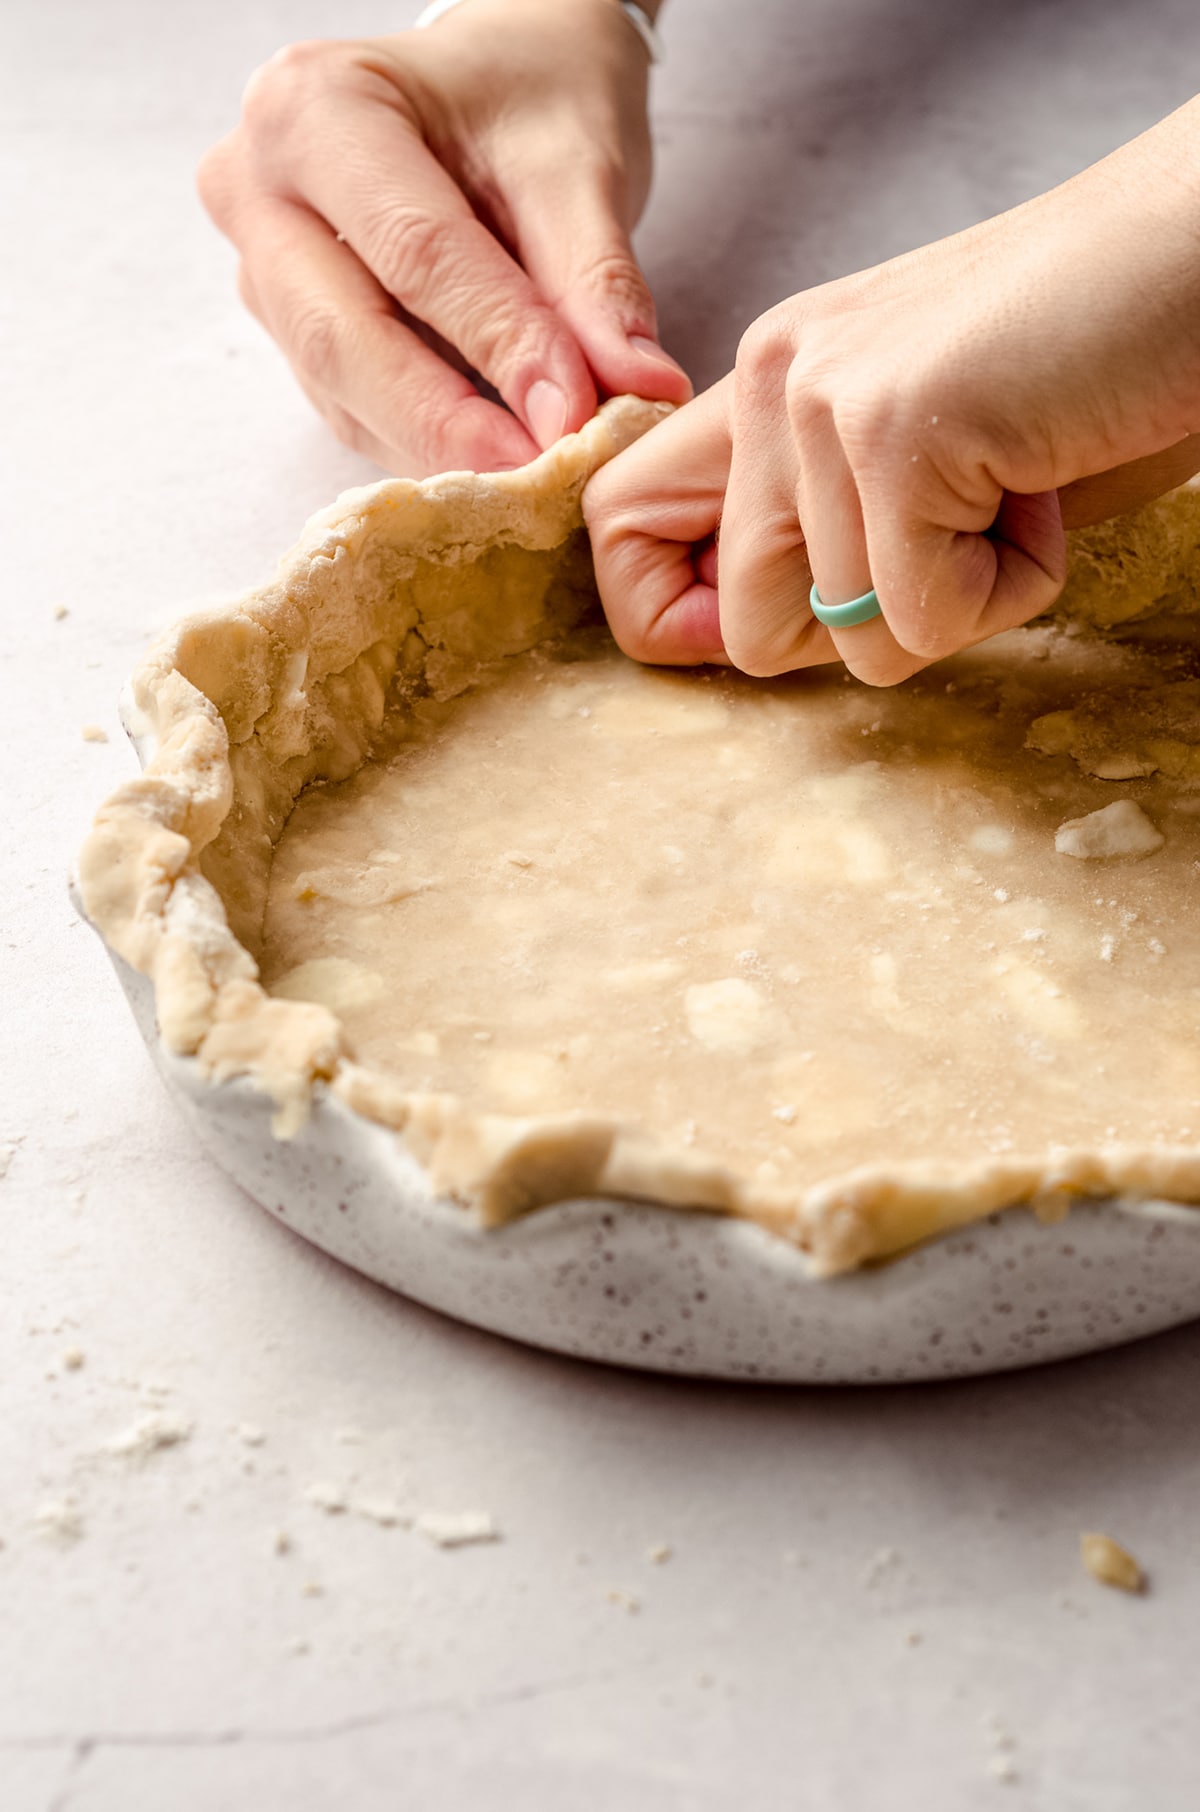
Before I even start making my pie filling, I prepare the base crust, which can sit in the pie plate in the fridge and chill to retain the flakiness while we prepare the filling and the lattice strips.
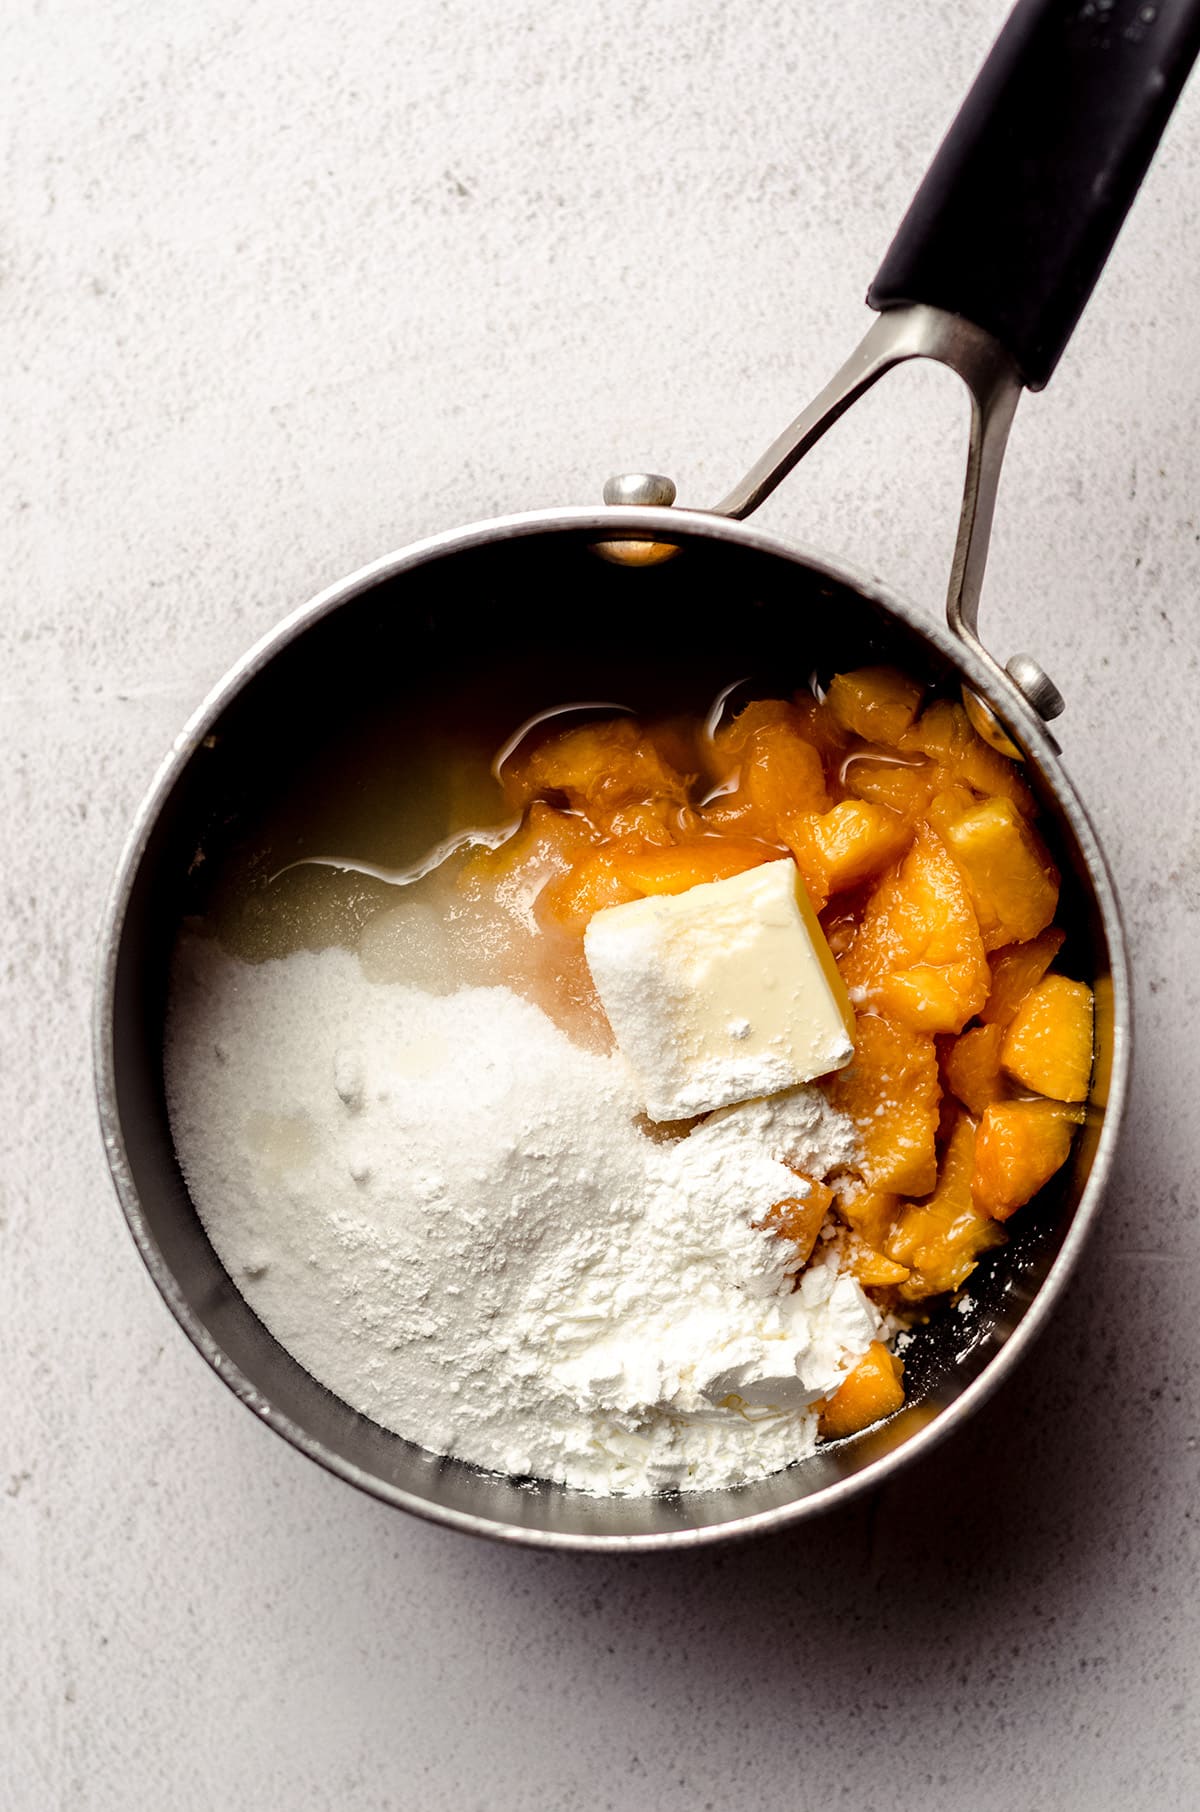
MAKE THE PIE FILLING
If you haven’t yet at this point, make your pie filling. Perhaps you made it ahead of time and it’s been sitting in the refrigerator (to save you time on pie baking day). Or maybe you want to make it after you cut your strips.
It all depends on how long it will take you, whether or not it has to cool before you put it into the base pie crust, or just your general preference.
You be the judge! Just make sure that in the next step, you are able to keep your lattice strips chilled until right before they’re going onto the top of your pie.
PREPARE THE LATTICE STRIPS
Now it’s time for the fun stuff!

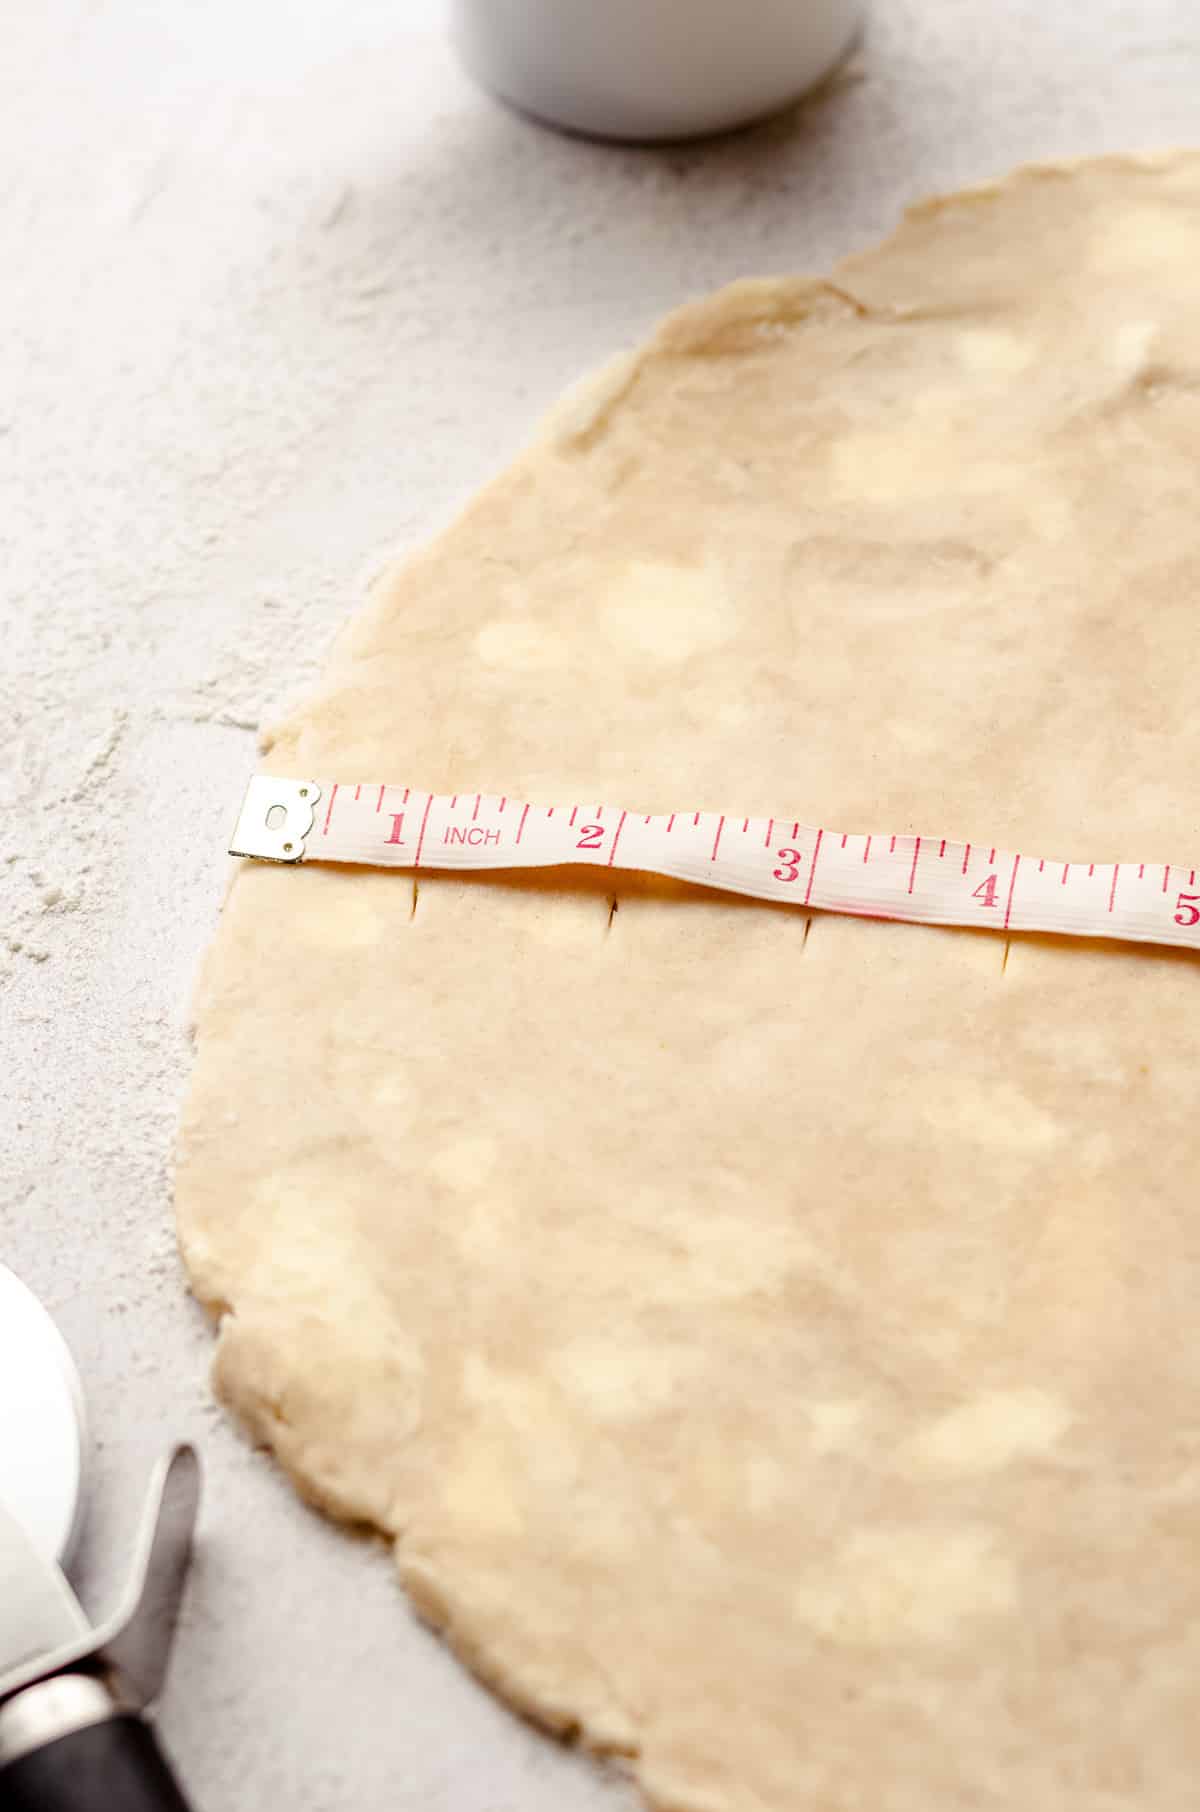
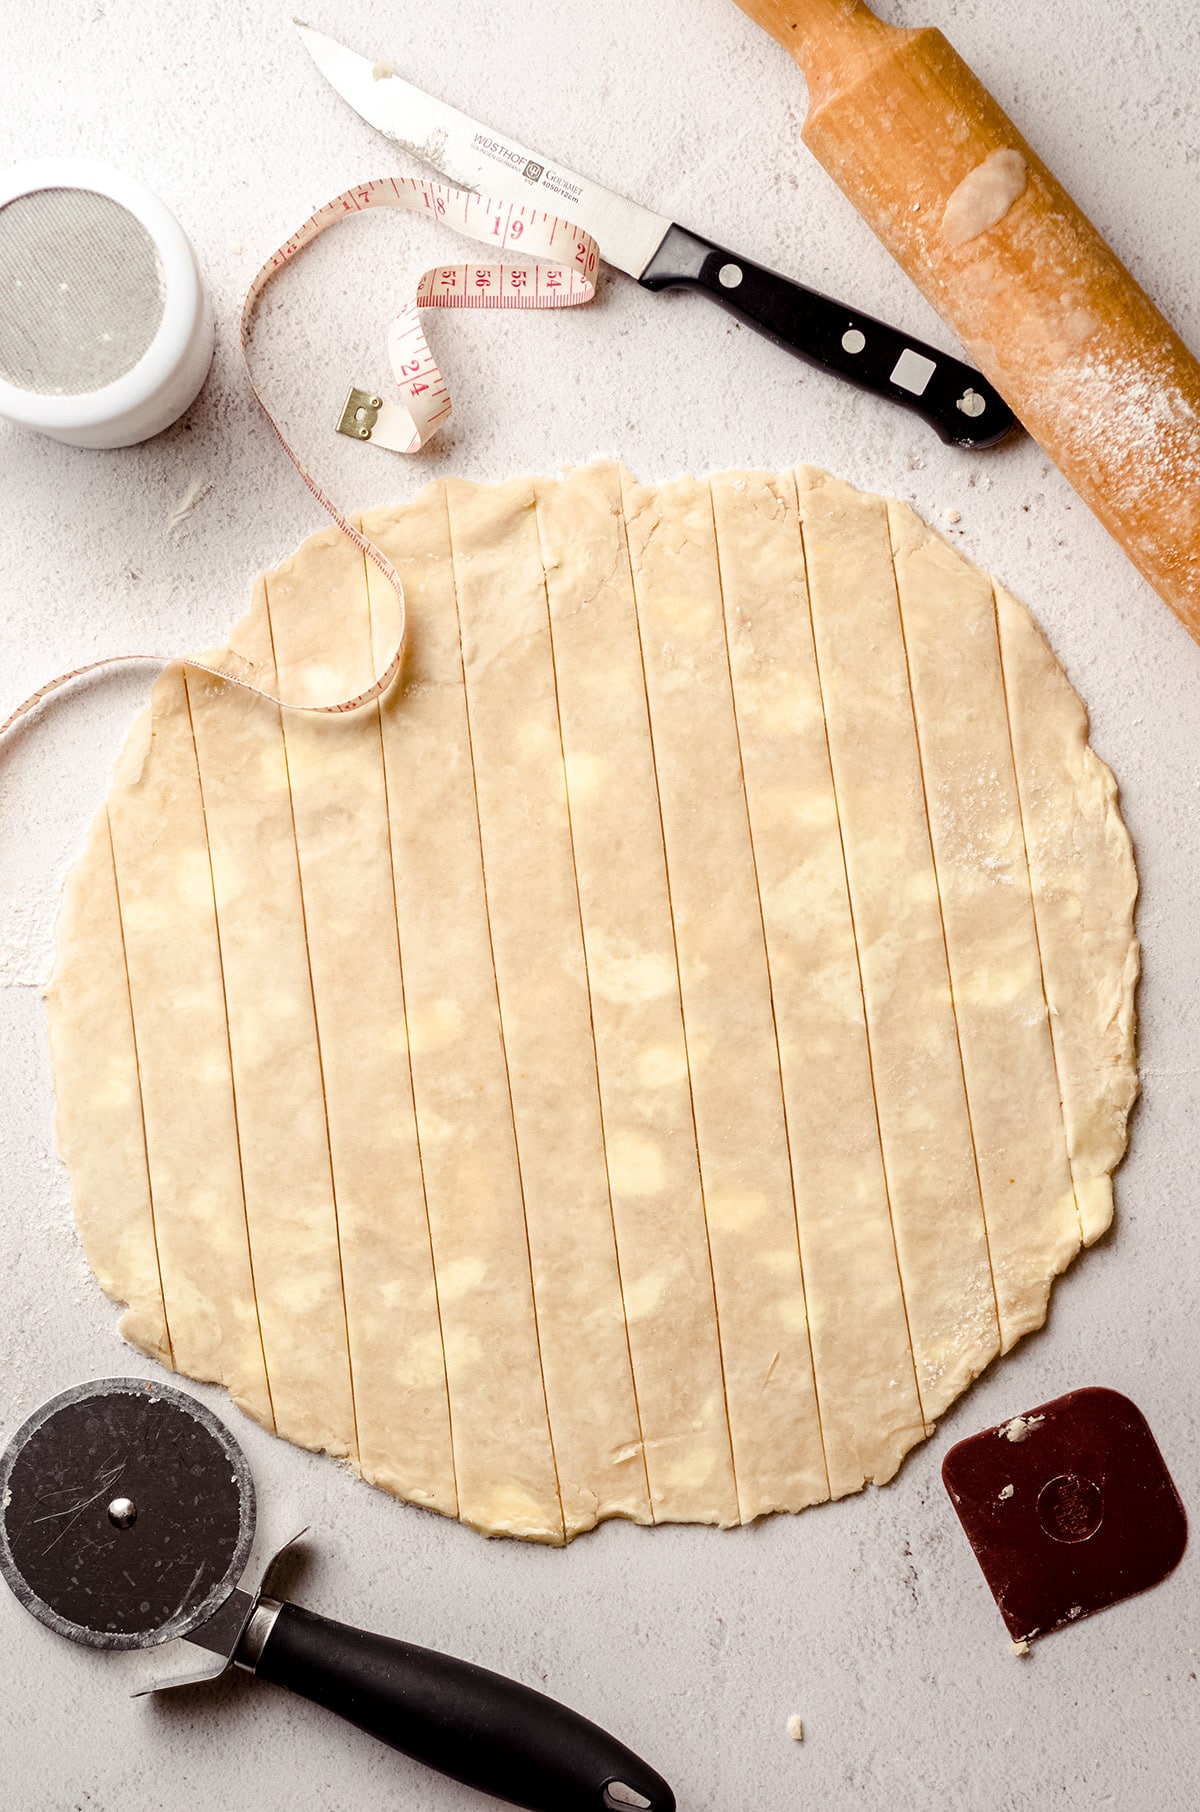
Roll the second disc of pie crust into a 12″ circle. I prefer to use a tape measure or ruler here so I can make it as exact as I can. I also like to do this on a large circular surface (like a pizza stone) that I can place in the fridge if the butter/shortening starts to melt too much.

Use the measuring tape or ruler and a sharp knife to mark off 1″ increments across the diameter of the pie crust.
Now, turn your measuring device 90º and use your knife or a pizza cutter (my preference) to cut a straight line along each of the tick marks. You should now have 12 strips of dough.
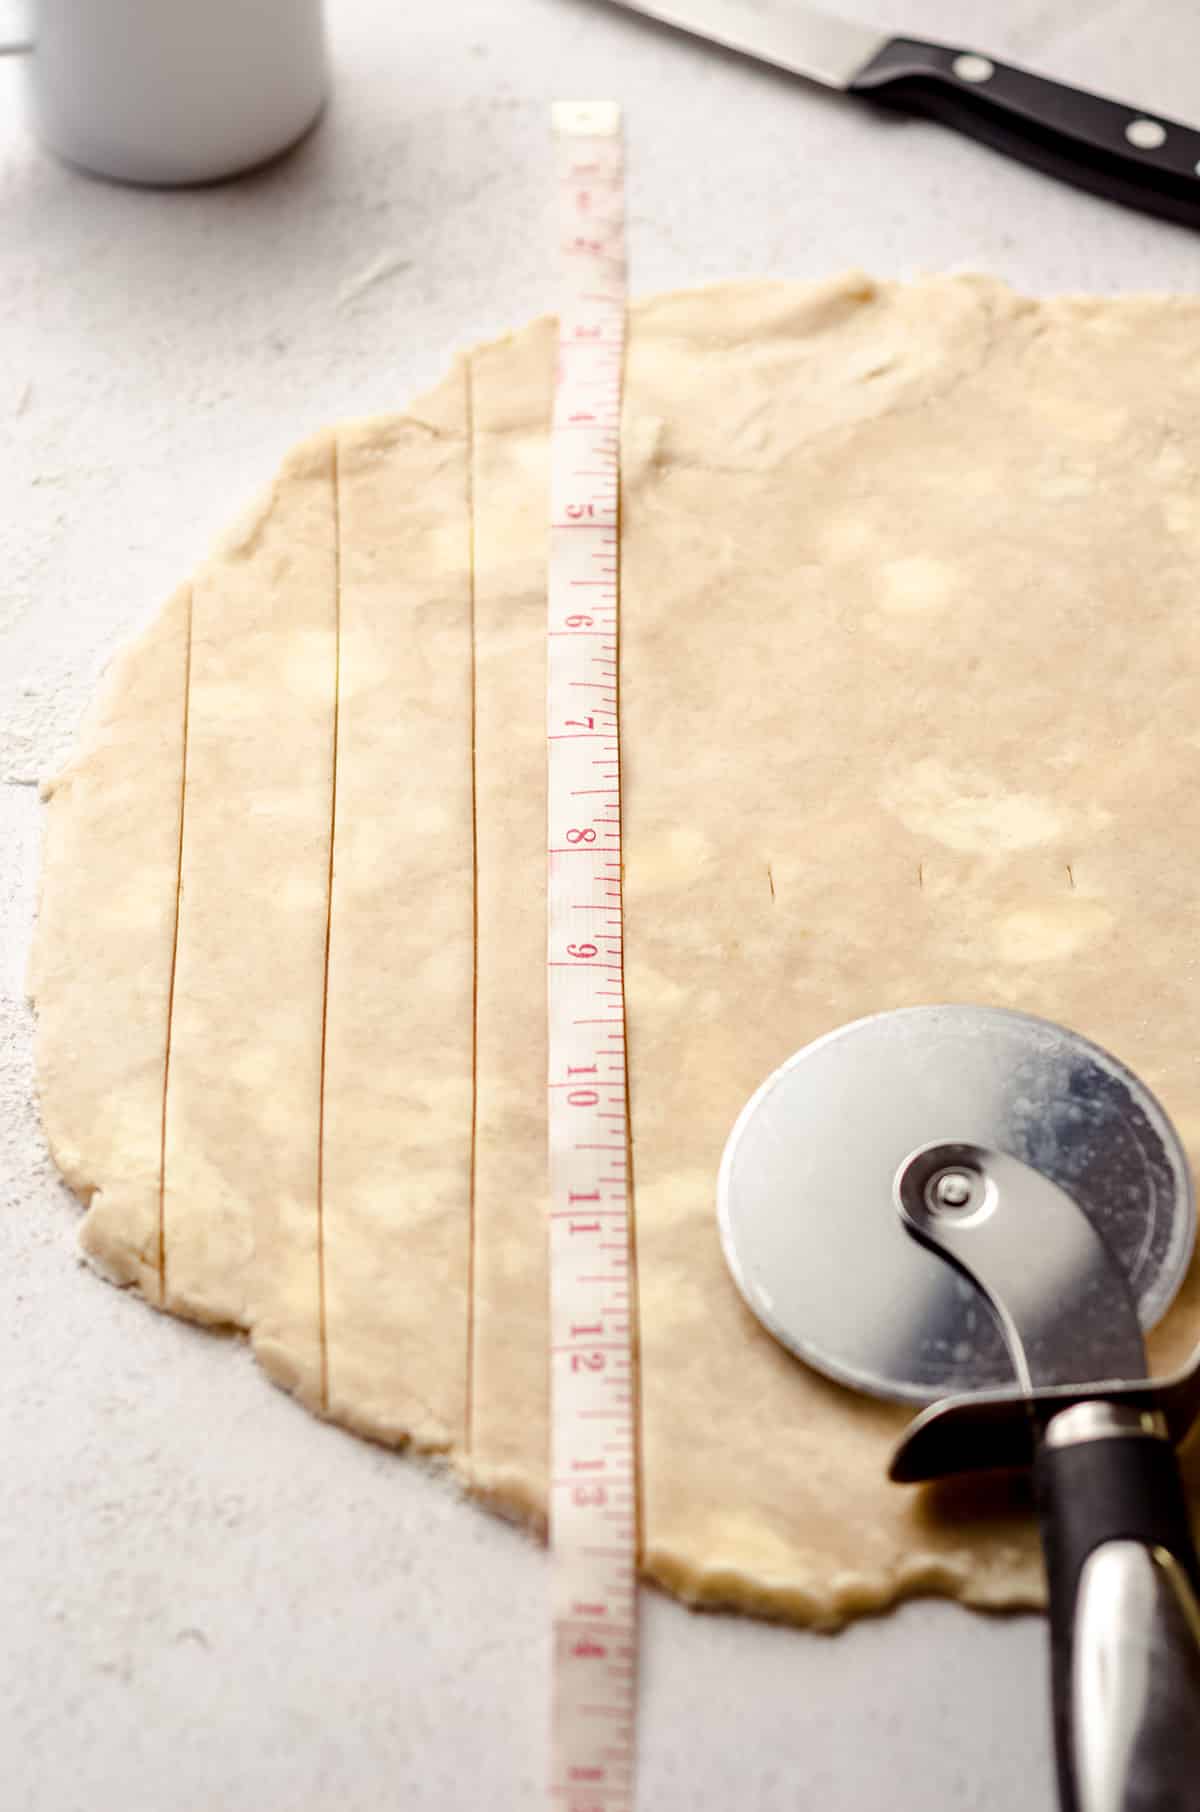
If the butter/shortening seems like it melted from a lot of touching, place the large round surface in the refrigerator for 10 minutes to firm up at this point.
Or if you still need to make your pie filling, place it in the fridge regardless of how it’s feeling at this time.
FILL THE PIE
This is where you will pour your pie filling into the prepared base pie crust. Be sure to follow your specific pie recipe, because it’s possible you may have to blind bake your pie crust.
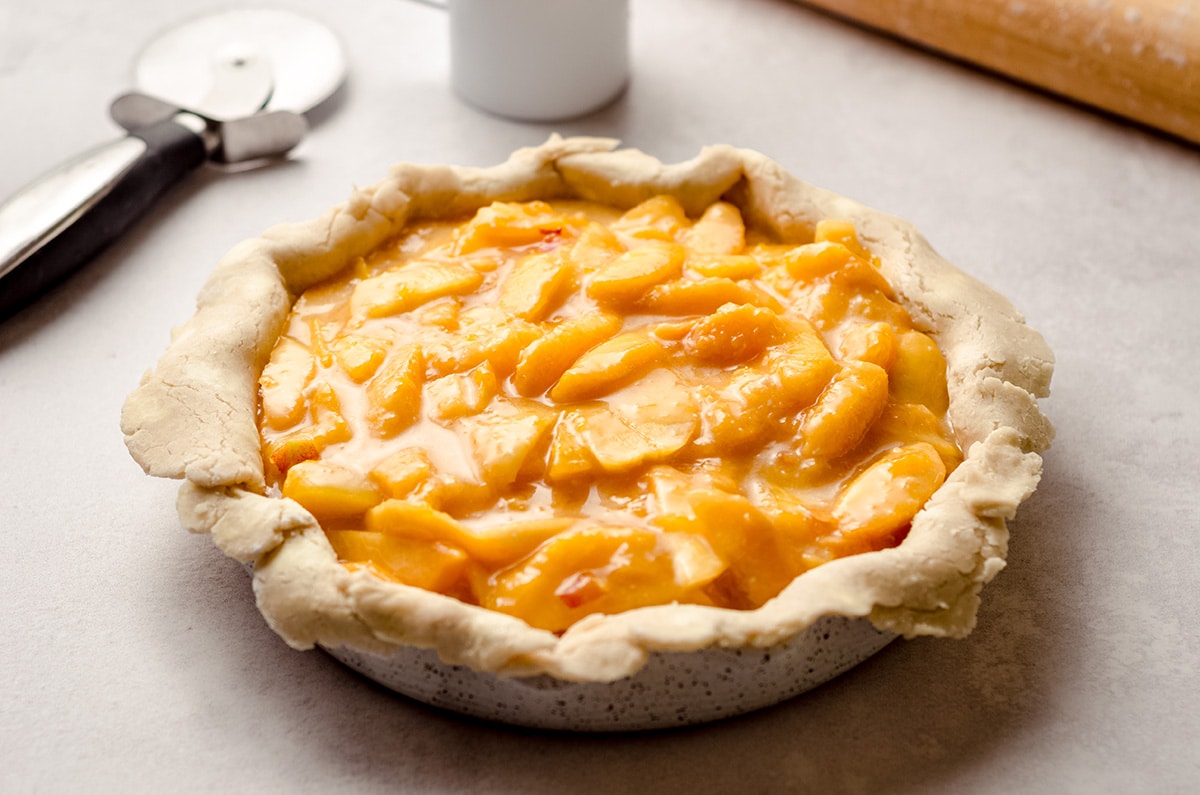
If you’re making a lattice topped pie, there’s a good chance it’s a fruit pie, which will not require blind baking. Just be sure you keep this in mind and proceed with your pie prep steps in a way that makes sense for you and your workflow.
That said, whatever the filling may be, pour your pie filling into the prepared pie plate and spread it out evenly.
HOW TO LATTICE A PIE
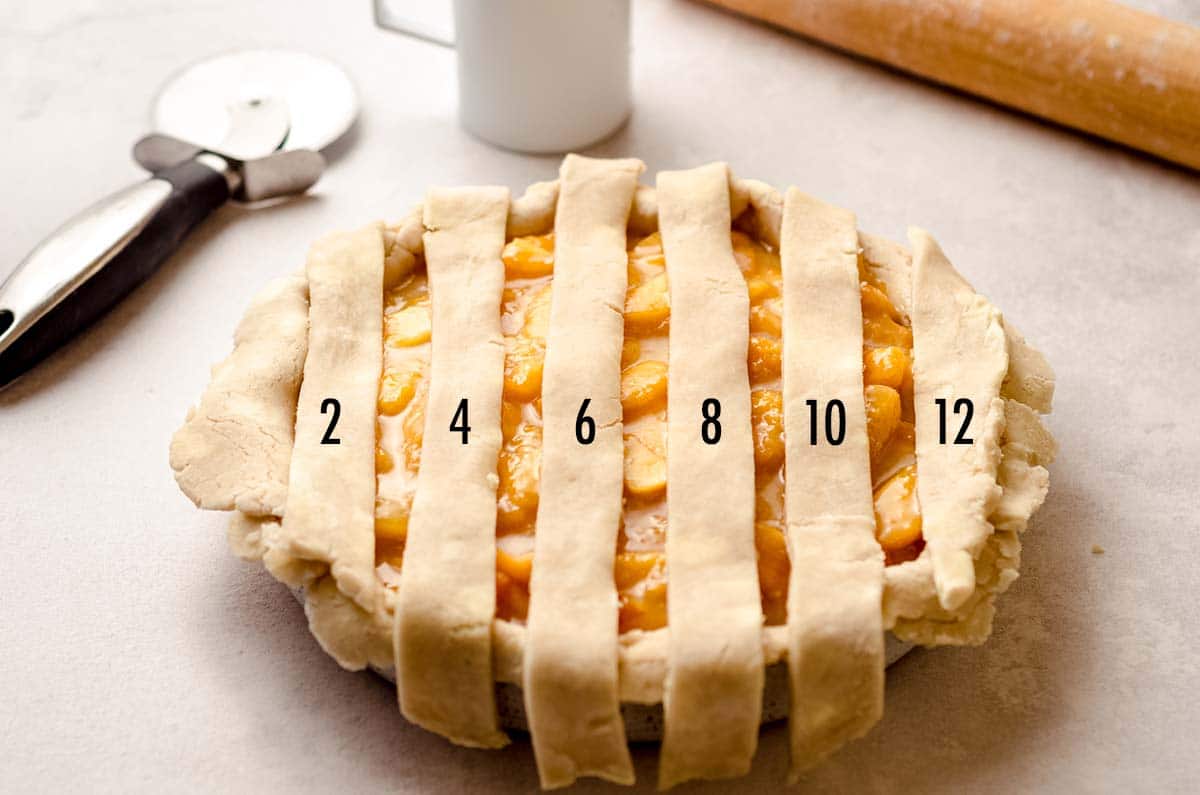
To start, place the strips of pie dough parallel in front of you.
Starting with the left-most strip, number this one #1 (either mentally or with a piece of tape on whatever surface you’re working on). Working to the right, number each strip until you have numbered all 12 strips.

Picking up every other 1″ strip (2, 4, 6, 8, 10, 12), lay 6 strips vertically and evenly spaced on top of the filled pie. The longer strips will be in the center of the pie and the shorter strips will be on the ends of the pie.
Fold every other strip (2, 6, and 10) away from you, slightly past halfway so they’re lying on top of themselves.
Pick up strip #7 and lay it on the pie perpendicular to the folded strips slightly off-center. Unfold strips 2, 6, and 10 back over the pie and the strip you just lay, then fold back 4, 8, and 12 and repeat with strip #5, working toward yourself/toward the closer side of the pie.
Fold 2, 6, and 10 back again, and repeat with strip #3. You now have a lattice top on half of the pie.
Working toward the other side of the pie in the opposite direction, fold strips 2, 6, and 10 toward you, then lay strip #9 across the pie. Fold back 4, 8 and 12 and repeat with strip #11, working away from yourself/toward the far side of the pie.
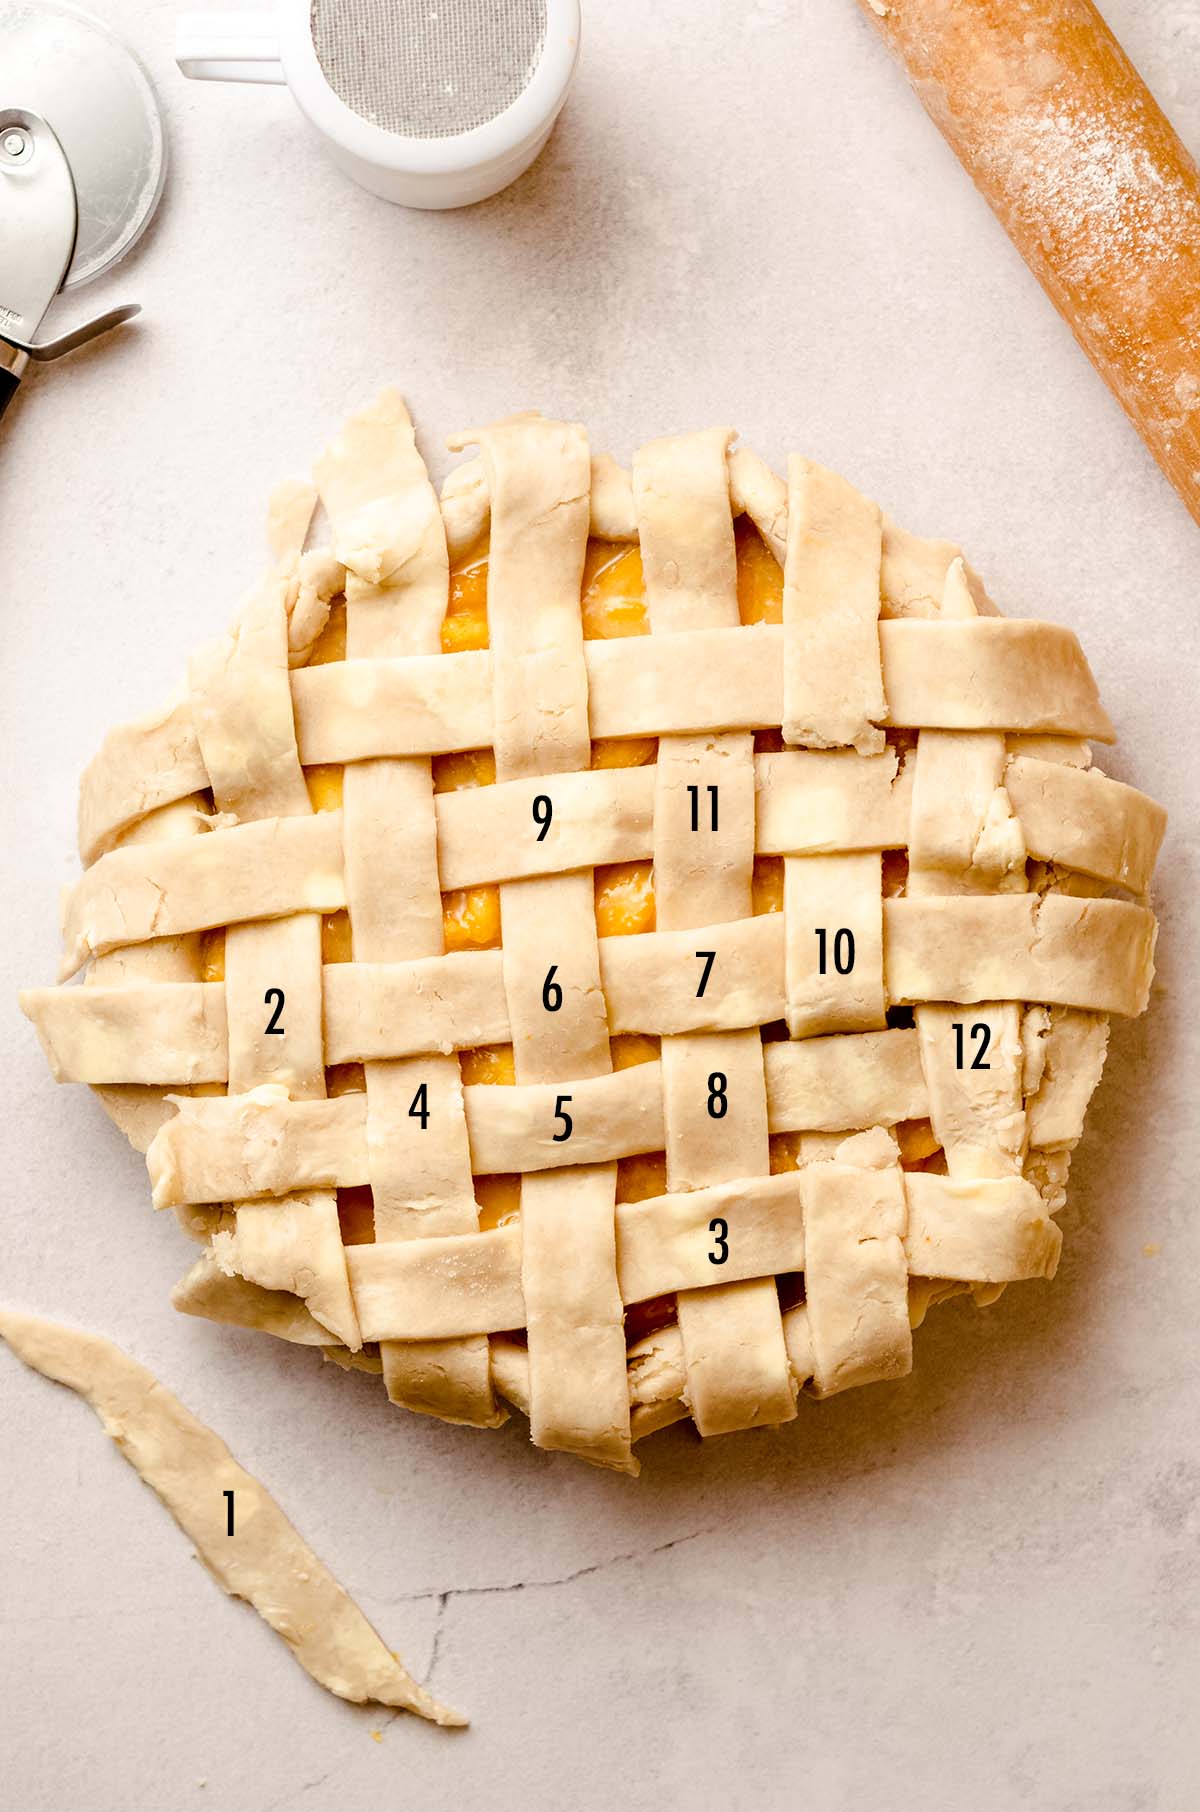
Fold 2, 6, and 10 back one last time and finish with strip #1, if needed. I often don’t use the very last strip, only because I like to space my lattice out a bit more to see the filling.
Depending on how tight you lattice your strips, you may have space for it. If not, just discard or pinch into a thin spot on the edges before fluting.
Do not cut off excess pie dough. Instead, gather and pinch together the top strips with the bottom crust, then flute the edges.
CHILL THE PIE BEFORE BAKING
This is the most overlooked step, in my opinion, and at this point, I want you to chill the pie in the refrigerator for at least 30 minutes.
Chilling a lattice crust pie insures the strips stay crisp and the edges don’t melt together. This is especially helpful if your filling is still a little warm, though it’s advisable to make sure your filling is either cold or completely cooled to room temperature.
When the pie has about 15-20 minutes left to chill, move a rack in the oven to the center position and preheat the oven according to your instructions.
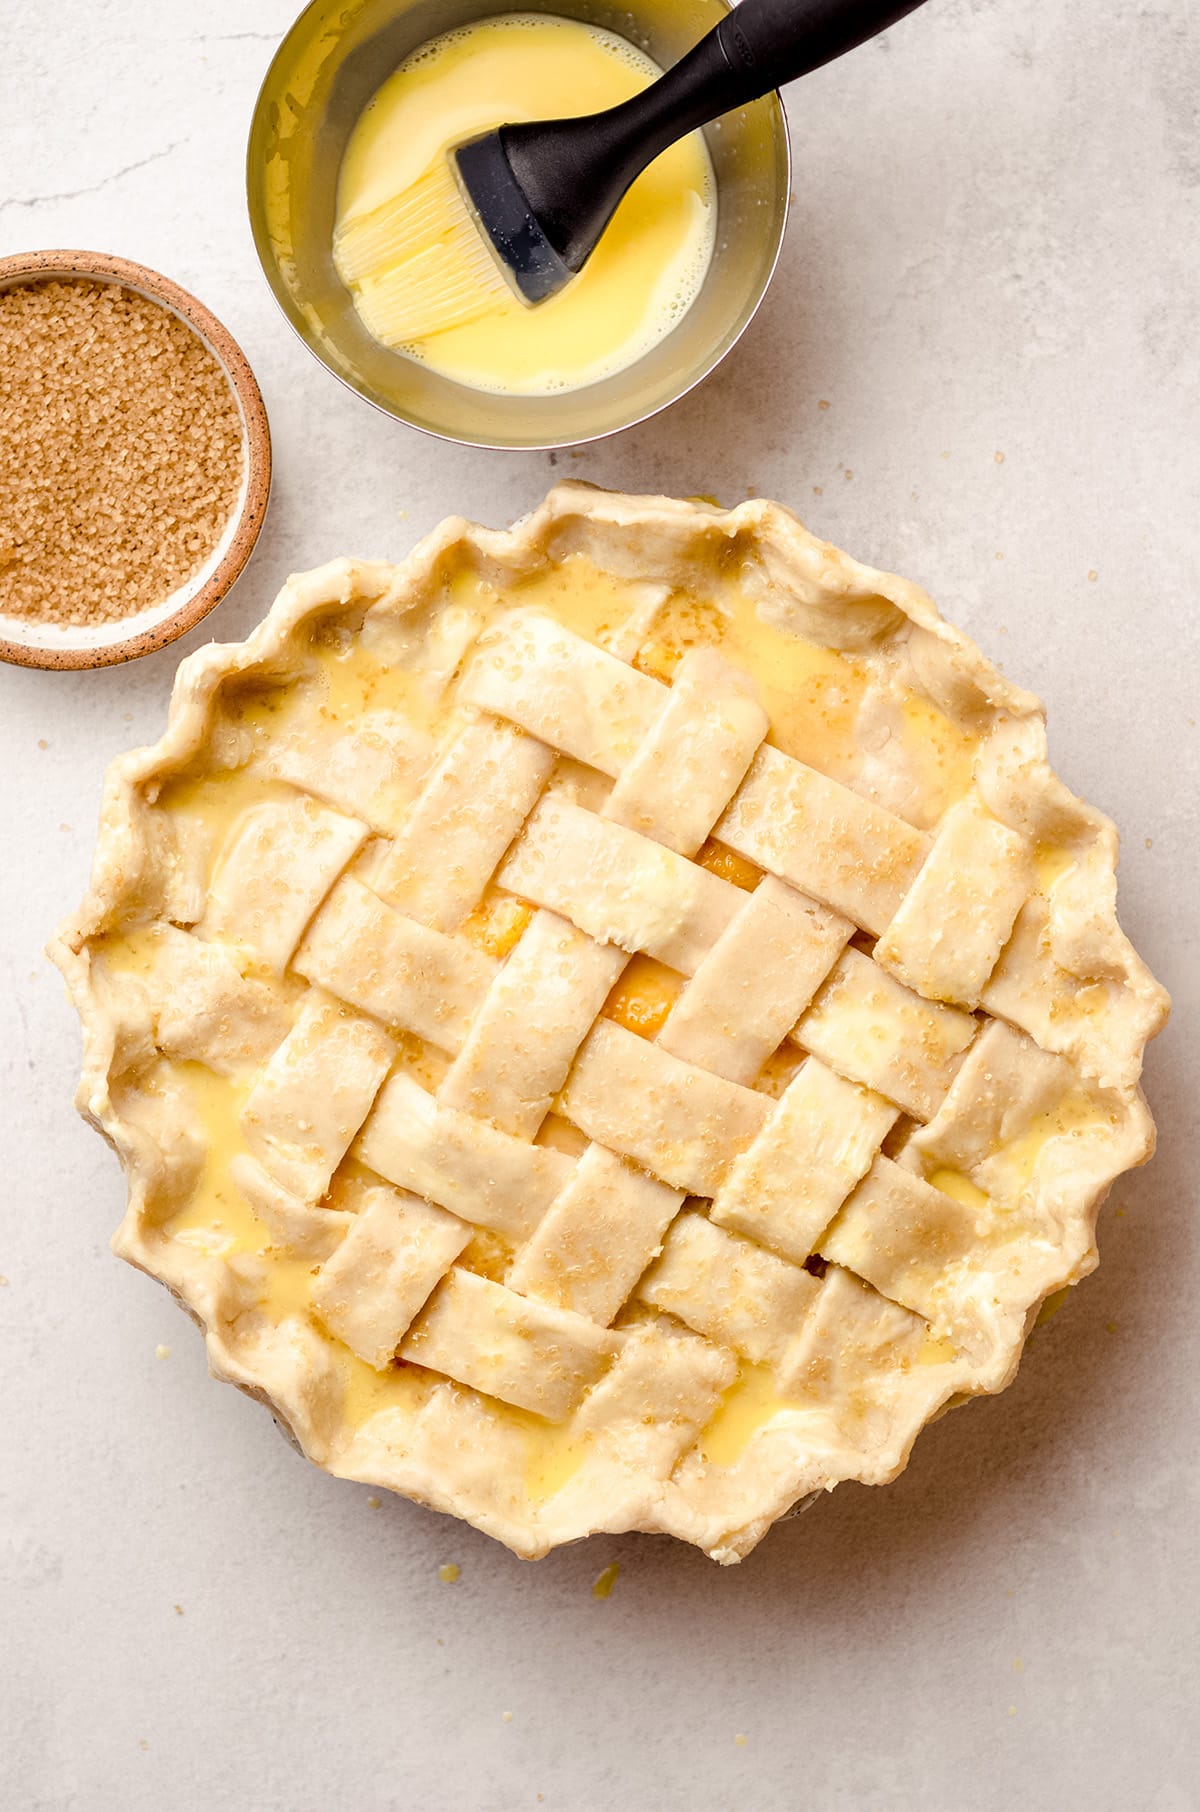
USE AN EGG WASH
Once the pie is completely chilled and your oven is preheated, brush the whole pie with an egg wash, then sprinkle with coarse sugar.
This egg wash and coarse sugar add sparkle and crunch to the top of your pie for not just an upgraded aesthetic, but also another layer of flaky pie crust to sandwich whatever delicious filling you have going on inside of your pie.
My personal preference is to always place the pie on a large baking sheet to catch drippings and place the baking sheet with the pie on it in the oven to bake for the time suggested in the recipe.
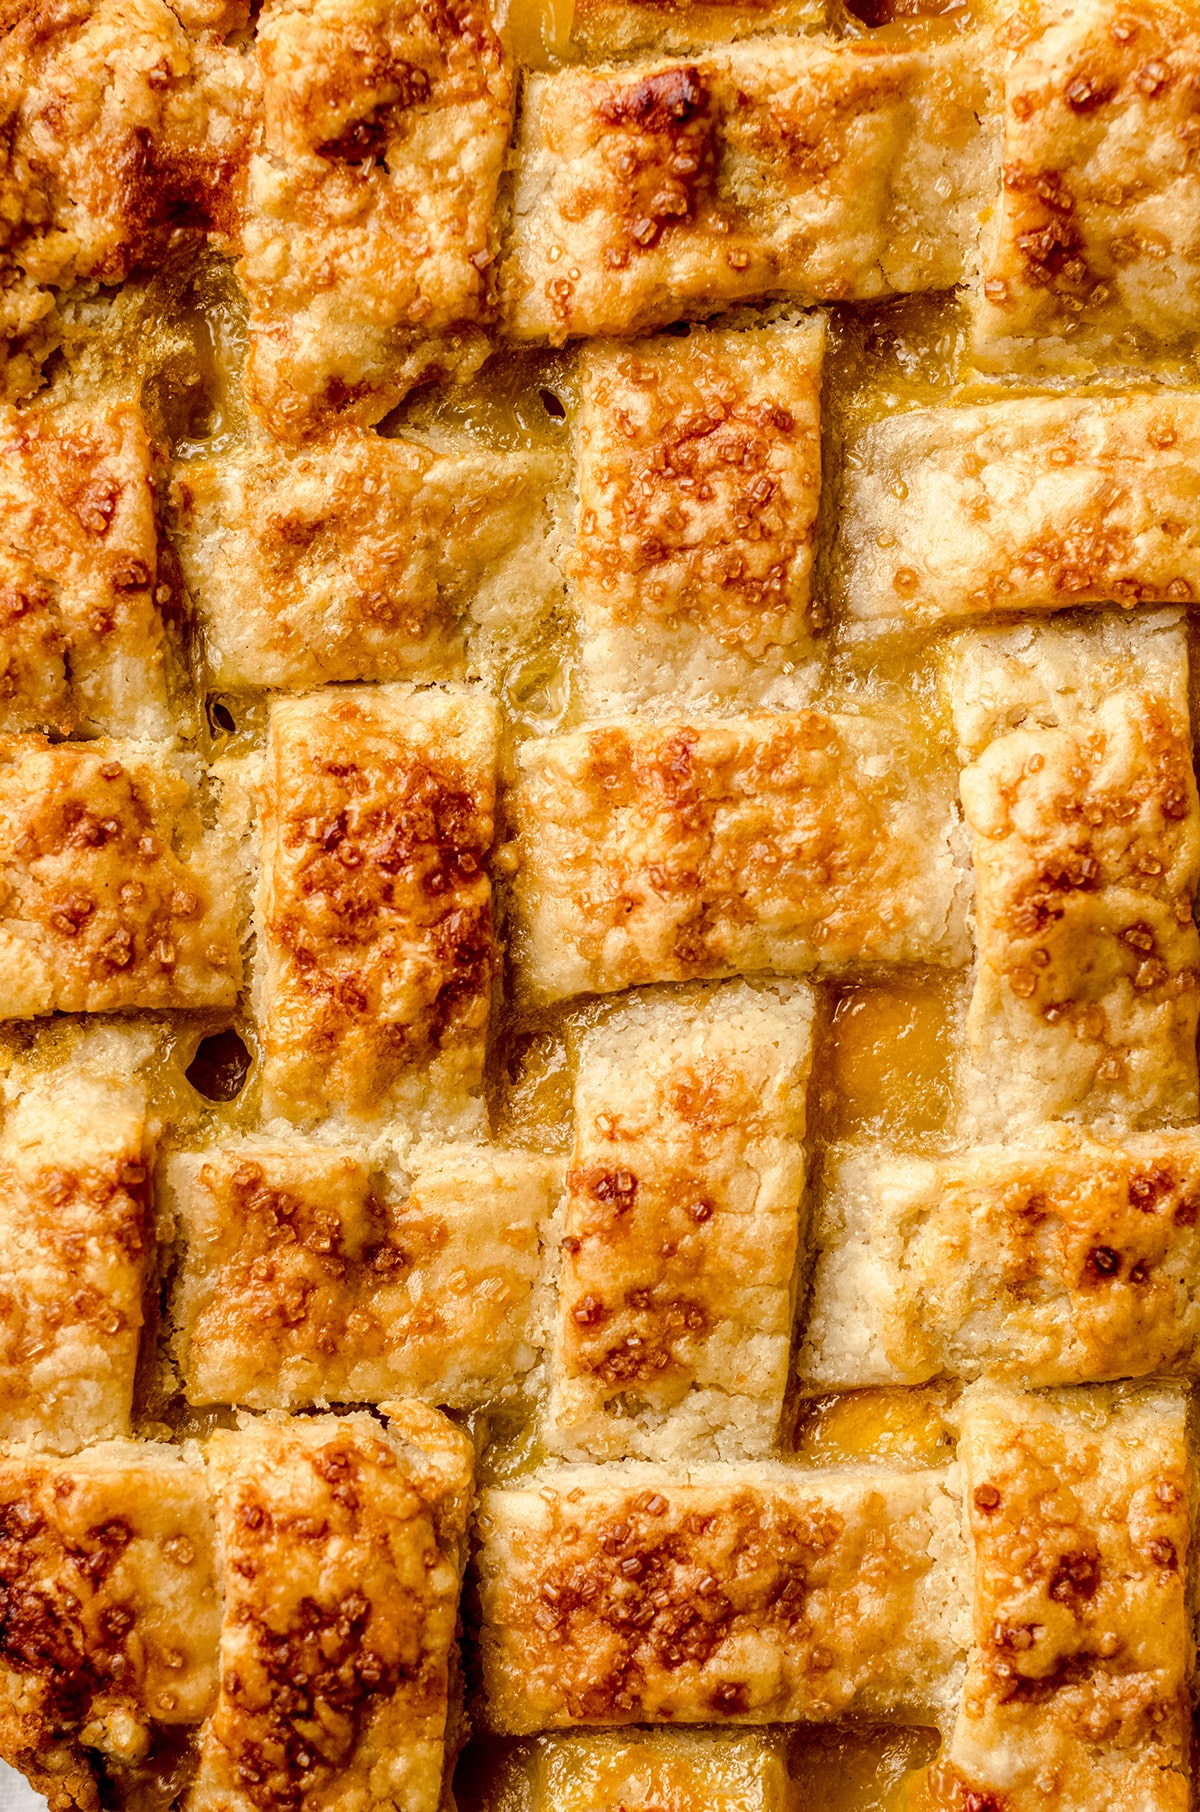
Lattice pies are most often fruit pies, and you know a fruit pie is done when the filling is bubbling through the holes of your lattice pie top and often dripping down the sides.
It might seem super messy, but it’s actually the perfect indicator that the pie is sufficiently done.
Now that you’re fully equipped with the skills for how to do lattice pie crust, let’s grab a fork and dive into my very favorite fresh peach pie!


Pie Lattice
Ingredients
- 1 full recipe homemade pie crust
- egg wash: 1 large egg + 1 teaspoon of water beaten
- coarse sugar for sprinkling if desired
Instructions
- Remove one disc of pie crust from the refrigerator, roll it out, and line a 9" plate with the crust.1 full recipe homemade pie crust
- Place pie plate in the refrigerator to chill while you prepare the lattice strips.
- Roll the second disc of pie crust into a 12" circle. I prefer to use a tape measure or ruler here so I can make it as exact as I can. I also like to do this on a large circular surface (like a pizza stone) that I can place in the fridge if the butter/shortening starts to melt too much.
- Use the measuring tape or ruler and a sharp knife to mark off 1" increments across the diameter of the pie crust. Turn your measuring device 90º and use your knife or a pizza cutter (my preference) to cut a straight line along each of the tick marks. You should now have 12 strips of dough. If the butter/shortening seems like it melted from a lot of touching, place the large round surface in the refrigerator for 10 minutes to firm up.
- Pour your pie filling into the prepared pie plate and spread it out evenly.
- Place the strips of pie dough parallel in front of you. Starting with the left-most strip, number this one #1 (either mentally or with a piece of tape on whatever surface you're working on). Working to the right, number each strip until you have numbered all 12 strips.
- Picking up every other 1" strip (2, 4, 6, 8, 10, 12), lay 6 strips vertically and evenly spaced on top of the filled pie. The longer strips will be in the center of the pie and the shorter strips will be on the ends of the pie.
- Fold every other strip (2, 6, and 10) away from you, slightly past halfway so they’re lying on top of themselves. Pick up strip #7 and lay it on the pie perpendicular to the folded strips slightly off-center. Unfold strips 2, 6, and 10 back over the pie and the strip you just lay, then fold back 4, 8, and 12 and repeat with strip #5, working toward yourself/toward the closer side of the pie. Fold 2, 6, and 10 back again, and repeat with strip #3. You now have a lattice top on half of the pie.
- Working toward the other side of the pie in the opposite direction, fold strips 2, 6, and 10 toward you, then lay strip #9 across the pie. Fold back 4, 8 and 12 and repeat with strip #11, working away from yourself/toward the far side of the pie. Fold 2, 6, and 10 back one last time and finish with strip #1, if needed. I often don't use the very last strip, only because I like to space my lattice out a bit more to see the filling. Depending on how tight you lattice your strips, you may have space for it. If not, just discard or pinch into a thin spot on the edges before fluting.
- Do not cut off excess pie dough. Instead, gather and pinch together the top strips with the bottom crust, then flute the edges. Allow the pie to chill in the refrigerator for 30 minutes.
- When the pie has about 15-20 minutes left to chill, move a rack in the oven to the center position and preheat the oven according to your instructions.
- Brush the whole pie with the egg wash, then sprinkle with coarse sugar. Place the pie on a large baking sheet (to catch drippings) and place the baking sheet with the pie on it in the oven to bake for the time suggested in your recipe.egg wash: 1 large egg + 1 teaspoon of water, coarse sugar for sprinkling
Nutrition Disclosure
All nutritional values are approximate and provided to the reader as a courtesy. Changing ingredients and/or quantities will alter the estimated nutritional calculations.
I love your posts, thank you for making this so easy, I’ve always been so afraid of lattice pies and this made it so simple!
Thanks so much, Kathleen! Glad it was helpful 🙂
This is always so daunting to me! I love making pie and my crust is usually good but my braiding skills are terrible. Your step my step instructions are amazing. Not only did I get it finished but it actually looked good! Thanks!
Thank you so much, Jennifer! So happy to hear that!
This is always a talent that has impressed me. I still need to work on mine, but with your tips I made a better one than usual.
Thanks so much, Debi!
Give me a pie every day over a cake…and a lattice top pie gets bonus points. I learned so much from this post! Thanks.
I’m so happy to hear that 🙂 thank you!
Thanks so much, Julie 🙂
Thank you so much for the detailed direction on making a lattice top! I’m using this post as we head towards pie-making season. It will come in handy – I’ve never really been happy with how mine have come out.
You are so welcome! 🙂
This tutorial was so easy to follow! Can’t wait to rock Thanksgiving dessert this year.
Heck yes, Susannah! Thanks!