
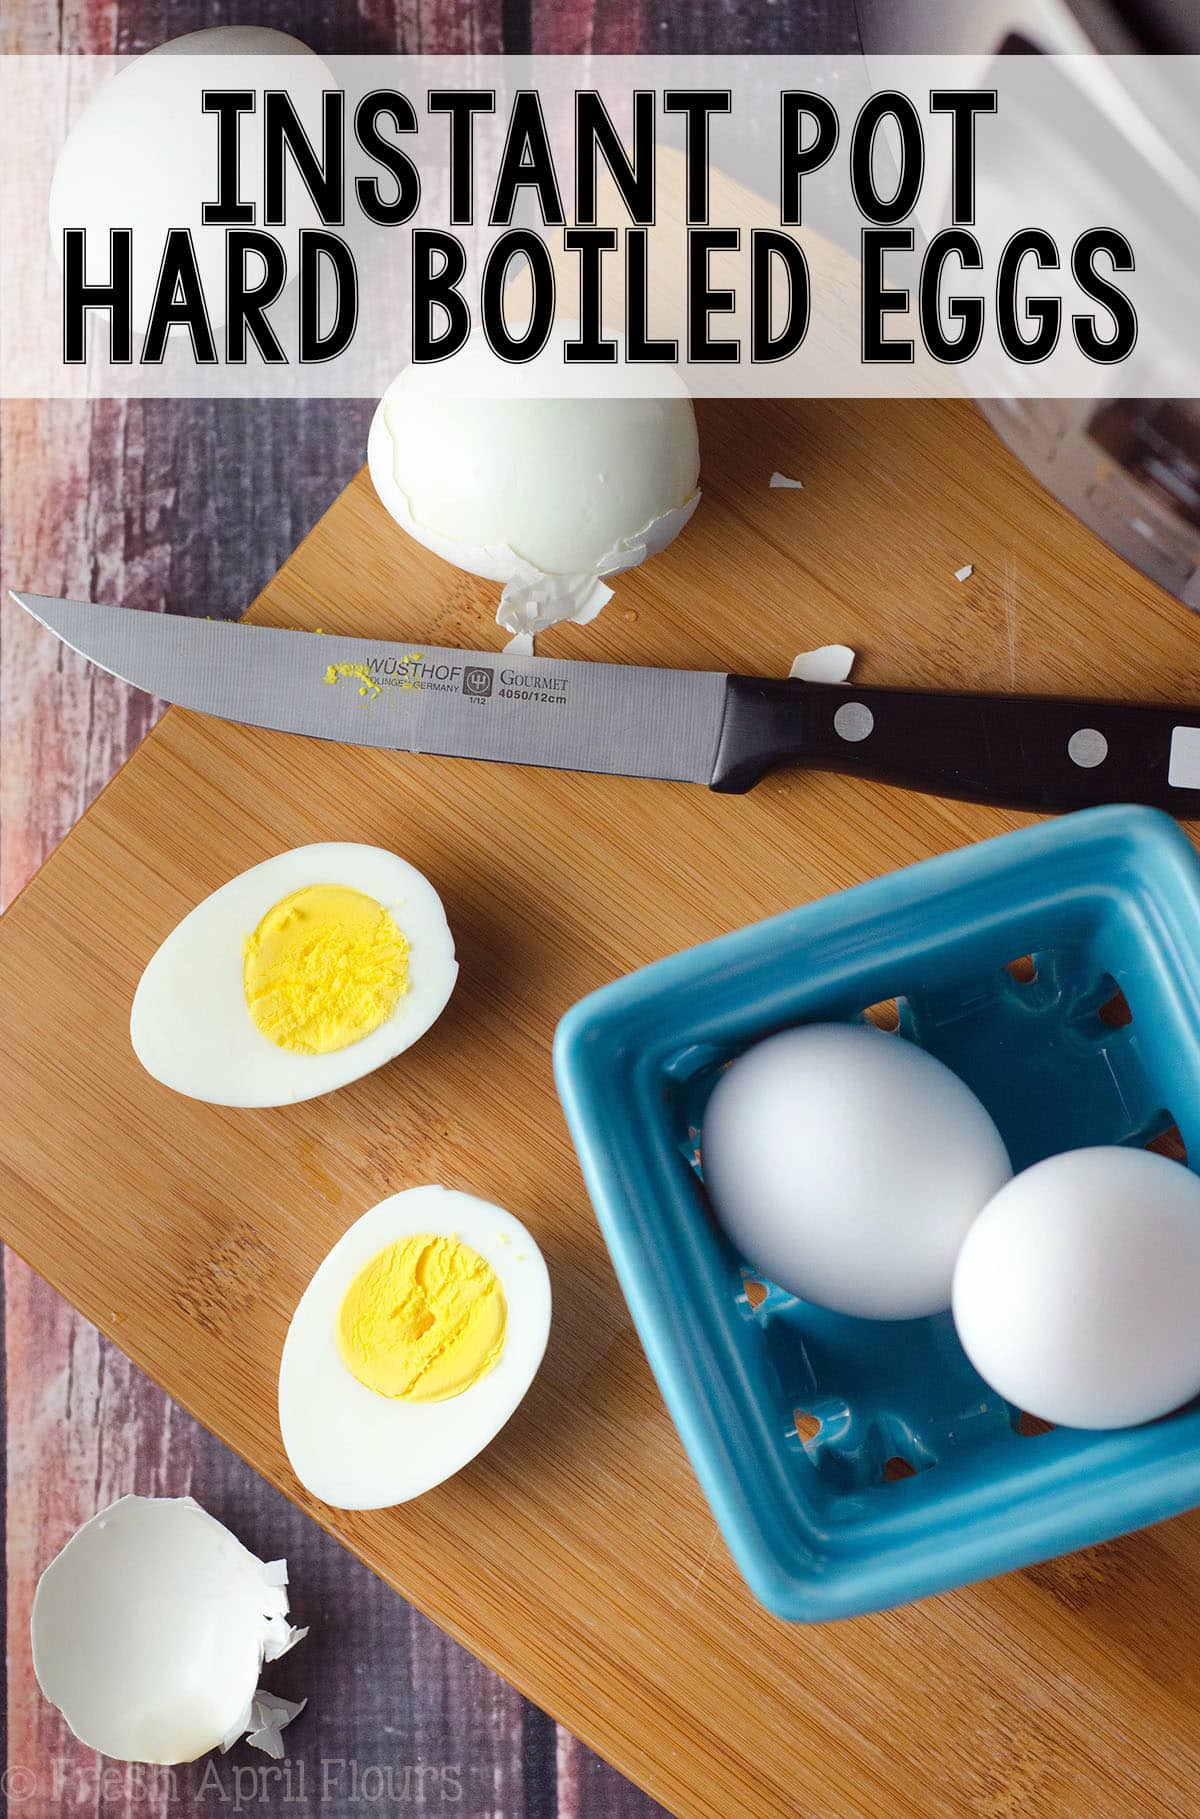
Hard Boiled Eggs in Instant Pot
As an Amazon Associate, I earn from qualifying purchases. Read the full disclosure here.
Make fool-proof hard boiled eggs in the Instant Pot with my tried-and-true 7-7-7 method. Using a pressure cooker is the best way to guarantee easy-to-peel eggs with the perfect texture every time!
Why we love Instant Pot Boiled Eggs
As a family that consumes 12-18 hard cooked eggs every single week, believe me when I say we have tried all the ways of cooking them! The Instant Pot is the only method we’ve found to produce reliable, repeatable results, and we’ve been relying on the same exact method for literally hundreds of dozens of eggs since our Instant Pot purchase in 2017.
By using a pressure cooker, you eliminate the need to stand over the stove to boil eggs in a giant pot of water or the need to preheat the oven just to have eggs burst all over a muffin tin. Aside from providing a super simple method, hard cooking eggs in the Instant Pot is the only method we’ve found that makes peeling an absolute dream.
7, 7, 7 Method for Making Boiled Eggs in Instant Pot
My tested and perfected technique for cooking hard boiled eggs in the pressure cooker is the 7-7-7 method (I like to call this the Monica Method… #IYKYK).
The steps in this method are:
• heat/allow to pressurize
• cook
• rest/warm/allow to release pressure naturally
• manually release remaining pressure
• ice bath
HOW TO MAKE INSTANT POT HARD BOILED EGGS
STEP #1
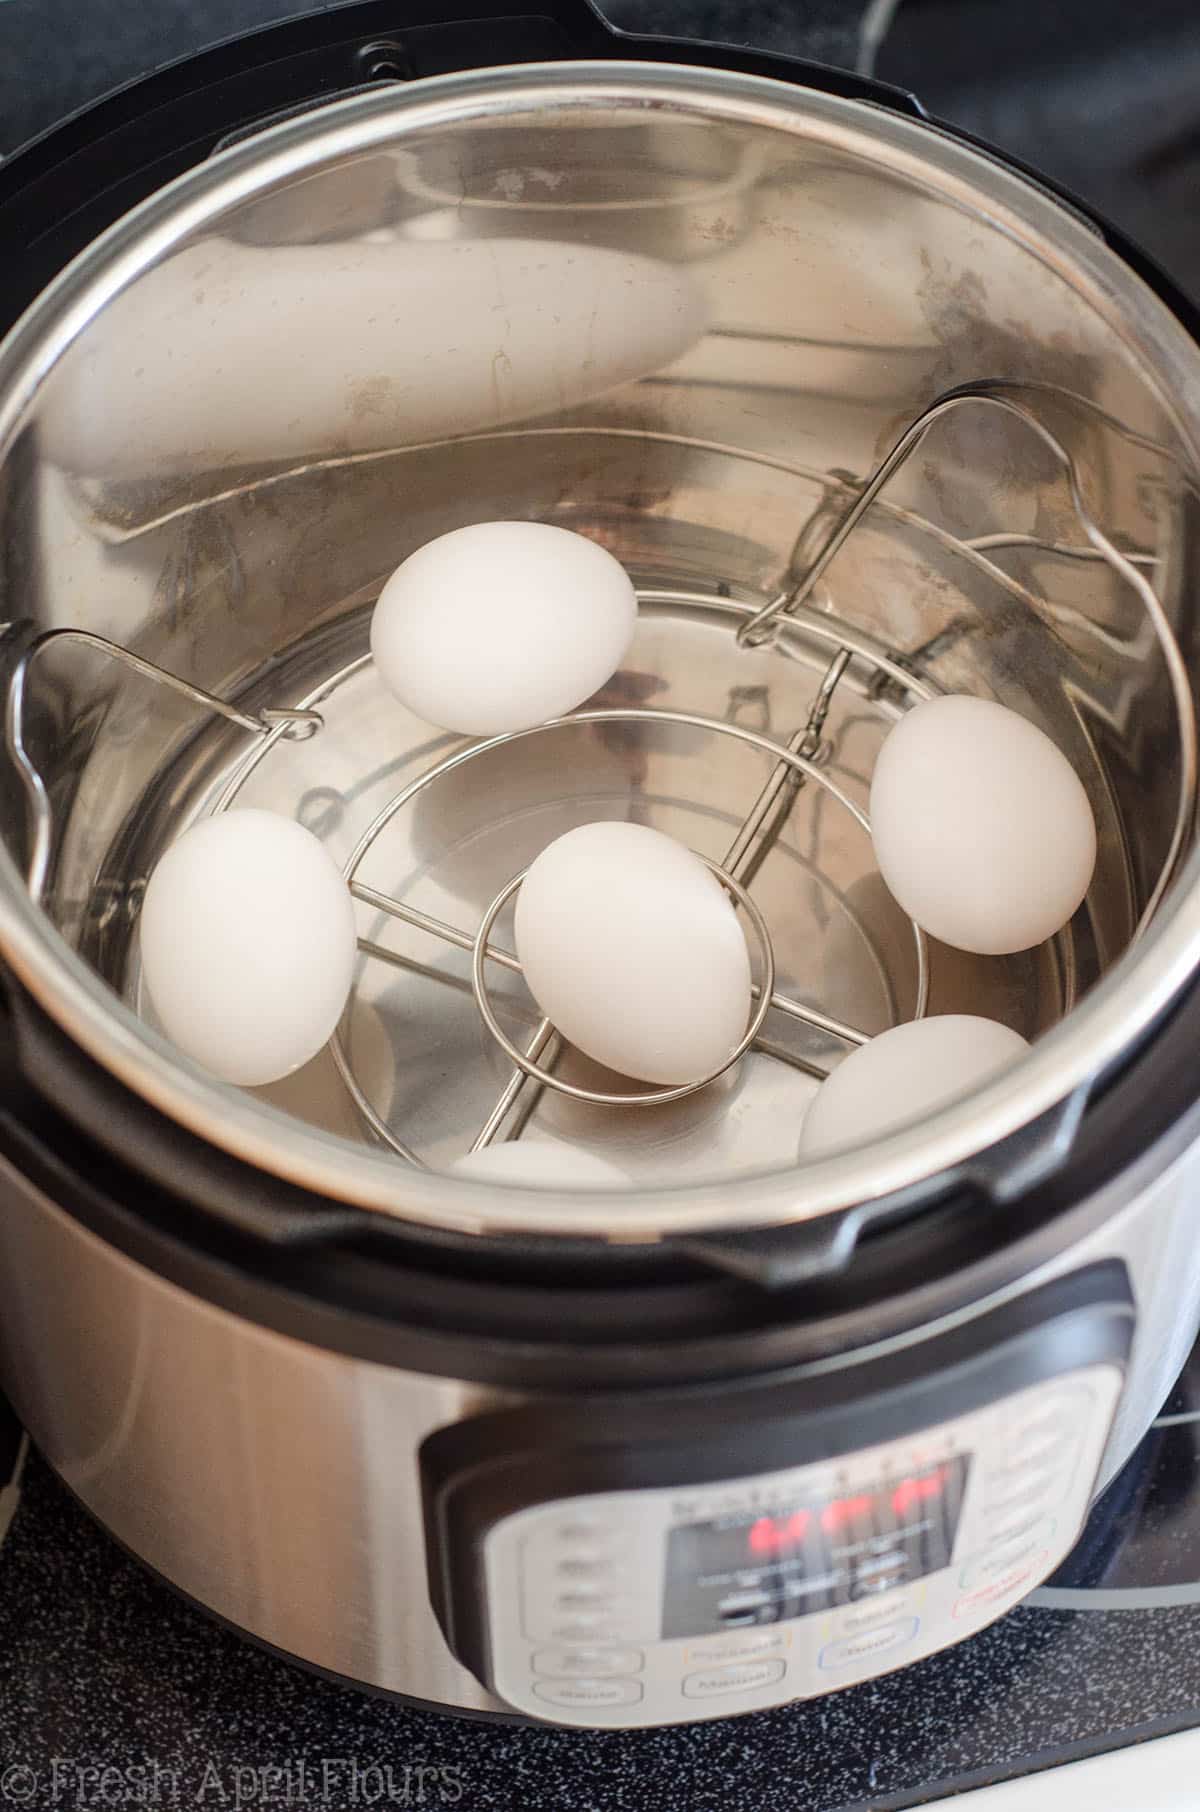
Add the cold water, the wire trivet, and the eggs to the pot.
STEP #2
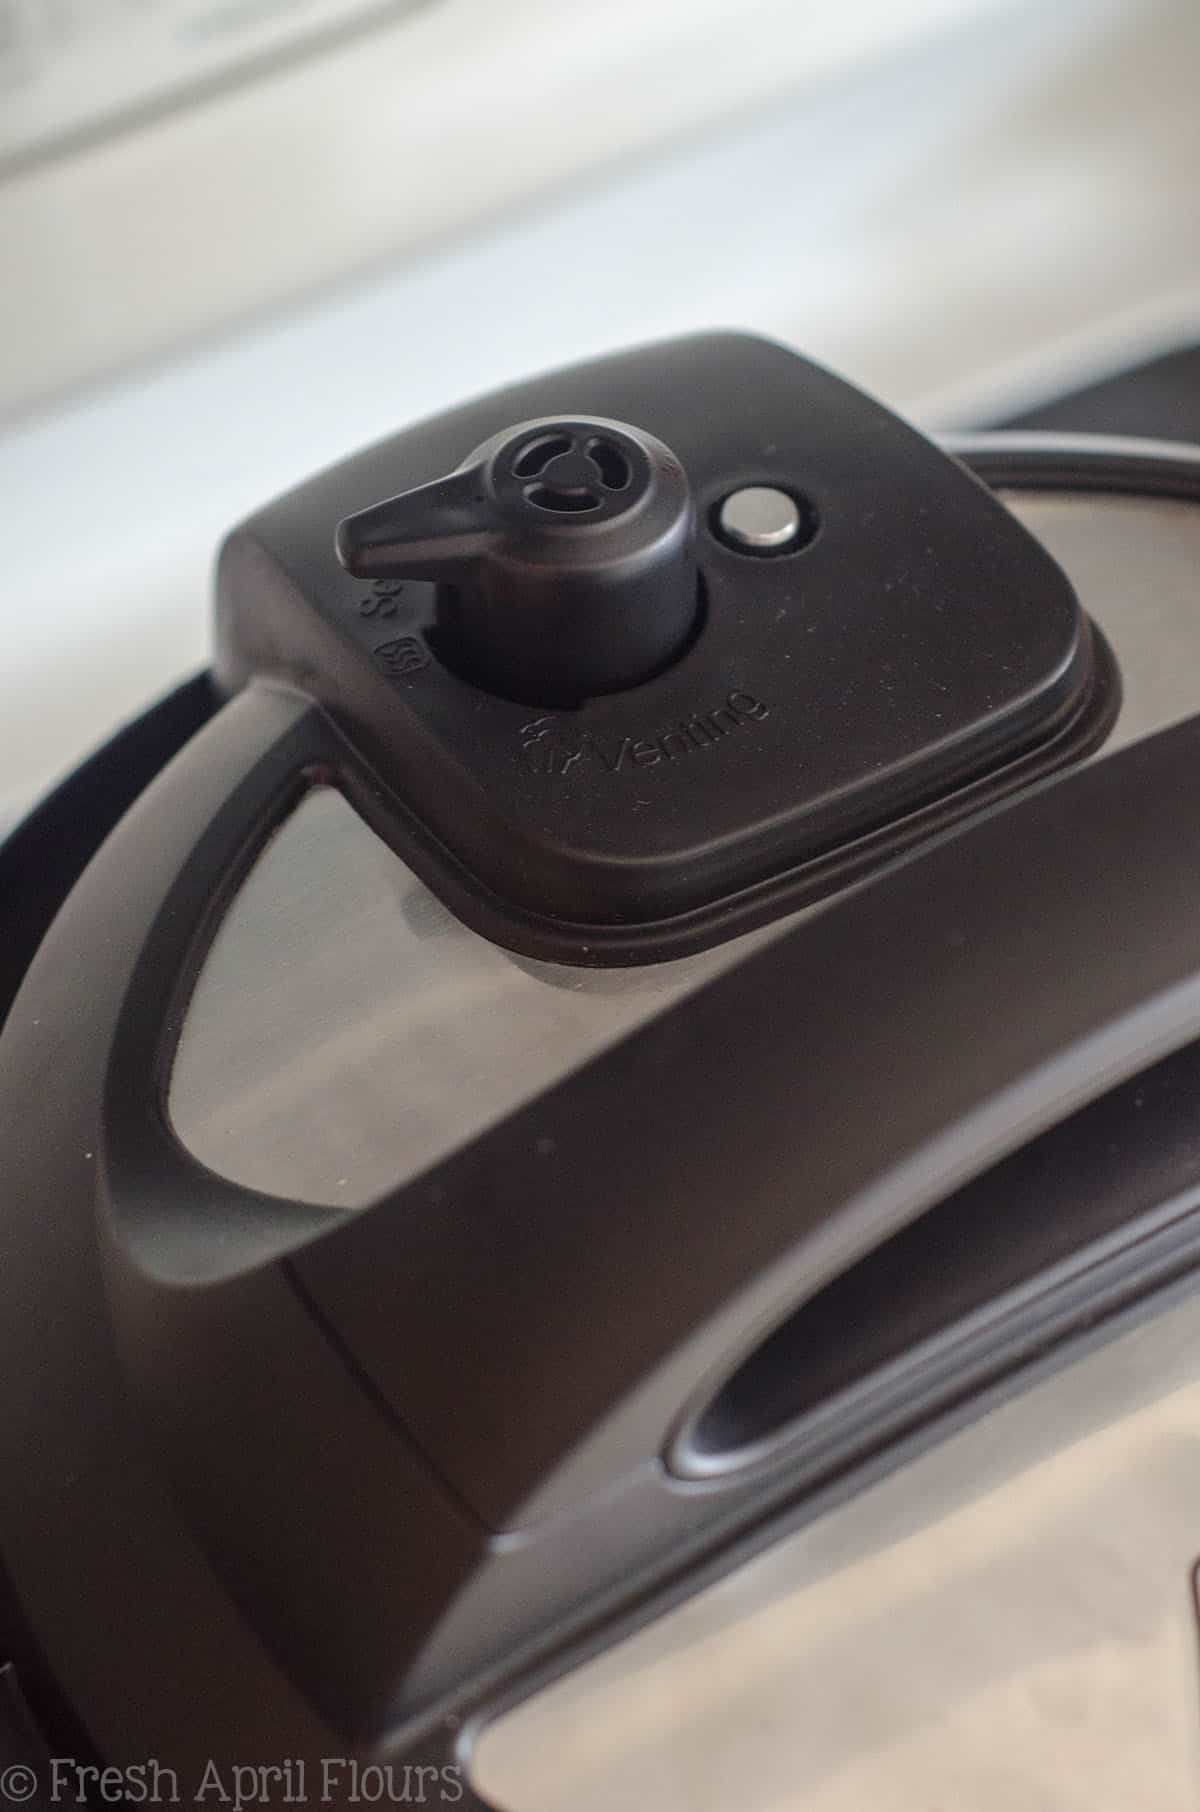
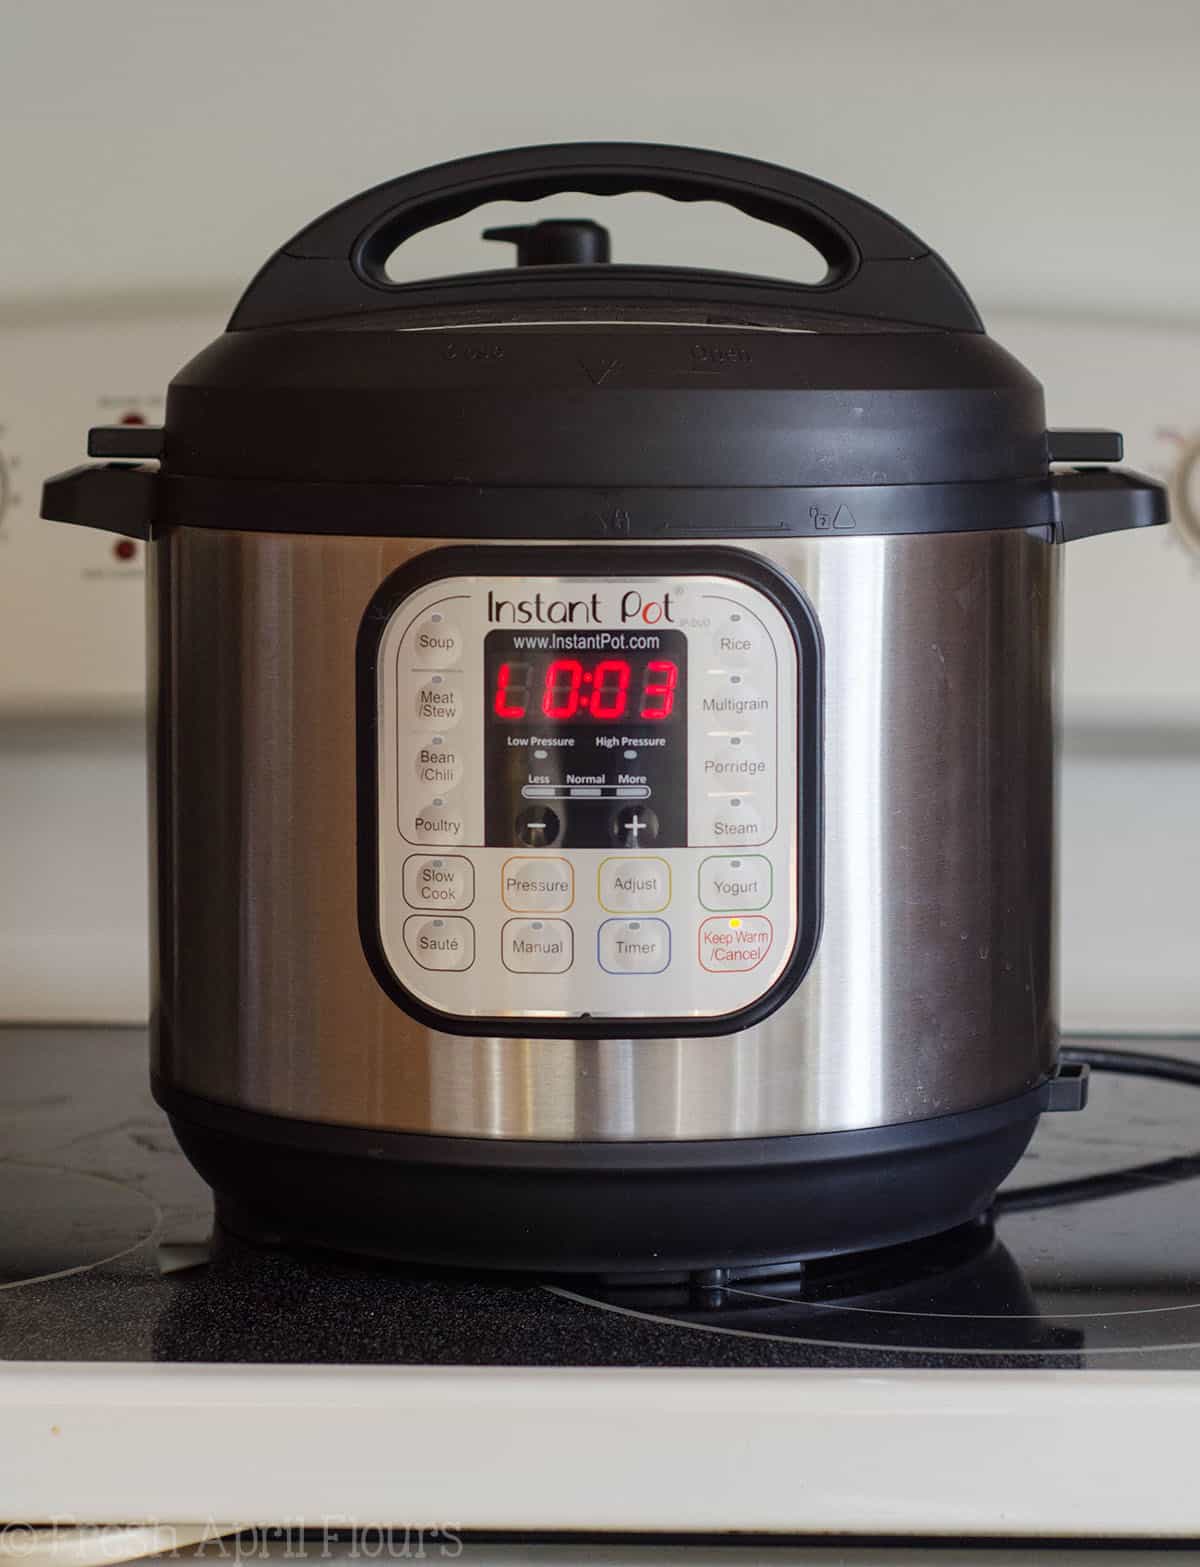
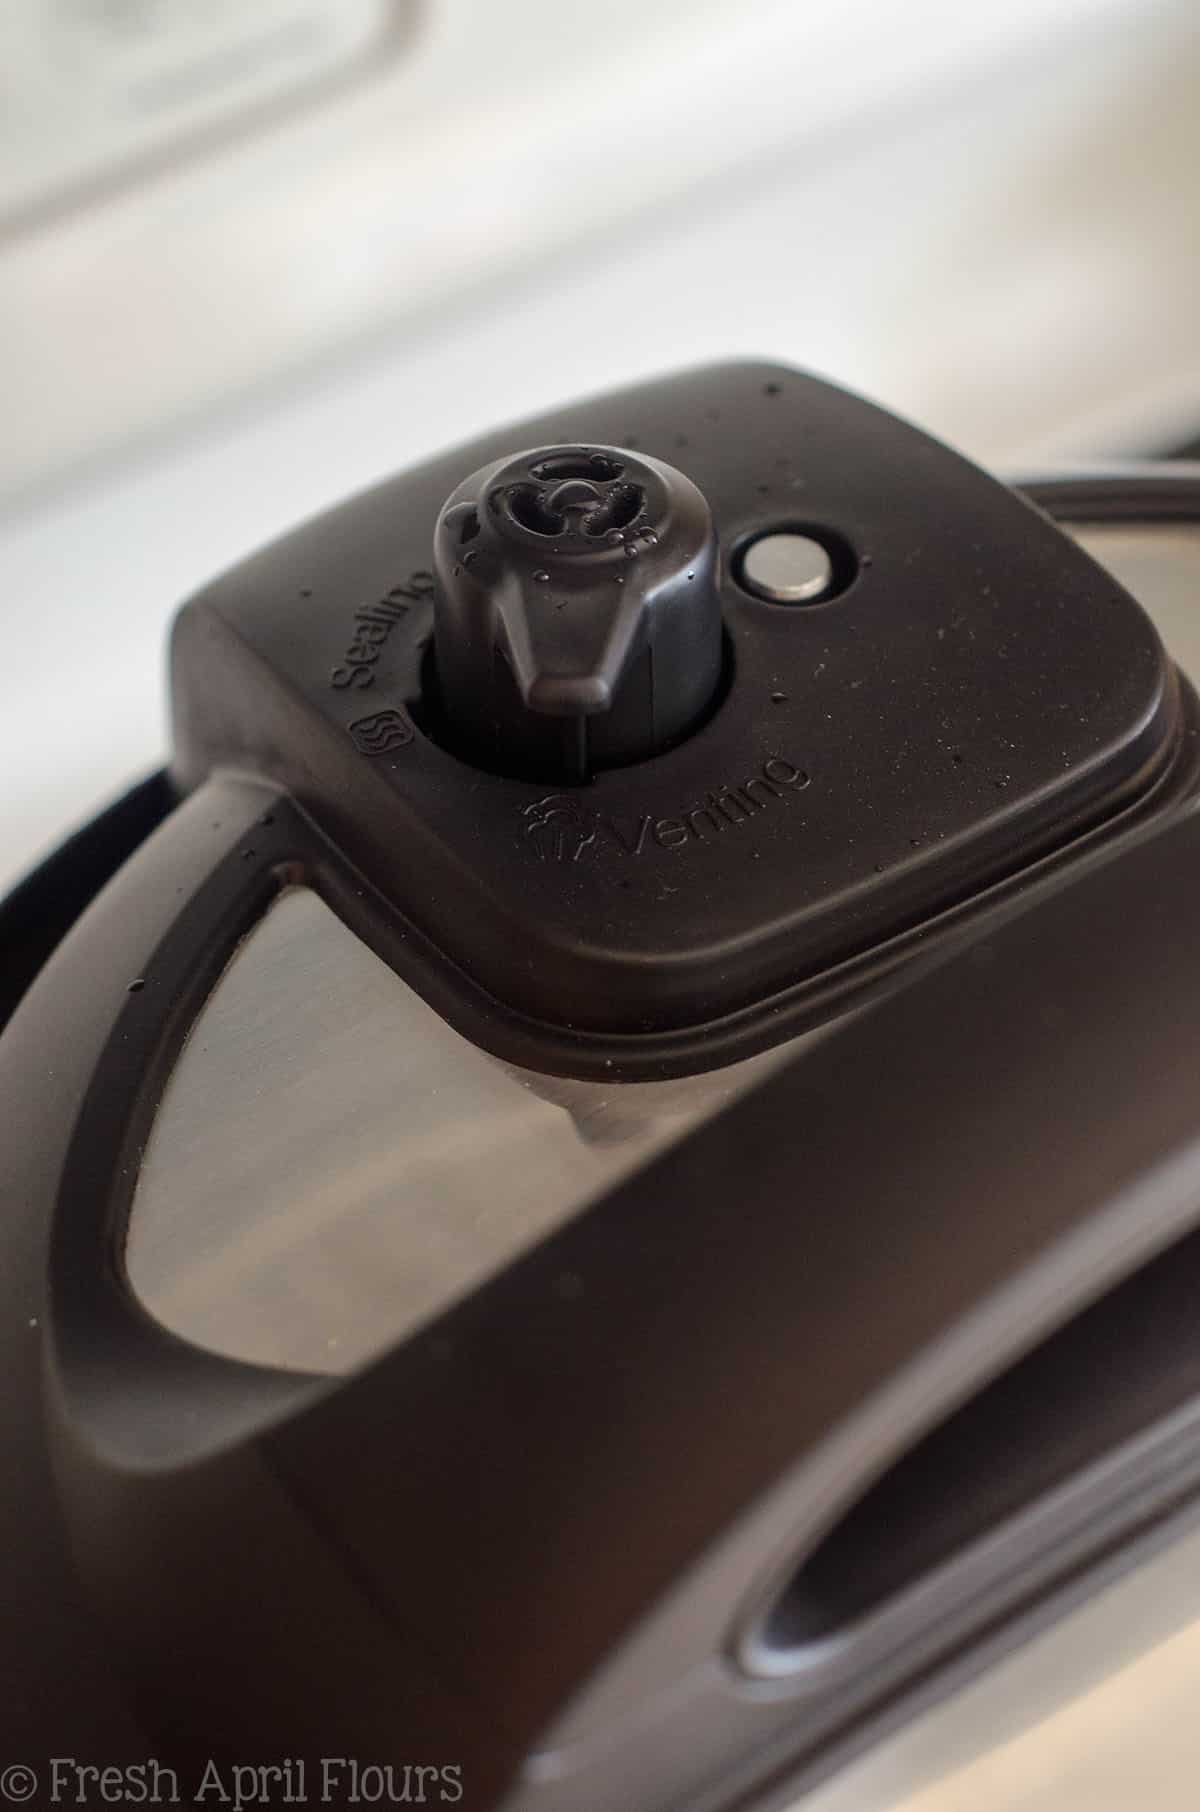
Place the lid on the Instant Pot and be sure the lever is pushed down and turned to “sealing.”
STEP #3
Press “manual.” A number will appear (the number you set to cook last time you used the Instant Pot). This is your cook time. Use the buttons to adjust the time to 7. You’ve now set your cook time to 7 minutes (this is the first part of the 7-7-7 method).
STEP #4
After a few seconds, your Instant Pot will accept 7 minutes as your cook time and then start heating and pressurizing. The display will say “On.” This process takes about 7-8 minutes, but is not part of the 7-7-7 method.
STEP #5
When your Instant Pot is ready to cook, the little metal knob will be completely raised, indicating pressure in the pot, and it will start counting down the 7 minutes of cooking time.
STEP #6
When your 7 minutes is up, it will BEEP and the display will read “L 0:00.” This is your “keep warm” setting and it will start counting up. You’ll want to count up to 7 minutes (this is the second part of the 7-7-7 method).
STEP #7
Since your pressure cooker will sit until you manually stop it and not beep to let you know your 7 minutes of resting/natural pressure release is up, you will either need to be able to watch it or set a separate timer for yourself to let you know when the 7 minutes has passed.
STEP #8
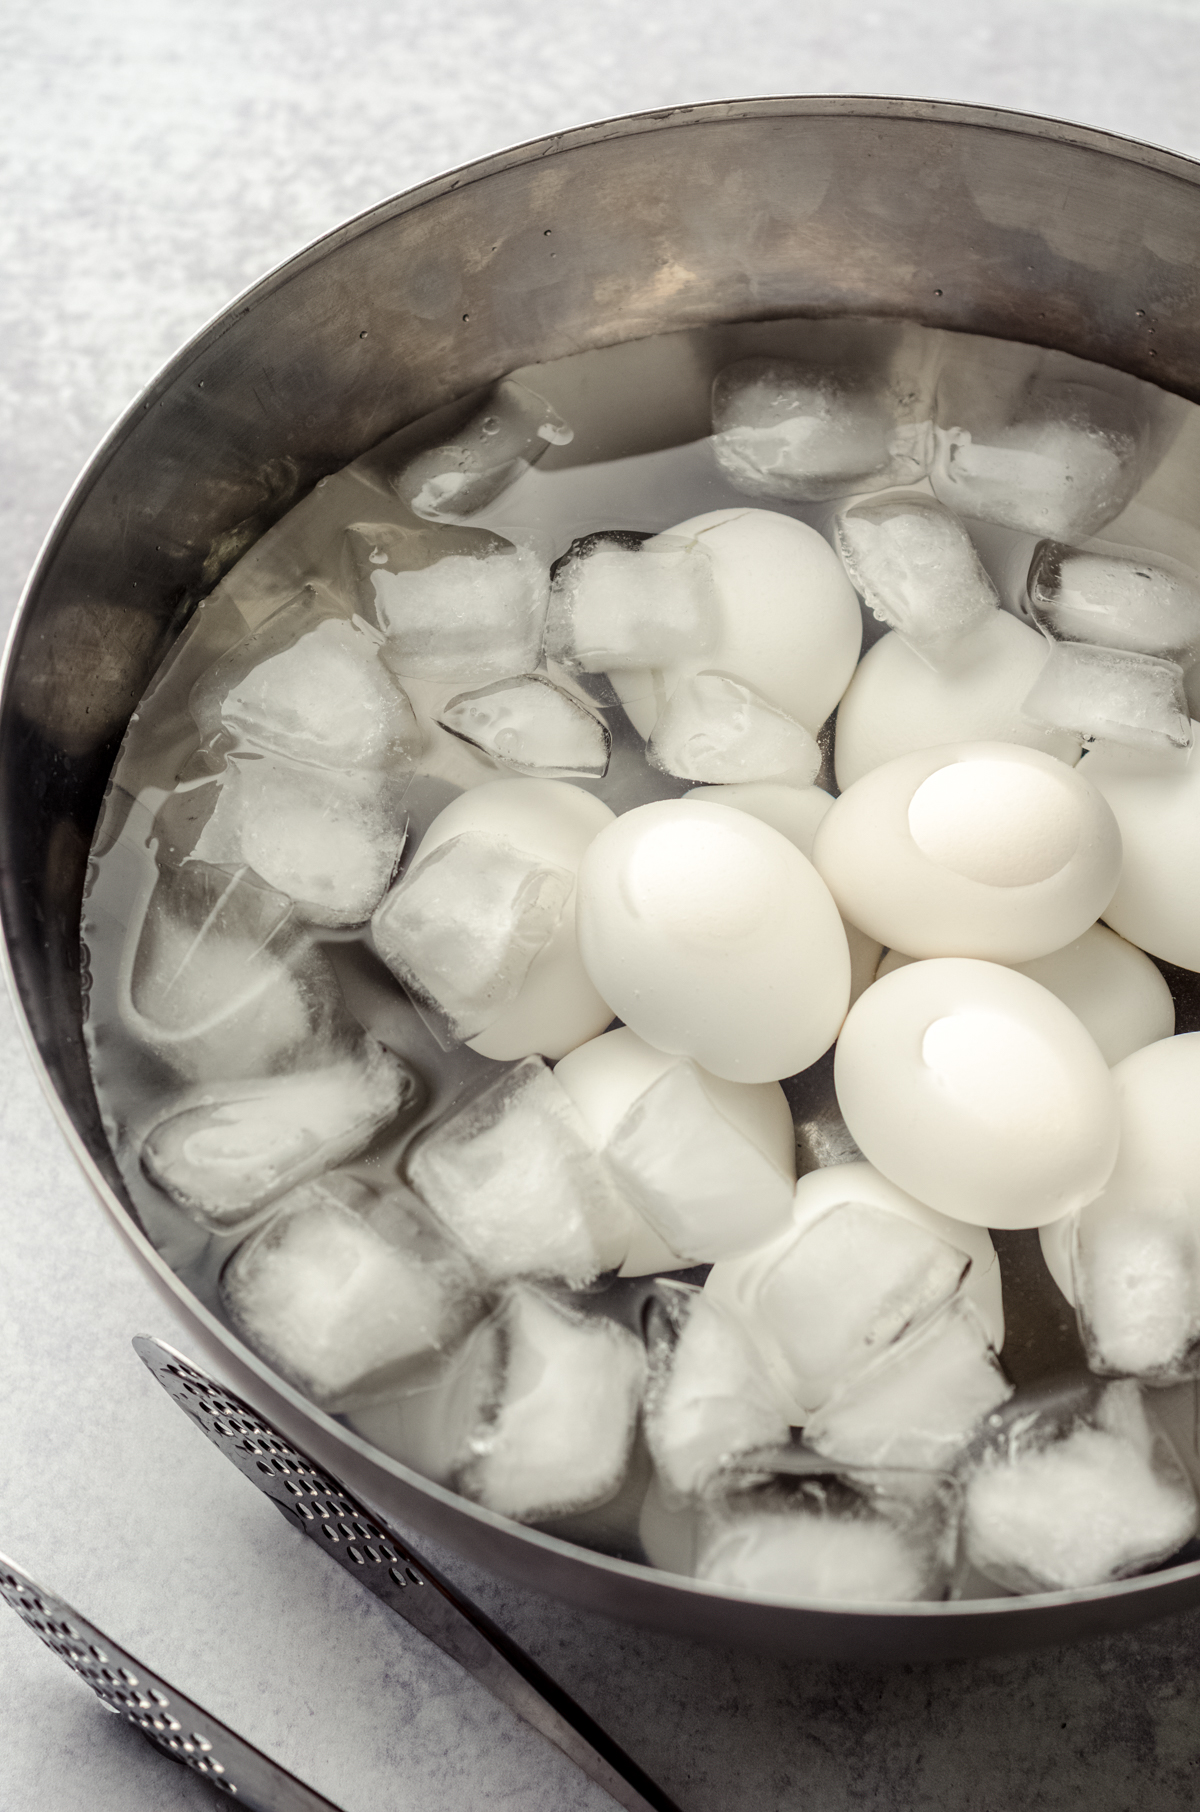
After the 7 minutes of resting, you will carefully move the knob to “venting,” at which point the Instant Pot will release the remaining steam and pressure. When it has finished hissing, remove the top and use tongs to retrieve the eggs for their ice bath.
STEP #9
Your eggs will take their icy bath for (at least) 7 minutes, which is the last part of the 7-7-7 method.
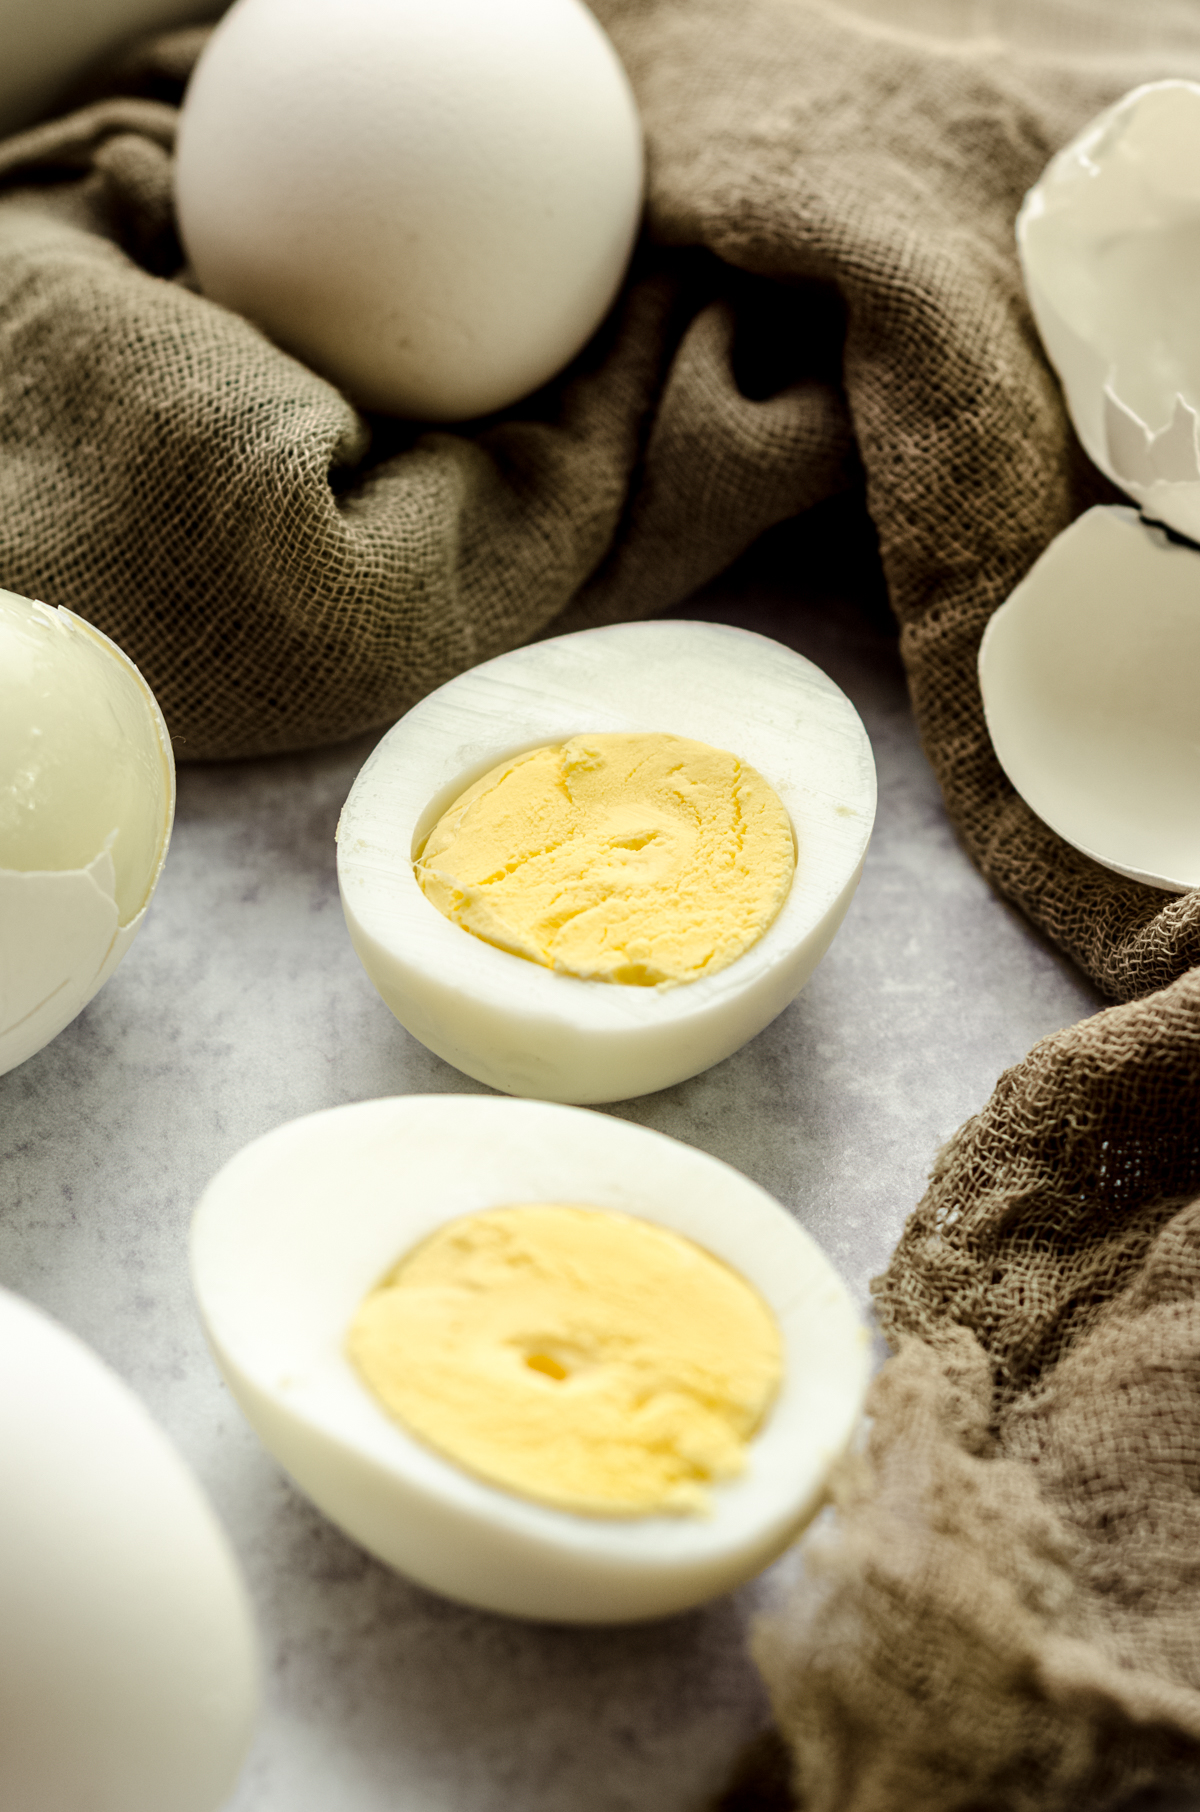
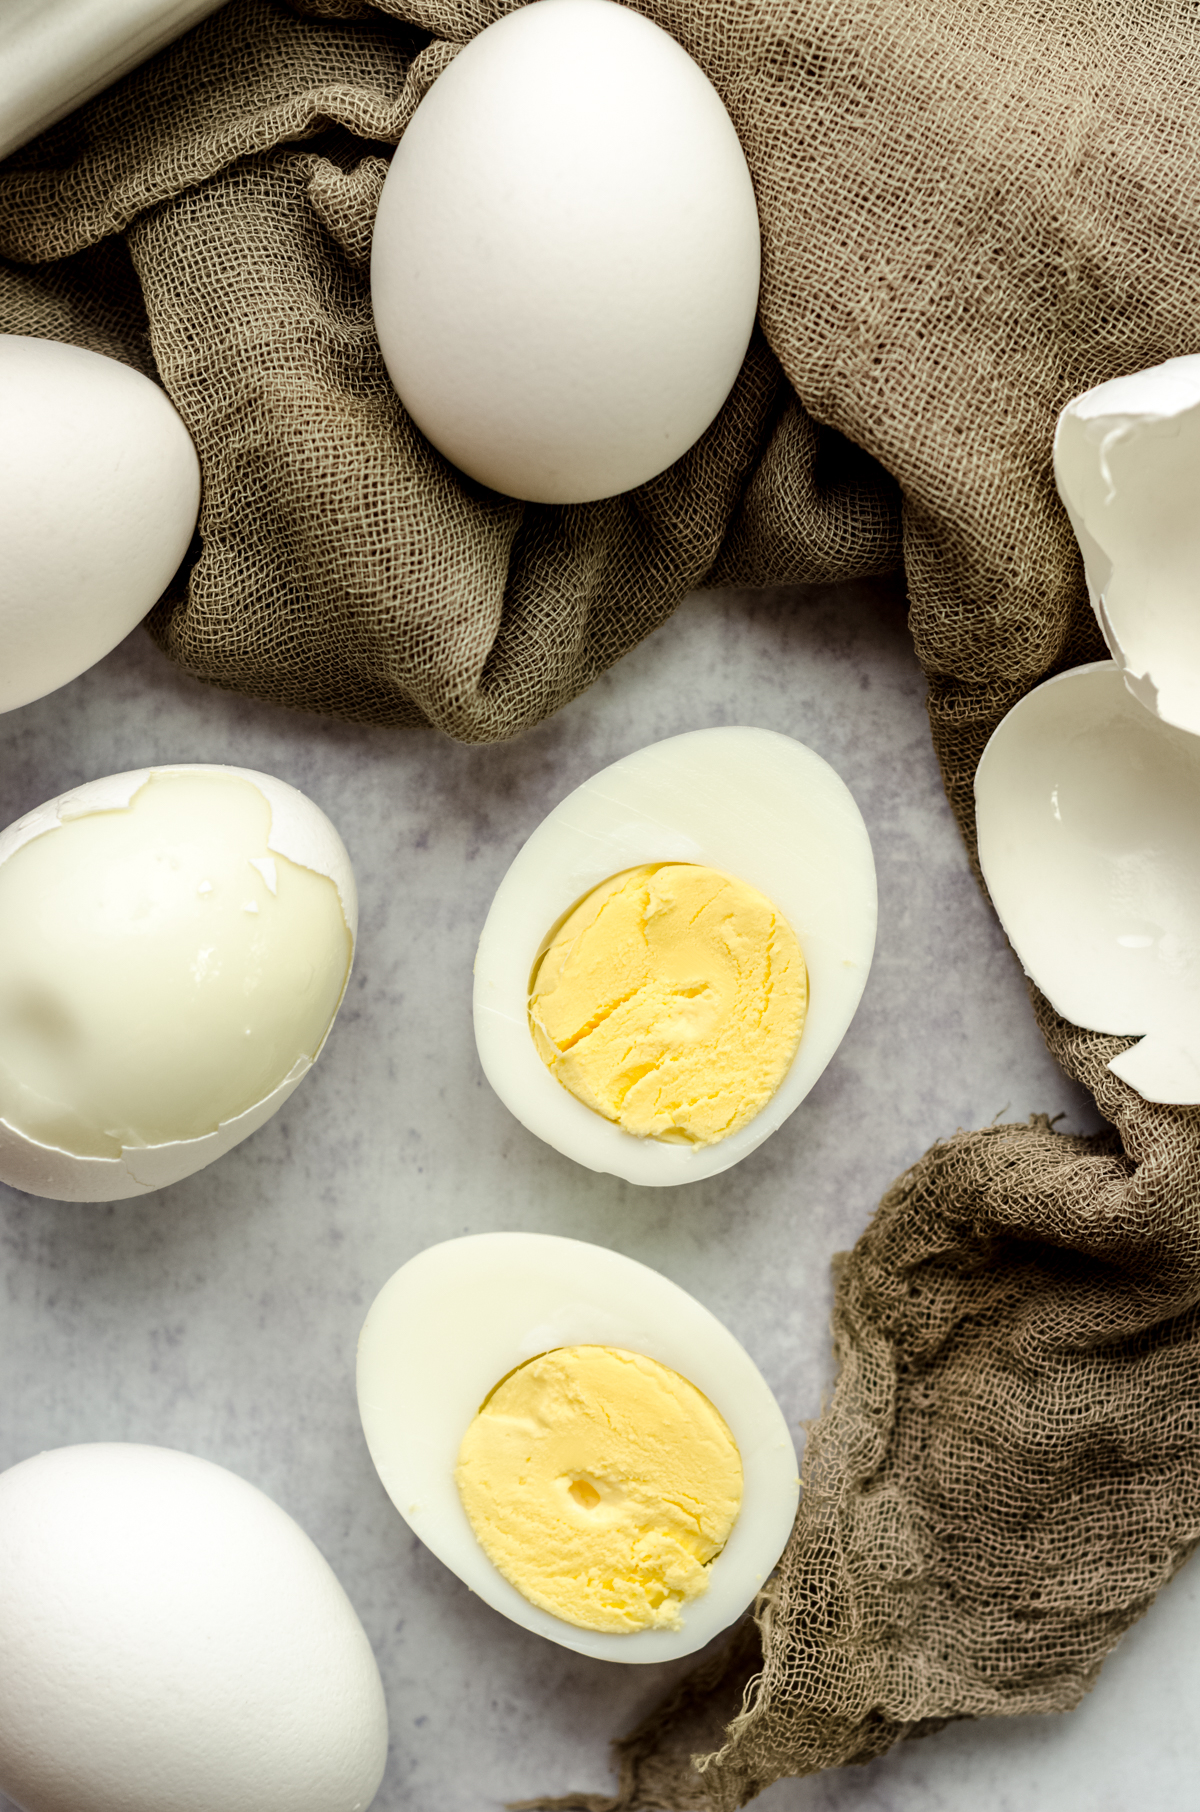
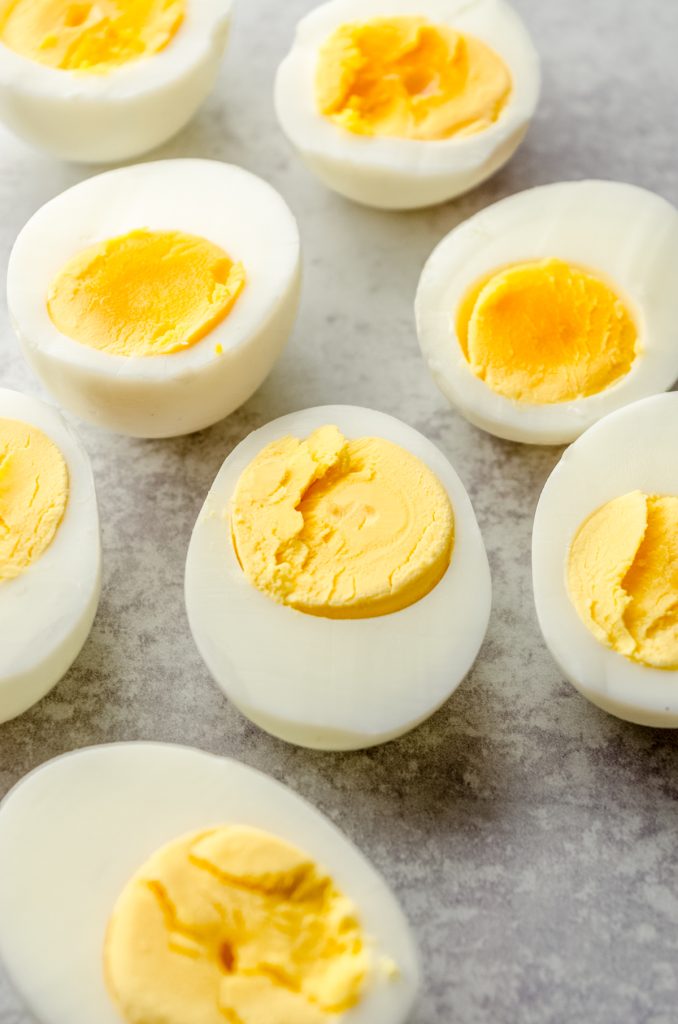
After the ice bath, you can store your eggs or peel them immediately. I’ve done both, and both ways yield easy-peel eggs that are perfectly cooked on the inside.
SERIOUSLY. Look at those fluffy, perfect eggs!
Instant Pot Boiled Eggs Cook Times
In our house, the 7-7-7 is how we prefer our eggs, but if you find that the doneness isn’t just right for you with this method, take a look at this chart to determine what texture might be the best for you. The only step that gets adjusted is the cook time. The natural release and ice bath times will remain the same.
Regardless of which time you pick for doneness… It is guaranteed to work perfectly every time.
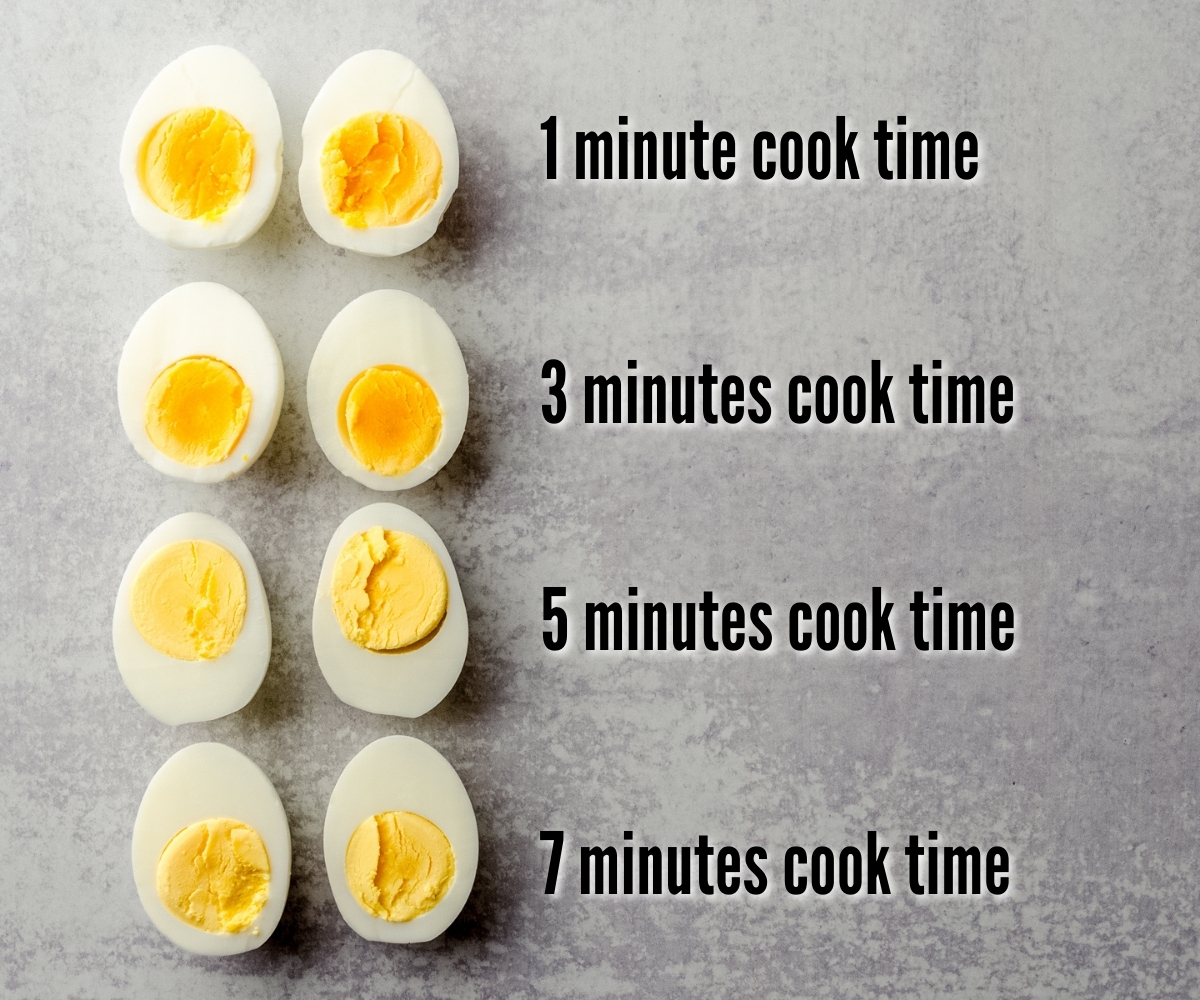
WHAT IS THE DIFFERENCE IN DONENESS WITH DIFFERENT TIMES?
ONE MINUTE: this yolk is not runny, but it is just cooked. There is a lot of moisture in this yolk and the white is also still soft.
THREE MINUTES: this yolk is a bit more done than the one cooked for 1 minute, but still moist, and the white is sturdier still.
FIVE MINUTES: there is still a bit of moisture, but the egg is fully cooked. I like this doneness for deviled eggs as the white is nice and sturdy and the yolk still has some moisture to work with for the filling.
SEVEN MINUTES: this is the most done you can get your eggs before they are unappealingly dry or get green rings. As I’ve mentioned, this is our preference for eating, but if you are not happy with your hard cooked eggs after this timing, your Instant Pot may cook warmer than ours, so reduce the cook time by 2 minutes and reassess.
Our favorite ways to use Pressure Cooker Hard Boiled Eggs
While we enjoy hard boiled eggs as is, there are so many uses for them! You can use them for egg salad, sliced or shredded on top of a salad, in tuna salad or potato salad, as a quick breakfast, for Easter, as deviled eggs… Endless opportunities for hard boiled eggs, and you did them beautifully in your Instant Pot. Pat on the back, friend!
Hard Boiled Eggs Instant Pot FAQs

Pressure Cooker Hard Boiled Eggs
Ingredients
- 1 cup (240mL) of cold water1
- 12 large eggs2
Instructions
- Add the cold water, the wire trivet that came with your Instant Pot, and cold eggs to the pot.1 cup (240mL) of cold water1, 12 large eggs2
- Put on the lid and turn the lever to “sealing.”
- Press "manual" and adjust the cook time to 7 minutes.
- When the Instant Pot beeps, the display will read "L 0:00." This is your "keep warm" setting and it will begin counting up.
- After the InstantPot has warmed for 7 minutes, carefully move the knob to "venting." When most of the noise has stopped, remove the lid.
- Using tongs, remove the eggs and place into a prepared ice bath for at least 7 minutes. After this point, you can stop and store your eggs or peel them immediately.
Notes
- Cold water: be sure you are using cold water. Hot or even warm water will change the cooking time. This means you’ll also need to start with a cold pressure cooker, so if you’re using it for more than one batch, you’ll want to let it cool completely before starting the next one.
- Eggs: I find the best results with old eggs (at least 1 week post-purchase) as the membrane seems to separate better from the shell. If all you have are brand new eggs, be aware they could be a little more difficult to peel.
Nutrition Disclosure
All nutritional values are approximate and provided to the reader as a courtesy. Changing ingredients and/or quantities will alter the estimated nutritional calculations.
Love it. I havent tried eggs yet but made my first pulled pork this week. Would love to see high protein healthy meals.
I’m working on some easy ones!
Is it shameful to admit this the only reason i bought one in the first place last year? I’ve made so many things but the time i save on peeling eggs is the best!!!
Hahaha, AGREED!!
I received this pot for Christmas . . . the eggs were the first thing I tried . . . and I was hooked . . . and willing to give up storage space in my small kitchen. Sounds like kindred spirits here.
Haha, yes, I totally agree!! It’s so worth the space it takes up! And I actually have mine in prime real estate in our kitchen, right up there with my KitchenAid stand mixer.
You had me at the Monica Method. I didn’t click on it but it only took a minute to realize what that meant. Will definitely be checking your whole blog our now!
Haha, AND you have a pretty cool first name 😉 enjoy!
Do you use the 7-7-7 method for a dozen eggs as well?
Hi, Clarese! Actually, no. I’ve done this with a dozen and wound up with green-rimmed eggs. Even with 9, I haven’t had the best results.
I used this method yesterday with 8 eggs and they came out perfect! Thank you for sharing!
Great, so glad it worked for you!
Is there a way to make hard boiled eggs if the InstaPot didn’t come with the wire basket ?
Hmm, I’m sure there is, but I’m not positive what I would use instead!
If you have a regular metal steamer basket you would use in a pot on the stove or anything metal (i. e. small cooling rack) that will fit inside of your Instant Pot you can use that to keep your eggs off of the bottom of the pot.
Love how you broke this down for new users!
Thanks, Erin! I noticed a lot of recipes I’ve found DON’T do that… And I want first-timers to be able to understand how exactly to use their IPs properly!
Tonight I decided to do your egg recipe. Much to my surprise they really came out beautifully. I accidently bought medium eggs so timed 5 5 5. They were so perfect. Thank you.
You’re welcome, EJ!
Love love the instructions! Very easy to understand!😉
Thanks so much, Cathy!
Just wondering – do really fresh eggs peel easily? If they do, I will be using this recipe always. Thanks for the great instructions.
I’ve used fresh and older eggs in the IP for this and both perform the same!
When I hit steam fir 7 minutes the keep warm light up also. Is that correct?
Hi, Marie. I’m not sure it stays on the whole time. I think it just comes on until it’s warmed up the whole way…
So I’m a newbie with the instant pot & I want to say thank you for the awesome detailed instructions! It helped me know what the ‘pot’ should look like. Wow…those eggs turned out amazing! If you have any good high protein recipes for this rookie I would love it.
I’m so glad you found my post helpful!
I made my first boiled eggs today. Your recipe was on point and worked flawless. My mom would be proud. Thanks!!!
So glad you liked it, Elia!
I did 6 eggs in an 8 qt Ultra!! Had some green!! Should the recipe be adjusted? Had an issue of the steam release valve not sealing completely after the float valve popped up!! Could that be the cause???
Hmm, I’m not quite sure, but I have a 6 quart, so that’s the way the recipe is written.
I tried the “Monica Method” of making boiled eggs this afternoon, and I’m totally hooked! I ordered my IP (actual brand is Yedi for mine) a month ago, but the day it arrived, my minister also asked me to do a huge, time sensitive project for him, so I didn’t even pull the pressure cooker out of its boxes until I was done with that. Then it sat on what little counter space I have (I don’t have a kitchen in my studio, so made up a pseudo one) for a few days. Today, I did the water test, and then the eggs, and as I said, I’m hooked. Now I can have boiled eggs whenever I want, without having to resort to those nasty ones sold in all the grocery stores in bags.
I’m so happy with, and so impressed with this method of cooking eggs that I told my friends a few doors down that I’d cook eggs for them, too–they’ve been buying the pre-boiled bagged eggs, but dislike the rubbery texture and the tiny size of eggs used–so they’re happy to have me do that for them.
I’m so glad you found a method you like, Joyce! It’s definitely our go-to!
I have done this 3 times now hoping that the first time I just didn’t get lucky. Each time the eggs were perfect. This is just too good to be true ! Love it. I am hooked. Came out perfect. Everyone peeled very easily.
Thanks for your extensive testing, Lupe 🙂
They came out perfect!!
So glad they worked out well for you, Amy!
These turned out perfect! Thanks!
You’re welcome, Krissy 🙂
Best hard boiled eggs I’ve ever made! It really did turn out perfectly!
Thanks so much, Libby!
Perfect hard boiled eggs! Thank you!
You are so welcome!