So… You’re here because you want to start a blog. Great! I know how to do that! Let me share with you what I’ve learned so you don’t have to ask a bazillion questions like I did. Although you might still have questions. And I’m here to answer them, if I don’t cover it already on this page.
So your blog: is it a food blog? Fashion blog? DIY blog? Dog blog? Fitness blog? Pregnancy/baby blog? There are so many blogs out there, and so many people passionate about the topics they choose to blog about. So before I get to any technical and specific stuff, make sure you are passionate about whatever it is you’re about to tell the internet all about. No one wants to a read a blog with no passion behind it. Believe me. Readers can sense that and will quickly lose interest.
Hosted vs Self-hosted
Before we even really get to the nitty-gritty, there is one thing we need to define before moving forward. There are two ways to host (or hold a spot on the internet) your blog. One is hosted and the other is self-hosted. As you can probably figure out, hosted means that someone else is in charge of the space you take up on the internet and it’s typically free. You aren’t required to update the software, nor do you need to think about backing up your site. Think Facebook– you hold a profile on that huge server. You edit your profile with the tools provided for you. You can customize it a little bit (with your pictures and such), but not a ton. You never have to check for updates. If you think of the server as a large office building, hosting is a chair somewhere in a large room of that office building.
With self-hosting, you’re the one in charge. It’s more like you’re renting your own space from a server. In that large office building, you’re now in a cubicle. You can customize your site, you control it, and you sometimes are required to know a bit of code (HTML). But you’re also required to manually backup your site and check for updates. If you’re not familiar with this type of stuff, fear not. Hiring a web designer is incredibly helpful here. Working on a budget? That’s ok, too. Ask around on Facebook. I’m sure you know someone who is a web designer or who knows a good one they can recommend and perhaps you can work out a good deal. You don’t always need a web designer when you self-host, but it’s good to have one on hand when you don’t know exactly what you’re doing.
When I started Fresh April Flours, I started on WordPress.com, (free, hosted). This was a great option for me since I had no intention of making money with my blog, and I had no idea how much time I would be dedicating to it. Because this was free and hosted by someone else, my original URL was https://www.freshaprilflours.wordpress.com.

If you’d like to start with the free option, head to WordPress.com and choose the “create blog” option. By doing this, you’ll be choosing framework for your blog that knows you’re going to have continuous content. If you choose the website option, you’re looking more at a layout that has static pages that will not really change a whole lot. Definitely go with the “create blog” option here.
Congrats! You’re ready to start blogging! You can stop right here. If you’re looking more for the self-hosted option… Read on.
After just 4 months of blogging on WP.com, I wanted to self-host. This meant that 1) I needed to buy my domain (the address for my blog) and 2) I needed to find a host that would let me rent space from them. I chose to buy my domain from godaddy.
This expense is incredibly cheap. Including tax, we pay about $15 a year for freshaprilflours.com to exist on the internet.

While transferring my site from hosted to self-hosted was slightly non-complicated, I still hired someone else to do the work, because I had a lot of content that needed to be transferred properly. Again, find someone who can help you with this, if it’s in your budget. It saves a lot of technical headache.
If I could go back in time, I would have gone straight for the hosted solution from the very beginning. But that’s just me.
Hosting with BlueHost

When I first switched to self-hosting, I will admit, I did not use BlueHost (despite being incredibly familiar with it since I did host Lucky Duck Cakes there). If I could go back in time again, I would. BlueHost is a wonderful host, I have never had any problems with them, and the little hiccups I’ve had along the way were able to be sorted out quickly by their customer service.
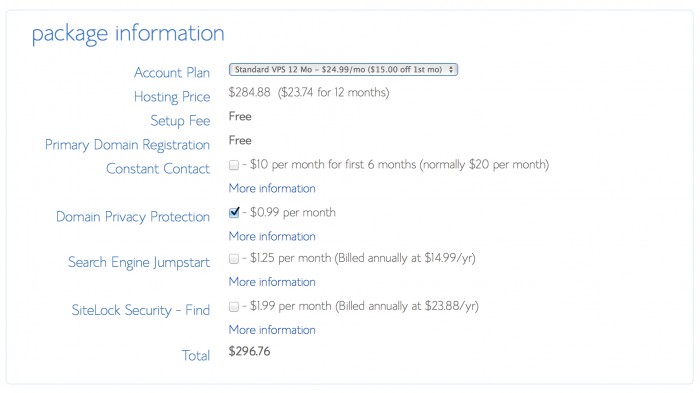
BlueHost offers several packages for their hosting, and each of them come with an included domain registration (more on that in a minute).
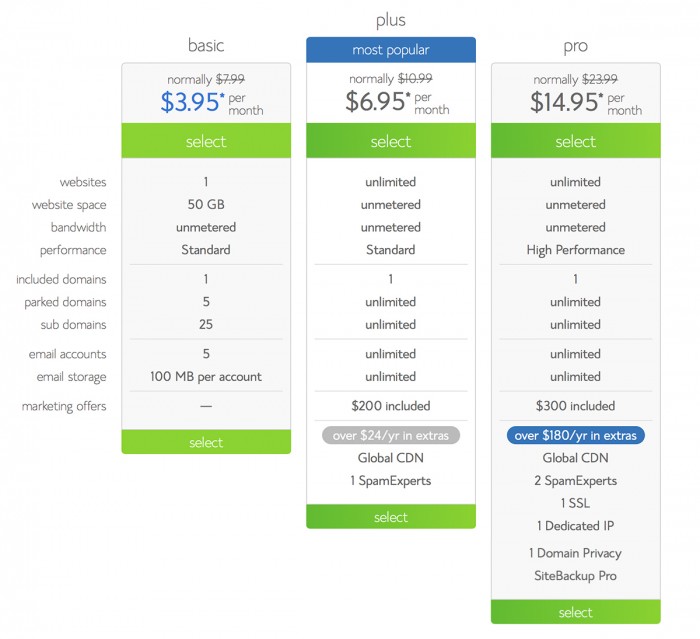
If you’re likely not going to have a ton of content, especially at first, I would go with the cheapest package. If you’re looking to have a lot of content like I do (with tons of food photos, plugins, and recipes), I would choose the second package.
Next, choose what domain you’d like to set up hosting with. If you haven’t already bought your domain, choose “new domain.” If you’ve purchased your domain elsewhere, choose “I have a domain name.”
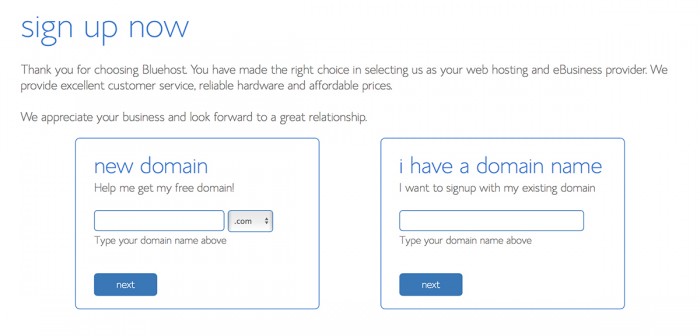
There is no right or wrong way, advantage or disadvantage, to either option. This is purely based on what you’ve already done. And just as a side note, the “free” domain is not exactly free, but the 1 year cost of it is credited to your account later.
Lastly, choose the kind of add-ons you’d like with your package.
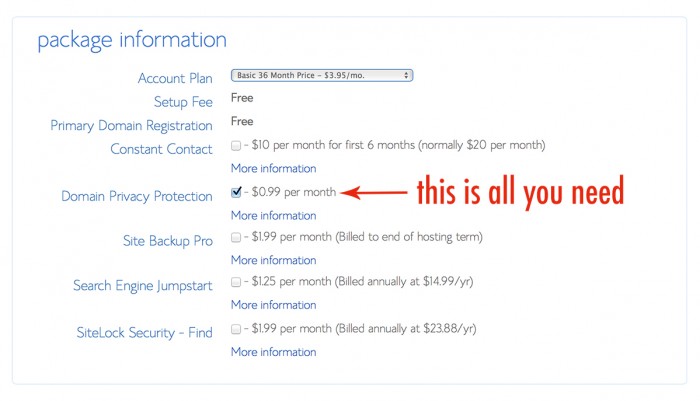
Ideally, you really only need the domain privacy protection, which prevents your name and address from being publicly attached to your domain. Yes, you want this protection.
Currently on Fresh April Flours
I am on what’s known as a VPS (virtual private server). It was necessary for me to upgrade to this type of hosting service after about a year of blogging due to 1) the amount of content on my blog and 2) the steadily increasing amount of traffic I was getting that were slowing down my site. This is a wonderful option for people who have a lot of traffic and *stuff* on their blog and who need the speed to keep up with all of it.
In that office building again? A VPS is more like an office… Or perhaps a large store room.
It’s definitely much pricier than standard hosting, but if you get to that point, you’re likely making enough income from your blog to offset this cost.
Here is BlueHost’s explanation of exactly what a VPS is.
Installing web software
When you’re self-hosted, you basically have a blank space, so you’re going to need editing software to, duh, edit your blog. The most popular editing software out there is WordPress. And no… Not the same WordPress we used up there in the hosted portion. This is WordPress.org, a place for you to download the software for editing your blog. I absolutely love WordPress, as it allows me to install plugins (also called the “bells and whistles” of the blog– more on this below), customize my layout, and also install third party ads to generate money from my blog. It’s also incredibly user-friendly and is really hard to screw up. It’s a blogger’s dream.
In order to get WordPress software installed on your BlueHost space, you’ll need to enter into your cPanel (control panel) and install it.
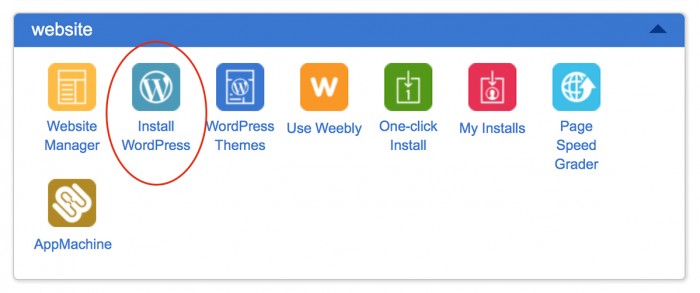
You will have the option of doing this yourself (for free) or you can pay BlueHost to do it for you. Luckily, installing it yourself is quite easy. Here is a video directly from BlueHost showing you just how to do it.
Making your blog pretty
After you’ve got WordPress installed, it’s time to make it look nice. You’ll do this with a theme, which you can find for free, or for purchase. Here is a collection of WP’s free themes. There are several beautiful ones to choose from. Personally, my theme was purchased (it’s called Vertikal) for a one-time cost of $49. This is where you make the blog your own, and where you can install all kinds of plugins to make your blog do exactly what you’d like it to do.
Installing plugins
There are 5 plugins that I absolutely love and would have a hard time functioning without:
Akismet: this plugin prevents spam comments. Without it, I was getting dozens of spam comments daily from bots and people just plugging products/websites that had no relation to my blog whatsoever. I empty the “spam” category of my comment section often. Some of the stuff in there is scary.
Comment Reply Notification: do you ever comment on a blog with a question or even just a simple comment and forget about it or wonder if that blogger responded to it? When a reader leaves a comment or question on my blog, 99% of the time, I have a response, be it an answer to the question or a simple “thank you” for stopping by or sharing feedback. With this plugin, the reader receives an email when I respond to their comment and doesn’t make them have to come back to see what my response was (or even if I responded in the first place). Sometimes, I will get a response to my response, so it’s nice to be able to notify my reader that I’ve extended the conversation. It keeps things personal.
Co-Schedule: this is easily the most valuable plugin that I have. Hands. Freaking. Down. I am constantly resharing posts on my Facebook page, because I can’t always guarantee my audience saw the recipe when I originally posted it. Not only that, but I am constantly getting new readers who may not even be aware a specific recipe even exists on my blog. This is where CoSchedule is incredibly handy. It allows me to schedule posts on Facebook and Twitter in advance. I will often do an entire month at a time, so that I can set it and forget it. This post right here? Scheduled several weeks in advance and published while I was at work. Not only that, but it also shows me what my social reach was on these posts.
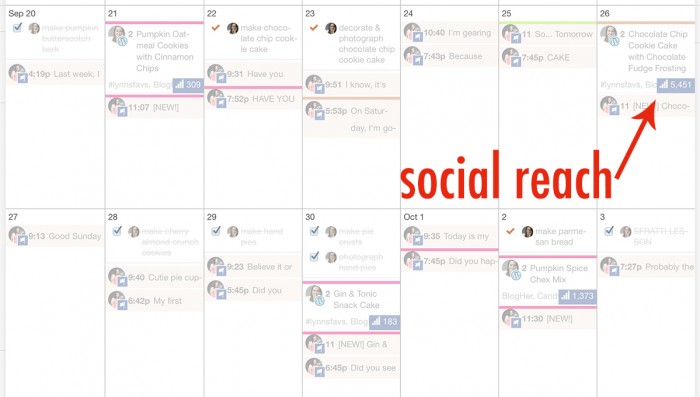
You can also see little checked boxes that I set as “tasks.” These were times I wanted to remember to make or photograph and recipe, and CoSchedule emailed me to remind me of these tasks. This is a paid plugin ($15/month or $180/year with no contract) but it is so worth every single penny. In fact, I think it’s invaluable.
Related Posts Thumbnail: at the the bottom of each of my posts, you will always find 6 thumbnails with links to similar posts or recipes. These can be chosen for me (what I typically let happen) based on the recipe category or common ingredients, or I can edit the posts that are displayed. I find that the plugin is pretty good at picking for me, so I have never edited them. This is just another way to share your content with your readers easily and literally effortlessly.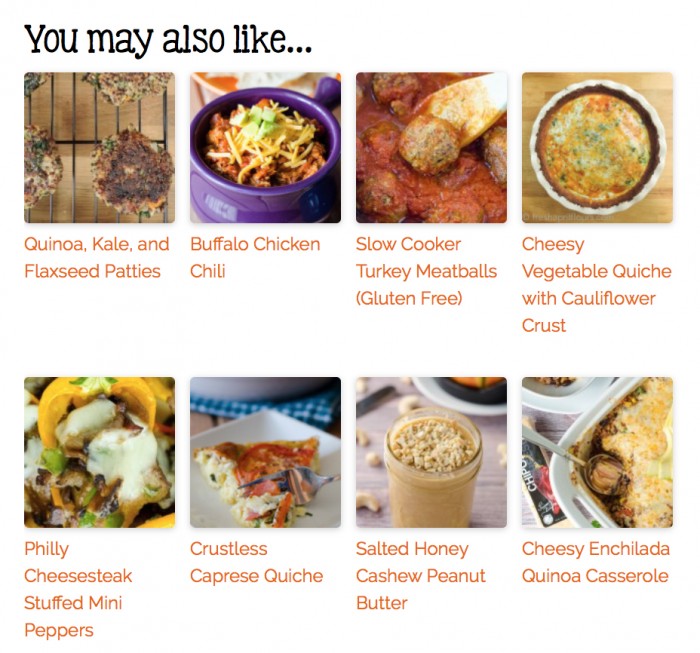
Pinterest “Pin It” Button Lite: this plugin allows me to have the “Pin It” button that you see at the top and bottom of my blog posts. What I love most about this plugin is that I can choose the image and the description that get pinned from my blog. If I didn’t do this, anyone on my blog could choose to pin whatever they’d like and the image could be totally unrelated to the finished product (sometimes my photos are of in-process techniques) and the description can be completely nondescript (like the actual filename of the image). It’s not 100% foolproof, but it helps a ton.
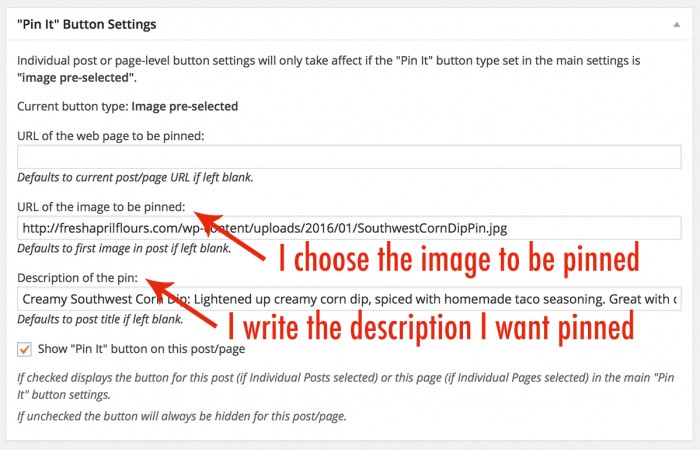
Also, I am able to “hide” the image that I’ve chosen to pin, as I typically choose an image that has words on it. Like this one…
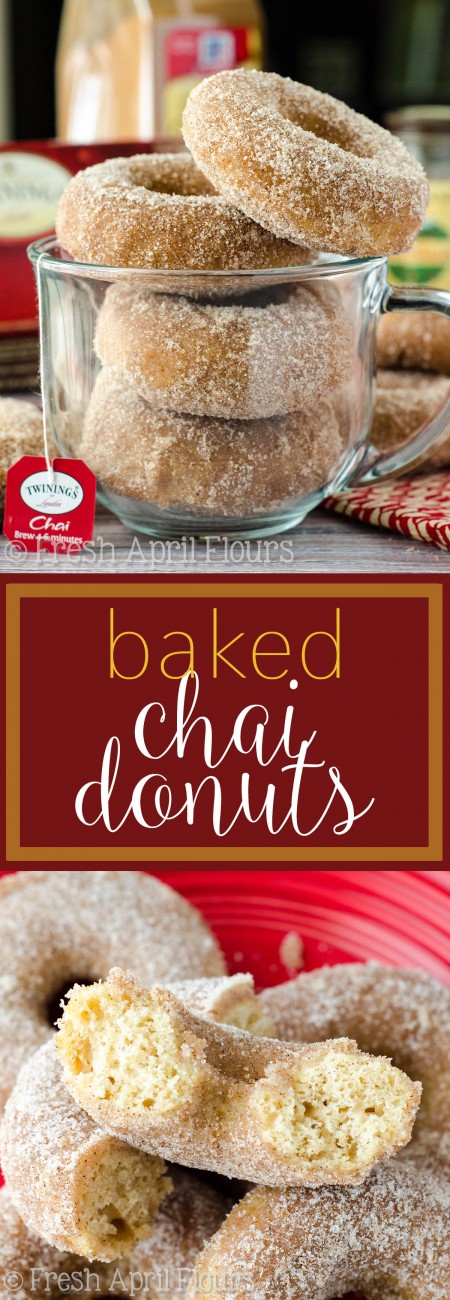
I don’t always want that large, chunky, busy image to be all up in my blog post. But it’s perfect for Pinterest. All I do is upload the image to my media library and copy and paste its URL to that spot. It pins that image without it needing to appear on my blog.
One of the best kept secrets of the internet right there.
![]()
So there you have it. My incredibly lengthy (but I hope informative!) tutorial on how to start a blog. If you’re looking to start a food blog specifically, I will be adding to this series shortly. Stay tuned!
Did you learn anything that you didn’t know already? Find something incredibly helpful? Have a question I didn’t address? Don’t be a stranger– let me know!
This page contains affiliate links.

