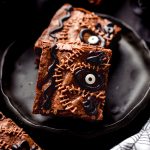
Hocus Pocus Spellbook Brownies
Turn traditional brownies into an iconic Hocus Pocus themed treat! Use my recipe for my favorite homemade fudgy brownies, your favorite go-to brownie recipe, or even a box mix. Just don't forget the eyeball!
Servings: 16 brownies
Ingredients
BROWNIES
- ½ cup (113g) unsalted butter cut into 6-8 slices
- 8 ounces (227g) semi-sweet chocolate coarsely chopped
- ¾ cup (150g) firmly packed brown sugar
- ¼ cup (50g) granulated sugar
- 3 large eggs room temperature preferred1
- 1 teaspoon vanilla extract
- ¾ cup (90g) all-purpose flour be sure to measure properly
- ¼ teaspoon salt
SPELLBOOK DETAILS
- 1 ounce (14g) quality semi-sweet chocolate coarsely chopped
- 2 Tablespoons (28g) unsalted butter
- ½ teaspoon vanilla extract
- 1 to 2 Tablespoons (15-30mL) milk or cream
- 1 cup (120g) powdered sugar
- pinch of salt
- 2 ounces (28g) black candy melts2
- 16 candy eyeballs
Need to keep track of your ingredients?Check out my Printable Ingredient List!
Instructions
BROWNIES
- Preheat the oven to 350ºF (177ºC). Line an 8" or 9" square baking pan with foil and spray with nonstick spray. Set aside.
- In a medium saucepan over medium heat, melt the butter and chopped chocolate, stirring frequently until completely smooth. Allow to cool for about 15 minutes.½ cup (113g) unsalted butter, 8 ounces (227g) semi-sweet chocolate
- Whisk sugar into cooled chocolate mixture until combined. Add the eggs one at a time, whisking after each addition until smooth. Whisk in the vanilla. Add the flour and salt and stir gently until completely combined.¾ cup (150g) firmly packed brown sugar, ¼ cup (50g) granulated sugar, 3 large eggs, 1 teaspoon vanilla extract, ¾ cup (90g) all-purpose flour, ¼ teaspoon salt
- Pour the batter into the prepared pan. Bake brownies for 25-30 minutes or until a toothpick or cake tester inserted in the center comes out mostly clean. Allow brownies to cool completely before cutting into squares.
- When you are ready to cut the brownies, remove the brownies by lifting the foil overhang straight up. Peel back remaining foil and place brownie block onto a large cutting board, then cut into 16 equal squares.
SPELLBOOK DETAILS
- Before decorating the brownies, you will need to make the chocolate fudge frosting for the stitches before you start. You can also use store-bought chocolate frosting, if you prefer. Just be sure your frosting is ready before you melt your candy melts.
- If you are making the chocolate fudge frosting yourself: in a small saucepan over medium heat, melt the semi-sweet baking chocolate and the butter, stirring constantly to prevent scorching or burning. Remove from heat and allow to cool for 15 minutes.1 ounce (14g) quality semi-sweet chocolate, 2 Tablespoons (28g) unsalted butter
- In a medium size bowl with a handheld mixer or the bowl of a stand mixer fitted with the paddle attachment, combine the cooled chocolate/butter mixture, vanilla extract, and milk or cream (starting with 1 Tablespoon). Turn the mixer down to low and slowly add the powdered sugar. Increase mixer speed to medium and beat until completely combined, scraping down sides as needed. Add salt to taste. Fit a piping bag or cookie decorating bottle with a very small tip (I used a Wilton #1 for this component but a #2 will also work), fill it with the chocolate fudge frosting, and set aside.½ teaspoon vanilla extract, 1 to 2 Tablespoons (15-30mL) milk or cream, 1 cup (120g) powdered sugar, pinch of salt
- Melt the candy melts by microwaving in a small bowl for 30 seconds on MEDIUM, stirring, and then heating again and stirring again until smooth. This will usually only take 3-4 times in the microwave to achieve a totally melted and smooth texture. Take care not to scorch the candy melts, as they are sensitive to seizing. Fit a second piping bag or cookie decorating bottle with a #2 or #3 tip, fill it with the melted candy melts, and set aside.2 ounces (28g) black candy melts2
- Working with one brownie at a time, and starting with the black candy melts, pipe a "snake" down the spine of the book. Next, pipe curled up "snakes" in the top left and bottom left corners of the book. Add a small dot to the space between the two curled snakes, add a candy eyeball, then pipe an oblong circle around the eye. Move to the next brownie until all of the black/dark piping is finished.16 candy eyeballs
- Using the chocolate fudge frosting, pipe haphazard lines in the empty spaces between the black/dark elements on the front of the book. Then, pipe stitches across the lines you just drew. Allow designs to set before serving. Store leftover brownies at room temperature up to 1 week. Brownies freeze well, up to 3 months. Thaw in refrigerator overnight.
Notes
- Room temperature eggs: these incorporate into batter much more easily than cold eggs, although this is not absolutely necessary.
- Black candy melts: you can also just use melted dark chocolate, if you prefer, or pre-made black cookie icing.
Nutrition Disclosure
All nutritional values are approximate and provided to the reader as a courtesy. Changing ingredients and/or quantities will alter the estimated nutritional calculations.
Serving: 1brownie | Calories: 284kcal | Carbohydrates: 35g | Protein: 3g | Fat: 15g | Saturated Fat: 9g | Polyunsaturated Fat: 1g | Monounsaturated Fat: 4g | Trans Fat: 0.3g | Cholesterol: 51mg | Sodium: 56mg | Potassium: 126mg | Fiber: 1g | Sugar: 28g | Vitamin A: 277IU | Vitamin C: 0.01mg | Calcium: 29mg | Iron: 2mg
