
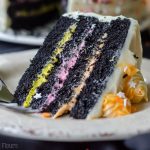
Black Velvet Cake

As an Amazon Associate, I earn from qualifying purchases. Read the full disclosure here.
Classic red velvet cake gets a spooky makeover in this black velvet edition perfect for Halloween!
It is an absolute understatement to say that I’m so excited to bring you this black velvet cake recipe today, because truly, I was squealing with excitement during the photoshoot. That is #foodbloggerlife for you, for sure.
A long time ago, I brought you red velvet cupcakes in preparation for a cake experiment for the following month (for my Cake of The Month series that year). I was a little nervous about where this cake would go, but I went for it, and the result was aaaaamazing.
And (!!!), just in time for one of the greatest times of the year (Halloweeeeeen!) because who doesn’t love candy and candy CORN and costumes and monsters and just about any reason to bake some sort of spooky treat? You feel me?
BLACK VELVET CAKE VS RED VELVET CAKE
No, this is not just a black chocolate cake. Red velvet cake is in its own category of flavor– it’s actually considered a buttermilk cake.
That said, I won’t go into too much detail about exactly what happens in this black velvet cake, because in all honesty, it is identical to the red velvet cupcakes recipe you’ll see here, aside from the coloring and amount of black cake batter the recipe produces. Please visit that post if you’re interested in the whats and whys of this cake.
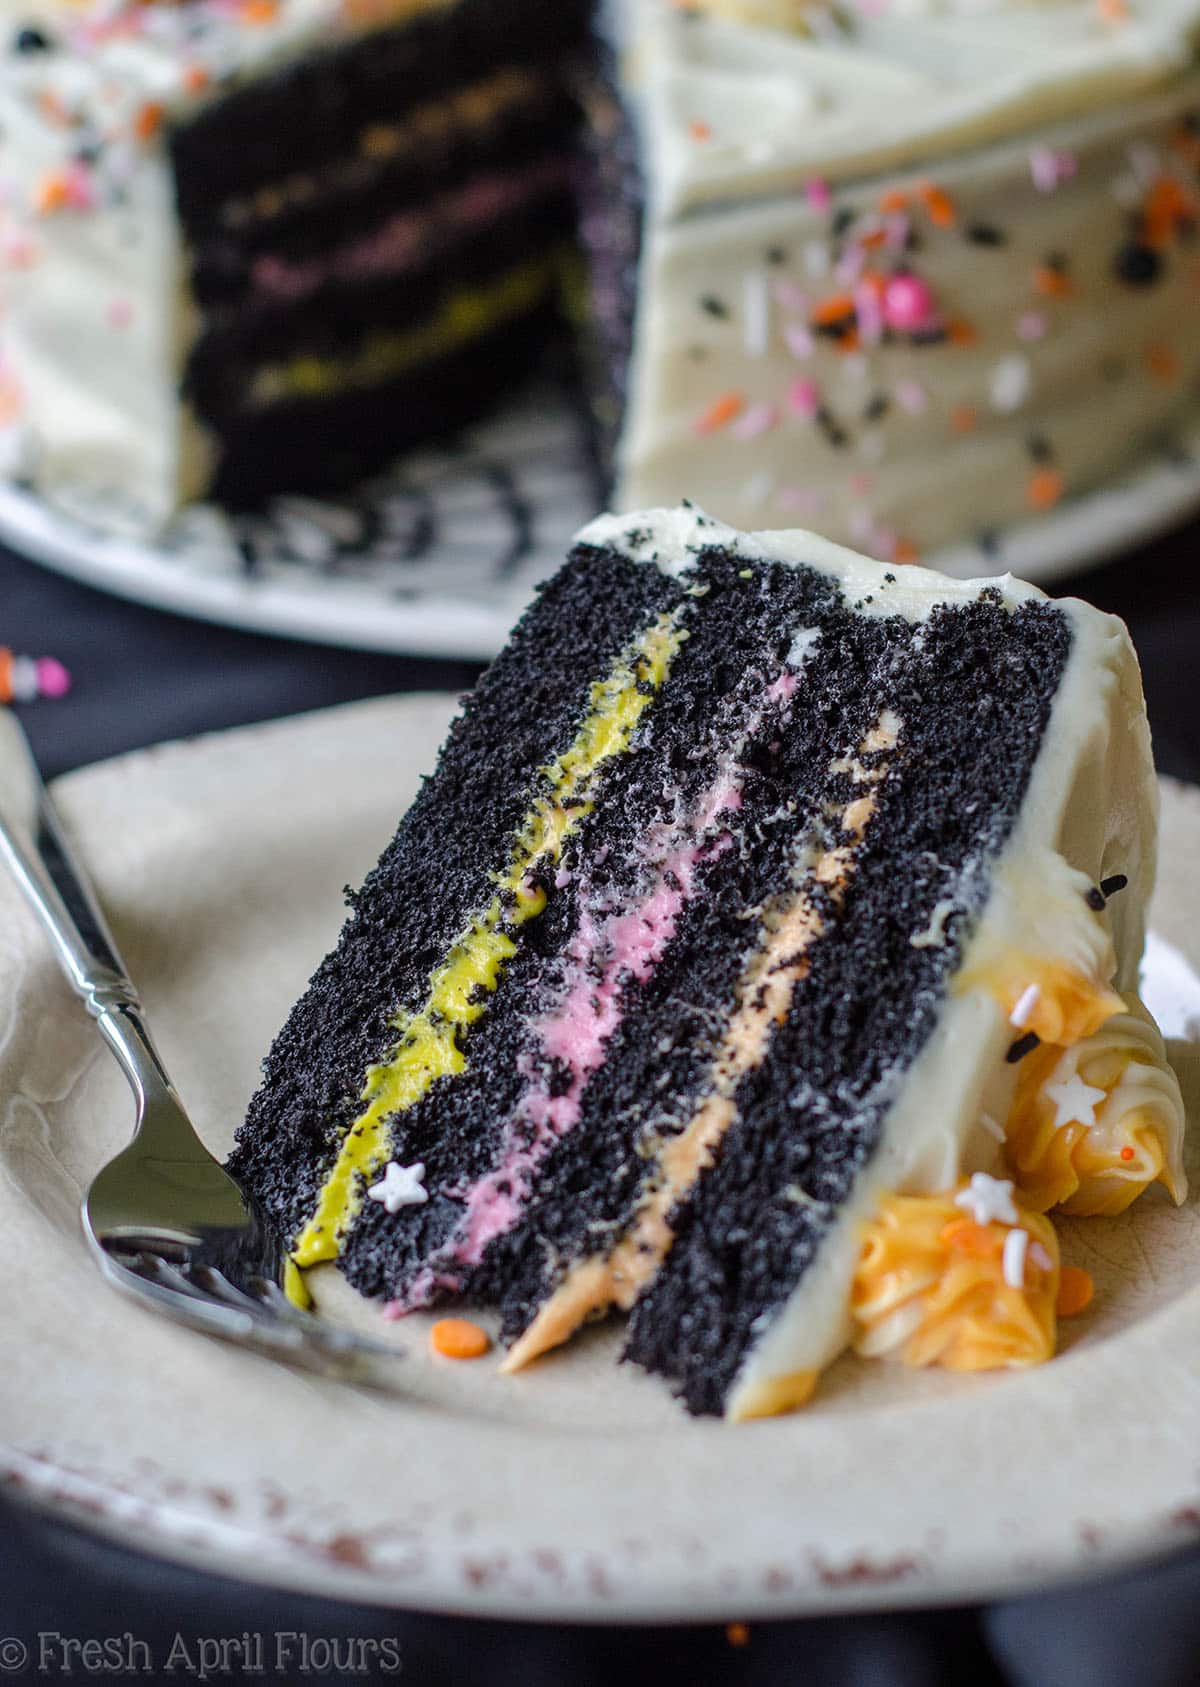
That cupcake recipe doubled = this cake, with a simple tweak to the amount of gel food coloring (because only 1 teaspoon meant a dingy black/gray cake and that was g-ROSS).
And obviously, this black velvet cake batter has a longer bake time than its cupcake counterpart. Bing, bang, boom! We have ourselves black cake. Or a black velvet cake. Or a black red velvet cake? You get the idea.
Psst… This also means that you can use black gel coloring in place of the red coloring in my red velvet cupcakes recipe to make black velvet cupcakes!
With all of the cake hooplah out of the way, I’d like to chat a bit about exactly how you’re going to get colored layers and how to make them perfectly contained within your cake so you don’t wind up with weird swirls on the outside of your cake because inside colored frosting leaked out.
Is that something you thought you’d have to worry about? If not, read on, because this is where it gets important!
HOW TO MAKE BLACK VELVET CAKE
When working with any kind of filling or frosting that is not the same color as the outside frosting of your cake (like this one– white on the outsides, yellow/pink/orange on the inside), you want to be sure all of that color, liquid, drippings, etc are contained and not leaking out into the beautiful outside coating.
The way to do that? Making a well of white frosting on the outside edge of the layer.
Like so…
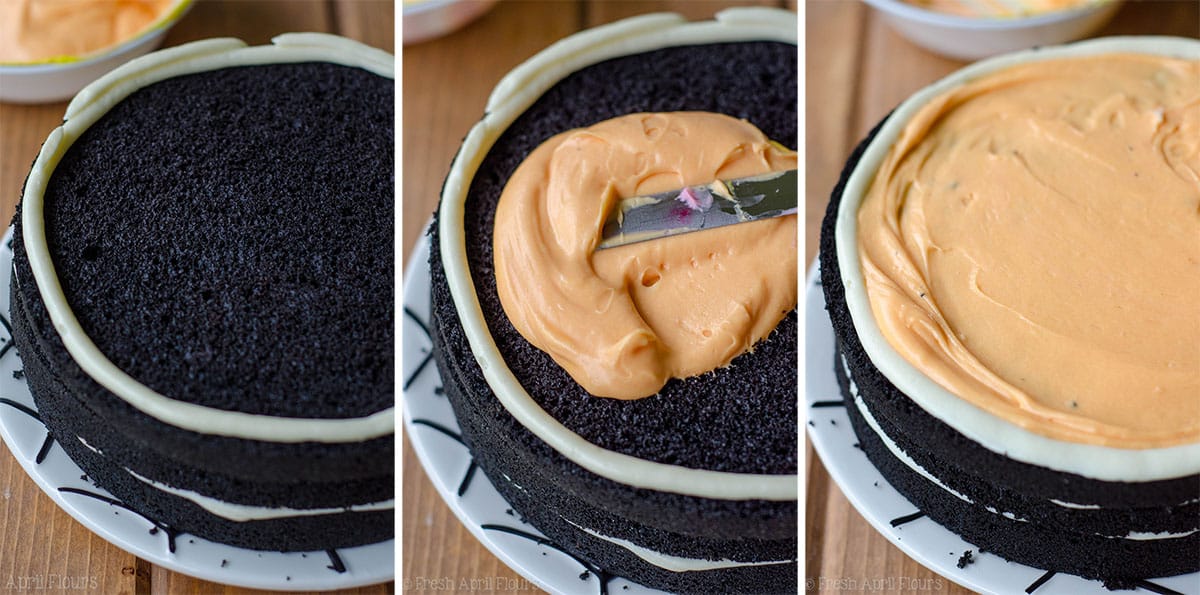
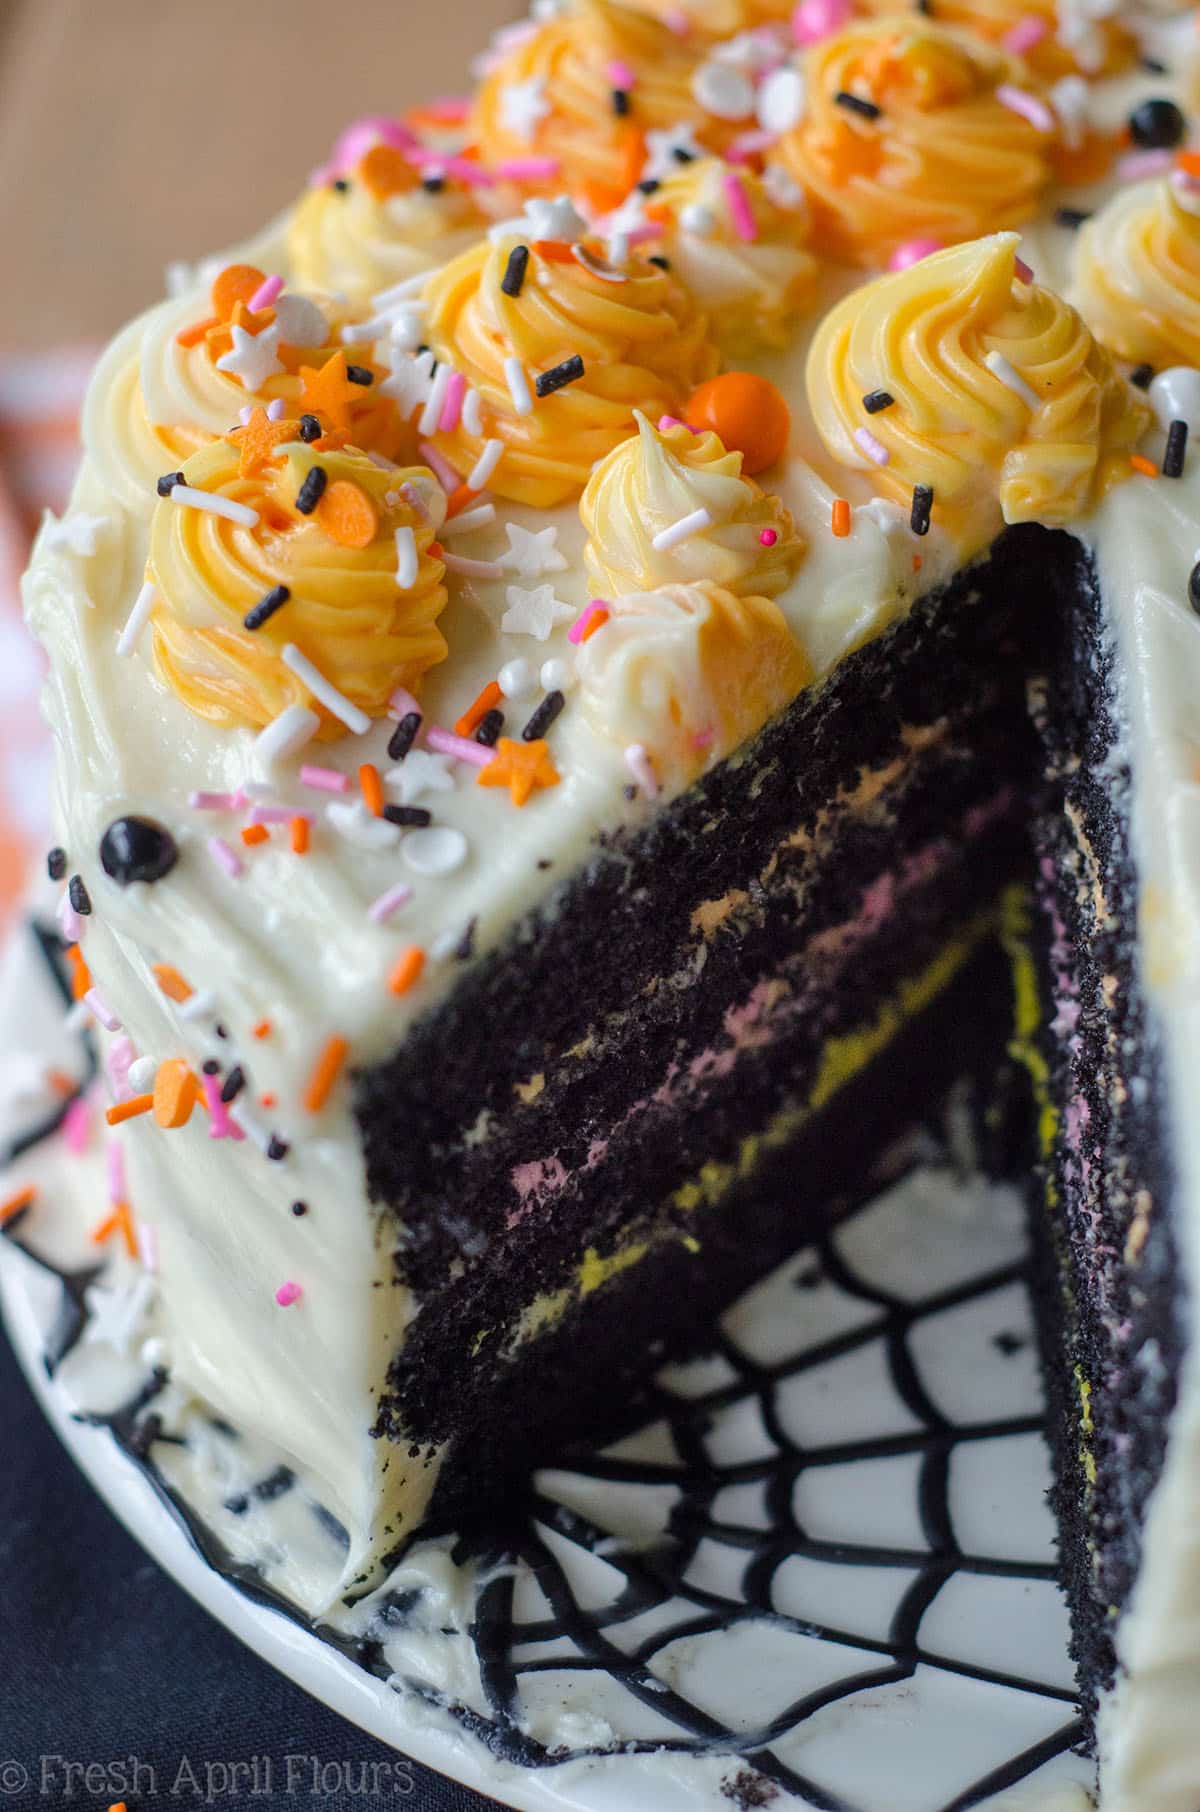
See how we have a barrier of white frosting keeping in the orange frosting? When all of those layers are on top of each other, the white frosting will make a bit of a “glue” to hold all that colorful goodness inside. No unwanted swirls on the outside! Wahoo!
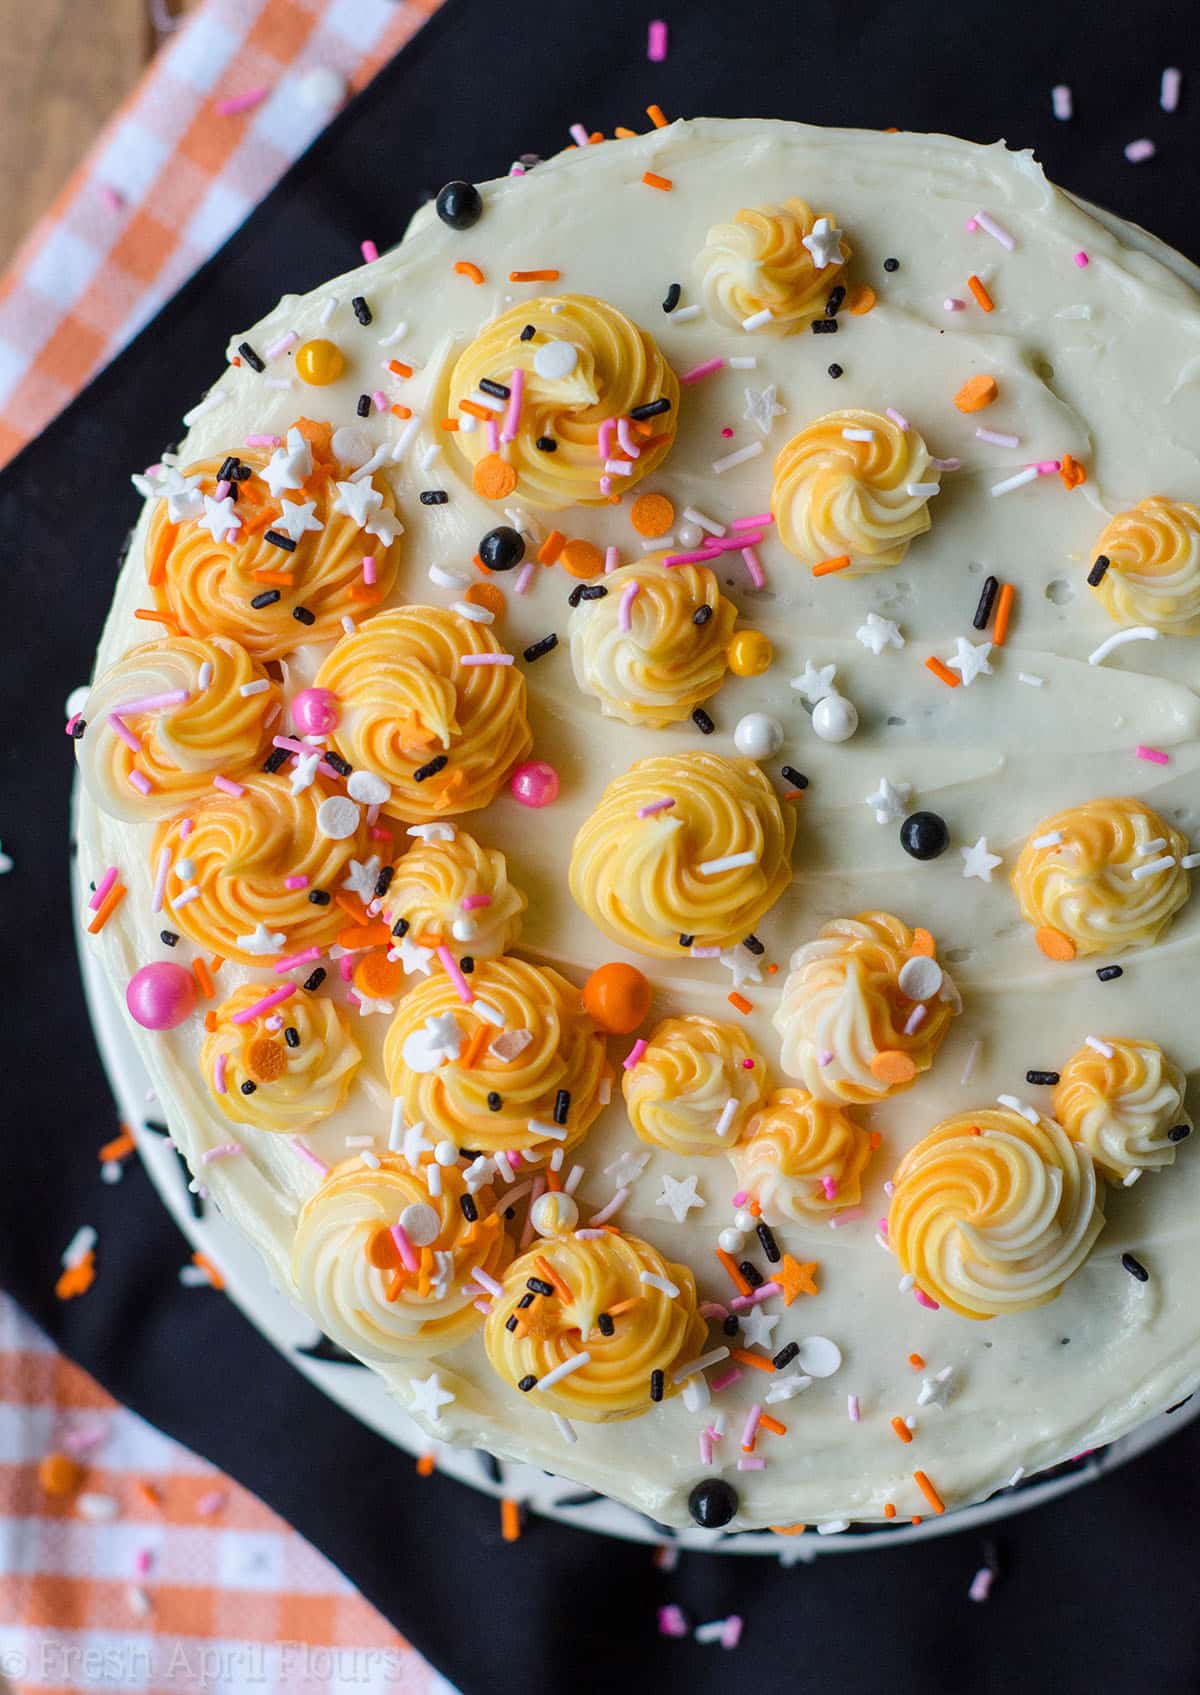
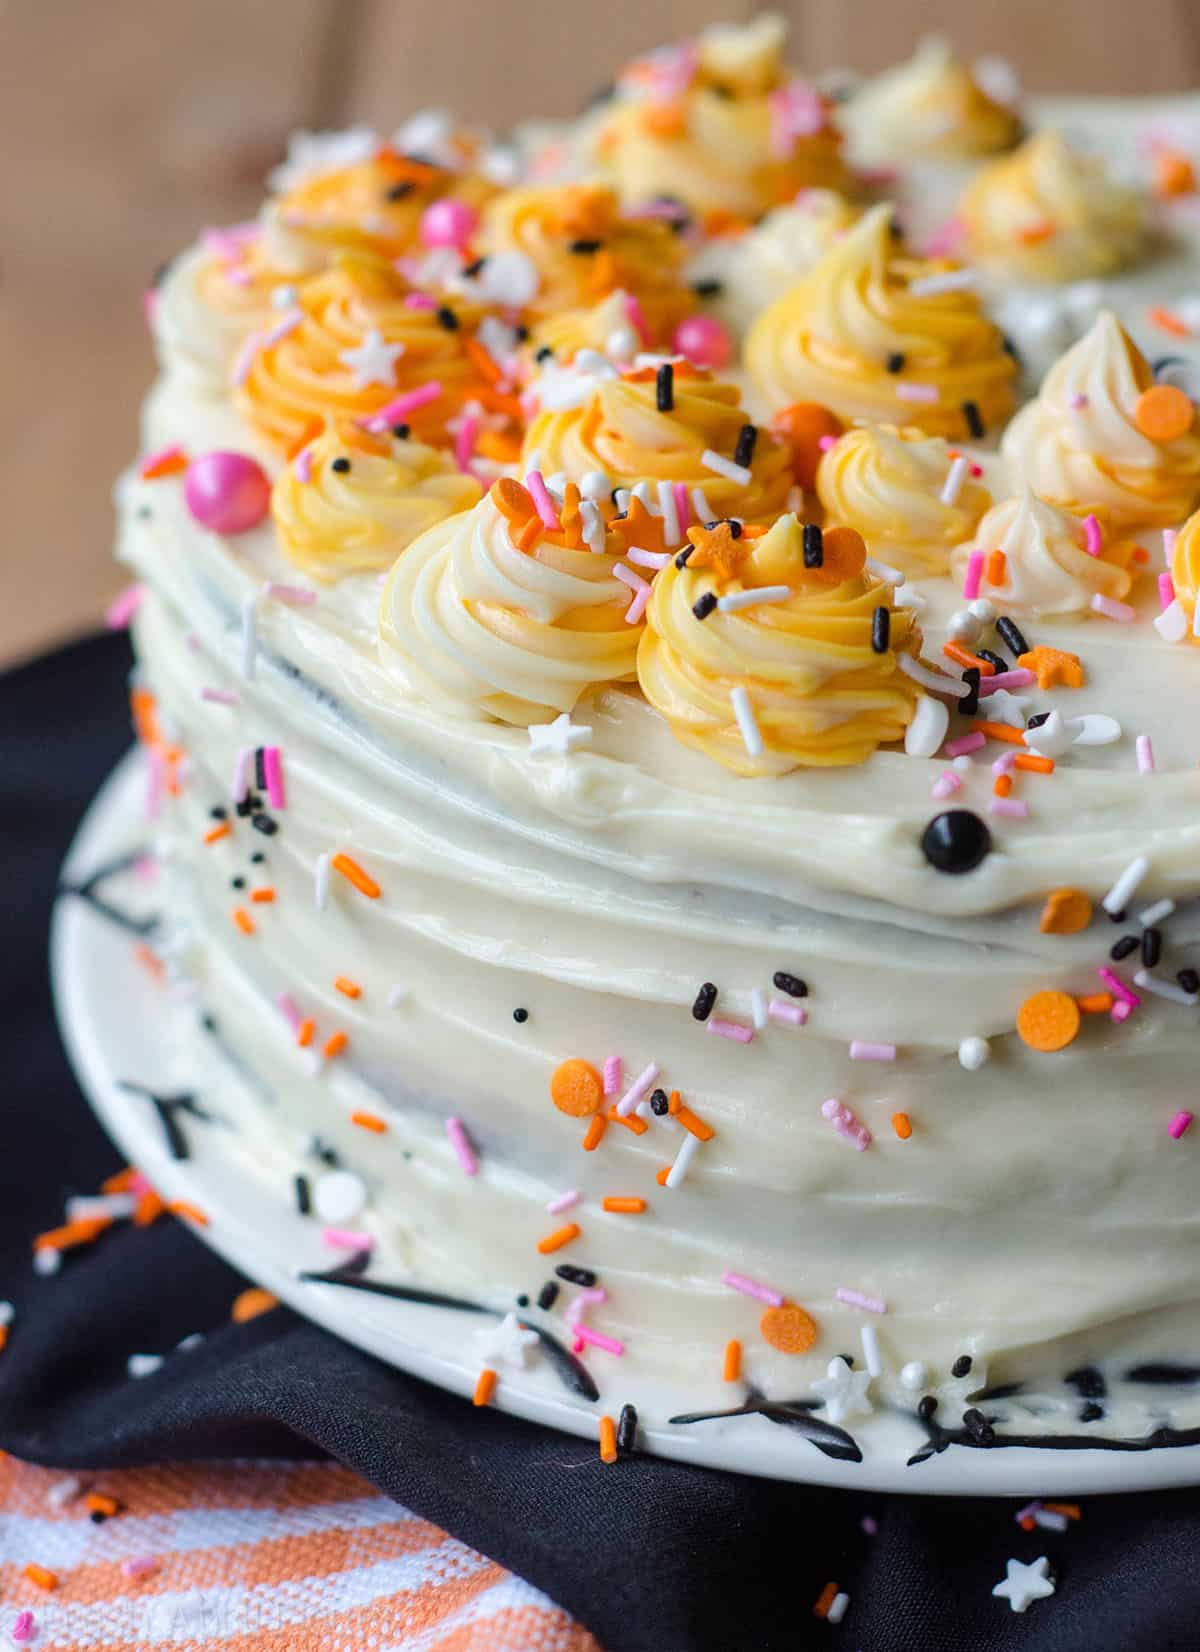
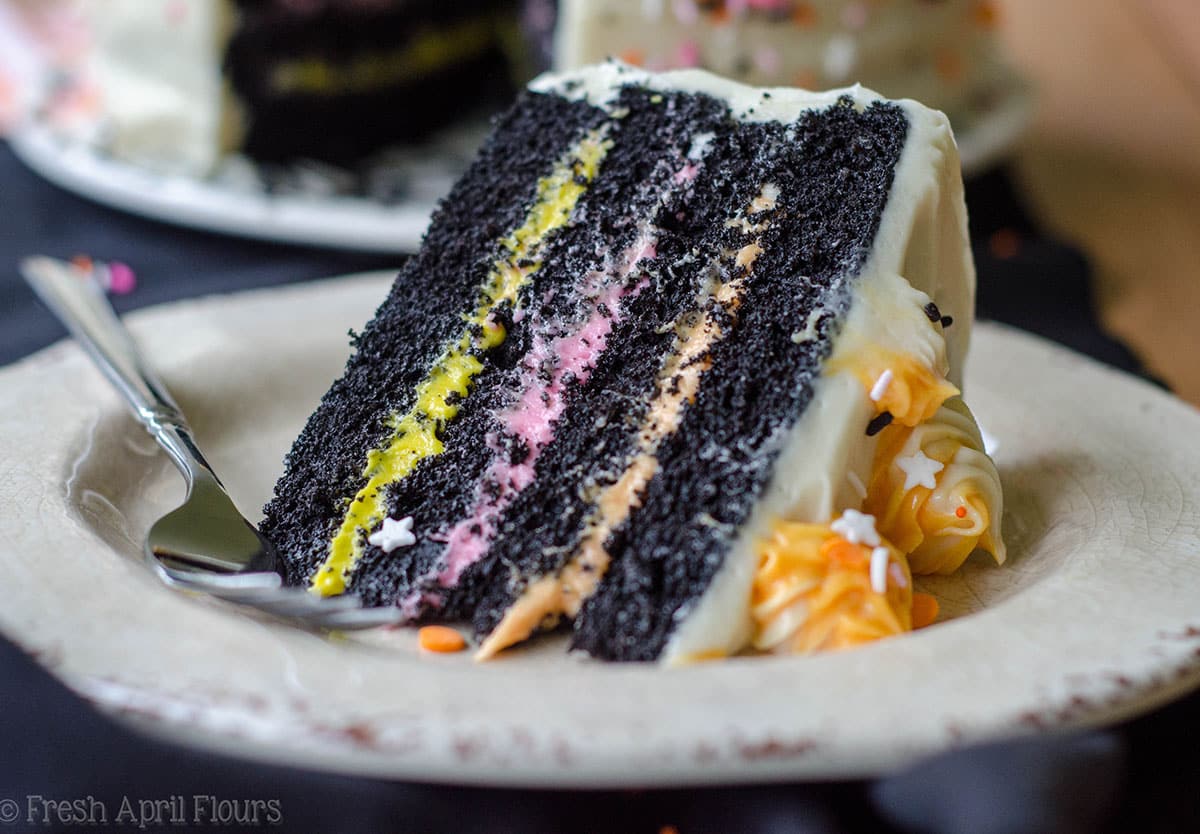
This moist black velvet cake recipe tastes just as terrific as it looks. It tastes just the way you’d expect red velvet to taste, and if you choose cream cheese frosting like I did, you’ll get the full effect with that spooky flair. It is the perfect complement to your Halloween celebration, and it’s certainly a show stopper once you’ve cut into it.
Seriously, just look at those layers!!
If you’re into impressive desserts and really getting into the spirit of Halloween, this cake absolutely belongs in your repertoire this weekend or early next week. And of course, save this recipe so you can just have a black birthday cake at some point in your life, because whythehecknot?
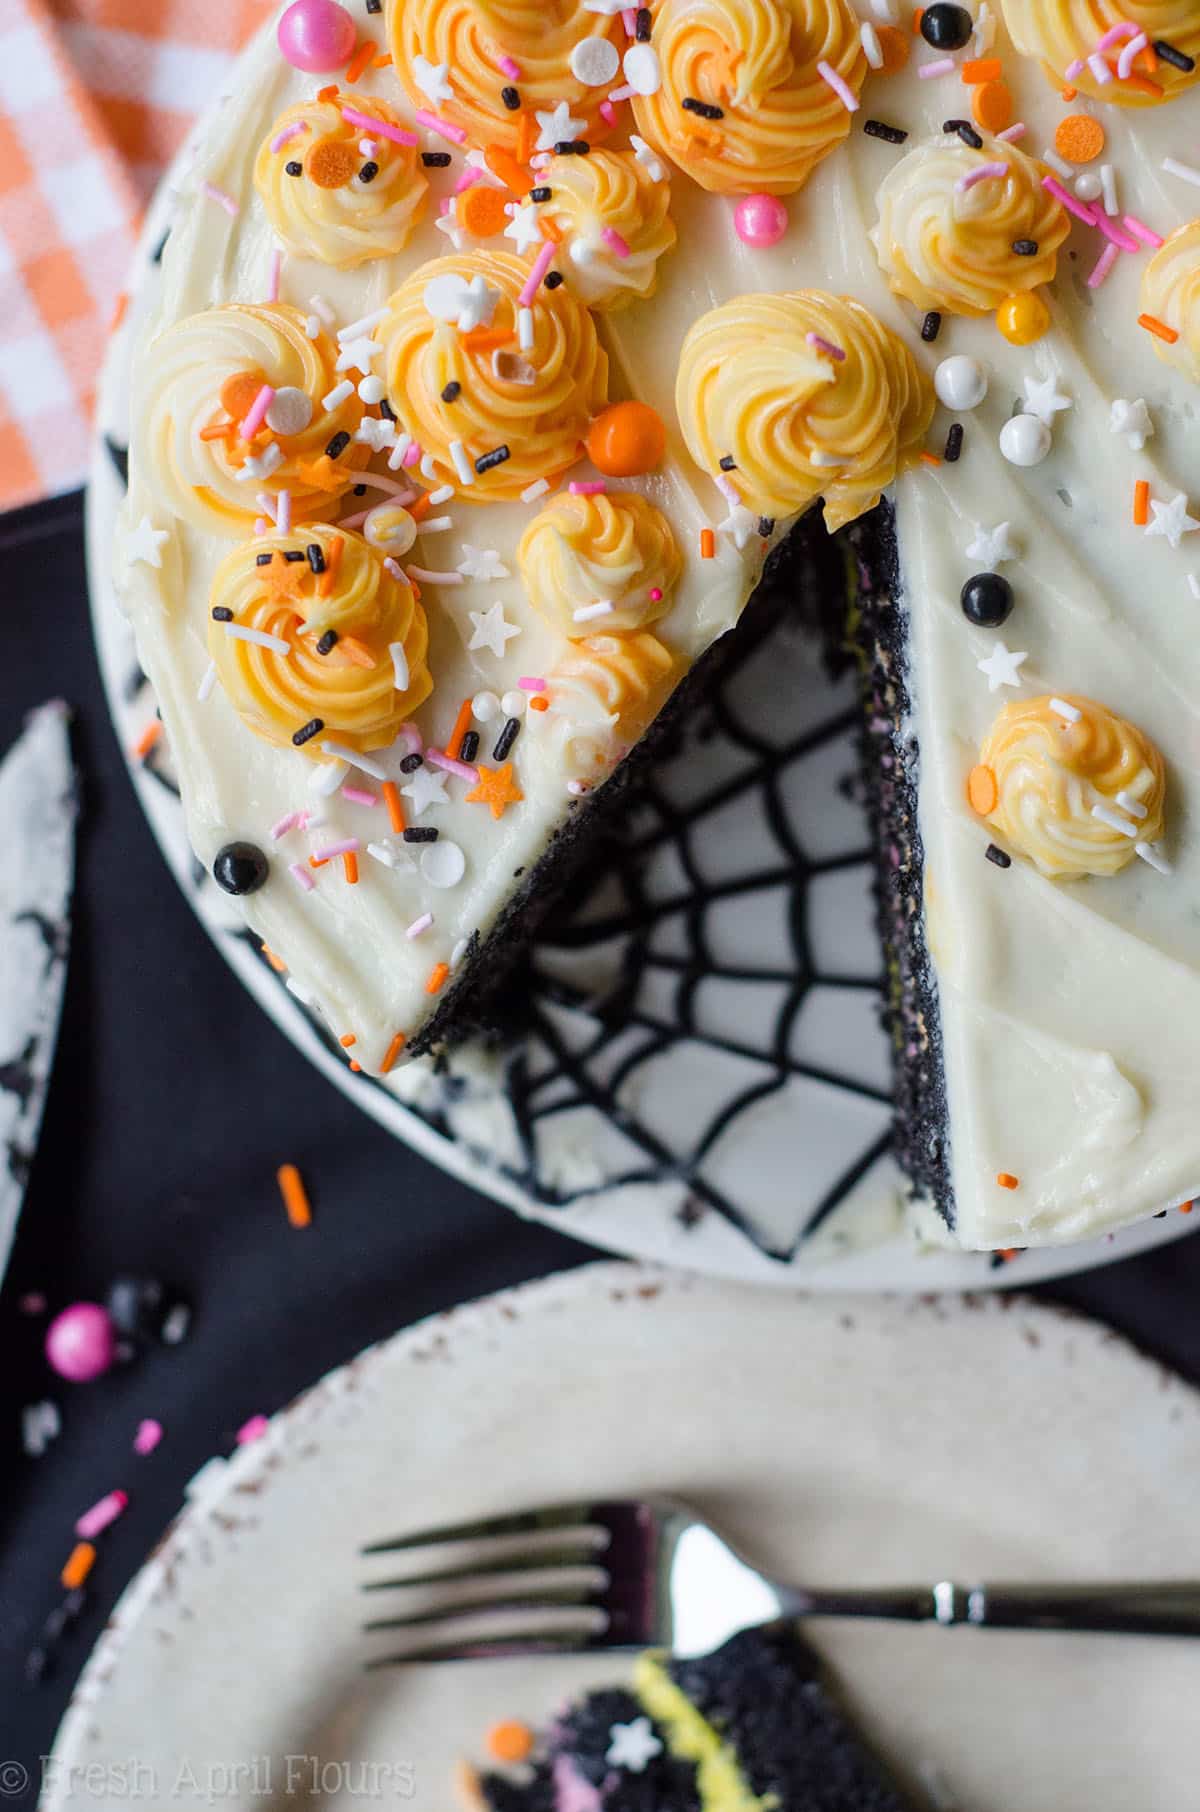
And on a spider serving plate? Well, that’s just the icing on the cake.
More Creepy Creations
- Bloody Monster Hands from That Recipe
- Monster Rice Krispie Treats from Hostess At Heart
- Mummy Brownies from Devour Dinner
- Mummy Halloween Poppers from Magical Ingredients
- Mummy Spinach Artichoke Stromboli from The Spiffy Cookie
- Pumpkin Pudding with Chocolate Spiderwebs from Art of Natural Living
- Spider Web Mexican Pizza from Palatable Pastime
- Spider Web Pretzels from Jen Around the World
- Vampire Donuts from Hezzi-D’s Books and Cooks
We share Recipes From Our Dinner Table! Join our group and share your recipes, too! While you’re at it, join our Pinterest board, too!
Black Velvet Cake
Ingredients
BLACK VELVET CAKE
- 4 large eggs room temperature and separated
- 2 and ½ cups (300g) all-purpose flour be sure to measure properly
- ½ cup (60g) cornstarch
- 3 Tablespoons (22g) unsweetened cocoa powder
- 1 teaspoon salt
- 1 teaspoon baking soda
- ½ cup (113g) unsalted butter softened to room temperature
- 2 cups (400g) granulated sugar
- ⅔ cup (160mL) vegetable oil
- 3 teaspoons vanilla extract
- 2 teaspoons distilled white vinegar
- 3 teaspoons black gel coloring*
- 1 cup (240mL) buttermilk
CREAM CHEESE FROSTING
- 8 ounces (225g) full fat block cream cheese softened to room temperature
- ½ cup (113g) unsalted butter softened to room temperature
- 3 and ½ cups (420g) powdered sugar
- 2 teaspoons vanilla extract
- ⅛ teaspoon salt
- gel food coloring in desired colors for optional tinting of frosting
Instructions
CAKE
- Place oven rack on the middle setting and preheat the oven to 350ºF (177ºC). Grease and flour (or use homemade cake release) two 8" or 9" round cake pans. Set aside.
- In a medium size bowl with a handheld mixer or the bowl of a stand mixer fitted with the whisk attachment, whip the egg whites until soft peaks form (approximately 2 minutes). Set aside or remove from mixer bowl and transfer to a smaller bowl.
- Sift the flour, cornstarch, cocoa powder, salt, and baking soda together into a medium size bowl. Set aside.
- In a large bowl with a handheld mixer or the bowl of a stand mixer fitted with the paddle attachment, cream the butter and sugar together on medium speed until light and fluffy (approximately 2-3 minutes). Add the vegetable oil and beat again until completely incorporated. Add the egg yolks, vanilla extract, vinegar, and food coloring and beat again on medium speed until everything is combined.
- Turn the mixer down to low speed and add the dry ingredients in three additions, alternating with half of the buttermilk. Do not overmix batter. Gently fold the whipped egg whites into the batter with a spatula.
- Divide batter evenly between the two prepared cake pans. Bake cakes for about 22-24 minutes or until a toothpick inserted in the center comes out mostly clean. Remove from oven and allow cakes to cool in the pans completely on a wire rack before removing and assembling.
CREAM CHEESE FROSTING
- In a large bowl with a handheld or the bowl of a stand mixer fitted with a paddle attachment, beat the cream cheese and butter together on high speed until smooth and creamy. With the mixer on low, add the powdered sugar, vanilla, and salt.
- Increase mixer speed to medium-high and beat for 2 minutes.
- For more buttercream troubleshooting tips, see my book, The Home Baker's Guide to Basic Buttercream.
ASSEMBLE THE CAKE
- If you'd like colorful layers inside your cake, tint approximately ⅓ cup of frosting the desired color for each layer you'd like colored. For a 2 layer cake, you only need one layer of colored frosting. For a 4 layer cake, you will need 1-3 colors of frosting.
- For a 2 layer cake: place one layer, bottom side up, on a plate or cake stand. Using a large zip top bag with the corner snipped off or a pastry bag fitted with a Wilton #12 piping tip, pipe a well with white frosting (or the color of the outside of your cake) around the outside edge of the cake.
- Using a spatula or knife, spread an even layer of colored frosting over the entire surface, staying inside the well. Place the second layer on top, bottom side down, and press down on the top lightly. Spread the rest of the white (or desired color) frosting on the cake, beginning with the top and working your way down the sides. Decorate as desired.
- For a 4 layer cake: split each layer into two smaller layers using a cake leveler or serrated knife and repeat steps for 2 layer cake, using desired color frostings.
- Cake stays fresh covered at room temperature for up to 4 days. Cake may be covered and refrigerated for up to 7 days.
- Make ahead: prepare cakes and frosting up to 1 day in advance. Cover cakes tightly and keep at room temperature or in the refrigerator until ready to assemble. Refrigerate prepared frosting in an airtight container until ready to use. Unfrosted cake layers may be frozen, wrapped tightly, up to 2 months. Thaw overnight in the refrigerator before assembling. Frosted cake can be frozen, wrapped tightly, up to 2 months. Thaw overnight in the refrigerator and bring to room temperature before serving.
Notes
Nutrition Disclosure
All nutritional values are approximate and provided to the reader as a courtesy. Changing ingredients and/or quantities will alter the estimated nutritional calculations.
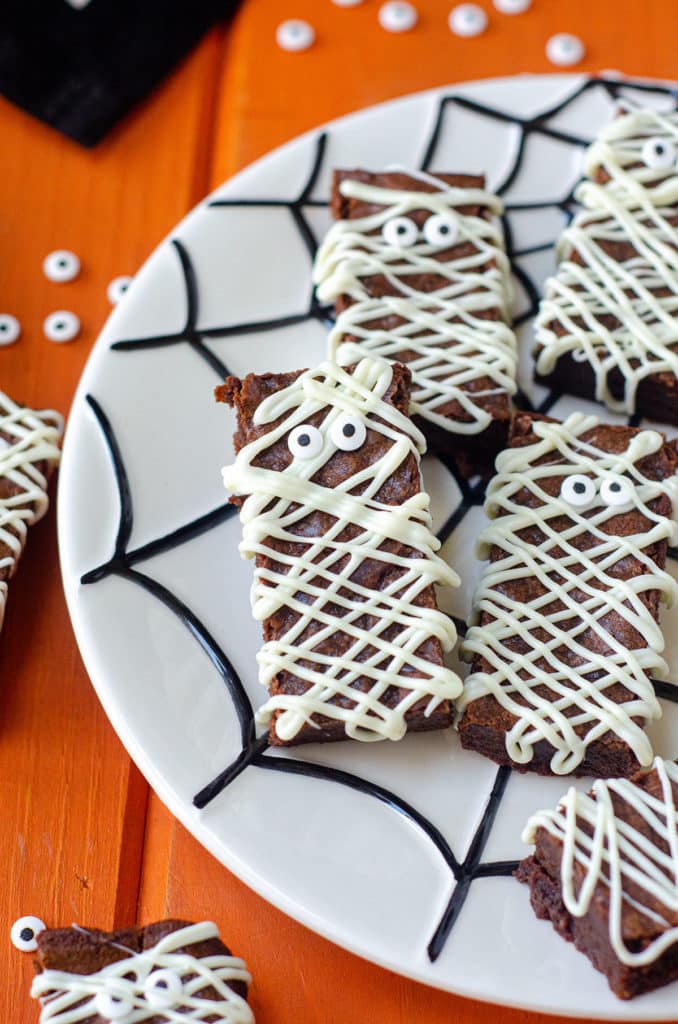
Try my spooky mummy brownies next!
This is such a perfect cake for Halloween! It is truly gorgeous. I’m pretty jealous of your cake skills! Hope you have a great Halloween, Lynn 🙂
Wow! What an amazing cake Lynn! You’ve totally outdone yourself!!
SO perfect for Halloween! I’ve never heard of a black velvet, but LOVE everything about this.
WOW! This is a showstopper Halloween cake! Looks and sounds gorgeous and delicious!
What an adorably delicious cake! Perfect for our little spooks.
I can’t get over the colors in the frosting layers and on top! I’m loving it against the black velvet!
This is really pretty. Finally something for the grownups!
I love how spooky this cake is, and that is tastes like red velvet! It’s a perfect and tasty October treat!
Hi there! I just made this case with the cream cheese icing The icing is delicious and the cakes came out beautifully.